
Introduction
Plaster repairs in high humidity rooms require moisture-aware prep and material choices to stop powdery finishes. Start by preparing the walls carefully, removing loose material and cleaning the surface before patching. Choose materials and patching methods suited for humid conditions, and verify any limits on use with the product label or manufacturer instructions.
Mix plaster only as directed by the product instructions, and work in a way that avoids trapping excess moisture. Apply in thin, even coats and allow appropriate drying time, adapting technique for humidity and using breathable finishes when needed. If in doubt, check local rules and follow safe ranges or alternatives suggested by what the product label allows.
Key takeaways
- Prepare wall surface by cleaning, drying, and masking adjacent areas before plaster repair.
- Choose plaster and bonding agents rated for high humidity environments and damp rooms.
- Mix plaster per manufacturer instructions, avoiding lumps and too-thick batches in humid conditions.
- Apply in thin, even coats, letting each set partially before the next in humidity.
- Seal porous surfaces and use mold/mildew resistant primers for lasting finish.
- Safety: wear respirator, eye protection, and keep workspace ventilated during repairs.
Table of Contents
- Introduction
- Key takeaways
- Why Plaster Powders in High Humidity Rooms
- Assessing Damage and Deciding When to Repair Vs. Replace
- Tools and Materials Checklist
- Step-by-Step Plaster Repair Process for Finished Surfaces
- Techniques to Prevent Future Powdery Finishes
- Common Mistakes to Avoid
- Safety Precautions and Mold/Mildew Considerations
- Cost Considerations and Planning Estimates
- Conclusion
- FAQ
Why Plaster Powders in High Humidity Rooms
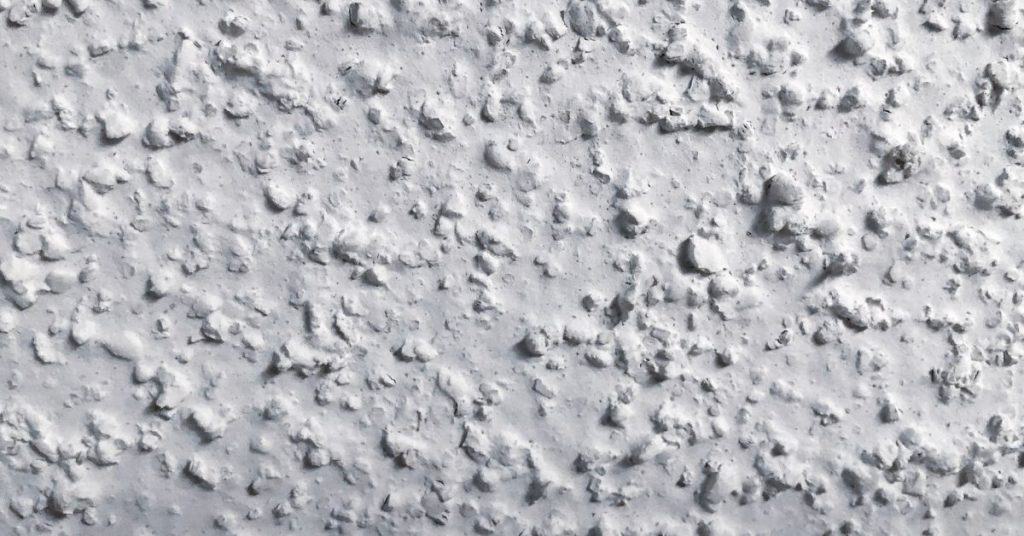
In damp spaces, salts and moisture interact with plaster. Salt efflorescence pulls soluble salts to the surface, creating a powdery film. Binders lose grip as moisture rises, leading to chalking and flaking.
Humidity accelerates these processes through higher vapor pressure and repeated condensation. Capillary rise and thermal cycling can further weaken the finish. Condensation, leaks, and poor ventilation are common triggers to watch for on site.
Chemical and Physical Causes
The powdering of plaster in high humidity rooms is driven by a few key mechanisms:
Efflorescence: This is when soluble salts within the plaster or substrate migrate to the surface, driven by moisture. As water evaporates, these salts are left behind, forming a white, powdery deposit.
Binder breakdown: Moisture can weaken and break down the binders holding your plaster together. This is especially true for plasters with poor quality or inappropriate binders for high humidity areas.
Moisture also causes surface salt migration. As water moves through the plaster, it carries salts to the surface where they accumulate and cause powdering.
Environmental and Installation Contributors
Several environmental factors and installation practices contribute to plaster powdering:
Humidity cycles: High humidity levels encourage the movement of moisture through your walls, driving the processes that cause efflorescence and binder breakdown. Repeated condensation cycles exacerbate these issues.
Temperature differences: In colder climates, freeze-thaw cycles can physically break down plaster, making it more susceptible to powdering. Even in warmer climates, temperature fluctuations can drive moisture movement.
Poor substrate preparation and using the wrong plaster mixes can also lead to problems. If your substrate is too wet or not properly prepared, it can draw moisture into the plaster, leading to powdering. Using plasters that aren’t suitable for high humidity areas can also cause issues.
Assessing Damage and Deciding When to Repair Vs. Replace
Develop a clear framework for repair scope based on surface friability and powder depth. Look for signs of adhesion loss and moisture history when judging whether to patch or replaster.
Visually inspect and feel for loose powder, color streaks, and crumbling edges. Damp patches, hollow sounds, or moving substrates indicate deeper concerns that may require more extensive work.
Quick inspection checklist
Before you start any repairs, run through this quick checklist to determine the extent of damage and the appropriate repair approach.
- Surface friability: Gently press on the plaster. If it crumbles easily, it’s severely damaged.
- Depth of powdering: Use a putty knife to scrape off loose material. If it goes deep, you’ll need more than just patching.
- Blistering: Look for raised, bubbly areas. These indicate moisture trapped beneath the surface.
- Damp spots: Check for wet or cold patches. These could signal hidden moisture issues.
- Color streaks: Uneven discoloration can hint at underlying problems that need addressing.
- Crumbling edges: Inspect corners and edges. If they’re crumbling, it might be a sign of deeper structural issues.
- Tapping test: Gently tap the wall with a screwdriver handle. A hollow sound indicates loss of adhesion or backing damage.
- Uniformity of powder: If powdering is inconsistent, it might indicate varied damage depths that need different repair approaches.
Quick rule: If you find multiple issues or extensive damage, consider full replastering instead of patching.
When to call a professional
While DIY repairs can save you money, there are times when it’s crucial to hire a professional. Here are some scenarios where you should seek expert help.
Extensive delamination: If large areas of plaster are peeling off the wall or ceiling, this could indicate structural issues that require professional assessment.
Mold presence: Any signs of mold growth should be handled by a professional. They have the necessary safety equipment and knowledge to remove it effectively.
Structural moisture sources: If you suspect the damage is due to ongoing moisture issues, like leaks or condensation, it’s best to consult with a professional. They can identify the source and recommend appropriate solutions.
Tools and Materials Checklist
List essential hand tools and moisture tolerant patch compounds suitable for indoor use. Consider hydraulic lime or cement-lime mixes and moisture-stabilized plasters as alternatives to standard mixes when needed.
Include surface prep gear, primers compatible with moisture-prone substrates, and a mixer, tub, and containment for mixing. Plan for ventilation, PPE, and proper disposal during the project.
Recommended materials and specs
Use this checklist to select the right materials for your plaster repair in humid rooms.
- Plaster: Choose breathable plasters like lime or cement-lime mixes. Check product labels for breathability ratings.
- Primer: Use a primer suitable for high humidity areas to promote adhesion and prevent mold growth.
- Salt Inhibitor: Apply a salt inhibitor primer to prevent efflorescence, especially in damp conditions.
- Breathable Finish: Opt for breathable paints or varnishes to allow moisture evaporation.
- Lime vs. Gypsum: Lime plasters are more suitable for humid rooms due to their better resistance to damp conditions.
- Moisture-Stabilized Pre-Mixed Plasters: Consider using these for convenience and quick application.
- Hydraulic Lime: This is ideal for high humidity areas as it sets underwater and resists dampness.
- Cement-Lime Mixes: These provide a balance between the strength of cement and breathability of lime.
Quick rule: Always check product labels to ensure materials are suitable for high humidity conditions.
Essential tools and safety gear
Use this checklist to gather the necessary tools and safety equipment for your plaster repair job in humid rooms.
- Scraper: Use a wide-blade scraper to remove loose plaster. Safety: Wear gloves to protect hands.
- Putty Knife: A flexible putty knife helps apply and smooth patch compounds. Safety: Be careful not to cut yourself.
- Feather/Edge Trowel: Use for applying plaster and creating smooth, even surfaces. Safety: Keep edges away from face and eyes.
- Sanding Block: For smoothing finished surfaces. Safety: Wear a respirator to avoid inhaling dust.
- Humidity Meter: Measure humidity levels before and during repairs. Safety: Ensure readings are within acceptable ranges (40-60%).
- Respirator: Protect against plaster dust and mold spores. Safety: Choose a respirator with a particulate filter.
- Goggles: Shield eyes from dust and debris. Safety: Ensure they fit well and provide full coverage.
- Gloves: Protect hands from cuts, plaster, and chemicals. Safety: Choose gloves that fit well and allow good grip.
Quick rule: Always prioritize safety when working with tools and in damp conditions.
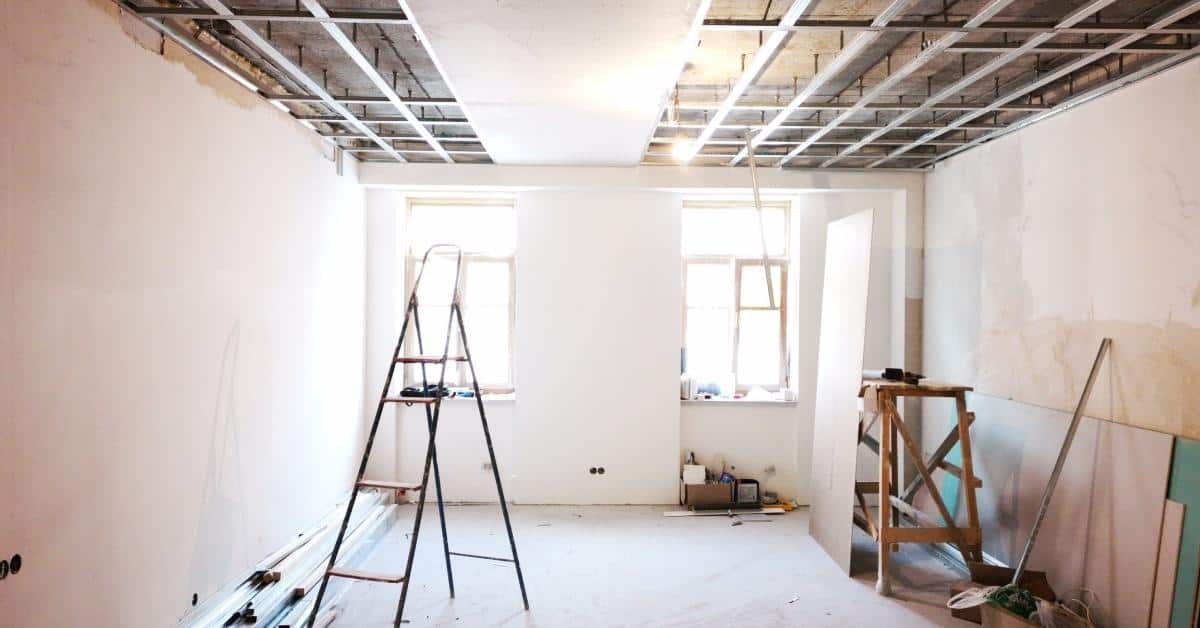
Step-by-Step Plaster Repair Process for Finished Surfaces
Outline a practical sequence from prep to finish, noting how humidity affects each step. Start with inspection, then address cleaning and dampness control before patching.
Follow with removing loose material, applying patch material, and embedding any mesh as required. Build up the finish, cure with environmental controls, and apply a breathable top coat or primer when ready.
Step-by-Step Repair Process
This section guides you through a clear, numbered sequence of practical steps for repairing finished plaster surfaces in humid rooms. Follow these DIY-friendly actions to ensure a successful and long-lasting repair.
- Safety first: Inspect the area, turn off power if needed, and wear appropriate PPE (gloves, goggles).
- Inspect damage: Identify loose material, cracks, or holes. Mark them for reference.
- Prepare tools: Gather trowels, hawk, bucket, water, plaster mix, mesh (if needed), and sealers/primers.
- Repair process: Remove loose material, apply patch material, embed mesh if required, apply base coat, build up to match finish. Follow the manufacturer’s instructions for mixing and application.
- Final checks: Allow proper cure time in humid conditions (usually 24-72 hours). Inspect the repair, ensure it’s level, smooth, and well-adhered before painting or finishing.
Surface preparation and salt/sulfate removal
Before replastering, remove loose powder and treat contaminated areas to prevent future powdering issues. This step ensures a solid base for your repair.
Start by brushing or vacuuming off loose material. For efflorescence (white salt deposits), use a stiff brush or wire brush to scrub gently. Be careful not to damage the surface.
For severe cases, apply a salt inhibitor or use a poultice to extract salts. Follow the manufacturer’s instructions for application and removal. Ensure the area is clean and dry before proceeding with repairs.
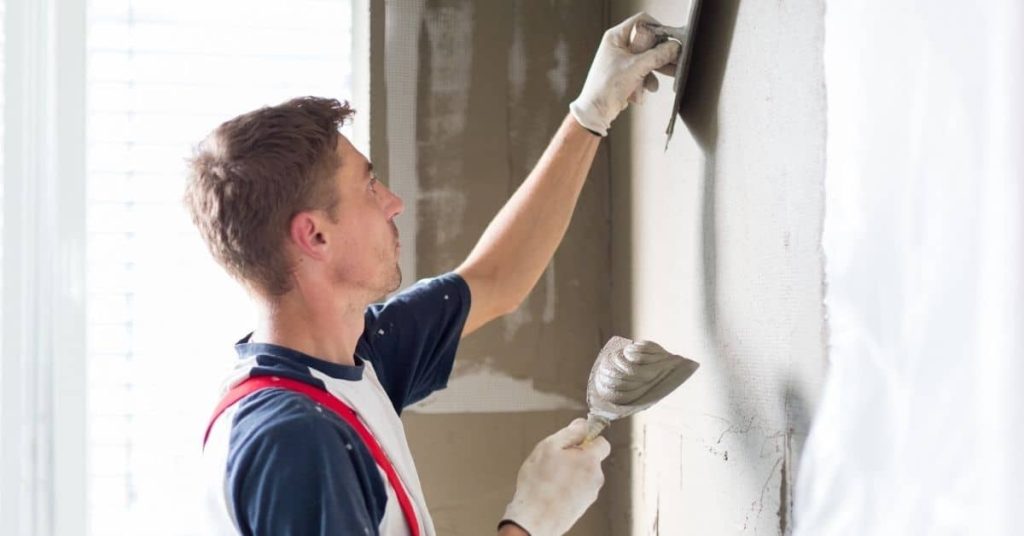
Patching, bonding, and finishing technique
Applying a suitable bonding/primer layer ensures strong adhesion of your patch. Mix plaster correctly and use the right layering technique to minimize future powdering.
First, apply a bonding primer or sealant designed for humid rooms. This helps prevent moisture migration and improves adhesion. Follow the manufacturer’s instructions for application and drying time.
Next, mix your plaster according to the manufacturer’s specifications. Use a hawk and trowel to apply the patch material, building up layers to match the existing finish. Ensure each layer is well-bonded before applying the next. For deep holes or cracks, embed a mesh or fiberglass tape for added strength.
Once patched, allow the plaster to cure in humid conditions (usually 24-72 hours). Apply a final skim coat if needed, ensuring it’s well-bonded and smooth. Before painting or finishing, test a small, hidden area first to ensure compatibility with your chosen paint or finish.
Techniques to Prevent Future Powdery Finishes
Define your moisture plan by identifying sources and implementing proper ventilation. Set practical humidity controls relevant to plaster work in humid rooms.
Compare breathable finishes with sealants or primers that suit moisture-prone substrates. Plan substrate improvements and moisture barriers where needed to reduce recurrence risk.
Humidity control strategies
Long-term prevention of powdery finishes in high humidity rooms starts with managing moisture. Identify and quantify your room’s humidity sources – this could be from cooking, showering, or even outdoor weather conditions.
Ventilation is key. Install extract fans in kitchens and bathrooms to remove excess moisture. Consider using dehumidifiers if necessary, but remember they’re not a long-term solution on their own.
Heat also plays a role. Warmer air can hold more water vapor, so keeping your room temperature consistent helps control humidity. Placing extract fans or vapor barriers in strategic locations can further reduce moisture buildup.
Choosing breathable materials and coatings
Material choices greatly impact how well your plaster finish holds up in humid conditions. Lime-based or vapor-open systems often outperform cement or non-breathable paints because they allow moisture to escape.
- Lime-based plasters: These are porous, allowing moisture to pass through. They’re ideal for high humidity rooms. Look for products with high lime content and low cement content. Tip: Avoid using them in areas prone to freezing temperatures as they can crack.
- Breathable paints: These allow moisture to evaporate from the surface. Choose water-based, breathable acrylic or silicone-based paints. Look for products with a high vapor permeability rating.
- Cement plasters: While cheaper, they’re not ideal in humid rooms as they trap moisture, leading to cracking and powdering. Avoid using them in bathrooms or kitchens unless you have excellent ventilation.
- Non-breathable paints: These seal the surface, preventing moisture from escaping. They can lead to trapped moisture causing problems like efflorescence (salt deposits) and weak bond with the substrate.
- Breathable sealants/primers: These allow moisture to pass through while protecting the substrate. Use them before applying plaster or paint to improve adhesion and prevent moisture entrapment. Look for products specifically designed for high humidity areas.
Common Mistakes to Avoid
Document substrate conditions that commonly trigger powdery finishes, such as damp walls and efflorescence, and explain why these conditions cause issues. Recognize moisture-related limitations before starting.
Avoid incorrect material choices and over-sealing. Do not coat overly thick or fast-drying layers that trap moisture and compromise adhesion.
Material and application pitfalls
Choosing the right materials and applying them correctly is crucial for preventing powdery finishes. Here are common mistakes to avoid:
- Using fast-drying plasters: These can cause cracking and weak bond on damp surfaces.
- Wrong mix proportions: Too much or too little water can lead to poor adhesion and powdering.
- Incompatible primers/paints: Using non-breathable sealers or paints that don’t match your plaster can trap moisture, causing problems.
- Applying thick coats: This traps moisture and promotes powdering. Keep coats thin and even.
- Ignoring product ratings: Always check the material’s suitability for high humidity areas and follow manufacturer guidelines.
Planning and timing errors
Repairing without addressing moisture sources or rushing through steps can lead to poor results. Avoid these common planning mistakes:
- Repairing without fixing moisture source: Powdering will return if rising damp, leaks, or condensation aren’t addressed.
- Working in unsuitable humidity/temperature: Too high or too low humidity and temperature can affect plaster curing and adhesion.
- Rushing curing times: Allowing plasters to dry too quickly can cause cracking and weak bond. Keep temperatures stable during curing.
- Not accounting for drying time: Plasters need time to set and dry properly before applying sealers or paint.
Take your time, plan ahead, and address moisture sources to prevent powdery finishes.
Safety Precautions and Mold/Mildew Considerations
Identify health risks associated with dusty, salt contaminated surfaces and potential mold in humid spaces. PPE choices should reflect exposure risk and work sequencing needs.
Containment, proper disposal, and fresh air management are essential. If mold signs appear, halt work and seek professional guidance to protect occupants and surfaces.
Mold Identification and Remediation Basics
Before you start any plaster repair, it’s crucial to identify if the problem is mold or just efflorescence – a harmless salt deposit. Efflorescence looks like white powdery patches but doesn’t cause damage or health issues. If you see dark spots, smell musty odors, or notice water damage, you’re likely dealing with mold.
Mold can cause health problems, so if you suspect it, consider hiring a professional for testing and remediation. Before any repair work, contain the area to prevent spore spread. Use plastic sheeting and negative pressure if possible.
If mold is present but not extensive (less than 10 sq ft), you can remove it yourself using detergent, water, and a stiff brush. Always wear appropriate PPE – respirator, gloves, eye protection, and coveralls.
Safe Handling and Waste Disposal
When working with contaminated surfaces or mold, safety is paramount. Always use a P100 respirator or half-face respirator, waterproof gloves, eye protection, disposable coveralls, and footwear.
Control dust during scraping, grinding, or cleaning by using damp rags or misting the area with water. Contain the work area with plastic sheeting and maintain a clean-to-dirty workflow to prevent cross-contamination.
Dispose of contaminated materials responsibly. Seal waste in labeled bags and follow local disposal regulations. Clean tools and surfaces thoroughly after use, and ventilate the area well post-work. Always check surfaces for any remaining contamination before applying new plaster.
Cost Considerations and Planning Estimates
Highlight factors that influence repair costs, including materials and labor intensity, plus the potential need for humidity control equipment. Acknowledge regional variations and seasonal changes without quoting exact figures.
Provide guidance on how to estimate scope, get quotes, and plan contingencies. Use a staged budgeting approach and verify product specs, warranties, and cure requirements before proceeding.
DIY vs Professional Cost Drivers
When it comes to plaster repairs, you’ve got two main options: DIY or hiring a pro. Let’s break down the cost drivers for each.
DIY: You’ll save on labor costs by doing the work yourself. But don’t forget about hidden expenses like equipment rental (scaffolding, moisture meters) and materials you might not use up entirely. Plus, DIY repairs can take longer due to learning curves.
Professional: You’re paying for expertise and efficiency. Pros have the right tools, know-how, and can spot hidden issues. But it’ll cost more upfront. Make sure to factor in any additional costs they might charge for specialized services like mold remediation or humidity control.
Long-Term Value and Warranty Considerations
Investing in the right repairs now can save you money in the long run. Here’s how:
Using hydrophobic plaster and proper moisture barriers adds to your upfront cost but prevents future damage from humidity. It’s like putting a raincoat on your walls.
Proper humidity control, like installing dehumidifiers or improving ventilation, might seem expensive at first. But it’ll keep your plaster in tip-top shape for years to come, saving you repair costs down the line.
When hiring a pro, check their warranty terms. Some contractors offer warranties on their workmanship and materials. This can give you peace of mind and protect your investment. Just make sure the warranty covers potential humidity-related issues.

Conclusion
These repairs matter because a solid, properly finished plaster surface in a humid room protects your walls, looks clean, and lasts longer. Stay focused on safety, avoid backsliding on moisture control, and keep the finish durable.
Start by checking the humidity source and fixing leaks, dry the area completely, remove loose or powdery material, clean and prime the surface, set up the right plaster mix, apply in thin, even layers, let each layer cure, seal against future moisture, and maintain ventilation to prevent a repeat problem.
Common mistakes to avoid include rushing repairs without drying the area, skipping surface prep or proper priming, and ignoring mold or mildew signs. Always wear eye and respiratory protection in damp rooms, test a small area first, and recheck humidity after the repair before moving on to finishing touches.
If you encounter persistent moisture, extensive damage, or recurring powdering after following the steps, call a professional for a thorough assessment. Stay steady, follow the plan, and you’ll keep both the plaster and the room looking solid and safe. momentum and practical results start with smart prep and careful execution.
FAQ
How should I prepare walls before plaster repair in a high humidity room?
Start by removing loose, powdery material and any peeling coatings. Clean the surface and let it dry as much as possible, shaving down any high spots. Check for lingering moisture and fix the source before you apply new plaster.
What materials work best in humid environments, and how do I choose?
Look for plaster products labeled for high humidity or damp areas. Read the manufacturer instructions for compatibility with existing plaster and moisture levels. If unsure, check the product label and local guidelines, and ask at the supply shop for a humidity-tolerant option.
How do I mix plaster correctly in a humid space?
Follow the product instructions and mix in small batches to stay consistent. Add powder to the water gradually and mix to a workable, not too stiff, consistency. Avoid guessing; if it looks wrong, re-check the mix on the label.
What are good techniques for applying plaster in humid conditions and preventing powdery finishes?
Work in manageable layers and let each layer firm up before the next. Use a damp but not wet surface to help the plaster adhere and prevent dusting. If you see powdery spots forming, halt and assess moisture and surface readiness before continuing.
What are common issues in plaster repairs and how do I troubleshoot?
Common problems are poor adhesion, cracking, and powdery finishes. Re-check surface prep, moisture levels, and material compatibility. If problems persist, revisit the wall preparation steps or consult the product instructions for remediation procedures.