

Introduction
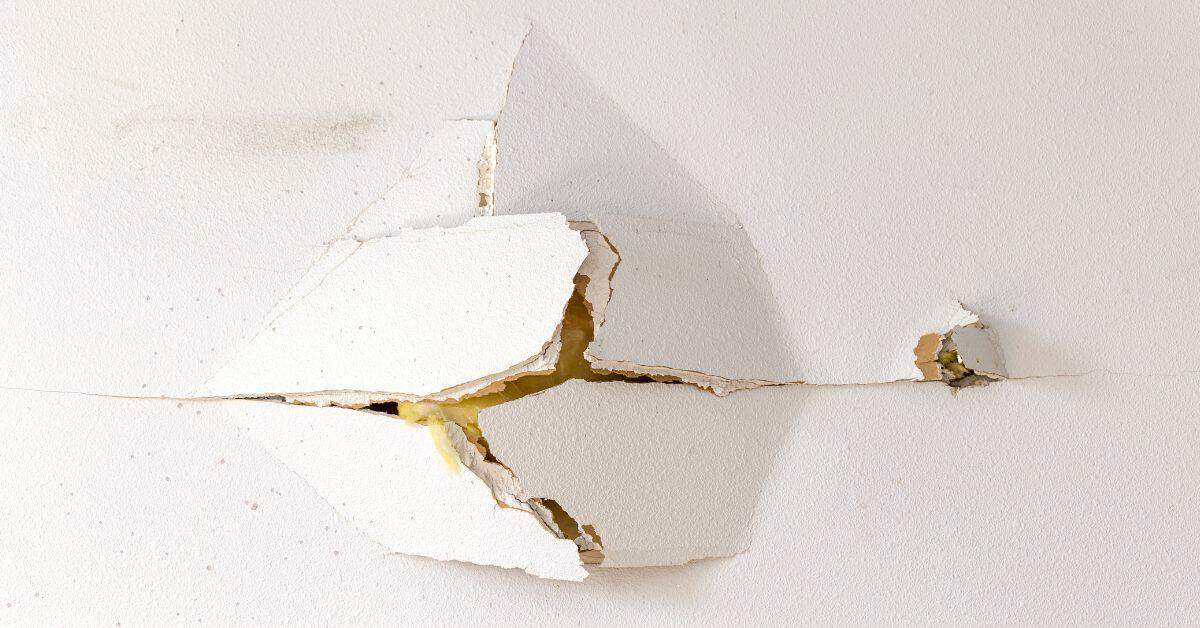
Repairing plaster coves means supporting the curved profile as it sets so the curve stays true. You’ll start by inspecting the damaged area, removing loose plaster, and cleaning the surface. This is a hands‑on prep step that guides the repair and helps the new plaster grab.
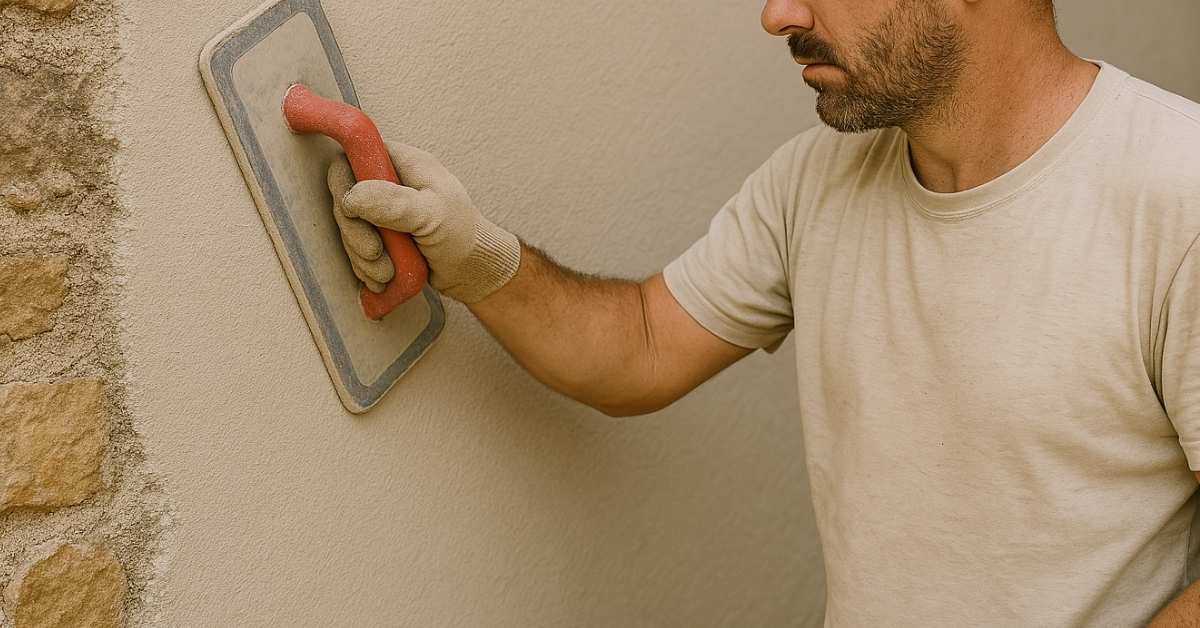
After prep, you apply new plaster and work the curve as it sets. Use appropriate reinforcing methods to support the curve (thin coats, backing, or similar methods) while following the manufacturer instructions and local rules. If anything looks off, pause and recheck the surface, the support, and the curing environment.
Key takeaways
- Assess damage and plan repairs before removing plaster coves to avoid surprises.
- Securely support the curve with temporary splines or blocks during setting.
- Prepare damaged edges by cleaning, feathering, and lightly keying surface for new plaster.
- Mix plaster or joint compound as directed and apply in thin, curved layers.
- Reinforce curves with lath, fiberglass mesh, or wire to prevent cracking.
- Wear eye protection and a dust mask; risk of sharp edges and dust.
Table of Contents
- Introduction
- Key takeaways
- Assessing Damage and Planning the Repair
- Tools and Materials Checklist
- Preparing the Surface Before Repair
- Building and Supporting the Curve While It Sets
- Applying Plaster or Joint Compound on Curves
- Sanding, Finishing, and Visual Checkpoints
- Preventing Future Damage and Long-Term Maintenance
- Safety, Cost Considerations, and Common Mistakes
- Conclusion
- FAQ
Assessing Damage and Planning the Repair
Assess the plaster coves by looking for cracks, delamination, missing sections, or sagging, and note any signs of moisture. Use practical criteria to decide whether you should patch small cracks, do a partial replace for localized damage, or re-cove the whole curve when the damage is widespread. Keep in mind whether the curve’s profile and rigidity are affected and whether the substrate shows signs of movement.
Understanding the substrate and coving support helps you plan the right approach, including lath status, plaster thickness, and potential movement that could recur after repair. This matters because it guides your material choices, reinforcement, and whether temporary support during cure is needed. If you encounter hazards like lead paint, uncertain curves, or high work areas, set clear thresholds for calling a pro. Check product labels or manufacturer instructions for patching plaster or hydraulic cement and follow local recommendations for safe handling.
Inspecting the Cove Profile and Substrate
Before you start patching, you need to understand what you’re dealing with. Grab a flashlight and get up close.
Measuring Curve Radius: Use a tape measure to find the radius of your cove’s curve. You’ll need this to match it when you repair. Check at multiple points, as curves can vary.
Checking Lath/Board Backing: Carefully remove any paint or wallpaper covering the substrate. Look for any cracks, gaps, or loose pieces. Use a flathead screwdriver to gently tap and listen for hollow spots. If you find any, note them down.
Remember, hidden damage can cause your repair to fail. So, take the time to check behind paint and wallpaper. It’s like checking under the hood of a car – you might not want to, but it’s necessary.
Creating a repair plan and materials list
The right materials ensure your repair lasts and looks good. Here’s what you need, why, and how to choose.
- Plaster or Joint Compound: Fills gaps and smooths surfaces. Choose multi-purpose joint compound for small repairs (up to 1/4″ wide). For larger gaps, use setting-type compound. Avoid cheap, fast-setting compounds as they’re hard to work with.
- Clay or Lightweight Joint Compound: Used when you need to match existing texture. Check the label for ‘clay’ or ‘lightweight’. Cheap, heavy joint compounds can cause cracking later.
- Mortar (Type N): For repairing damaged cove profiles. Type N is versatile and strong. Look for ASTM C270 compliance on the bag. Avoid using masonry cement as it’s too weak.
- Concrete Repair Mortar: For major substrate damage. Check strength class (e.g., C30) and ensure it matches your existing concrete. Cheap, low-strength mortars won’t last.
- Concrete Sealer: Protects repaired areas from water and chemicals. Choose a penetrating sealer for best durability. Avoid cheap, topical sealers that peel off.
- Trowels (1/4″, 3/8″, 1/2″): For applying compounds and mortars. Rent or buy good quality ones; cheap trowels bend and break.
- Hawk: Holds your trowel when not in use. Any size will do, but a 16″ hawk is standard.
- Tape Measure & Pencil: Mark out repair areas accurately. A cheap tape measure is fine, but ensure it’s accurate.
- Safety Gear (Glasses, Gloves, Ear Protection): Protect yourself from dust and debris. Don’t skimp on safety gear; it’s cheap insurance.
Pro tip: Buy materials in small quantities to avoid waste. Store compounds properly to prevent drying out. Always mix small batches at a time for best results.
Tools and Materials Checklist
You’ll need the core hand tools, a level and straight edge, and some temporary supports to shape and hold the coving while it cures. Gather mixing tools, a bucket, a paddle, a hawk, and the patching plaster or plaster mix, bonding agents, and filler materials. Have safety gear ready: eye protection, a dust mask or respirator, gloves, long sleeves, and hearing protection if you plan on sanding.
For budget jobs, use basic household tools and store-brand plaster with simple temporary supports like bats or curved lath. For pro options, consider air-mix or rapid-set plasters and curved foam coves, plus stronger bonding sealants and reinforcement tape. Check compatibility with existing plaster, pre-wetting or priming steps, and cure times before finishing.
Essential tools for shaping and support
Before you start repairing, gather these specialized tools to ensure your curve stays in place and looks right.
- Temporary supports: Blocks, splines, or curved laths. These keep the curve’s shape while plaster sets.
- Margin trowel (1/2″ – 3/4″): For applying and shaping small amounts of plaster.
- Plastering hawk: Holds plaster mix, keeps hands clean. Use the edge for scraping off excess.
- Mixing bucket & paddle: Combine plaster mix evenly to avoid lumps.
- Level and straight edge: Check alignment and ensure a smooth finish.
- Clamps or battens: Hold the curve in place while setting. Adjust as needed.
- Margin plumb line: Maintain vertical alignment during setup to prevent sagging.
- Sanding tools (fine-grit sandpaper, orbital sander): Smooth out any imperfections after plaster sets.
- Measurement devices (tape measure, curve gauge): Ensure repairs match the original cove’s dimensions and shape.
Quick rule: Don’t skip these tools. They’re your secret to a smooth, well-supported curve.
Recommended materials and their properties
Choose the right materials for your repair job. Here’s what you need to know about each.
- Traditional lime/plaster: Long-lasting, breathable, but slow-setting. Ideal for historic restorations.
- Gypsum-based plasters: Quick-setting, easy to apply, but less durable than lime. Great for modern homes.
- Setting-type joint compounds: Fast-drying, used for filling gaps and seams. Can be too brittle for structural repairs.
- Reinforcing tape/mesh: Strengthens joints, prevents cracking. Essential when repairing large areas or stress points.
- Adhesives (bonding agent): Enhances plaster adhesion to substrate. Use before applying new plaster.
- Plaster of Paris: Quick-set, easy to mix, but shrinks more than other plasters. Best for small touch-ups.
- Sealant or bonding sealant: Prevents moisture penetration at joints and edges. Use where walls meet floors or ceilings.
- Curved foam coves or wood backing: Temporary supports for recreating original cove shape. Use when substrate is damaged or missing.
Quick rule: Match your materials to the existing plaster and repair needs. Don’t compromise on adhesion and reinforcement.
Preparing the Surface Before Repair
Before patching, you must create a clean, secure work area and a well-defined edge: remove loose plaster, sweep or vacuum away dust, and establish a stable boundary around the repair while preparing backing for curved profiles and priming the edges for good adhesion.
This prep matters because proper backing and edge bonding prevent sag and delamination, reduce suction against the patch, and keep the repair from loosening over time on fragile or curved substrates. Follow safety and containment practices, control dust, and choose bonding agents and patch materials that suit the curve and substrate, checking product labels and manufacturer guidance as you go.
Securing loose or delaminated plaster
Before you start repairing, secure any loose or delaminated plaster to the substrate. This ensures a strong bond for your patch.
Use injection adhesives like PL Premium or similar to fill gaps and reattach the loose pieces. Squeeze the adhesive into the gap, then clamp the piece temporarily until it sets.
For larger areas, use screws with washers driven through pilot holes. This prevents splitting the plaster. Use temporary clamps to hold everything tight while you drive the screw.
Be gentle. Too much force can crack the plaster further or damage the substrate.
Creating a clean, keyed edge on curved sections
To create a strong bond for your patch, you need a clean, stable edge. On curves, this can be tricky.
Use a sharp chisel to carefully remove any flaking plaster without flattening the curve’s profile. Square or feather the edges as needed, but keep the curve intact.
For mechanical keying, undercut the edge slightly with your chisel. This creates a recess for your patch material to lock into. But be careful – too much undercutting can weaken the substrate.
Inspect your work closely. The edge should be clean, stable, and maintain the curve’s profile for best results.
Building and Supporting the Curve While It Sets
To build the curve and hold it as it sets, define the target shape with a clear radius and reference points so the supports reproduce the coving exactly. Choose temporary supports from wood forms, rigid foam, flexible splines, or caulking strips, and note when each is best for plaster or joint compound. Lay out a lightweight, removable frame or spline system that grips the edge without misalignment, handling junctions and corners.
Apply the mix in stages, secure with the supports, and monitor sag or bow during early set; adjust as needed. After curing, remove supports safely and inspect for cracks or deformation, then smooth joints and feather edges before priming.
Making and positioning reusable curve templates
Use these templates to ensure your new cove matches the existing profile exactly. They’re especially useful when repairing large sections or complex curves.
- Measure the radius: Use a tape measure to find the exact radius of your cove. This ensures your template fits snugly.
- Trace the profile: Draw the curve’s shape onto your chosen material (wood or flexible MDF). Be precise; any errors here will show up in your finished cove.
- Cut carefully: Use a jigsaw or bandsaw to cut along your line. Take your time to avoid splinters or rough edges.
- Test fit: Before attaching, place the template against the wall to ensure it matches the existing curve exactly.
- Mark attachment points: Mark where you’ll attach the template to the wall. This helps keep it in place while you work.
- Attach securely: Use screws or adhesive to fix the template temporarily. Ensure it’s level and won’t move during application.
- Check alignment: Double-check that your template is aligned correctly before applying plaster. Any misalignment will be permanent.
- Avoid over-tightening: Be careful not to overtighten screws; this can warp the template and ruin its curve.
Quick rule: Always test fit your templates before attaching. A poor fit means wasted time and materials.
Using backing and temporary braces
Backing provides support for your new cove, while braces prevent sagging during cure. Here’s how to use them effectively.
Choose the right backing: For small repairs, drywall strips or shim blocks may suffice. Larger sections might need wire lath for extra strength.
Install backing properly: Attach backing directly to the wall using screws or adhesive. Ensure it’s level and follows the curve accurately. Any gaps can cause cracks later on.
Brace effectively: Use wooden braces or adjustable clamps to secure your template and backing in place. Braces should be tight but not so much that they warp the cove. Check them regularly during cure to ensure they’re still doing their job.
Applying Plaster or Joint Compound on Curves
Prepare the key for curved coves by cleaning, dusting, and priming or bonding as needed, then apply a thin skim to establish a consistent key without flattening the curve. Use a light, even first coat that follows the profile, and don’t over-trowel at the apex to avoid sagging. Plan for when to embed reinforcement like mesh or tape and how to build up in coats while keeping the radius intact.
This matters because a curved surface shows every mistake, so proper adhesion, even thickness, and careful curing keep the curve smooth and seamless. Following practical steps—timing, patching, and feathering edges—helps you avoid edge curl, pinholes, and visible joints, while leaving a workable surface for final skim and touch-ups. Check product labels or datasheets for exact guidance on mix behavior and working time for your temperature and humidity, and adapt as needed for your space.
Reinforcing seams and transitions
When applying plaster or joint compound on curves, reinforcing seams and transitions is crucial to prevent cracking and maintain the curve’s integrity. Here’s how:
First, ensure your surface is clean and dry. Use a bonding primer to improve adhesion. For wider gaps, apply a thin skim coat to establish a consistent key without breaking the curve.
Next, embed paper or fiberglass tape along seams and transitions. Start at the top of the curve, pressing firmly downwards. Work your way around, ensuring no ridges or gaps form. Use a wide, flexible blade to smooth out any wrinkles.
Shaping and profiling the finish coats
Applying finish coats on curved surfaces requires careful shaping and profiling. Here are some tips:
Use convex trowels or spoons for curves. They’re designed to follow the contour of your cove, helping you maintain a consistent radius.
For the final coat, use wet-sanding to achieve a smooth, seamless finish. Start with a coarse grit (e.g., 120) and work your way up to finer grits (e.g., 220). Sand along the curve’s direction, using a flexible sanding block or sponge to follow the profile.
Regularly check your progress by stepping back and viewing the curve from different angles. This helps you spot any inconsistencies early and make adjustments as needed.
Sanding, Finishing, and Visual Checkpoints
Sanding the coving should start with coarse adjustments only where needed, then move to finer grits. Use a flexible sanding block or wrapped sponge to follow the curve and avoid flattening the profile. Feed the sandpaper along the curvature, not perpendicular to it, and check frequently with a level or profile guide.
After sanding, apply a compatible primer for plaster or concrete, then choose a finishing paint with a gentle sheen to hide imperfections. Visual checkpoints include uniform texture along the curve, crisp edges where coving meets walls and ceiling, and no sanding trails or bare patches.
Sanding technique for curved surfaces
Before you start sanding, make sure your curve is fully set and dry.
- Start with coarse grit: 80-120 grit to remove major imperfections. Use a flexible sanding block or wrapped sponge to follow the curve.
- Progress to finer grits: 150, 220 for smoothing. Keep your strokes light and even.
- Use dust control: Vacuum or damp cloth to minimize dust buildup on the surface.
- Avoid sanding perpendicular: Feed sandpaper along the curvature to prevent flattening.
- Check corners gently: Sand corners lightly, avoid over-sanding which can cause flattening.
- Test with a level or profile guide: Ensure you’re maintaining the intended radius. Skip this and you might end up with an uneven curve.
- Inspect for sand-through: Check for any bare patches where plaster has been sanded through. Reapply thin plaster if necessary.
- Wet-sand if needed: For a super smooth finish, wet-sand with 400 grit and polish with a soft cloth.
Quick rule: Always test your progress with a level or profile guide to avoid flattening the curve.
Final inspection and touch-ups
Before applying primer, inspect your coving for any imperfections. This step ensures a professional finish.
- Check for micro-cracks: Inspect the entire curve under raking light. Fill with joint compound if found.
- Inspect edges: Ensure crisp edges where coving meets walls/ceiling. Touch up with a thin coat of plaster if needed.
- Feel for ridges: Run your fingers along the curve to feel for any ridges or uneven spots. Sand down if found.
- Check curvature: Use a level or profile guide to ensure consistent radius. Re-sand or re-apply plaster as needed.
- Look for sanding trails: Check for visible sanding marks under raking light. Lightly sand and touch up if necessary.
- Check for bare patches: Ensure there are no bare spots where primer or paint could soak in unevenly.
- Inspect color consistency: Check that the coving is consistent with surrounding walls/ceiling. Touch up if needed.
Quick rule: Address any issues before priming to avoid trapping problems under paint.
Preventing Future Damage and Long-Term Maintenance
Preventing future damage comes down to keeping moisture in check, controlling any settlement behind plaster, and reinforcing vulnerable joints before cracks become a habit. It also means setting up a simple, low-effort maintenance routine and using patch materials that tolerate a little movement without fall‑apart. The goal is to slow recurrence by combining moisture control, structural support, and smart sealing at seams and transitions.
This matters because small leaks, subtle shifts, and neglected joints are sneaky culprits that degrade finishes over time. A clear plan — with regular inspections, easy fixes, and quick resealing or recoating — helps you catch issues early and save bigger repairs later. When you’re unsure about products or methods, check the label or manufacturer instructions and follow local guidance, using a practical rule‑of‑thumb if exact specs aren’t provided; keep notes and photos to guide timely corrective action.
Environmental and structural prevention measures
To keep your plaster coves in tip-top shape, you need to tackle both environmental factors and structural issues. Let’s dive into each.
Moisture control: Humidity is the enemy of plaster. Use a dehumidifier if needed, ensure proper ventilation, and seal any leaky plumbing or roof lines near your coves. Make sure water drains away from the wall to prevent moisture buildup.
Addressing building movement: Plaster doesn’t like to move around much. Reinforce vulnerable areas with appropriate backing and added support where needed. Use compatible patch materials that can handle minor movement without cracking.
Reinforcing transitions: Cracks often start at joints, seams, or transitions. Use mesh tape, fiberglass tape, or lightweight joint compounds here to strengthen these areas and reduce the likelihood of cracks recurring.
Simple ongoing maintenance actions
Maintaining your plaster coves doesn’t have to be a big job. A little TLC goes a long way.
Cleaning: Gently clean your coves as needed to remove dirt and grime. Avoid abrasive cleaning methods that could damage the surface.
Prompt crack repair: Hairline cracks happen. When you spot one, address it promptly with a bit of joint compound and touch-up paint. This prevents small issues from becoming big ones.
Monitor for adhesion problems: Keep an eye on your coves for any signs of paint peeling or texture loss. If you notice anything, address it right away to prevent further damage.
Safety, Cost Considerations, and Common Mistakes
Safety, cost, and avoiding common mistakes around curved plaster coves come down to a clear plan you can actually follow. Wear the basic PPE—dust mask or respirator, eye protection, and gloves—and keep dust containment and ventilation in place while you work. Handle plaster and patch compounds with care, follow mixing and curing guidance from labels or manufacturer instructions, keep the area secured to prevent slips, and don’t skip backing or scoring behind patches as needed to hold shape. Check for electrical and ladder hazards and plan a safe workflow that minimizes rework or damage to adjacent surfaces.
The cost picture isn’t just the material price on the bag—think about bonding agents, mesh or tape, tools, and any rental time for mixers or support gear, plus the labor time you’ll invest shaping and letting cure. Understanding these drivers helps you spot savings like batch planning and reusing accessories, while still honoring the limits of the work and your space. Why it matters is simple: curved repairs break easily if you rush or cut corners, so slow, careful prep, proper containment, and a cautious cure window save you from costly rework and texture mismatches later. Use a practical checklist for surface prep, safety reminders, and post-fix checks on joint integrity and texture match, and always verify cure indicators before finishing.
Safety and handling of materials
The right materials ensure your repair lasts. Wrong ones cause cracks, stains, or weak bonds.
- Plaster or joint compound: Use high-quality, low-shrinkage formulas. Look for 4-hour set times. Avoid under-thinning to prevent sagging and cracking.
- Bonding agents: Choose ones rated for plaster or joint compounds. Apply thinly to avoid mildew growth.
- Mesh or fiberglass tape: Use reinforced, heavy-duty tapes for curves. Avoid regular drywall tape as it’s too weak.
- Respirator: Wear a proper respirator, not just a dust mask, to protect from harmful particles.
- Gloves and eye protection: Use gloves to protect hands from chemicals. Safety glasses or goggles shield eyes from debris.
- Ventilation: Ensure proper ventilation to reduce dust inhalation and ensure materials cure correctly.
- Waste disposal: Dispose of waste materials responsibly, following local regulations to avoid environmental harm.
Typical mistakes and how to avoid them
Learn from common errors to save time and money.
- Over-thinning mixes: Over-thinning causes sagging, weak bonds, and poor finish. Avoid adding too much water; follow mix ratios exactly.
- Poor backing: Skipping scoring or backing behind the patch leads to weak adhesion. Always score the surface before applying compound, and use a backing material like mesh tape.
- Insufficient support: Not supporting the curve during setting causes sagging and cracking. Use temporary braces and templates as explained earlier.
- Wrong tape choice: Using regular drywall tape on curves results in weak repairs that crack easily. Always use reinforced, heavy-duty tape designed for curves.
- Rushed sanding: Sanding too soon causes dust to embed in the finish, leading to a poor final result. Allow compounds to cure fully before sanding.
Take your time, follow guidelines, and avoid these common pitfalls for successful repairs.

Conclusion
Focus on a safe, durable finish that looks right and holds together. The core idea is to get the curve supported while it sets, protect your joints, and leave a surface you can sand and finish without trouble.
In practice, keep this as a simple check sequence: inspect the damage and plan the repair, clear and prime the area, set up proper supports for the curve, apply the plaster or joint compound in stages, let each layer firm, sand smooth, finish evenly, and then review the result for any touch ups or maintenance needs. Do the work in that order, test in a small area first, and respect the cure and set times. If anything looks off, pause and reassess before proceeding.
Common mistakes to avoid are overloading the curve with material, skipping proper support during curing, and rushing sanding or finishing. Apply only as much as the curve can bear at each stage, support it firmly and recheck alignment, and never force a tool or compound into place. Always test a small patch first, wear eye and skin protection, and work with clean, dry surfaces to prevent weak spots and cracks.
If you encounter cracks wider than a small groove, unstable framing, or you simply don’t have a solid way to support the curve safely, it’s time to call a professional. Otherwise, follow the steps, stay patient, and you’ll restore both form and function. You’ve got this—steady hands and good judgment pay off with a clean, lasting finish.
FAQ
How do I prep damaged plaster coves before repair?
Chips and loose material should be removed with a putty knife or chisel. Clean dust and debris from the curve with a brush and a damp rag. If the bond is suspect, roughen the edges slightly so patch material can grab on.
What are my options for removing and repairing cracked plaster in a coving area?
Small cracks can be filled with patch compounds or plaster, pressed into the crack and smoothened. For larger breaks, expose a solid edge and rebuild with multiple thin coats, letting each coat set before the next. Always seal the repaired edge to prevent future peeling.
How can I reinforce a curved coving area during repair?
Use a flexible reinforcing mesh or scrim behind the plaster where feasible to resist cracking. If you’re rebuilding the curve, pin a temporary support or light backing along the curve until the patch hardens. Check the manufacturer instructions for any reinforcement needs specific to your product.
What should I watch for during the drying and setting of plaster on curves?
Keep the area from drafts and rapid drying. Let patches cure gradually and avoid loading the curve until it feels firm to the touch. If you see surface cracking forming, address it with a light skim coat after initial set and before final finishing.