
Introduction
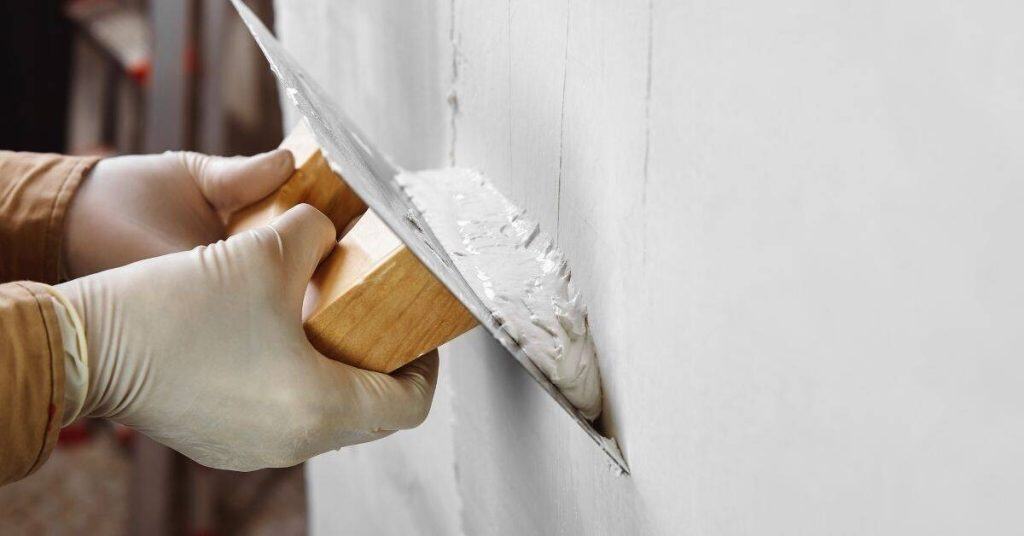
A smooth plaster finish comes from controlled trowel pressure and proper timing. That means pressing evenly as you float or skim, and watching the set so you don’t pull or push too much. You’ll get a better look if you keep strokes consistent and work in small, overlapping sections.
Check the plaster’s working time and adjust your pace to stay ahead of it. Avoid overworking the surface once it starts to stiffen, and stop to re-wet or re-knead as needed. Always follow the product label and local rules for mixing and finishing, and test a small area if you’re unsure.
Key takeaways
- Maintain consistent trowel pressure to avoid dull or uneven plaster surfaces.
- Watch set times closely and work within the window for finishing.
- Keep plaster and substrate moisture balanced to prevent cracking and sag.
- Use clean tools and frequent blade checks to prevent pulled fibers.
- Pad lightly during floating, then firm with steady passes for a smooth coat.
- Safety: wear eye protection and masks when mixing, sanding, and cutting.
Table of Contents
- Introduction
- Key takeaways
- Overview: What a Smooth Plaster Finish Demands
- Tools and Materials Checklist
- Understanding Trowel Pressure Fundamentals
- Timing Basics: Setting, Floating, and Finishing Windows
- Plaster Mix and Substrate Effects on Pressure and Timing
- Step-by-Step Technique for a Smooth Finish
- Troubleshooting Common Finish Problems
- Visual Checkpoints and Quality Control
- Conclusion
- FAQ
Overview: What a Smooth Plaster Finish Demands
The goal is a flat, even surface with a uniform sheen and solid adhesion. You want a finish that holds up under room conditions and traffic without showing patches. Trowel pressure and timing are the levers that shape those results and set the skill level you’ll need to succeed.
Expect a finish that looks consistent across large areas and feels smooth to the touch. More importantly, understand that achieving that result relies on paying attention to how your plaster behaves as you work it, not chasing a fixed clock or number.
What this article covers
The following topics will be covered to help you achieve a smooth plaster finish:
Tools: We’ll discuss the essential tools needed, including trowels and hawks.
Pressure Technique: You’ll learn how to apply pressure with your trowel for optimal results.
Timing Cues: Timing is crucial in plastering. We’ll provide clear cues on when to apply pressure and when to let the plaster set.
Troubleshooting: Common issues and their solutions will be addressed to help you avoid pitfalls.
Quality Checks: Finally, we’ll discuss how to inspect your work for a professional finish.
Why pressure and timing matter
The way you apply pressure with your trowel and the timing of your actions significantly impact the final appearance of your plasterwork.
Pressure: Too much or too little pressure can lead to an uneven surface. Proper pressure compacts the plaster, creating a smooth, even sheen.
The timing of when you apply this pressure is also crucial. If you apply it too early, before the plaster has set enough, you’ll disrupt its structure. Too late, and the plaster may have already started to cure, making it difficult to achieve a smooth finish.
Understanding these relationships will help you create a surface with even sheen, flatness, and durable adhesion – the core goals of any smooth plaster finish.
Tools and Materials Checklist
Gather a sturdy trowel, a margin trowel, a hawk, a straight edge, a wide float, and a sponge for final cleanups. Have a sturdy mixing bucket, a drill mixer, and a clean water supply handy. Include a gauge or rubbing tool for checking flatness and sheen, plus protective gloves and eye protection.
Choose tools and materials that match your plaster type and substrate. Always check product labels or data sheets for compatibility and working times, and verify any local rules or recommendations before starting.
Trowel types, sizes, and blades
Check your trowels before you start. Right tools make the job easier.
- Square trowel (6-12 inches): Best for spreading and embedding plaster. Too soft can’t handle pressure; too hard won’t flex.
- Float (8-30 inches): Smooths surface, removes excess. Soft blade needed to avoid marking finish.
- Finishing trowel (12-24 inches): Gives final smoothness. Stiffer blade for better control of pressure.
- Blade stiffness: Match to plaster type – softer for gypsum, stiffer for cement-based.
- Trowel size: Larger trowels cover more area faster but need more elbow grease. Smaller ones offer better control.
Quick rule: Choose trowels that fit your hand, match plaster type, and cover the job size efficiently.
Plaster types and common additives
Know your plaster. Different types need different handling.
- Gypsum (Drywall): Fast-setting, easy to apply but sensitive to moisture. Additives can slow set time or improve bonding.
- Cement-based: Slower setting, stronger finish. Retarders slow set time; accelerators speed it up.
- Lime plaster: Slowest setting, best for exterior use. Additives can improve workability or color.
- Additives: Follow manufacturer’s guidance. Wrong additives can cause poor bonding, cracking, or slow set times.
Quick rule: Understand your plaster type and follow additive instructions to avoid surprises.
Site prep and protective gear
Prep your site right. Safety first, then consistency in timing.
- Masking: Protect edges with painter’s tape to avoid messy cleanups later.
- Dust control: Wet down surfaces before plastering to minimize dust and improve adhesion.
- Ventilation: Ensure good airflow to keep plaster workable longer. Fans or open windows help.
- PPE (Personal Protective Equipment): Wear gloves, goggles, and a respirator for safety and comfort.
Quick rule: Prep your site right to maintain consistent working conditions and protect yourself from hazards.
Understanding Trowel Pressure Fundamentals
Pressure influences surface compression and how the plaster bonds to the substrate. Too little pressure can leave weak, hollow spots; too much pressure can smear or pull material off the wall. The way pressure is applied also guides moisture migration within the surface as it dries.
Learn to read the surface as you work: a uniform drag indicates even pressure, while shiny patches or texture changes hint at overworking. Use this feedback to adjust your hand speed, angle, and contact time rather than chasing a numeric target.
How pressure affects flatness and adhesion
Applying the right trowel pressure is crucial for a smooth plaster finish. Too little pressure leaves ridges and poor compaction, while too much can drag and delaminate the surface.
Light touch: Insufficient pressure causes the plaster to sit on top rather than bonding with the substrate. This results in a weak, uneven finish with visible ridges.
Heavy hand: Excessive pressure can pull moisture out too quickly, causing the plaster to dry and crack. It may also delaminate, leading to a rough, unstable surface.
The goal is even pressure across the blade. Practice makes perfect; start light and gradually increase until you find your ideal force.
Developing a tactile sense and visual feedback
Learning to interpret cues from your trowel helps refine your pressure technique. Pay attention to sound, blade glide, and surface sheen.
Sound: A smooth, consistent ‘swish’ indicates even pressure. Irregular sounds signal areas needing adjustment.
Blade glide: The trowel should slide effortlessly across the plaster. Resistance suggests too much or too little pressure.
Surface sheen: A uniform, matte sheen shows consistent compaction and bonding. Shiny patches or dull spots indicate areas to rework.
Grip, arm motion, and body positioning
Your grip, arm motion, and body position directly impact trowel pressure. Experiment with different grips and techniques to find what works best for you.
Grip: A loose, relaxed grip allows better control over pressure. Try holding the trowel like a pencil, with your thumb and index finger forming a ‘C’ shape.
Arm motion: Use your whole arm, not just your wrist, for smoother strokes and consistent pressure. Keep your elbow slightly bent and move in controlled arcs.
Body positioning: Stand with your feet shoulder-width apart for stability. Bend at the hips and knees to maintain a comfortable working height, keeping your back straight.
Timing Basics: Setting, Floating, and Finishing Windows
Understand the stages from initial set to final finish so you work in the right window. The material’s plastic state will dictate when you can float or start burnishing without pulling away or creating marks. Working at the wrong stage invites rework and a tougher finish.
Rely on cues like touch, stiffness, and a slight set in the surface rather than clocks or charts. When in doubt, test a small area to confirm the surface response before moving on to a larger patch.
Recognizing set stages by visual and tactile cues
The plaster’s setting process is crucial. You need to recognize its stages to work at the right time.
Primary Set: The surface starts to lose its gloss, becoming matt. It’s still soft but resists tool pressure slightly. Don’t rush; let it set further.
Touch Set: The plaster feels firm to touch, like fresh bread dough. It leaves a slight impression under light finger pressure. Now you can start floating or finishing.
When to float versus when to trowel for finish
The plaster needs leveling before refining. Here’s how:
First, float. Use a wide-bladed trowel (6-8 inches) to spread and level the plaster. Work quickly but gently, using light pressure.
Once leveled, let it set further until it feels like damp cardboard. Then, trowel/finish. Use a smaller trowel (4-6 inches) with a sharp edge for smooth, even strokes to refine the surface.
Adjusting timing for temperature and humidity
Temperature and humidity affect plaster setting. Here’s how to adapt:
Hot or Dry Conditions: Work early, late, or in the shade. Add a little more water to your mix (but not too much). Follow manufacturer guidance.
Cold or Wet Conditions: Keep the area warm and dry. Use less water in your mix. Again, check with the manufacturer for product-specific advice.
Plaster Mix and Substrate Effects on Pressure and Timing
Mix consistency and aggregate size affect how the plaster carries and compresses under the trowel. A stiffer mix holds shape better but requires careful pressure control to avoid hollow spots. A looser mix can feather in but needs gentler handling to prevent sagging.
Substrate porosity changes how quickly moisture moves and how long you have to work. Test a small area first to dial in pressure and timing based on the actual conditions of your wall. Always check the product instructions for any substrate notes or limitations.
Achieving the right mix consistency
The consistency of your plaster mix directly affects how smoothly you can apply it and the final finish. Too thick, and your trowel won’t glide easily; too thin, and it’ll be hard to build up a smooth surface.
Workability is key. It’s when the mix holds together but isn’t so stiff that you’re fighting it. Start with manufacturer recommendations for water-to-plaster ratio, then adjust by small increments until you get it right.
Don’t guess proportions. Do trial mixes on a scrap board or in a bucket to see how it behaves before slapping it onto your wall. Remember, consistency also affects setting times, so keep that in mind too.
Preparing different substrates (concrete, drywall, lath, lime)
Each substrate has its own quirks. Concrete sucks up moisture fast; drywall needs a seal first; lath needs to be secure and clean; lime plasters set quick.
Concrete: Apply a mist of water first to slow absorption. Use medium pressure, but not so much you push through to the concrete. Timing’s crucial – don’t let it set too fast.
Drywall: Seal with primer or PVA before applying plaster. Use light pressure and work quickly as it sets slower on drywall.
Lath: Ensure laths are secure, clean, and free of rust. Apply a thin first coat (scratch coat) to fill gaps, then follow up with regular coats using medium pressure.
Using retarders, accelerators, and bonding agents
Admixtures like retarders, accelerators, and bonding agents can help you control setting times and improve adhesion. But use them wisely – too much can mess with your finish.
Retarders slow down setting time, giving you more working time. Use when it’s hot or if your mix is setting too fast. Follow manufacturer instructions to avoid over-retarding.
Accelerators speed up setting. Use in cold weather or when you need a quick turnaround. Be careful not to rush the set – it can weaken the finish.
Bonding agents improve adhesion, especially on difficult surfaces like concrete. Apply a mist first, then use light pressure to ensure good contact with the substrate. Don’t overdo it; too much can cause delamination.
Step-by-Step Technique for a Smooth Finish
Start with a light, even coat to establish a base level and anchor the finish. Use steady, moderate pressure and keep the blade at a consistent angle to avoid gouges. Move in uniform passes to prevent ridges and pinholes.
As you progress, adjust pressure to feather transitions and fill any low spots. Finish with a burnish pass, applying just enough pressure to compress the surface without smearing the sheen. Keep the motion smooth and continuous for best results.
Step-by-Step Process
Follow this clear, numbered sequence to achieve a smooth plaster finish. It starts with preparation and safety checks, then moves on to the main work, and finally ends with cleanup or final checks.
- Prepare your workspace: Clear the area, ensure proper ventilation, and cover nearby surfaces to protect them from dust and debris.
- Check substrate readiness: Ensure your surface is clean, dry, and primed (if necessary) before applying plaster. Refer back to Plaster Mix and Substrate Effects on Pressure and Timing for details.
- Mix plaster: Follow the manufacturer’s instructions to achieve the right mix consistency. Remember, a consistent mix ensures better adhesion and finish.
- Apply base coat: Spread the mixed plaster evenly using your trowel. Use moderate pressure to compact the material without over-working it. We’ll cover this in more detail later.
- Let it set: Allow the plaster to set according to its stage, as discussed in Timing Basics. Be patient; rushing can lead to an uneven finish or weak adhesion.
- Float and trowel: Once the plaster has set enough, use a float to remove high spots and create a uniform plane. Then, apply final trowel strokes for a smooth finish. We’ll dive into these steps later in this section.
- Clean up: After finishing, clean your tools thoroughly to prevent dried plaster from causing damage or making future jobs more difficult.
- Final checks: Inspect your work for any missed spots or areas that need touch-ups. Make sure the surface is even and free of defects before moving on to painting or other finish work.
Applying and leveling the base coat
Laying on a proper base coat is crucial for achieving a smooth final finish. Here’s how to do it right.
Start by dipping your trowel into the plaster mix, then spread it evenly onto the substrate using moderate pressure. Be sure to maintain a consistent thickness across the entire surface. Too thin, and you’ll have weak adhesion; too thick, and you’ll struggle with the final finish.
Use your straight edge or guide to screed the plaster, controlling its thickness and ensuring an even plane. Apply just enough pressure to compact the material without over-working it. Overworking can lead to a weak base coat that’s prone to cracking or delamination.
Remember, the key here is consistency – in thickness, pressure, and coverage. This will give you the best chance at achieving a smooth final finish.
Floating to close the surface
Floating is an essential step that helps create a uniform plane and removes high spots. Here’s how to do it right.
Wait until the plaster has set enough to support your weight without leaving footprints or causing damage. Then, use a float trowel with a smooth, even motion to remove any high spots or ridges. Apply light pressure – too much can cause the surface to become concave or wavy.
Work in small sections at a time, using long, steady strokes that cover the entire area evenly. This helps minimize ridging and ensures a consistent finish. Remember, floating is about evening out the surface, not adding more plaster.
Pro Tip: If you notice any ridges or uneven spots after floating, wait for the plaster to set further, then use a damp sponge to gently smooth them out before moving on to troweling.
Final trowel and burnish technique
The final trowel and burnish technique is where you’ll achieve that smooth, even sheen. Here’s how to do it right.
Wait until the plaster has set enough to support your weight without causing damage. Then, use a steel trowel with a smooth, even motion to apply final strokes. Start with light pressure, then gradually increase as the plaster sets further. This helps create an even sheen without leaving trowel marks.
Work in small sections at a time, using long, steady strokes that cover the entire area evenly. As you work, use polishing motions to help achieve that smooth, even finish. Remember, the goal here is to compress the plaster and bring it to a smooth, hard surface.
Pro Tip: If you notice any trowel marks or uneven spots after your final pass, wait for the plaster to set further, then use a damp sponge to gently smooth them out. If necessary, apply a thin skim coat of plaster and repeat the process.
Troubleshooting Common Finish Problems
Trowel marks usually come from uneven pressure or overworking the surface. Lighten the contact in those areas and rework with long, smooth strokes. Cracking may indicate too-fast drying or excessive tension; back up moisture and rework with softer passes.
Blisters and an uneven sheen point to moisture pockets or improper curing. Adjust time between coats and check ventilation and humidity. Prevent these by testing, patching small areas, and refining your technique before tackling the full surface.
Identifying causes of surface defects
Surface defects can be a real pain, but understanding their cause is the first step to fixing them. Let’s match some common problems with their likely culprits.
Trowel marks often happen when you trowel too early, before the plaster has set properly. You’ll see these as lines or swirls on your surface.
Cracking can be due to excessive pressure during troweling, or it might indicate that your substrate wasn’t prepared well enough. Blisters usually mean there’s something under your plaster that shouldn’t be there – like trapped air or moisture.
An uneven sheen could be caused by inconsistent mix, or it might be due to temperature and humidity fluctuations. Remember, these are just the most common issues. Always check your work area for any other potential problems.
Practical fixes: patching, re-floating, and recoat strategies
Don’t worry if you spot a problem after the fact. There are ways to fix it without starting from scratch.
For small defects, like trowel marks or minor cracking, sanding can help smooth things out. Just make sure your plaster is fully set first. For larger issues, you might need to remove and reapply the affected area. Make sure to feather the edges of your patch so it blends seamlessly with the rest of your surface.
If your problem is more about sheen than structure, a recoat might do the trick. But remember, this only works if your original plaster is still in good condition. Always check for underlying issues before you start applying new coats.
When to call a professional
While DIY is great, there are times when it’s best to leave things to the pros. Knowing when to call for help can save you time, money, and a lot of stress.
If you’re seeing large areas of delamination or structural cracking, that’s a sign of serious trouble. These issues could indicate a problem with your substrate, or they might be due to water damage. Either way, it’s time to call in an expert.
Before you make that call, though, document everything. Take pictures of the affected areas, note down any environmental conditions, and keep records of what products you used. This information can help your pro diagnose the problem faster and give you a more accurate estimate.
Visual Checkpoints and Quality Control
Look for a uniform texture and consistent reflectivity across the entire surface. Run a light hand over the wall to feel for flatness and absence of tooling marks. Use a straight edge to confirm no high or low spots are visible.
Conduct simple on-site tests, such as a light wipe and a visual inspection under angled light, before painting or sealing. If anything looks off, rework in the same session rather than letting it cure and risk permanent defects.
Surface sheen, touch, and straightedge checks
Before painting or sealing, use this checklist to ensure a smooth finish.
- Glare test: Inspect at different angles. Glossy spots indicate high areas.
- Fingertip feel: Run your fingers over the surface. Bumps or rough patches need attention.
- Straightedge check: Use a level or straight edge to find low or high spots.
- Cracks: Look for fine cracks, especially at corners and edges.
- Pinholes: Small voids in the surface can show up as tiny holes.
- Orange peel texture: Irregular, dimpled surface indicates air bubbles or improper troweling.
- Sagging: Check for areas where plaster has settled too much, creating low spots.
- Missed spots: Ensure no areas were missed during the final trowel pass.
Quick rule: If in doubt, recheck with a different lighting angle or after letting your eyes adjust.
Light-angle inspection and repaired-area blending
Inspect the finish under various light conditions to catch any missed flaws and ensure repairs blend well.
- Lighting angles: Inspect at 45-degree angles to the surface. This reveals imperfections not visible from straight on.
- Distance: Check from a few feet away, then up close. Different distances show different defects.
- Repair blending: Ensure repaired areas match surrounding sheen and texture by using the same troweling technique and light angles for inspection.
- Color variation: Check that repairs blend with the rest of the surface. If not, consider spot priming before painting.
- Texture variation: Ensure repaired areas have the same texture as the surrounding finish.
Quick rule: Always inspect from multiple angles and distances to catch all defects.
When to sand versus recoat
Use this decision guide to choose the right fix for surface flaws before painting or sealing.
- Sanding: For fine scratches, light orange peel, or minor imperfections. Sand lightly with 220-grit paper after the plaster has cured.
- Spot repair: For small defects like pinholes or hairline cracks. Reapply a small amount of plaster and trowel smooth.
- Full recoat: For deep scratches, sagging, or large areas with imperfections. Apply a new base coat and follow the same finishing process.
- Curing time: Always follow recommended curing times before sanding, spot repairing, or recoating to avoid damaging the surface.
Quick rule: If in doubt, opt for a full recoat. It’s better to do more work than to leave visible defects.
Conclusion
Keep safety at the front and your finish will last. A smooth look comes from steady technique, proper timing, and solid substrate preparation, not luck or force.
Check this path as you go: confirm the surface is clean and damp, mix to the right consistency, set up your tools, test trowel pressure on a scrap area, apply a light setting coat, float to the right level, finish within the window, and monitor curing conditions. Work in small, controlled sections and measure progress against the checkpoints you already established in the guide.
Common mistakes to avoid are overworking the plaster, using too much pressure or pressure in the wrong phase, and skipping the surface test or the drying cues. Safety rules are simple: wear eye protection and a dust mask, keep tools well maintained, work with good ventilation, and never rush through the setting window. If you see cracking, persistent dusting, or a substrate that feels unstable, pause and reassess before continuing.
If the area is large, the substrate is questionable, or moisture is involved, it’s wise to call a professional rather than forcing a DIY fix. Stay practical, stay patient, and you’ll finish strong with a durable, smooth finish you can trust.
FAQ
How do I know I’m applying the right trowel pressure for a smooth finish?
Start with light, steady pressure and let the plaster set a bit before smoothing. If it drags or pulls, ease up and let it stiffen a touch. Check the product label or manufacturer instructions for any specific guidance on pressure.
What are reliable timing cues between steps during plastering?
Watch for a skin to form on the surface before the next pass. If the surface looks dull or starts to pull away, give it more set time. Environmental conditions and mix can change timing, so verify with the material’s instructions.
How do I fix a rough spot after the first pass?
Dampen the area lightly and rework with fresh, light pressure to feather the edges. Don’t overwork or you’ll burnish the surface and create more issues. If in doubt, refer to the plaster manufacturer’s guidelines for rework methods.
What should I inspect before the final pass?
Check for uniform thickness and remove any tool chatter or ridges. Make sure corners and edges are clean, then perform a final light pass to bloom a smooth surface. If you see any questionable spots, confirm with the product instructions or local guidance before finishing.