

Introduction
Concrete burn marks from steel trowels are surface defects caused by working the slab too long or with too much pressure while the surface is still finishing; to avoid them, match your troweling timing and hand pressure to the concrete’s set and follow good finishing technique. This means watching the slab, feeling the surface, and easing off if the paste starts to smear or darken. If you’re unsure when the mix is ready, check the product label or manufacturer instructions and use conservative timing until you gain experience.
Control pressure by keeping trowel blades flat and using light, even passes instead of heavy scraping, and stop if the surface shows sheen changes or white powderiness. Practice on a small test pad or an inconspicuous corner to get a feel for timing and force before finishing the whole slab. When in doubt, slow down, reduce pressure, and let the slab firm up a bit more rather than trying to force a smooth finish.
Key takeaways
- Understand burn marks: firm surface distress from overworked or high-bleeding mixes.
- Time trowel introduction correctly: wait until surface holds sheen but isn’t tearing.
- Pressure control: use light, consistent pressure; avoid sliding aggressively across the surface.
- Finishing workflow: minimize rework by aligning placement, finishing, and cure steps.
- Mix and cure factors: aggregate size, water, and curing affect burn susceptibility; follow label.
- On-site corrections and safety: wear PPE; patch or grind burns after initial cure per instructions.
Table of Contents
- Introduction
- Key takeaways
- What Concrete “Burn” Marks Are and How They Form
- Timing: When to Introduce the Steel Trowel
- Pressure and Technique: Controlling Force to Prevent Burns
- Concrete Placement and Finishing Workflow to Reduce Overworking
- Mix Design and Curing Factors That Affect Susceptibility to Burns
- Preventing and Correcting Burn Marks on-Site
- Tools, Materials Checklist and Safety Considerations
- Cost, Scheduling, Common Mistakes and a Visual QA Checklist
- Conclusion
- FAQ
What Concrete “Burn” Marks Are and How They Form
Burn marks are drag or smear patterns created when a steel trowel rides too hard or too soon over the cement paste, leaving a denser, shinier line or haze that contrasts with the surrounding surface.
Excessive friction and localized heat from aggressive troweling compress and smear the paste, changing surface density and sometimes exposing or burying aggregate; mix factors and timing make that worse. To distinguish burns from stains, efflorescence, or abrasion look for directional smear, uniform sheen variation, and tactile differences when damp; when in doubt check product data sheets or manufacturer guidance and run simple moisture and scratch tests on a small area.
The mechanics of burn formation
Burn marks on concrete are caused by excessive friction and heat generated from aggressive troweling. Here’s how it happens:
Repeated passes with a steel trowel create friction, which generates heat. This heat causes the cement paste at the surface to set faster than intended, creating a thin layer of denser, harder material.
The trowel also smears fine particles and water towards the surface, further altering the composition of the top layer. This combination of heat, density change, and paste smearing results in dark, translucent patches that resist polishing.
Visual and tactile signs to distinguish burns from other defects
Burn marks can sometimes be confused with other surface issues. Here’s how to tell them apart:
Appearance: Burns appear as dark, translucent patches that may have a slight sheen. They are usually consistent in size and shape, following the path of the trowel.
Texture: Tactile inspection can help too. Burns feel harder than the surrounding concrete due to the denser surface layer. Run your fingers over the surface; burns will feel smoother and more resistant to indentation.
Field checks: Perform a quick moisture check using a non-contact moisture meter. Burns should show lower moisture content than the rest of the slab, as they’ve been ‘cooked’ by the heat. Also, try polishing a small area with a concrete polisher. Burns will resist polishing and may even darken further.
Timing: When to Introduce the Steel Trowel
Introducing the steel trowel at the right moment is about surface readiness, not a clock: follow placement, screeding, and bullfloating until bleed water is managed and the surface shows the correct sheen and firmness for troweling. Use touch tests—fingerprint, slight pull with a flat blade, or a skim-coat feel—and compare with manufacturer instructions for the finish material.
Ambient conditions, mix slump, and admixtures change how quickly that readiness arrives, so check slab temperature and moisture rather than relying on a set time. If tests show tacky paste or visible bleed, delay steel troweling, continue light floating, or re-float until the surface firms to reduce burn risk.
Surface Readiness Cues to Watch For
Before you grab that steel trowel, check these signs. They tell you when your concrete’s ready for its final finish.
First, look for the loss of sheen. That glossy surface means there’s still moisture moving around. You want it to look more matte.
Next, feel the surface. It should be firm, not soft or squishy. A simple firmness test with your thumb can tell you this. No indentation means it’s ready.
Check for bleed water too. If there’s none, that’s a good sign. And do the fingerprint test. Lightly press your finger on the surface. If it leaves no mark, you’re good to go.
How Environmental Conditions Change the Timing
The weather plays a big role in how fast your concrete sets. Keep an eye on these factors.
Temperature is key. Warmer days speed up setting. Hotter than 85°F (29°C), and you might need to adjust your schedule or add retarding admixtures.
Humidity matters too. High humidity can slow down the process, but it also means more moisture in the air that could cause issues later if not managed right.
Wind and sun can dry out the surface too fast, leading to cracks. So, monitor these conditions and adjust your timing accordingly. Don’t just go by the clock; check for moisture and set regularly.
Pressure and Technique: Controlling Force to Prevent Burns
Start troweling with very light contact to set the surface and only increase pressure incrementally as the paste firms; avoid sustained high-pressure passes that generate heat and smear the paste. Maintain a consistent blade angle and keep strokes smooth and continuous—stopping and rocking in one spot concentrates friction and causes burns.
Match pass timing to surface condition: monitor sheen, bleed, and firmness between passes and allow short rest periods if the slab is warming or the paste remains soft. If you see gloss lines or smear beginning, reduce pressure immediately, switch to a softer float, or delay further steel trowel work until conditions improve.
Hand-trowel techniques and pressure cues
Start with a light touch, barely grazing the surface. This sets the concrete without applying too much force.
Feel for resistance as you trowel. If it becomes too easy to push the blade, you’re using too much pressure. Back off.
Watch for shiny streaks or rapid color change. These are signs of excessive heat and high pressure. Slow down and lighten up.
Power trowel operation and settings to reduce risk
Start with a shallow blade pitch. This distributes pressure evenly and avoids deep grooving.
Control your rpm. Too fast can cause excessive heat. Too slow may not smooth the surface properly.
Make overlapping passes, not long, stationary ones. This prevents dwell marks and heat buildup.
Follow manufacturer guidance. They know their machines best. Don’t ignore their advice on blade downforce and pass duration.
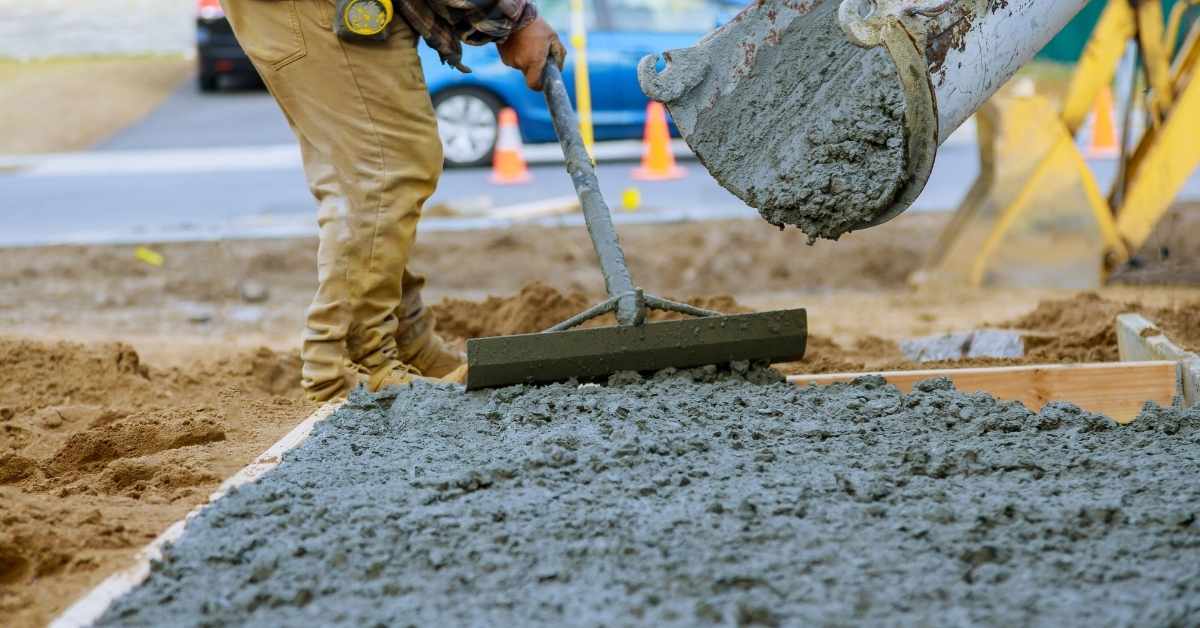
Concrete Placement and Finishing Workflow to Reduce Overworking
Organize placement, consolidation, screeding, bullfloating, and finishing as a coordinated workflow with clear handoffs so each area gets the minimum effective passes—this prevents repeated finishing of the same spot. Assign roles and timing cues so crews move methodically across zones and avoid re-troweling already finished patches.
Plan finishing zones and sequence joints so you don’t chase set times and overwork edges; use single-pass or minimal-pass strategies and staggered finishing to limit repeat contact. Monitor slump, bleed and slab temperature during placement and adjust tool choice and pass speed accordingly to keep finishing consistent and reduce burn risk.
Consolidation and Screeding Best Practices
Proper consolidation is key to avoiding burn marks. Use a vibrator to remove air pockets as you pour.
Screed accurately to level the surface. This reduces the need for aggressive troweling later.
Don’t rush these steps. Take time to ensure a solid, even base.
Bullfloating and Edging Strategies
Bullfloat soon after screeding. This removes excess water (bleed) and creates a smooth surface.
Edge the slab to remove any high spots that could cause burn marks when troweling.
Timely bullfloating and correct edging ensure your final trowel passes are light, brief, and burn-free.
Mix Design and Curing Factors That Affect Susceptibility to Burns
Surface paste softness and the risk of burn marks are closely tied to mix proportions and admixtures: higher water content or certain workability-enhancers can leave a softer paste that smears under steel. Check the mix design and product data sheets for water-cement tendencies and admixture effects before planning final troweling timing.
Curing regime—temperature, humidity, and duration—changes how quickly the surface hardens and therefore how tolerant it is of trowel pressure; inadequate moisture retention or hot, dry conditions accelerate surface drying and can increase burn risk. If the slab is curing faster or slower than expected, adjust finishing timing and pressure, or modify curing practices to protect the surface before aggressive steel troweling.
What to check in the mix and what adjustments help
The mix design plays a crucial role in preventing concrete burn marks. Check these factors when your mix arrives on-site.
- Water-Cement Ratio: Too much water makes the surface paste soft, prone to burns. Aim for a balanced w/c ratio (0.45-0.6).
- Admixtures: Retarders slow set time, plasticizers improve workability, air-entraining agents protect against freeze-thaw damage. Check their types and dosages.
- Aggregate Content: Too much fine aggregate exposes more paste at the surface, increasing burn risk.
- Workability:</ Slump test indicates workability. Low slump may cause overworking, high slump might lead to excessive bleeding and segregation.
- Consult Design Specs: Check if mix proportions match design specs or supplier guidance.
- Check for Segregation: Inconsistent aggregate distribution can lead to weak spots and burns. Stir the concrete before use if necessary.
- Temperature: Concrete sets faster in hot weather, increasing burn risk. Adjust admixtures or timing accordingly.
- Cement Type: Different cement types set at different rates. Check your cement’s properties to adjust finishing times.
Quick rule: Balanced mix design and proper adjustment of admixtures can significantly reduce burn risk.
Curing practices and their role in surface readiness
Proper curing is vital for concrete strength development and preventing burns. Here’s how to manage your curing regime.
Moisture Retention: Keep the surface moist during curing to allow proper hydration of the cement paste. Use wet burlap, plastic sheets, or sprinklers as needed.
Temperature Control: Concrete cures best between 50-90°F (10-32°C). Insulate or heat cure if necessary in cold weather.
Cure Duration: Curing should continue until the concrete reaches at least 70% of its design strength. Use maturity meters or moisture tests to monitor progress.
Timing of Finishing: Finish only when the surface is hard enough (around 5,000 psi) and no longer leaves marks from a light touch. Be patient; rushing finishing can cause burns.
Preventing and Correcting Burn Marks on-Site
Stop finishing as soon as directional gloss lines, smear, or a different surface feel appears; assess severity by testing whether the flaw is a surface haze or a deeper density change, and then decide on immediate mitigation. Immediate steps include backing off pressure, switching to a softer float or broom finish, or delaying the next pass until the surface firms.
If a burn has already developed, corrective options range from light grinding or targeted removal of the affected layer to feathering and skim-coating, depending on depth and finish intent. For widespread or deep burns, document conditions and consult a specialist—check the mix paperwork and curing records before attempting large-scale remediation.
Immediate actions if burning is detected during finishing
If you spot burn marks while troweling, stop immediately to prevent them from worsening.
Lightly re-float the affected area with a magnesium float or a soft-bristled broom. This helps distribute the concrete and remove any excess water that might be causing the burn.
Monitor the surface for signs of rehardening. Once it’s firm but not yet hard, you can resume troweling. Be extra careful around those areas to avoid further burns.
Post-installation correction options and limitations
If burn marks appear after the concrete has set, you’ll need to address them through corrective measures. Keep in mind that some burns may be permanent without significant removal.
Mechanical removal or grinding can help eliminate minor surface burns. For deeper gouges, you might need to remove the affected layer entirely and patch it with fresh concrete.
For polished finishes, a re-polishing plan may be necessary after repairs. However, extensive or deep burns might require professional intervention as they could indicate structural issues.
Tools, Materials Checklist and Safety Considerations
Prepare hand and power trowels in the right sizes, check blade edges for flatness and burrs, and have softer floats and abrasives available so you can switch tools if the surface shows early smearing. Keep moisture meters, straightedges, and a simple tactile checklist on hand to verify surface readiness before you introduce steel blades.
Use appropriate PPE—gloves, eye protection, respirator or dust mask for grinding, hearing protection for power trowels, and sturdy boots—and follow basic power-tool safety and cord management practices. Do a pre-use tool check each shift (blade condition, lubrication, electrical cords) and replace or service blades that are nicked or dull to reduce the temptation to over-press and create burns.
Trowel Blade Selection and Maintenance Tips
Inspect your trowel blades before each use to ensure they’re in optimal condition for a smooth, burn-free finish.
- Check blade sharpness: Dull blades cause more friction, leading to burns. Use a file or grinder to sharpen if needed.
- Inspect blade flatness: Warped blades apply uneven pressure, causing marks. Replace warped blades promptly.
- Remove burrs: Small metal fragments can cause pits in the concrete. Remove with a file or grinder.
- Lubricate gearbox (power trowels): Regular lubrication reduces wear and tear, preventing blade wobble that causes burns.
- Check power cord (power trowels): Inspect for frays or damage to prevent electrical hazards and maintain consistent power supply.
- Use appropriate blade type: Cast blades are better for initial passes, while float blades smooth the final surface. Use each at the right time.
- Replace worn-out blades: Worn blades cause more friction and apply uneven pressure, leading to burns. Replace when needed.
- Clean blades after use: Remove concrete residue to prevent buildup that dulls edges and causes marks.
Quick rule: Regular blade inspection and maintenance ensure consistent finish quality and reduce burn risk.
Safety and Ergonomics When Controlling Pressure
Follow these safety and ergonomic guidelines to maintain consistent trowel pressure, prevent burns, and keep your crew safe.
- Wear appropriate PPE: Gloves protect hands from concrete and vibration; eye protection shields from debris; hearing protection reduces noise exposure; boots provide traction and toe protection.
- Maintain proper posture: Stand with knees slightly bent, back straight, and trowel at a 45-degree angle to the surface. This reduces strain and maintains consistent pressure.
- Rotate crew members: Regularly switch operators to prevent fatigue that can lead to overpressure and burns.
- Use lockout/tagout (power trowels): Ensure power tools are safely locked out before maintenance or blade changes to prevent accidental start-up.
- Manage cords (power trowels): Keep cords away from work area to prevent tripping hazards and maintain consistent trowel movement.
- Use fall protection (where applicable):Check moisture content: Use a moisture meter to ensure concrete is within the optimal range (4-6%) before troweling to prevent burns.
- Test flatness (straightedge): Check for high or low spots with a straightedge. Trowel only when surface is flat enough to prevent overworking and burning.
Quick rule: Prioritize safety, proper technique, and crew rotation to maintain consistent trowel pressure and reduce burn risk.
Cost, Scheduling, Common Mistakes and a Visual QA Checklist
Burn-related rework extends schedule and adds labor and materials; catching issues early reduces downstream cost and disruption, so build inspection steps into your schedule. Track and photograph suspect areas, and note environmental and mix conditions when defects appear to justify any schedule changes.
Common mistakes include using steel too early, excessive pressure, overworking the same area, and ignoring inconsistent moisture; each raises burn risk and should be in your crew briefings. Use a quick visual QA checklist—look for sheen changes, streaks, pinholes, or tire-track patterns—and pause work if any appear, then follow a documented decision path to delay, retool, or remediate with minimal impact.
Typical mistakes that lead to burns and how to prevent them
Before you start troweling, check for these common mistakes to avoid burn marks.
- Premature steel-trowel use: Wait until bleed water has evaporated. Using a steel trowel too early can cause burns.
- Excessive pressure: Apply even, steady pressure. Too much force can cause burns and damage the surface.
- Overworking: Don’t over-trowel. Each pass should be smooth and even; extra passes can lead to burns.
- Inconsistent moisture: Ensure consistent water content in your mix. Insufficient or excessive water can cause burns.
- Rushing transitions: Allow time for proper curing between passes. Rushing can trap moisture and cause burns.
- Ignoring bleed: Let bleed water rise to the surface naturally. Skipping this step can lead to trapped moisture and burns.
- Poor coordination: Ensure all crew members are on the same page. Mismatched efforts can cause inconsistent results and burns.
Quick rule: Prevention is key. Train your crew, follow best practices, and inspect regularly to catch issues early.
Visual checkpoints and a quick on-site QA checklist
Before each finishing pass, use this visual checklist to ensure your concrete is ready.
- Surface sheen: Check for shiny streaks. These indicate trapped moisture and potential burns.
- Color uniformity: Ensure the surface color is even. Uneven color can indicate inconsistent curing or mixing.
- Micro-cracks: Look for fine cracks. These can widen over time, leading to structural issues and unsightly appearance.
- Pinholes: Check for small holes. Pinholes can indicate trapped air or improper curing.
- Tire-tracks patterns: Inspect for clear tire-track patterns. These can indicate overworking or premature troweling.
Quick rule: Document conditions before each finishing pass. This helps track progress and catch issues early.
Conclusion
Finishing concrete without burn marks comes from getting the timing right, using the right amount of pressure, and sticking to a solid workflow that protects the surface and your investment. When you control these factors, you get durability, a uniform look, and fewer costly fixes down the line.
Check your plan and proceed in logical steps: confirm the placement order and curing status, wait for the surface to reach the right drag before a steel trowel, use a light, steady pressure and short passes, test a small area first and compare to your QA checklist, and only move to the next task when the surface reads clean and smooth, then document what worked for future projects.
Avoid these mistakes: rushing the timing, pressing too hard or dragging the trowel across fresh concrete, and overworking the surface that creates heat and burns. Always wear proper safety gear, test a small patch first, and keep dispersion and moisture in check to prevent issues from forming or worsening.
If the project is large, if you’re unsure about mix design or curing factors, or you still see burn marks after fixes, call a professional for a quick assessment. Stay disciplined, stay safe, and you’ll end up with a strong, even finish that lasts.
FAQ
What causes concrete burn marks, and how do they show up on a surface?
Burn marks are shiny, overly hard patches caused by overworking the surface with a steel trowel. They usually appear where the concrete is exposed to too much friction or heat from prolonged finishing, especially as it starts to set.
When is the right time to bring in the steel trowel to avoid burns?
Start troweling only after the bleed water has mostly disappeared and the surface has stiffened a bit. If you can press with a gloved finger and leave a slight mark, you’re closer to the right window. Don’t rush it—timing varies with mix, temperature, and humidity.
How can I control pressure to prevent burn marks without leaving the surface rough?
Use light, even pressure and avoid dragging the trowel across the same spot. Work in small, systematic passes and lift the blade frequently to avoid dragging heat into one area. When in doubt, back off and go over with a lighter touch rather than pushing harder.
What mix/design or finishing tweaks help reduce surface burns in DIY pours?
A well-graded mix and proper water management help. If your mix finishes too slick or too fast, burns are likelier. Check bag or supplier notes for workability and follow any manufacturer guidance for finishing times in your weather.