

Introduction
Bold or outdated paint colors can make buyers hesitate because they expect neutral finishes.
Key takeaways
- Assess moisture intrusion before repainting; fix leaks and humidity to prevent peeling.
- Test adhesion on suspect surfaces; latex over oil issues usually require proper prep.
- Plaster walls can crumble; patch with compatible patch compounds and prime thoroughly.
- Sun-exposed exteriors may fade unevenly; choose breathable primers and UV-resistant finishes.
- Document failures: poor prep, moisture, or incorrect film thickness cause buyer concern.
- Address safety first: test for lead paint and follow local regulatory guidance.
Table of Contents
- Introduction
- Key takeaways
- Why Paint Choices Matter to Homebuyers in 2026
- Peeling Paint: Causes, Diagnosis, and Buyer Risks
- Incompatible Paint Layers: Latex over Oil and Other Mistakes
- Sun Damage, Fading, and Exterior Color Failures
- Other Common Causes & Testing Protocols (Product, Prep, and Application Errors)
- Fixes, Materials, and Step-by-Step Repair Plans for Sellers
- Safety, Lead Paint, and Regulatory Considerations
- Staging, Color Selection, and Final Touches to Attract Buyers
- Conclusion
- FAQ
Why Paint Choices Matter to Homebuyers in 2026
In 2026, buyers gravitate toward neutral, warm tones and easy to maintain finishes. Quality paint that lasts and looks fresh influences perceived value and first impressions. Color sets the flow of spaces and helps rooms feel cohesive.
Choose finishes and palettes with durability and low maintenance in mind, and check for signs of wear before listing. Poor paint condition can signal neglect and raise renovation costs in buyers’ minds. Testing color options with samples and staging visuals helps buyers picture the home and supports photography and tours.
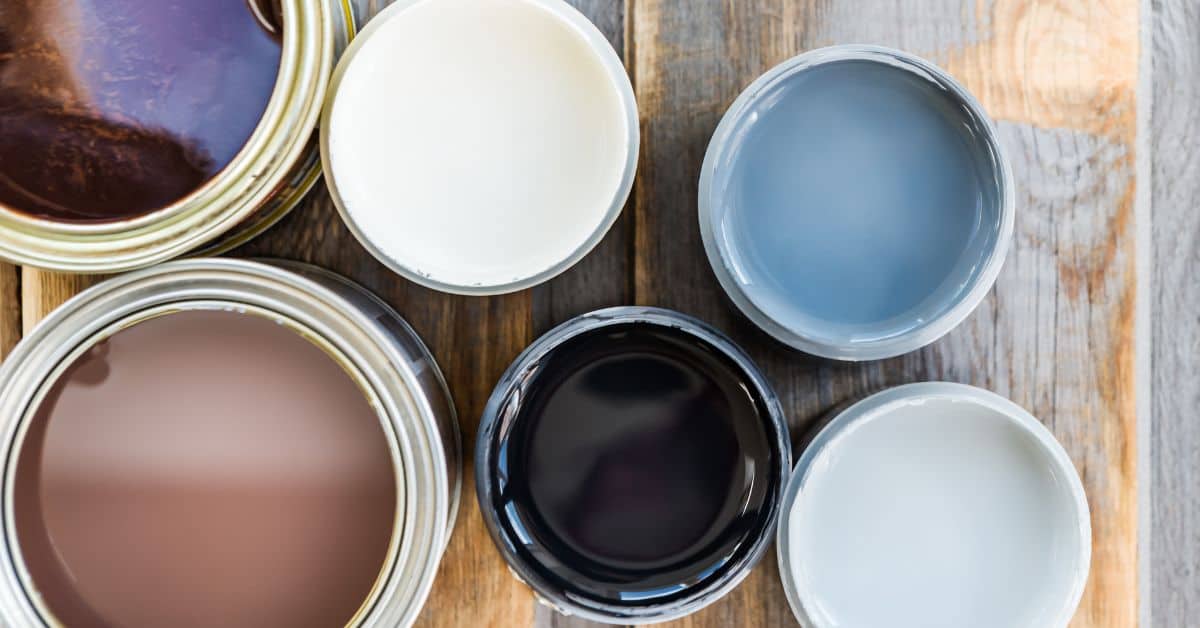
Which colors are red flags for buyers
Some colors just don’t fly with homebuyers. Overly bright hues, dated shades, or personalized choices can turn potential buyers away.
Brights and neons might be your thing, but they’re a no-no for most buyers. They’re hard to paint over and make rooms feel smaller.
Dated colors like harvest gold or avocado green are also big red flags. Buyers see them and think ’70s renovation.
Personalized choices, like bold feature walls, can be a turn-off too. Not everyone wants to live with your favorite shade of purple.
When paint condition outweighs color choice
Buyers might love the color, but if the paint’s in bad shape, they’ll walk away. Here’s why.
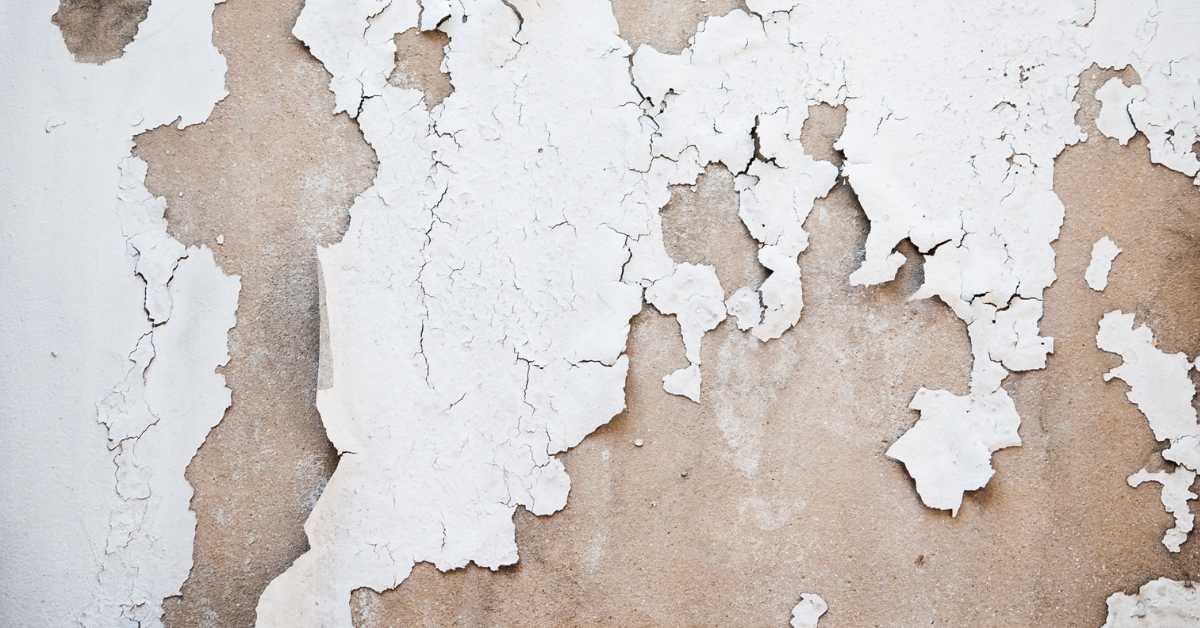
Peeling paint is a big no-no. It screams ‘neglect’ and makes buyers wonder what else you’ve been ignoring.
Stains or marks on walls can be a deal-breaker too. They make rooms look dirty and hard to clean.
Poor application, like roller marks or missed spots, shows carelessness. Buyers see it and think ‘sloppy’ workmanship.
Peeling Paint: Causes, Diagnosis, and Buyer Risks
Peeling often signals moisture intrusion, substrate issues, sun exposure, or incompatible coatings. Buyers read peeling as a potential red flag for hidden problems.
Use a simple inspection checklist to document areas prone to moisture, substrate cracking, or prior repaint history. Note signs that peeling may indicate ongoing issues that could affect value or require repairs.
Peeling due to moisture — how to spot it
Moisture-related peeling is easy to spot. Look for these signs:
Visual: Bubbles, warping, or lifting paint. Dark stains or discoloration.
Tactile: Paint feels cold and damp. Wall may feel soft or spongy.
Confirm with quick moisture tests: CaCl2 test (dab calcium chloride on suspect area, wait 15-30 min, check for moisture) or Moisture meter (penetrate surface to measure moisture content).
Peeling from hard, glossy, or slick surfaces
Glossy finishes can cause adhesion failures. Here’s how to spot it:
Paint peels off in large sheets rather than flaking. Edges lift easily with a putty knife.
Underlying surface feels hard, slick, or waxy. It might be old varnish, shellac, or waxed surfaces.
Sand lightly to check. If you can’t get good adhesion with sandpaper, you’ve got a slick substrate problem.
Peeling on plaster and older substrates
Plaster or substrate failure shows up differently than surface paint problems:
Large sections of paint peel off. Plaster may crumble or fall away with the paint.
Walls feel cold, damp, or soft. You might see cracks, efflorescence (white powder), or blisters.
Check for moisture sources first. Then, assess substrate: tap gently with a hammer (sound test). Hollow or dull sound indicates plaster failure. Use a mole gauge to measure thickness and identify weak spots.
Incompatible Paint Layers: Latex over Oil and Other Mistakes
Latex over oil or other compatibility mistakes can lead to lifting, peeling, or blistering after paint has cured. Hidden underlayers often drive this failure pattern.
Identify likely scenarios with a physical check and simple tests, then decide whether to strip or properly prime based on results and moisture context. Document findings clearly for buyers or inspectors.
How to test for oil-based undercoats safely
Before you start painting, it’s crucial to know what’s underneath. Oil-based paints can cause issues when topped with latex. Here’s how to test:
Rubbing Alcohol Test: Apply rubbing alcohol (isopropyl alcohol) to a cotton swab and rub it on the surface. If it becomes tacky or dissolves, you’ve got oil-based paint.
Acetone Test: Acetone is stronger. Use it if rubbing alcohol doesn’t work. Be careful – it can damage some surfaces. If the paint softens or lifts, it’s oil-based.
Safety First: Always wear gloves and eye protection. Do these tests in a well-ventilated area. If you’re unsure, consult a pro before proceeding.
Prep and repair options when layers are incompatible
When you find incompatible layers, you’ve got choices. Here’s how to prep:
Sanding: Lightly sand oil-based surfaces before applying latex. This creates ‘tooth’ for better adhesion.
Deglossing: Use a deglosser or sand lightly to remove shine from slick surfaces, improving primer adhesion.
Bonding Primers: These can help latex stick to oil-based surfaces. But they won’t fix moisture issues or severe peeling. If layers are lifting badly, you might need to strip and start over.
Trade-offs: Sanding and deglossing take time but are usually cheaper than stripping. Bonding primers add cost but save time. Stripping is the most labor-intensive but ensures a fresh start.
Sun Damage, Fading, and Exterior Color Failures
Sun exposure and climate accelerate color drift and cracking in vulnerable areas. Exposures and finishes interact with pigment stability and film integrity.
A practical check covers typical cracking patterns and fade signs, plus guidance on finishes best suited for sun-heavy facades and maintenance needs over time.
Visual tests and inspection points for sun-damaged paint
Before you start any repairs, use this checklist to assess the extent of sun damage during a walkthrough.
- Chalking: Gently rub your fingers over the surface. If it feels powdery or leaves marks on your fingers, chalking is present.
- Fading: Compare exposed and shaded areas. Significant color difference indicates fading.
- Brittle film: Try to bend a small area of the paint. If it cracks or flakes off, the film is brittle.
- Microcracking: Look for tiny cracks, especially around corners and edges.
- Efflorescence: Check for white, powdery deposits, which indicate moisture intrusion.
- Substrate movement: Inspect for gaps or cracks in the substrate that could be due to expansion/contraction cycles.
- Moisture intrusion signs: Look for water stains, peeling, or blistering, which can worsen sun-related failures.
- Gloss loss: Compare gloss levels between exposed and shaded areas. Significant difference indicates sun damage.
Quick rule: Skipping these checks might lead you to miss minor issues that could become major problems later on.
Product choices and fixes to prevent future sun-related peeling
To protect your home’s exterior from sun damage, choose the right products and maintain them properly.
Exterior paints: Opt for 100% acrylic latex paints with built-in UV protection. They resist fading and chalking better than other types.
UV-resistant finishes: Consider using elastomeric coatings or high-quality stains designed to withstand intense sunlight. These can help maintain color and flexibility over time.
Maintenance intervals: Inspect your home’s exterior annually, especially in sun-heavy areas. Touch up any minor issues immediately to prevent them from worsening. Repaint every 5-10 years, depending on the paint quality and local climate.
Other Common Causes & Testing Protocols (Product, Prep, and Application Errors)
Less-obvious culprits include improper primer, wrong sheen, inadequate cleaning, humidity during application, and fast-drying conditions. Each factor can affect adhesion and film quality.
Follow simple diagnostic steps to test adhesion, cleanliness, and compatibility before committing to a full coat, then document the results for future buyers.
Quick diagnostic checklist for DIY inspectors
Use this checklist when paint issues arise. It helps isolate the cause.
- Adhesion: Check if paint is peeling or flaking. Use a putty knife to gently scrape at edges.
- Moisture: Perform a simple moisture check with a hygrometer. Readings above 12% indicate excess moisture.
- Substrate: Inspect surface for cracks, holes, or rough patches. Feel for any soft spots.
- Primer: Ensure primer is compatible with substrate and paint type. Check if it’s bonding, stain-blocking, or gloss-tolerant.
- Application conditions: Note humidity, temperature, and dew point during application. Fast-drying conditions can cause issues.
- Sheen choice: Confirm sheen matches desired finish and is suitable for the surface type.
- Surface cleanliness: Check for dirt, grease, or other contaminants that could hinder adhesion.
- Wait times: Ensure adequate drying time between coats and before full application.
Quick rule: Don’t skip any checks. Each step helps pinpoint the problem.
Common misidentifications and how to avoid them
Frequent mistakes can lead to incorrect fixes. Here’s how to avoid them:
- Stains vs. peeling: Don’t mistake stains for peeling paint. Use a putty knife to check for loose edges.
- Sheen issues: Don’t assume sheen problems are due to application errors. Check if the wrong sheen was chosen.
- Moisture vs. other causes: Don’t blame all peeling on moisture. Use a hygrometer to confirm.
- Incompatible layers: Don’t assume old paint can be covered without testing for compatibility.
Always perform simple tests to confirm the root cause before fixing.
Fixes, Materials, and Step-by-Step Repair Plans for Sellers
Assess peeling or poor paint on different substrates through moisture checks and surface porosity observations. Determine whether issues are cosmetic or require structural attention.
Outline repair pathways from light touch-ups to full repaint or substrate repair, and note which products suit concrete or refinished surfaces, including primer and moisture-mitigating options.
Tools and materials checklist for DIY repairs
Before you start any repair, make sure you have these essential tools and materials to ensure a safe and effective job.
- Wire brush: To remove loose paint and prepare the surface. Skip this and your primer won’t stick.
- Scraper or putty knife: For removing large flakes of paint and applying filler.
- Sandpaper (120-grit): To smooth surfaces after filling and before painting. Without it, your paint will look uneven.
- Safety glasses: Protect your eyes from debris during sanding and scraping.
- Dust mask: Essential for protecting your lungs while sanding.
- Drop cloths or plastic sheets: To protect floors and furniture from paint spills.
- Primer (oil-based or latex, depending on existing finish): A must to ensure paint adhesion and hide old colors.
- Paint (latex for interior, oil for exterior): Choose a quality brand suitable for your surface type.
- Caulk: To fill gaps and cracks before painting. Skip this and moisture can get in, causing more peeling.
- Painter’s tape: For protecting trim and creating clean lines. Don’t rely on freehand painting; it’s hard to get right.
Quick rule: Always check your materials before starting. Running out mid-job can delay your sale.
Step-by-step: from small patch to full room repaint
Follow this sequence to ensure a buyer-ready finish, whether you’re touching up a small area or painting an entire room.
- Prep the surface: Clean, degrease, and let it dry. Any dirt left behind will cause your paint to peel prematurely.
- Inspect for damage: Check for cracks, holes, or other defects. Fill with spackling compound if necessary. Ignoring these can lead to further damage.
- Sand lightly (120-grit): To smooth the surface and help paint adhere. Don’t over-sand; you don’t want to create a dusty mess.
- Wipe clean: Remove all sanding dust with a damp cloth. Dust left behind can cause your primer to fail.
- Apply primer: Use a roller or brush, depending on the size of the area. Primer helps paint adhere and covers old colors. Don’t skip this step; it’s crucial for a good finish.
- Let primer dry (follow manufacturer’s instructions): This is usually 1-2 hours. Rushing can lead to poor adhesion.
- Paint application: Use a roller or brush, depending on the size of the area. Apply even strokes, working from top to bottom in ‘W’ or ‘M’ patterns. Don’t overload your brush or roller; it’s harder to control and can cause drips.
- Let paint dry (follow manufacturer’s instructions): This is usually 2-4 hours before touching up with a second coat. Rushing can lead to poor results.
- Inspect your work: Check for any missed spots or areas that need touch-ups. A thorough inspection ensures you won’t miss anything when potential buyers are looking.
Safety, Lead Paint, and Regulatory Considerations
Pre-1978 paint raises lead exposure concerns for children and pregnant individuals, triggering specific safety steps. Understanding the risk helps plan appropriate actions.
Discuss testing options, disclosures, and when professional remediation is required, plus safe-work practices and contractor qualifications to protect occupants.
How to test for lead and when to stop DIY
Testing for lead paint is crucial before you start any work. Here’s how:
Use an XRF non-destructive test kit. It’s like a fancy metal detector, showing you the elements in the paint. You can find these at hardware stores or online.
If it shows lead levels above 0.5%, stop. That’s when professional abatement is required. If it’s below that, test again in another spot to confirm.
For lab-based swab/soil tests, collect samples and send them off. This is more accurate but takes time. Do this if you suspect high lead levels or want a second opinion.
Environmental and disposal best practices
Safety isn’t just about you, it’s about the environment too. Here’s how to dispose of paint waste safely:
Check local regulations first. Some places have specific rules for hazardous waste.
Wear gloves and a mask when handling waste. Don’t let it run into drains or waterways.
For liquid paint, let it dry out in a sealed container before throwing it away. For solid waste like chips, wrap them tightly in plastic before disposal.
Staging, Color Selection, and Final Touches to Attract Buyers
Adopt a simple staging approach that favors universal appeal, with minimal personalization and strategically placed accents. This helps buyers envision their own life in the space.
Nail color choices by pairing neutral bases with compatible undertones, and match wall colors to common flooring and cabinetry to keep rooms coherent and bright.
Best neutral palettes and finishes for 2026 staging
The key to attracting buyers in 2026 is timeless, neutral color schemes. They let buyers envision their own style.
Start with a base of eggshell/Paris white, greige, or taupe. These neutrals work with any decor and flooring.
Consider undertones. Avoid cool blues or purples in greys, as they can feel cold. Warm undertones in beiges and browns create a cozy atmosphere.
For finishes, flat/matte works best for living spaces to hide imperfections. In kitchens and baths, use satin/eggshell for easier cleaning and better light reflection.
Final visual checkpoints before listing
Before you list your home, walk through with this checklist. It ensures a polished presentation.
- Touch-ups: Check high-traffic areas like walls near doors and hallways for scuffs or marks.
- Trim: Ensure baseboards, crown molding, and other trim are clean and intact. Touch up any nicks or scratches.
- Caulking: Inspect caulk around tubs, showers, and sinks. Replace if it’s cracked or discolored.
- Sheen consistency: Ensure all walls have the same sheen to avoid a patchwork look.
- Clean lines: Straighten any crooked pictures or wonky blinds.
- Light switches and outlets: Make sure they’re clean and work properly. Replace any that don’t.
- Doors: Check for squeaks, scratches, or peeling paint. Fix as needed.
- Windows: Ensure they open and close smoothly. Clean any dirt or grime.
Quick rule: If it’s broken, cracked, or dirty, fix it before listing. It could be a deal-breaker for buyers.

Conclusion
What buyers notice most is a durable, safe, and well‑prepared paint job that shows you cared for the home. Do the prep, test what you plan to use, and fix the problems that could hurt value or safety.
First, test a small area for adhesion and finish, confirm there are no lingering moisture or lead concerns, and choose colors that match the home’s style and climate. Then follow a simple flow: inspect the surfaces, repair peeling or incompatible coatings, apply appropriate primers, and finally recoat with the right product in the right order. Keep the work clean, dry, and controlled so you don’t trap moisture or seal in defects.
Common mistakes to avoid are skipping the proper prep, rushing through repairs, and using the wrong type of paint over old coatings. Always wear basic safety gear, ventilate the space, and test product compatibility on a hidden spot first. If you uncover lead paint, or if regulatory requirements apply, stop and consult a pro before proceeding. When you finish these steps, you’ll have a durable, attractive result that helps buyers feel confident and secure about the home’s condition.
FAQ
What moisture-related peeling should I look for, and how do I test for it?
Look for damp patches, staining, or a musty smell near peeling areas. Lightly press the surface and see if paint flakes off with a fingernail; for a clearer read, use a moisture meter if you have one or a simple dampness test kit. Don’t paint over damp walls—dry completely, fix the source, and ensure good drying time before re-coating.
Can latex over oil-based paint cause peeling, and how should I fix it?
Yes, latex over oil can peel if the old coat isn’t properly prepped. You must identify the old paint type, remove loose layers, sand smooth, and apply a bonding primer designed for latex over oil. If you’re unsure, check the product label and manufacturer instructions for compatible primers and follow the prep steps exactly.
What plaster wall issues cause adhesion problems, and how do I address them?
Crumbled edges, exposed gypsum, or dusty, powdery surfaces show plaster problems. Patch or skim with appropriate plaster or patching compound, let it cure, then prime with a primer suitable for plaster. Verify that the primer is compatible with the next coat you plan to apply, per the label.
How does sun exposure affect exterior paint, and what fixes work best?
Sunlight can fade colors and cause surface chalking, especially on south- or west-facing walls. Wash the surface to remove chalk and dirt, choose a finish with good UV resistance, and follow the manufacturer’s guidance for any recommended sealers or primers. Check the product instructions for exterior use and recoat intervals.