

Introduction
Tackling concrete surface pop-offs from rusty wire can seem daunting, but with a clear timeline and efficient steps, you can complete the repair in a single weekend. This guide walks you through the process, breaking down each task into manageable timeframes to help you stay on schedule.
Before you start, gather your tools and materials, ensuring everything is in good working order. This will save you time and frustration during the repair process.
For the full guide, see Fixing Concrete Surface Pop-Offs From Rusty Wire: Root-Cause Repair and Stain Blocking.
The Repair Timeline: From Diagnosis to Completion
Follow this timeline to fix concrete surface pop-offs from rusty wire efficiently:
- Day 1 (3-4 hours): Inspection, diagnosis, and preparation. Identify the root cause of the pop-offs, gather tools, and secure the work area.
- Day 2 (5-6 hours): Exposing corroded wire, treating rust, and preparing for patching. This includes removing loose concrete, treating the wire, and cleaning the area.
- Day 3 (4-5 hours): Patching and reinforcing the concrete, stain blocking, and finishing. Apply the patch, reinforce as needed, seal to prevent stains, and allow for curing time.
By following this timeline, you can complete your repair project in just three days, ensuring a durable, stain-free surface that lasts.
Key takeaways
Proper preparation on Day 1 sets the stage for a smooth and efficient repair process. Taking the time to inspect and diagnose the issue accurately will save you from potential setbacks later on.
- Inspect cracking edges and rusty wires to confirm root-cause before patching.
- Wear eye protection and gloves; de-energize tools and clear work area.
- Remove loose concrete fragments to prevent trapping rust and stain spread.
- Use rust-stopping treatment per manufacturer instructions and patch with compatible concrete.
- Clean stains before patching; choose a stain-blocking sealer compatible with concrete.
- Document repairs and monitor for ongoing corrosion or efflorescence after cure.
Table of Contents
- Introduction
- Key takeaways
- Understanding Surface Pop-Offs and Root Causes
- Initial Inspection and Diagnosis
- Safety, Permits, and Site Preparation
- Exposing and Assessing Corroded Wire or Rebar
- Corrosion Mitigation and Rebar Treatment
- Concrete Patching and Root-Cause Repair Techniques
- Stain Cleaning and Stain-Blocking Strategies
- Preventive Measures and Long-Term Maintenance
- Conclusion
- FAQ
Understanding Surface Pop-Offs and Root Causes
Surface pop-offs are localized delaminations or spalls where the concrete cover separates and flakes away from the underlying matrix. They often originate at embedded metal that is corroding, with rust expanding and creating tensile forces that break the bond between steel and surrounding concrete.
Explain the mechanics simply: corrosion produces oxide products and internal pressure that crack the cover, while corrosion-induced loss of cross-section weakens the reinforcement and accelerates delamination. For any specific corrosion mechanisms or chemical behavior, check product data sheets or corrosion guides from reputable sources.
What constitutes a pop-off vs. other surface defects
A concrete pop-off is a localized delamination of the surface, often with a raised edge and sometimes accompanied by spalling. It’s different from:
- Scaling: A fine powdering or flaking of the surface.
- Hairline cracks: Thin, usually non-structural cracks on the surface.
- Structural spalls: Large pieces breaking off due to structural issues.
Pop-offs feel like a bubble under your foot and look like a raised, often discolored patch.
How rusty wire or rebar creates pressure and stains
When embedded metal corrodes, it expands. This expansion pushes against the concrete, creating pressure.
The rust also attracts moisture, forming a network of pathways for staining. As corrosion continues, it can cause:
- Loss of concrete cover: The expanding rust forces the concrete to break away.
- Visible discoloration: Rust stains seep through the concrete surface.
The combination of pressure and staining leads to pop-offs.
Common contributing factors (construction, environment, concrete cover)
Several factors can accelerate the problem:
- Inadequate cover: Insufficient concrete around the metal allows faster corrosion.
- Poor consolidation: Inhomogeneous concrete allows easier access to moisture and oxygen for rusting.
- Freeze-thaw exposure: Repeated freezing and thawing can cause cracks that let in water.
- Chloride ingress: Chlorides speed up corrosion, often from de-icing salts or poor concrete mix design.
- Water migration: Moisture moving through the concrete brings oxygen to the metal, fueling rusting.
Understanding these factors helps you address the root cause of pop-offs.
Initial Inspection and Diagnosis
Start with a systematic visual map of affected areas, marking size, location, and whether staining or active cracking is present before touching the concrete. Use simple tools like a hammer for sounding, a probe for loose material, and photos to document patterns and progression over time.
Follow a step-by-step approach: record surface condition, sound suspect areas, map extent onto a sketch or photo, and note nearby drainage or penetrations that could drive corrosion. If you need limits for what to inspect or thresholds for invasive testing, refer to local standards or manufacturer’s guidance.
Visual checkpoints and mapping damaged areas
Before you start any repairs, use this checklist to document the damage. It’ll help you plan your work.
- Size of pop-offs: Measure length and width. Small (under 6″ each) are easier to fix than large ones.
- Location: Note where they are. Pop-offs near edges or joints need extra attention.
- Stain patterns: Check if stains are spreading or changing color. Darker, larger stains mean more rust.
- Proximity to joints/penetrations: Measure distance from pop-offs to nearby cracks, joints, or openings. Closer means more stress on the area.
- Cracking around pop-offs: Look for hairline cracks. They can indicate further delamination.
- Pop-off edges: Check if they’re sharp or rounded. Sharp edges mean fresh damage, while rounded ones are older.
- Pop-off depth: Gently press around the edges. If it gives, it’s delaminated and needs immediate repair.
- Number of pop-offs: Count them. More pop-offs mean a bigger problem that might need professional help.
Quick rule: The more pop-offs, the larger they are, or the closer they are to edges/joints, the more urgent the repair becomes.
Probing and non-destructive checks
Before you start poking around, use these safe methods to confirm delamination and moisture. It’ll save you time and prevent further damage.
- Tap test: Gently tap the concrete with a hammer. A dull sound indicates delamination.
- Moisture check: Use a simple moisture meter to check for excess water behind the pop-offs. Too much moisture can hinder repair.
- Delamination check: Gently probe around the edges of the pop-off with a flathead screwdriver. If it goes in easily, there’s delamination.
- Rebar exposure check: Look for exposed rebar or wire. If found, stop and consult an engineer.
- Sound test: Listen carefully while tapping. A hollow sound indicates a void behind the concrete.
- Chisel test: Gently chip away at the edge of a pop-off with a cold chisel. If it crumbles easily, there’s delamination and you’ll need to remove more concrete.
Quick rule: Always be gentle when probing. Too much force can cause further damage or even collapse.
When to consult a structural engineer
Some situations are beyond the scope of DIY repairs. Here’s when to call in a pro.
- Extensive cover loss: If more than 1/4″ of concrete cover is missing over large areas, consult an engineer.
- Exposed load-bearing reinforcement: If you see exposed rebar or wire supporting the structure, stop and call a pro.
- Adjacent structural distress: If there are cracks, leaning, or other signs of structural damage nearby, get an engineer’s opinion.
- Pop-offs near critical areas: If pop-offs are near columns, beams, or other load-bearing elements, consult a structural engineer.
- Unsure about repairs: If you’re unsure about how to fix the damage safely, it’s better to err on the side of caution and call a pro.
Quick rule: When in doubt, consult a structural engineer. It’s always better to be safe than sorry.
Safety, Permits, and Site Preparation
Prioritize personal protective equipment, dust control, and containment before any cutting, chipping, or chemical use; set up barriers to protect occupants and adjacent finishes. Consider ventilation and respiratory protection when working in confined areas or removing rust-contaminated material.
Check whether local permits or disposal rules apply to structural repairs, lead/metal-contaminated debris, or wastewater from cleaning; confirm requirements with authorities or product documentation. Lay out drop cloths, containment, and a waste plan to keep the site organized and compliant.
Personal protective equipment and hazard controls
The right gear keeps you safe. Here’s what you need:
- Respirator: Protects from dust and fumes. Use a half-face respirator with P100 filters ($25-$40).
- Safety glasses: Shields eyes from debris. Get ANSI Z87.1-rated ones (around $10).
- Gloves: Protects hands from chemicals and sharp edges. Choose rubber gloves for chemical resistance ($5-$15).
- Ear protection: Shields ears from noise. Use foam earplugs (around $5) or earmuffs ($20-$40).
- Work clothes: Wear long sleeves, pants, and sturdy boots to protect skin and feet.
Dust, debris containment, and waste disposal
Contain dust to keep it from spreading:
Plastic sheeting is your friend. Hang it around the work area using tape or weights (around $10 per 10’x25′).
Use a HEPA vacuum to clean up dust. Rent one for about $40-$60 per day.
Dispose of contaminated waste responsibly. Bag it separately and take it to your local hazardous waste facility.
Permits, code interactions, and neighbor considerations
Check with your local building department for permits. You might need one if you’re removing or altering structural elements.
Notify neighbors if work may affect them, like blocking access or creating noise. A friendly heads-up goes a long way.
Follow local codes and zoning rules. They ensure your project is safe and legal. If you’re unsure, consult a professional or your local building department.
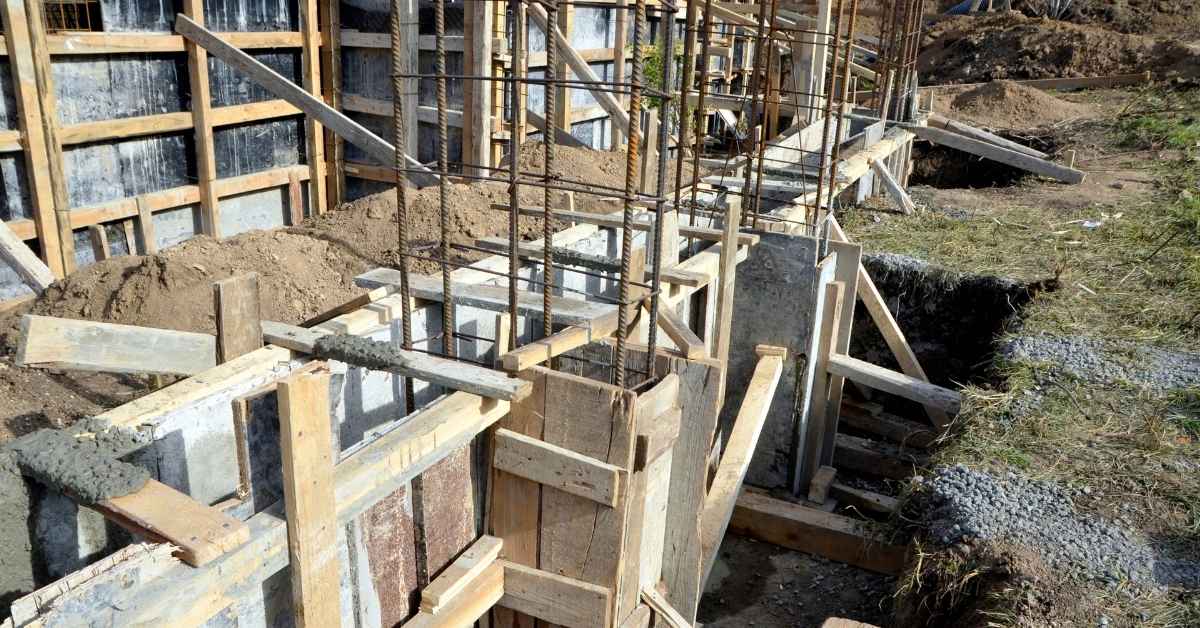
Exposing and Assessing Corroded Wire or Rebar
Remove delaminated and loose concrete in a controlled manner to fully expose the reinforcement without causing new damage to the surrounding sound concrete. Use hand tools or appropriate power tools with steady, shallow passes, and keep the cutting depth and tool selection compatible with the concrete thickness and reinforcement location.
Once exposed, clean the metal sufficiently to see the true corrosion extent and measure loss visually or with gauges if needed; document the condition before any treatment. If you must rely on product or tool limits, verify them in the manufacturer’s instructions rather than guessing removal depths or tool settings.
Controlled removal of delaminated concrete
Start by clearing the area. Use a chisel and hammer to carefully chip away loose, flaking concrete. Be patient; it’s better to take time than to damage good concrete or expose rebar too quickly.
Wear safety glasses and a dust mask. Work in small sections, no more than 1 ft² at a time. This helps maintain structural integrity and keeps dust down.
Do not use power tools like angle grinders without proper training and safety measures. They can cause overcutting and damage good concrete.
Assessing rebar condition and section loss
Once you’ve exposed the rebar, visually inspect it. Look for rust stains, pits, or cracks. These indicate corrosion.
Feel the rebar with gloved hands. If it’s rough or has sharp edges, that’s a sign of severe corrosion. Measure the diameter to check for section loss. A significant reduction (more than 20-30%) may require replacement.
Check if the rebar is still well-bonded with the concrete. Tap it gently; if it sounds hollow or moves, the bond might be compromised.
Deciding between repair, partial replacement, or full reinforcement
If corrosion is minor (less than 20% section loss) and bond is good, cleaning and protecting the rebar may suffice. Use a wire brush to remove rust, then apply an anti-corrosion coating.
For more severe cases (20-50% section loss), partial replacement might be needed. Cut out damaged sections, replace them with new rebar, and patch the concrete.
If corrosion is extensive (>50%) or bond is poor, consult a structural engineer. They may recommend full reinforcement or other solutions to ensure structural integrity.
Corrosion Mitigation and Rebar Treatment
Choose between mechanical removal of scale and rust, protective coatings, and corrosion-inhibiting treatments based on the severity observed; mechanical cleaning reveals the remaining steel profile, while chemical passivators or inhibitors reduce future activity. Prepare the surface per the chosen treatment’s directions so the product bonds and performs as intended.
When deciding among options, compare the trade-offs: mechanical cleaning plus protective coating for heavily corroded bars, or localized inhibitors for moderate surface corrosion. Always consult the treatment product label or technical data sheet for surface prep, application limits, and compatibility with repair mortars.
Mechanical cleaning methods and best practices
Before treating corrosion, you need to clean the rebar. Here are some mechanical methods:
Wire Brushing: Use a stiff wire brush to scrub off loose rust. Be gentle; don’t damage the steel.
Grinding: For heavier rust, use a grinding wheel or disc sander. Keep it moving to avoid overheating the metal.
Always wear safety gear – gloves, goggles, and a dust mask. Clean up any debris afterwards.
Chemical rust converters and inhibitors: purpose and selection
Rust converters and inhibitors are chemicals that stop corrosion. Here’s how they work:
Rust Converters: These turn rust into a stable, paintable layer. Apply after cleaning.
Inhibitors: These create a protective barrier on the metal. Use after applying a converter or directly on clean steel.
Choose products based on your climate and the specific rebar condition. Always follow safety instructions on the label.
Protective coatings and embedding mortars for treated rebar
After treating corrosion, protect the rebar with these methods:
Protective Coatings: Apply a thin layer of epoxy or zinc-rich paint to seal the steel. This prevents moisture from reaching it.
Embedding Mortars: Use a cement-based mortar with added corrosion inhibitors for rebuilding cover. This keeps the rebar isolated from oxygen and water.
Always follow manufacturer’s instructions for application and mixing. Ensure the new concrete or mortar is well-cured to provide lasting protection.
Concrete Patching and Root-Cause Repair Techniques
Select a repair mortar compatible with the existing concrete and the site conditions—adhesive properties, permeability, and thermal behavior matter for durable patches. Follow a clear application sequence: prepare the substrate, prime or bond, place repair material in lifts if required, and finish to match adjacent surfaces.
Address root causes when patching: ensure concrete cover is restored, water intrusion is stopped, and reinforcement has been treated to prevent recurrence. For exact mix selection and application details, check the repair product technical data sheet and follow manufacturer recommendations.
Choosing a compatible repair mortar and bonding agent
The first step to a successful concrete patch is choosing the right repair mortar. It should match your existing concrete’s cement chemistry, shrinkage characteristics, and porosity.
Check technical sheets for these details. Look for mortars with similar compressive strength and elastic modulus as your original concrete.
The bonding agent is crucial too. It helps the new patch stick to the old concrete. Opt for one that’s compatible with both your existing concrete and chosen mortar.
Application steps: bonding, layering, and finishing
Start by applying the bonding agent to the cleaned repair area. This primes the surface for better adhesion.
Next, place the mortar in thin layers, no more than 1-2 inches thick. This helps prevent delamination, where the new patch peels off from the old concrete over time.
Compact each layer using a vibrating poker or tamper to remove air pockets and ensure proper bonding. Then, finish the surface with a trowel or float for a smooth, even look.
Curing and managing shrinkage/cracking risks
Proper curing is vital to prevent shrinkage cracking. It allows the new concrete to gain strength gradually, without drying out too quickly.
Keep your patch hydrated by covering it with plastic sheeting or damp burlap. This retains moisture and protects the repair from harsh weather conditions.
Avoid heavy traffic or loading on the repaired area until it’s fully cured. This gives the new concrete time to gain strength and reduces the risk of cracks forming due to excessive stress.
Stain Cleaning and Stain-Blocking Strategies
Begin by removing loose rust and surface contaminants, then test stain-removal methods in an inconspicuous area to avoid damaging the substrate or surrounding finishes. Use cleaning products and techniques suitable for concrete—mechanical scrubbing, poultices, or cleaners—while following label directions and rinsing thoroughly.
After cleaning, apply a stain-blocking primer or barrier system compatible with the patch material to prevent residual iron compounds from reappearing as stains. Verify compatibility and application instructions on product technical data sheets before use, and consider testing an area to confirm stain control.
Safe cleaning techniques for rust stains on concrete
Removing rust stains from concrete safely is crucial to prevent damage to surrounding finishes and plants. Here are three methods:
Mechanical cleaning: Use a wire brush or power washer with a wide-angle nozzle to scrub the stain gently. Be careful not to damage the concrete surface.
Mild detergents: Apply a solution of mild detergent and water, let it sit for 15-30 minutes, then scrub and rinse thoroughly. Avoid using harsh chemicals that can harm plants or discolor nearby surfaces.
Chemical cleaners: Use rust removers specifically designed for concrete. Always test on a small, hidden area first to ensure they won’t damage the surface or cause discoloration. Follow manufacturer’s instructions and wear appropriate safety gear.
Choosing and applying stain-blocking primers or barriers
Stain-blocking primers or barriers prevent rust stains from reappearing after repair. Here’s how to choose and apply them:
How they work: These products create a barrier that stops moisture and staining compounds from penetrating the concrete surface.
Selection criteria: Look for products specifically designed for concrete, with good adhesion properties and suitable for your climate. Read reviews and ask for professional advice if needed.
Testing and application: Before full application, test the primer on a small, hidden area to ensure it adheres well and doesn’t cause discoloration. Apply according to manufacturer’s instructions, using a paintbrush or roller for even coverage. Allow it to dry as directed before proceeding with repairs.
Finishing and color-matching options
Achieving an acceptable visual match after repairing rust stains involves careful finishing techniques:
Feathering repairs: When applying repair mortar, feather the edges to blend it with the existing concrete. This helps create a smooth transition between the old and new surfaces.
Tinted coatings or overlays: Use tinted sealers, stains, or overlay products to match the color of your existing concrete. Test samples on a small area first to ensure an acceptable match.
Testing samples: Before applying any colored product, test it on a hidden or inconspicuous area. This allows you to assess the final appearance and make adjustments as needed before proceeding with full application.
Preventive Measures and Long-Term Maintenance
Reduce recurrence by managing water: repair leaks, ensure proper drainage, and maintain protective coverings or sealers to limit moisture reaching reinforcement. Control exposure by sealing penetrations, improving flashing, and avoiding chloride exposure from deicing salts or contaminated soils where possible.
Set up a routine inspection schedule to catch early corrosion signs and keep records of repairs, treatments, and conditions that preceded any issues. If you need inspection intervals or maintenance actions tailored to your situation, consult product guidance or local practice for recommended frequencies.
Improving drainage, waterproofing, and flashings
Water’s the root of most concrete problems. Keep it out to prevent rust and pop-offs.
Grade surfaces: Slope them away from walls to stop water pooling. A 1/4 inch drop per foot is good.
Seal flashings: Where walls meet the slab, water can seep in. Use a flexible sealant here. Don’t skip this – it’s cheap and vital.
Check gutters: Clogged or damaged gutters send water where you don’t want it. Keep them clean and in good shape.
Surface coatings, breathable membranes, and sacrificial layers
Concrete needs to breathe. Don’t seal it so tight it can’t.
Pros of surface systems: They protect from sunlight, rain, and de-icing salts. Some even hide stains.
Cons and breathability: Non-breathable coatings trap moisture. This causes problems later. Choose breathable options where water moves through the slab.
Sacrificial layers: These wear out over time, protecting the concrete beneath. They’re great for areas with heavy traffic or exposure to harsh chemicals.
Inspection schedule and early intervention tips
Regular checks catch problems early. Here’s a simple framework:
- Spring: Check for cracks, signs of rust, and any damage from winter.
- Summer: Look for scaling, pop-offs, and efflorescence (white powder).
- Fall: Clean gutters, check flashings, and prep surfaces for winter.
- Winter: Inspect for ice buildup, snow removal damage, and any signs of thawing causing issues.
- Quick fixes: Seal small cracks with a concrete sealant. This stops water getting in.
- Regular maintenance: Clean surfaces to remove dirt and debris that can trap moisture.
- Annual deep clean: Use a pressure washer or hire a professional to really clean the slab.
- Quick rule: If you see something, fix it quick. Small problems become big ones fast.
Conclusion
Fixing surface pop-offs from rusted wire is about stopping the damage now and keeping it from coming back. Do the work safely, confirm the root cause, and seal the area so it looks right and lasts. That means planning, testing, and sticking to solid patching and stain-blocking steps.
Check in this order: confirm the surface condition, verify wiring or rebar corrosion, follow the corrosion mitigation steps, apply the patch with the right technique, then clean and block stains before the area cures. Always test new actions in a small, hidden area first and proceed only after you’re sure the method won’t worsen the damage.
Common mistakes to avoid are rushing without safety gear, skipping permits or proper site prep, and assuming a quick patch hides the problem. Wear eye protection and gloves, work slowly to avoid creating new cracks, and document your results so you know what to redo if needed. Safety first and test in a small area are not optional tips here.
If the damage is widespread, if you’re unsure about the wire or rebar condition, or if the stain-blocking needs are beyond your confidence, call a pro. When in doubt, step back and get a second check. With careful steps and clear limits, you’ll finish confident and with a durable, clean result.
FAQ
What should I look for first to confirm rust from wire is the root cause of surface pop-offs?
Check for exposed, corroded wire or rebar near the pop-off area. Look for rust stains bleeding through the concrete surface and soft or hollow spots around the pop-off. If unsure, document where you see rust and plan to expose more to verify.
Can I remove rust and patch in the same day, or should I spread it out?
Rushing a patch can trap moisture or worsen the issue. Clean and neutralize the rust as much as possible, then allow any rust treatment to dry per the manufacturer’s instructions before patching. If the area is large, pace the work to avoid rework or hidden voids.
What safety steps should I take before exposing or repairing rusty wire?
Wear eye protection, gloves, and a dust mask. Keep the work area ventilated and set up containment to control dust. If you see loose or damaged rebar, address it with caution and consider professional help for structural concerns.
How do I know if stain blocking will hold up long term?
Choose a stain blocker labeled for concrete and rust compatibility. Check the label for surface prep needs and recoat intervals. If the stain reappears after weathering or resurfacing, reassess the underlying corrosion and patch integrity.