
Introduction
Degreasing concrete is a crucial process that requires careful planning and timing. Understanding the duration of each step ensures you achieve a soap-free surface without damaging your concrete.
In this guide, we’ll walk you through a comprehensive timeline, from preparation to final checks, ensuring you complete each task at the right time for optimal results.
For the full guide, see Degreasing Concrete the Right Way: Detergents, Poultices, and Rinse Methods That Don’t Leave Soap.
The Degreasing Timeline: From Preparation to Final Checks
Degreasing concrete involves several steps that require careful timing. Here’s a detailed timeline to help you achieve a soap-free surface efficiently:
- Preparation (15-30 minutes): Gather your tools and materials, including detergents, poultices, brushes, and safety gear. Ensure the concrete is dry and free from debris.
- Detergent Application (10-20 minutes per application): Apply the detergent or degreaser according to the manufacturer’s instructions, ensuring even coverage over the stained area. Allow it to dwell for the recommended time (usually 15-30 minutes).
- Agitation and Scrubbing (5-10 minutes per application): Using a stiff brush or scrubbing pad, agitate the detergent to loosen the stain. Repeat this step if necessary.
- Poultice Application (30-60 minutes per application): For stubborn stains, apply a poultice and allow it to sit for the recommended time (usually 30-60 minutes).
- Rinsing (5-10 minutes per rinse): Rinse thoroughly with clean water until the rinsate runs clear. This may require multiple rinses.
- Final Checks and Drying (24-72 hours): Inspect the surface for any remaining soap or film, and allow it to dry completely before applying a sealer or performing further maintenance.
By following this timeline, you can ensure that each step is completed at the right time, maximizing the effectiveness of your degreasing efforts while minimizing damage to your concrete surface.
Key takeaways
The preparation stage sets the foundation for a successful degreasing process. Ensuring you have all necessary tools and materials ready will help you maintain the timeline and achieve optimal results.
- Understand how concrete pores trap oil and how cleaners mobilize stains.
- Rinse thoroughly to avoid soap film that attracts dirt and re-stains.
- Test cleaner dilutions on a small area before full-scale use.
- Use appropriate poultice materials and follow manufacturer directions for safety.
- Sweep, scrub, and rinse in measured steps to prevent water pooling and damage.
- Dispose of used rinsates and sludge per local rules and label instructions.
Table of Contents
- Introduction
- Key takeaways
- How Concrete Structure and Stains Interact
- Why Soap Residue Happens and Why It Matters
- Choosing the Right Detergent or Cleaner
- Mix, Dilute, and Test — Safe Setup Steps
- Application Techniques and Tools Checklist
- Poultices: When, How, and Safe Recipes
- Rinse Methods That Leave no Soap Behind
- Final Checks, Drying, Disposal, and Ongoing Maintenance
- Conclusion
- FAQ
How Concrete Structure and Stains Interact
Concrete is a composite of cement paste, aggregate, and a network of pores and microcracks that control how liquids move and hold. Knowing whether a surface is dense, sealed, broom-finished, or power-troweled changes how deeply oils and cleaners penetrate and how aggressive your approach must be.
That matters because a shallow spill on a dense, sealed slab can often be rinsed or wiped, while the same stain on porous or unsealed concrete may need poulticing or stronger chemistry to reach trapped soils. Match cleaner type and contact time to the surface condition rather than assuming one method fits all; check product guidance if you need specifics for penetration or contact recommendations.
Why concrete holds oil and soap
Concrete’s porous nature is why it loves to hold onto oils, greases, and soaps. Think of those tiny holes as little magnets pulling in dirt.
Oils have low surface tension, meaning they spread out easily on surfaces like concrete. Soap, being a surfactant, lowers the surface tension even more, helping both oil and soap sink into those pores.
This is called capillary action – it’s why paper towels soak up liquid. Adsorption also plays a role; molecules from oils and soaps stick to concrete’s surface, making them hard to remove.
Porosity, alkalinity, and existing sealers
Concrete’s porosity varies. High porosity means more voids for dirt to hide in. Low porosity is smoother but can still hold grime if not sealed.
Alkalinity matters too. Concrete has a pH around 12-13, which can react with some cleaners. Always check your cleaner’s compatibility with alkaline surfaces.
Existing sealers change the game. They fill pores, reducing absorption but making penetration of cleaners more difficult. You might need to use stronger cleaners or let them soak longer.
Why Soap Residue Happens and Why It Matters
Detergents leave surfactants and byproducts that can lodge in pores or react with minerals or hard water, producing films or salts that stay behind after rinsing. Those residues show up as streaks, chalky patches, or a persistent tack that regular rinsing didn’t remove.
Visible residue can alter appearance, and functional residue can make a surface slippery, interfere with paint or sealer adhesion, or attract dirt faster. If unsure about product hardness or reactivity, consult the label or product data sheet before scaling up treatment.
Surfactant chemistry and hard-water interactions
When you clean concrete with detergents, the active ingredient is a surfactant. These are like tiny molecules that can grab onto both water and oil, helping to lift dirt and grease.
But here’s where things get tricky. In hard water areas, there’s plenty of calcium and magnesium around. When these minerals meet surfactants, they can form insoluble salts. That’s a fancy way of saying they clump together and don’t dissolve in water anymore.
These salt clusters are what we call soap scum or films. They’re the stuff that leaves streaks on your shower doors, and they can be just as annoying on concrete. The problem is, these films are tough to rinse off because they’re not soluble in plain water.
Practical consequences of leftover residue
Soap residue on concrete might seem harmless, but it can cause a few headaches. First off, it’s ugly. Those streaks and films can make your otherwise pristine patio or walkway look like it’s been neglected.
But it’s not just about looks. Leftover residue can also make surfaces slippery. Surfactants are designed to reduce surface tension, which means they can make things more prone to slipping – especially when wet.
And if you’re planning on applying a new sealer or coating, that soap scum needs to go. Residue can interfere with the bonding process, leading to adhesion problems down the line. That’s why it’s always best to start with a clean slate.
Choosing the Right Detergent or Cleaner
Selecting a cleaner starts with the stain: oils and greases often respond to solvent or alkaline cleaners, while mineral deposits or rust may need acidic or chelating formulations. Consider environmental limits and safety—enzymes and low-toxicity nonionic cleaners are gentler, while solvent- or caustic-based options offer stronger lift but require stricter handling and disposal.
Use a decision framework: identify the contaminant, assess concrete condition and surface treatment, weigh safety and runoff controls, then pick a product class and follow manufacturer instructions for dilution and contact time. When product specs matter, check the technical data sheet or label for compatibility with concrete and recommended uses.
Surfactant types, pH, and when to use each
Choosing the right cleaner starts with understanding surfactant types. Surfactants are what cut through dirt and grease.
Nonionic surfactants are good for general soils. They’re mild but effective on everyday grime.
Anionic surfactants, like dish soap, excel at cutting through grease and oil. Use them for heavy oil stains.
Alkaline cleaners are strong against heavy organic soils. They’re basic, so they can damage acid-sensitive surfaces if not rinsed properly. Always follow label guidance for pH-sensitive surfaces.
Acidic cleaners tackle mineral stains like rust or efflorescence. They can dull concrete’s finish if overused, so be careful.
Biodegradable, solvent-based, and specialty cleaners
For tough stains, you might need something stronger. But remember, strength often comes with trade-offs.
Biodegradable cleaners use eco-friendly emulsifiers. They’re safer for the environment but may not be as strong as solvent-based products.
Solvent-based or citrus-based cleaners can tackle set-in oil, paint, and tough grease. But they require proper ventilation and careful disposal. Always follow safety guidelines on the label.
Some cleaners are designed for specific stains. For example, graffiti removers use strong chemicals to break down paint. Use these sparingly and always follow instructions.
Mix, Dilute, and Test — Safe Setup Steps
Always prepare cleaners using the label or technical data sheet as your guide and mix in a well-ventilated area while wearing appropriate PPE. Choose a milder dilution for light soils and step up concentration for heavy soiling, but avoid guessing—perform a small test patch in an inconspicuous spot first.
The test patch tells you whether the cleaner removes the stain, leaves residue, or damages the surface finish; document the dilution, contact time, and outcome. If you don’t see clear instructions on the product, pause and contact the manufacturer for safe use recommendations.
Dilution approach and starting points
Always start with the mildest dilution that works. It’s gentler on your concrete and safer for you.
The label instructions are your primary guide. But remember, they often recommend stronger concentrations than necessary.
For light soils, start with a 1:4 or 1:5 cleaner-to-water ratio. For heavy soils, go up to 1:2 or 1:3. But always test first.
Never exceed the manufacturer’s recommended strength. It won’t clean better and could damage your concrete.
Test patches, dwell time, and record keeping
Before you start, do a test patch. It’s like a trial run to check if your method works and won’t damage your concrete.
Choose an inconspicuous spot. Apply your cleaner at full strength. Let it sit – that’s the dwell time. Check for color change or residue.
Record the date, cleaner type, dilution ratio, dwell time, and results. This helps you adjust your method before full-scale application.
If there’s no change after 30 minutes, increase the dwell time or try a stronger dilution. But remember, patience is key. Some cleaners need time to work.
Application Techniques and Tools Checklist
Pick tools and methods that fit the stain size and surface: pump sprayers or low-pressure sprayers for even coverage, stiff nylon brushes for textured areas, and soft brushes or microfiber pads for delicate finishes. For heavy or greasy spots, agitation and dwell time matter—use a scrub brush or rotary scrubber and consider a poultice for localized deep stains.
Always use PPE including gloves and eye protection, and rinse tools thoroughly between products to avoid cross-contamination. If unsure which tool suits your slab or stain, try small-area trials and follow any tool recommendations from the cleaner manufacturer.
Tools and materials checklist
Before you start degreasing, make sure you have all the right tools. Here’s a quick checklist to keep you on track.
- Gloves: Protect your hands from harsh chemicals.
- Eye protection: Safety glasses or goggles to prevent chemical splashes.
- Pump sprayer: For even application of detergent. A 1-gallon size is usually sufficient.
- Stiff brushes: For scrubbing tough stains. Choose one with stiff bristles for better agitation.
- Rotary scrubber: For larger areas or heavy soils. It’s a power tool that spins the brush, making your job easier.
- Wet-vac: To remove water and residue after rinsing. This is crucial to prevent slippery surfaces.
- Squeegee: For removing excess water from flat surfaces before using a wet-vac.
- Absorbents: Like rags or towels, for blotting up any remaining residue after vacuuming.
Quick rule: Always double-check your tools and materials before starting. Missing something can lead to extra work or even damage to the concrete.
Agitation methods: manual to mechanical
Choosing the right agitation method depends on the size and severity of your stains. Here’s a comparison to help you decide.
- Hand-scrubbing: Best for small areas or light soils. It gives you better control, but can be labor-intensive.
- Deck brushes: Great for medium-sized areas with moderate soils. They’re easy to use and provide good agitation.
- Floor machines: Ideal for large areas or heavy soils. They’re powerful and efficient, but require some skill to operate safely.
- Spot-sanders: For tough stains that won’t budge with other methods. They can remove the top layer of concrete if not used carefully.
Quick rule: Always start with the gentlest method and work your way up to avoid damaging the concrete.
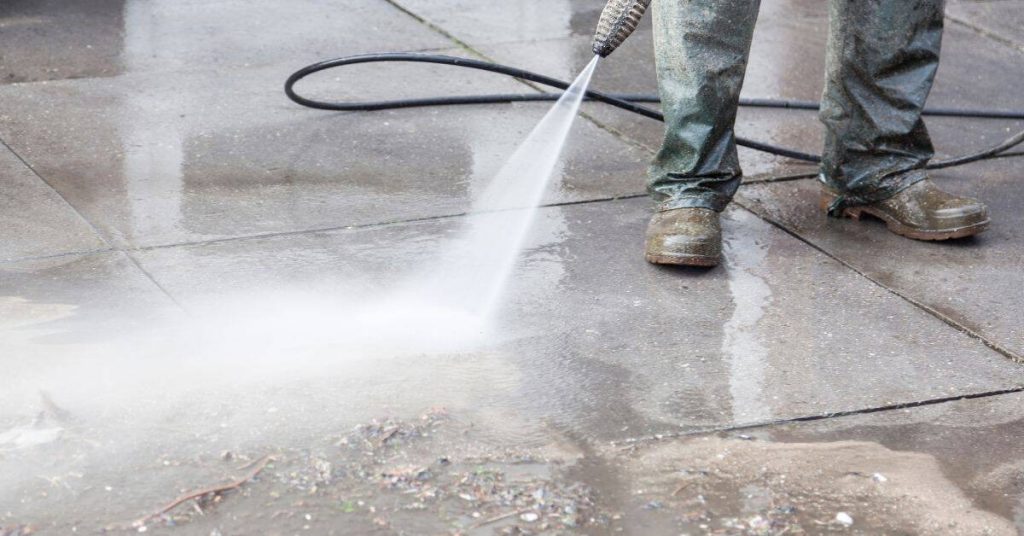
Pressure washing and equipment safety
Pressure washers can speed up the rinsing process, but they must be used carefully to prevent damage. Here are some safety tips.
- Read the manual: Always consult your pressure washer’s manual for safe operating procedures and recommended settings.
- Nozzle selection: Use a nozzle with a wide spray pattern (like 40° or 65°) to avoid etching the concrete surface. A 0° nozzle can cause serious damage.
- Stand-off distance: Keep the nozzle at least 12 inches away from the surface to prevent gouging or chipping.
- Test area first: Always test your pressure washer on a small, hidden area before starting the main job. This helps you adjust the settings if needed.
Quick rule: Never use a pressure washer without proper training and safety equipment. It’s not worth risking damage to your concrete or injury to yourself.
Poultices: When, How, and Safe Recipes
Use a poultice when stains sit below the surface or when targeted, minimal-area treatment is needed—typical cases include gearbox oil, hydraulic fluids, and aged grease spots. A poultice is a paste composed of an absorbent carrier and a solvent or cleaning agent that draws contaminants out of pores as it dries; mix conservatively and adjust consistency during the test patch stage.
Work with small batches, label spent material, and follow local rules for disposal since poultice waste can be hazardous depending on the contaminant and solvent used. If directions or disposal classifications are unclear, check the cleaner’s safety data sheet or ask the manufacturer for guidance.
Oil and Grease Poultice Technique
When you’ve got deep, stubborn oil or grease stains on your concrete, it’s time to break out the poultice. A poultice is just a fancy term for an absorbent paste that draws out the stain.
Here’s how to make one: mix an absorbent powder like clay, diatomaceous earth, or a commercial powdered absorbent with a compatible carrier – usually water or a mild detergent solution. The goal is a thick, spreadable consistency.
Apply the poultice directly onto the stain using a trowel or putty knife. Spread it evenly and thick – at least 1/4 inch. Cover the area with plastic to keep it moist. Let it sit for 24-48 hours, then remove and discard the dried poultice along with the absorbed stain.
Paint, Urethane, and Solvent-Based Poultices
For paint, urethane, or other solvent-based stains, you’ll need a stronger poultice. The carrier here is typically a solvent like mineral spirits, acetone, or even lacquer thinner.
Mix your absorbent powder with the solvent until you get that thick paste again. Apply it just like before – spread evenly and thickly over the stain. Cover it up and let it sit for 24-48 hours.
Safety first: Wear gloves, eye protection, and work in a well-ventilated area. Solvents can be harsh, so keep pets and kids away. And remember, solvent-soaked poultice waste is hazardous – it needs special disposal.
Rinse Methods That Leave no Soap Behind
Progressive rinsing means starting with low-pressure flushing to lift loosened soils, then increasing flow or using a surface cleaner or pressure washer to remove remaining film; finish with a high-volume fresh-water rinse or rinseless extraction to capture surfactants. For tight or porous surfaces, consider multiple rinses and squeegees or wet-vacuums to remove soapy water rather than allowing it to evaporate and leave salts.
Water quality affects results—hard water can cause deposits that bind with surfactants, so if you suspect issues check the product guidance for compatible water types or rinse aids. When in doubt about a rinseless system or final rinse method, test and evaluate the surface feel and appearance before declaring the job done.
Progressive rinse and fresh-water exchange
To ensure no soap residue is left behind, it’s crucial to perform multiple fresh-water rinses. Start by giving your concrete a good initial rinse with clean water.
Agitate the surface while rinsing using a stiff-bristled broom or a pressure washer on low setting. This helps dislodge any remaining detergent and dirt.
After the first rinse, replace the rinse water and repeat the process. Do this at least three times, ensuring you’re not redistributing surfactants by frequently replacing the rinse water.
Rinseless rinses, squeegee, and wet-vac extraction
For a more aggressive approach to soap-free rinsing, consider using a rinseless method. This involves immediately removing rinse water and dissolved detergents.
Start by giving your concrete a quick initial rinse. Then, use a squeegee to remove as much standing water as possible. Follow up with a wet-vac system to extract any remaining moisture from the surface.
This method reduces the chance of soap drying into residues and can be particularly useful on large or sloped surfaces where traditional rinsing might be challenging.
Water quality and final-rinse options
Hard water can leave behind unsightly residue even after thorough rinsing. If you suspect this is an issue, consider testing or using softened, filtered, or deionized water for your final rinses.
Softened water has had its minerals removed, reducing the likelihood of residue formation. Filtered and deionized water are even purer, with all impurities and ions removed.
If hard water is a local issue, consider checking with your municipal water treatment department or consulting with a water treatment specialist for advice tailored to your area.
Final Checks, Drying, Disposal, and Ongoing Maintenance
Perform visual and tactile checks after cleaning: look for streaks, chalkiness, tack, or changes in texture, and do a simple slip test or adhesion trial for paint or sealer if relevant. Drying with good airflow and avoiding re-soiling during cure are practical steps to prevent new problems while the surface sets back to normal.
Handle rinse water, spent poultice, and contaminated wipes per local regulations and the cleaner’s safety data sheet—don’t dump concentrated waste into storm drains without confirming rules in your area. Set up a routine maintenance plan to control drips and spills and reduce the need for aggressive future cleaning; consult local disposal guidance when you need to decide how to discard residue or wastewater.
Visual checkpoints and simple residue tests
Before declaring your concrete clean, run through this checklist to ensure no soap residue remains.
- Water break test: Sprinkle water on the surface. Soap residue will cause the water to bead up instead of spreading out.
- White cloth wipe: Wipe with a clean, white cloth. If it comes away dirty or leaves streaks, there’s still soap.
- Streaking: Look for any streaks or tackiness. These are signs of residual soap.
- Soil redeposition: Check if soil is redepositing on the surface after cleaning. This indicates soap residue.
- Dry test: Let a small area dry completely. If it feels slippery or tacky, there’s still soap.
- Soap smell: Sniff for any lingering soap scent. If present, re-rinse the area.
- Touch test: Run your hand over the surface. It should feel smooth and non-tacky.
- Drying check: Ensure all areas are drying evenly. Uneven drying can indicate soap residue in some spots.
Quick rule: If any of these tests fail, re-rinse the area and retest.
Waste handling and environmental compliance
Properly handle and dispose of your cleaning waste to protect the environment and stay compliant with local regulations.
- Collect rinse water: Use a pump or wet-vac to collect all rinse water. Do not let it run off into drains or onto soil.
- Segregate solids: Separate spent poultice material and other solids from liquids for proper disposal.
- Solvent-containing wastes: Keep these separate, as they may require special handling and disposal.
- Local regulations: Check your local waste management department’s guidelines for disposing of cleaning waste.
- Hazardous waste: Some poultices or solvents may be hazardous. Follow local rules for their disposal.
- Contain spills: Immediately contain any spills to prevent contamination of soil, water, or drains.
- Proper storage: Store collected waste in a secure, labeled container until disposal.
- Disposal: Take your waste to the appropriate facility. Do not dump it down drains or onto land.
Quick rule: Always follow local regulations for waste disposal to avoid fines and environmental damage.
Preventive sealing and maintenance schedule
Seal your concrete and maintain a regular cleaning routine to minimize future staining and heavy degreasing needs.
- Consider sealing: If your concrete is porous, consider applying a sealant after cleaning to prevent future absorption of stains.
- Surface treatments: Apply surface treatments like penetrating sealers or densifiers for added protection.
- Regular sweeping: Sweep your concrete regularly to remove loose dirt and debris.
- Periodic rinsing: Rinse your concrete periodically with clean water to remove any accumulated dirt or contaminants.
- Avoid harsh chemicals: Do not use harsh chemicals like bleach or acid on sealed concrete, as they can damage the sealant.
- Prompt cleaning: Clean spills promptly to prevent staining and absorption into the concrete.
- Inspect for damage: Regularly inspect your concrete for cracks, chips, or other damage that could allow stains to penetrate.
- Repair damage: Repair any damage promptly to maintain the integrity of your concrete’s surface.
Quick rule: A little maintenance goes a long way in keeping your concrete clean and stain-free.
Conclusion
Getting a clean, soap-free concrete surface is within reach when you keep safety first and test every step before you commit. A solid plan protects durability, avoids costly mistakes, and makes the finish look right for years.
Check in this order: verify the stain and concrete interaction, pick the right cleaner, mix and test a small area, apply with the approved technique, rinse thoroughly to remove any residue, perform final checks for soap or film, then dry and dispose as recommended and plan a simple maintenance routine to keep the surface looking clean.
Common mistakes to avoid are using the wrong cleaner for the stain, skipping a test patch, and rushing rinsing or drying. Always wear gloves and eye protection, work in a well-ventilated area, and never mix cleaners unless the instructions explicitly say it’s safe. If you’re uncertain about the stain chemistry, or if the concrete is highly sensitive or historic, call a professional before moving ahead. Stay steady, follow the steps, and you’ll finish with a clean, durable surface you can trust. You’ve got this.
FAQ
Can I tell if soap residue is still on the surface after I think I’m done rinsing?
Feel the surface for slipperiness or a silky feel. Look for a faint white film or streaks after drying. If it feels slick or shows soapsuds when you rub with a damp cloth, rinse again and recheck.
Can I use everyday dish soap to degrease concrete?
No. Dish soap isn’t designed for porous concrete and may leave residue. Use a cleaner or degreaser that’s labeled for concrete and follow the manufacturer’s instructions. Always test on a small area first.
What’s the right way to use poultices without leaving soap behind?
Apply the poultice to the stained area as directed and cover it if required. Keep the surface from staying too wet and remove components as instructed, then rinse with clean water and verify no soap film remains. If you see any residue, repeat the rinse after poultice removal.
How should I dispose of rinse water and used cleaning materials?
Collect runoff in a container if possible. Do not pour soap-laden water into cracks or landscaping. Check local rules and manufacturer guidance for proper disposal or recycling options.