
Introduction
Paint bleed under tape happens when paint seeps under the edge of the tape, blurring your line.
To get razor-sharp edges, press the tape edge firmly and keep a steady hand when you paint. Choose a painter’s tape suited for your surface and test a small area if you’re unsure what will seal best.
If bleed shows up, switch to tape made for clean-edge lines and follow the manufacturer’s guidance for surface prep. Seal the edge by pressing with a fingernail or a small tool, then wipe rough edges clean before you start; avoid pulling tape while the paint is wet. When applying primer near edges, apply a thin coat right up to the tape edge and let it dry fully before you paint for best edge control.
Key takeaways
- Burnish tape edges with a plastic card to seal gaps before painting.
- Choose premium painter’s tape designed for sharp lines and edge sealing.
- Gently sand rough edges and wipe with a damp microfiber cloth.
- Apply primer carefully along edges, feathering slightly beyond the tape line.
- Seal tape edges with a thin bead to block wicking under tape.
- Work in ventilated areas; avoid skin contact with fresh solvent-based paints.
Table of Contents
- Introduction
- Key takeaways
- Why Paint Bleeds and How Tape Fails
- Pre-Paint Preparation for Clean Edges
- Choosing the Right Tape and Materials
- Taping Techniques for Razor-Sharp Lines
- Sealing Tape Edges to Prevent Bleed
- Painting Methods and Tool Selection for Sharp Results
- Removing Tape and Fixing Imperfections
- Troubleshooting, Common Mistakes, and Budget Options
- Conclusion
- FAQ
Why Paint Bleeds and How Tape Fails
Bleed happens when the edge seal isn’t perfect. Adhesion problems, paint viscosity, and surface contaminants all contribute to seepage under the tape. The choice of tape and how you lay it down also influences bleed risk.
Surface prep and porosity drive the odds of bleed up or down. Cleaning solvents, dust, oils, or any release agents can leave a barrier at the edge. Tape edge quality and application technique determine how well the edge stays sealed against runoff.
Surface and Paint Interactions
Paint bleed often starts at the surface. Porous, textured surfaces can wick paint, lifting tape edges. Leftover contaminants like dust, oils, or release agents create barriers, preventing proper edge sealing.
Before masking, inspect your surface. Feel for rough spots, check for dirt with a damp cloth. Sand if needed, then clean thoroughly to remove any residue.
Remember, paint is like water – it follows the path of least resistance. So, ensure your surface is smooth and free of contaminants for a tight seal.
Tape Adhesion vs Paint Type
Different paints play nice with some tapes but not others. Waterborne paints, for instance, love painter’s tape. Solvent-based paints? They prefer masking tape.
Here’s a quick guide: use painter’s tape for waterborne and latex paints. It’s designed to resist moisture and prevent edge lift. For solvent-based or oil-based paints, opt for masking tape. It sticks better in these conditions.
Lacquers are tricky. They dry fast but can bleed under tape if not given time to set. Use a high-quality, low-tack tape here to minimize peeling when you remove it.
Environmental and Jobsite Factors
Temperature and humidity aren’t just comfort issues. They affect paint drying and tape adhesion. Too hot, too cold, or too humid – any extreme can cause tape to fail.
Ideally, keep your painting environment between 65-85°F (18-29°C). Avoid painting in direct sunlight or drafty areas. Humidity? Keep it below 70% if possible.
Dust is another enemy. It can stick to tape edges, creating gaps for paint to seep through. Keep your workspace clean and dust-free. A quick wipe with a damp cloth before masking helps too.
Pre-Paint Preparation for Clean Edges
A clean, defect-free substrate is essential before masking. Check moisture, patch cracks, and repair any pitting or rough spots on concrete. Do not mask until the surface is ready for bonding with tape.
Follow a methodical prep sequence to create a tactile edge. Remove dust and oils with a degreaser, rinse well, and dry completely. Light profiling helps primer and tape bite into the surface for better adhesion.
Surface cleaning and sanding checklist
Before you start, check your surface with this list to ensure it’s clean and ready for tape.
- Remove dust: Use a soft brush or vacuum. A quick wipe with a damp cloth confirms it.
- Degrease: Apply a degreaser like TSP, let it sit, then rinse off. No greasy residue should remain.
- Check for oils: Dab some denatured alcohol on a rag. If it turns dark, re-clean with degreaser.
- Light sanding: Use 120-grit sandpaper. Sand lightly to create a ‘key’ for primer adhesion. No visible scratches left behind.
- Wipe off sanding dust: A damp cloth should come away clean.
- Check for rough spots: Run your hand over the surface. Any snags? Sand them smooth.
- Inspect for cracks: Fill any hairline cracks with a suitable filler before sanding.
- Dry completely: Use a moisture meter to ensure no dampness remains. Surface should feel dry to touch.
Quick rule: Skipping these steps can lead to poor tape adhesion and paint bleed.
Priming and sealing edges
Choosing the right primer or sealer is crucial for locking in porous surfaces and creating a uniform base for your tape.
For concrete: Use a penetrating, water-based primer to reduce suction and bleed risk. Apply with a roller or sprayer, following manufacturer’s instructions.
For other surfaces: Choose a primer that matches your paint type (latex/alkyd). Apply evenly, avoiding drips or missed spots.
Sealing edges: Before taping, apply an edge sealer along the line. This helps prevent bleed and gives you a crisp edge to work from.
Masking layout and measuring
Planning your lines before taping ensures consistent results and saves time.
Use guides: For straight lines, use a level or laser level as a guide. Mark lightly with a pencil.
Measure consistently: Use a tape measure to ensure even spacing between lines. Consistency is key for a professional look.
Tape placement: Apply painter’s tape along your marked lines, pressing firmly and using a burnishing tool to seal the edges. This helps prevent edge lift and bleed.
Choosing the Right Tape and Materials
Know which tape suits your job: delicate trim, rough exterior, or multi-surface concrete. Look at adhesion level, stretch, and edge lift risk for each option. The goal is a tape that stays put without peeling at the edge.
Decode product labels and pick appropriately labeled tapes for your environment. Note paint compatibility, indoor vs outdoor use, and any special backing that affects edge fidelity. Consider how the tape interacts with your primer and topcoat.
Types of painter’s Tape and Their Uses
The right tape makes all the difference. Here are your options:
Low-tack tapes: Ideal for delicate surfaces like trim work. They won’t pull off paint when removed.
Medium-tack tapes: Great for most interior jobs. Sticks well but peels off easily.
High-tack tapes: Perfect for rough exteriors and multi-surface projects. They hold tight even on textured walls.
Tape Adhesive Strength and Backing Materials
The tape’s material and adhesive matter. Here’s what to look for:
- Paper-backed tapes: Cheap, easy to use. But can leave residue if not removed promptly.
- Plastic-backed tapes: More durable, less likely to tear. Ideal for rough surfaces but may lift edges.
- Crepe paper tapes: Flexible, conforms well to uneven surfaces. But can be harder to remove.
- Foam-backed tapes: Excellent for filling gaps and textured surfaces. But may absorb paint if not sealed.
- Adhesive strength: Check manufacturer’s guidance. Too strong may pull off paint, too weak won’t stick.
Tools and Materials Checklist
Before you start, gather these essentials:
- Painter’s tape: Choose the right type for your job.
- Sealer or primer: To prevent paint bleed and improve adhesion.
- Paintbrushes: For cutting in edges. Invest in quality for crisp lines.
- Rollers: For applying paint. A good roller cover makes a big difference.
- Scraper: To clean up any residue after tape removal.
- Solvents: Like mineral spirits or Goof Off for tough residues.
- Edge liner or guide: For maintaining straight lines on long runs.
- Measuring tape: To ensure straight lines and even spacing.
Quick rule: Don’t skimp on quality tools. They’ll save you time and effort in the long run.
Taping Techniques for Razor-Sharp Lines
Start with proper tape selection and a clean, dry surface. If needed, apply a light base sealer to improve edge fidelity. This helps the next steps hold a crisp boundary.
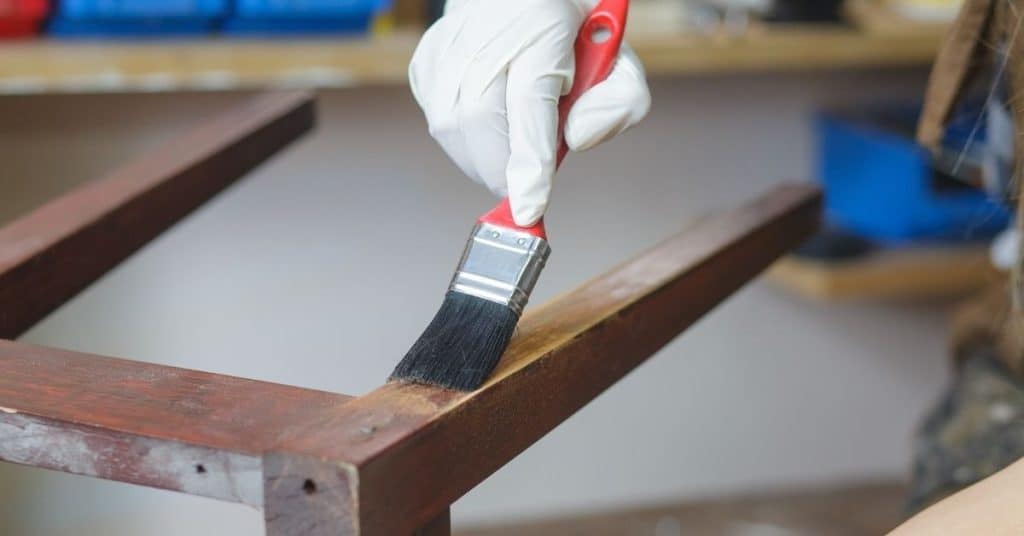
Burnish the tape edge with a firm tool to eliminate micro-gaps. Plan for corners and curves with steady pressure and smooth transitions to avoid wrinkles that invite bleed.
Correct application method
Start by unrolling your tape from the top of your work area. Press down firmly with your fingers as you go, ensuring full contact with the surface.
Use a squeegee or a flat edge to burnish the tape once it’s on. This eliminates air pockets and ensures a tight seal. Go over each section twice – once lengthwise and once widthwise.
Be consistent with your pressure. Too light, and you’ll have gaps; too hard, and you might damage the surface or lift the paint when you remove the tape.
Inside and outside corners, curves, and complex shapes
For inside corners, cut your tape at a 45-degree angle to create a ‘V’ shape. Press this into the corner, then use your tool to burnish both sides.
For outside corners, fold the tape over itself, creating a crease. Burnish this crease into the corner, then press down on either side.
For curves and complex shapes, cut your tape into small segments. Press each segment onto the surface, overlapping them slightly to maintain continuous contact without stretching or creating gaps.
Multi-color masking strategies
For two-tone designs, apply your first color and let it dry. Before applying the second color, tape off the area you want to protect using a new piece of tape that overlaps the edge of the first color.
For multi-color designs, follow the same principle but use different pieces of tape for each color. Make sure to overlap each piece slightly to prevent bleeding.
Always check your work under good lighting and run a gloved finger along the edges to feel for any gaps or wrinkles before painting.
Sealing Tape Edges to Prevent Bleed
Identify sealing methods that suit your project, such as edge sealants or sealing the edge with the base color. The barrier should prevent seepage while staying compatible with your topcoat. Choose materials that won’t lift when you remove tape.
Prep the surface and select tape designed for sharp lines. Ensure the edge is clean, dry, and ready for a precise seal. Apply the sealant or base color edge as recommended and allow appropriate setup before painting.
Sealants and edge-fillers (caulk, acrylics, shellac)
Choose the right sealant to create a barrier against paint bleed. Here’s what you need to know:
Caulk: Use flexible acrylic latex caulk for trim work and corners. It’s paintable and cleans up with water. Avoid silicone caulk as it doesn’t stick well to paint.
Clear acrylics or shellac: For wider tape edges, use clear sealers like acrylic varnish or shellac-based sealers. They dry fast and create a barrier without affecting color. Test compatibility with your paint first.
Safety note: Always wear gloves when handling caulk and other sealants. Follow manufacturer’s guidelines for application and cleanup.
Using the base color as a bleed seal
Before applying tape, paint a thin coat of your first color along the edge where you’ll place the tape. This technique, called ‘edge-sealing’, helps prevent the second color from migrating under the tape.
Let it dry for the recommended time (usually 1-2 hours) before applying tape. This method works best with latex paints and when using high-quality painter’s tape.
Pro tip: Use a small paintbrush or foam roller to apply the edge seal. Work quickly and carefully to avoid getting paint on areas you don’t want painted.
Mechanical seals and edge burnishing
Create a physical barrier with mechanical sealing techniques. Here’s how:
Backing tapes: Apply a second piece of tape along the edge, overlapping the first piece by about 1/2 inch. This creates an extra layer to prevent paint from seeping through.
Edge burnishing: Use a burnishing tool or even a credit card to press down firmly on the tape edge after applying it. This forces out any air bubbles and ensures a tight seal against the surface.
Pro tip: For complex shapes, use edge tapes designed for corners and curves. They provide extra protection where liquids are most likely to wick.
Painting Methods and Tool Selection for Sharp Results
Control factors for edge work include paint loading, hold distance, and feathering. These choices affect edge sharpness and the avoidance of buildup at the boundary. Pick tools suited to the line you’re tracing and the substrate you’re masking.
Match tool to paint type and surface while considering porosity and primer. Think through pre-wetting, seed coats, and how each step affects edge clarity. Follow a rhythm that minimizes runs and halos at the edge.
Brushes, rollers, and spray pros and cons
The choice between brushes, rollers, and sprayers depends on the job at hand. Each has its strengths and weaknesses.
Pros
- Brushes: Precise control for trim work and detailed edges.
- Rollers: Quick coverage for large flat areas.
- Sprayers: Even finish and ability to reach hard-to-get spots.
- Brushes: Versatile for various paint types and surfaces.
- Rollers: Economical with minimal waste.
- Sprayers: Time-saving for large projects.
Cons
- Brushes: Slower process compared to rollers and sprayers.
- Rollers: Less control over edges, may require additional touch-ups.
- Sprayers: Messier, requires protection of surrounding areas.
- Brushes: May leave streaks if not properly maintained.
- Rollers: Limited reach, may require additional equipment for high areas.
- Sprayers: Higher initial cost and maintenance.
Choose based on your project’s needs. For trim work, brushes are best. For large flat areas, rollers are quickest. Sprayers save time on big projects but require more setup.
Tool selection by paint type and surface
The right tool depends on your paint type and the surface you’re painting. Here’s a quick guide:
- Waterborne paints (latex):
- Brushes: Nylon or synthetic filaments for better flow.
- Rollers: 3/8″ to 1/2″ nap for smooth surfaces, 3/4″ to 1-1/4″ for textured.
- Sprayers: Fine finish nozzle (e.g., 2.0mm) for smooth surfaces, larger (e.g., 5.0mm) for textured.
- Solvent-based paints (oil):
- Brushes: Natural bristles for better flow and clean-up.
- Rollers: Similar to waterborne, but may require more frequent cleaning.
- Sprayers: Fine finish nozzle, but may clog if not properly maintained.
- Smooth surfaces:
- Brushes: Fine filaments (e.g., 1/4″ to 3/8″).
- Rollers: Short nap (e.g., 3/8″ to 1/2″).
- Sprayers: Fine finish nozzle.
- Textured surfaces:
- Brushes: Stiffer filaments (e.g., 1″ to 1-1/4″).
- Rollers: Longer nap (e.g., 3/4″ to 1-1/4″).
- Sprayers: Larger nozzle.
- Optional tools:
- Mini-rollers: For small areas or tight spots, around $5-$10.
- Edging rollers: For cutting-in edges, around $10-$20.
- Spray systems: Rentable for large projects, around $30-$50 per day.
Stroke technique and paint load control
Applying thin, even coats is key to sharp lines. Here’s how:
Brushes: Load the brush about halfway up the bristles. Gently tap off excess paint on the lip of your can or a plate. Use long, steady strokes, feathering out at the edge to avoid pushing paint under the tape.
Rollers: Lightly load the roller, tapping off excess paint on the tray’s grid. Apply with even pressure, using a ‘W’ or ‘M’ pattern for best coverage. Keep your strokes steady and consistent.
Sprayers: Use a light, steady spray, holding the gun about 10-12 inches from the surface. Overlap each pass by about half to ensure even coverage. Avoid overloading the gun or holding it too close to prevent runs and drips.
Remember, less is more when it comes to paint on your tools. A little goes a long way for sharp lines. Practice makes perfect, so don’t be afraid to do some test strokes before tackling your project.
Removing Tape and Fixing Imperfections
Timing for tape removal depends on the paint and the surface; observe how the finish feels as it cures. Peel in a controlled direction and angle to protect the edge. A steady pace helps prevent lifting cured edges.
When bleeds or jagged edges appear, take quick corrective steps. Score minor bleed with a sharp tool, trim excess, and smooth the edge with a fine brush if needed. Plan touch-ups after removal and consider a light top coat if appropriate.
Timing and angle for removal
Remove tape at the right moment to preserve crisp lines. For latex paints, pull tape off after about 20-30 minutes when it’s still slightly tacky but not fully cured. Oil-based paints need longer, around 45-60 minutes.
Pull tape away at a low angle, around 45 degrees, to minimize tearing and lift of the paint edges. Work steadily and smoothly for best results.
Never pull tape off too early or too late. Early removal can cause bleeding and lifting; too late may result in peeling paint.
Solvent use and safety precautions
Use solvents like rubbing alcohol, mineral spirits, or Goo Gone to soften edges or remove residue. Always test on a small area first.
Safety first: Work in a well-ventilated area, wear gloves, and use eye protection. Never mix solvents with water; dispose of used solvents responsibly.
For tough residues, use a razor blade to scrape gently. Always cut away from yourself and others.
Touch-ups and repair techniques
For small bleeds or jagged edges, score the excess with a sharp razor blade to remove it cleanly. Be careful not to cut into the paint below.
Use a fine brush dipped in matching paint to smooth hard edges. Work quickly before the paint dries too much.
If you have larger bleeds or imperfections, consider using a post-removal touch-up. But for minor issues, these quick techniques should suffice.
Troubleshooting, Common Mistakes, and Budget Options
Identify the main bleed factors: tape quality, surface prep, paint consistency, and environmental conditions. Do quick diagnostic checks like test patches and edge dryness checks. Verify tape holds after burnishing before proceeding.
Outline practical fixes and budget-friendly substitutes. Re-burnish edges, try edge sealers or tape alternatives, and adjust paint viscosity as needed. When in doubt, assess whether a professional is warranted based on area size or finish requirements.
Common mistakes and how to fix them
Avoid these common pitfalls for razor-sharp lines.
- Leaving tape on too long: Prolonged contact can cause bleed. Remove tape within 24 hours after the final coat.
- Using wrong tape type: Cheap or low-quality tape may not seal properly. Stick to reputable brands like FrogTape, ScotchBlue, or GreenFrog.
- Applying too-thick paint: Thick paint can seep under the tape. Thin your paint slightly with water (10-15%) for better control.
- Not burnishing enough: Inadequate burnishing lets paint creep under. Use a plastic putty knife or credit card to firmly press down the tape’s edge.
Address these issues promptly to maintain crisp lines.
Budget-friendly alternatives and DIY sealants
Save money with these cost-effective options, but remember, cheaper isn’t always better.
Affordable tapes: Consider brands like Duck or 3M ScotchBlue Multi-Surface for lower cost. They may not perform as well as premium tapes but can still get the job done.
DIY sealants: Use latex caulk mixed with a bit of paint to match your wall color, or even clear shellac diluted with denatured alcohol (1:1) as a homemade edge sealer. Apply sparingly and let dry before painting.
While these options can save you money, they might not provide the same level of performance or durability as professional products.
When to call a pro and what to expect
Know when it’s time to hire a professional for best results.
Large areas: Extensive wall or ceiling painting may require a pro due to time, effort, and safety concerns. Expect quotes based on square footage and complexity.
Complex curves: Intricate edges or architectural details might demand a pro’s touch. Be prepared for higher labor costs in these cases.
High-stakes finishes: Critical areas like showrooms, hotels, or high-end homes may warrant a professional to ensure top-notch results. Expect detailed contracts outlining expectations and penalties for subpar work.
Conclusion
Getting razor-sharp lines is about control, not luck. Prioritize safety, protect the surface, and work methodically to keep paint where it belongs.
Prepare by cleaning and sanding as needed, pick the right tape and seal the edges, apply a steady and careful tape line, seal the tape to stop bleed, choose the right brush or roller, and remove the tape while the edge is still set. Test a small area first, then confirm your plan once more before tackling the full job. Test first and use the right tape for the job.
Avoid these mistakes: skimping on surface prep, not sealing the tape edges, pulling tape too soon or at the wrong angle, and rushing the final removal. Keep hands steady, use gentle pressure along the tape edge, and work in good lighting. If you see bleed starting, pause, fix the edge, and re-tape before continuing. If the project is large, or involves high-visibility walls or finishing details, consider a professional approach instead of pushing on alone.
When in doubt, seek guidance early, especially on delicate surfaces or high-stakes areas. With careful prep, proper tape and sealing, and calm, deliberate painting, you’ll finish with clean, durable lines and fewer touch-ups to worry about. Stay practical, stay safe, and you’ll get results you can be proud of.
FAQ
What’s the best way to seal edges with tape before painting to prevent bleed?
Press the tape down firmly along the edge, then burnish with a plastic card to seal the edge. Run a light skim of paint or primer right up to the tape edge before final coats to lock the edge in. If you see gaps, re-press the edge and consider a fresh strip in a new location.
Which painter’s tape type actually resists paint bleed around sharp edges?
Choose a tape that’s designed for clean lines and edge sealing, and use it on surfaces similar to the finished area. Avoid tape that’s too old or dried out; replace if the adhesive seems weak. Always follow the manufacturer’s instructions on surface type and cure time before painting.
How can I clean up rough edges after painting without harming the new paint?
Use a sharp blade held at a shallow angle to cut along the edge while the paint is still tack-free. If edges look rough, lightly sand with a fine grit while protecting the surrounding paint. Wipe away dust before applying a final touch-up coat.
What should I check when applying primer near edge areas and removing tape later?
Prime up to the edge first, then let it dry per the product’s guidance before applying color. When removing tape, pull away from the edge at a low angle and while the paint is still firm but not fully cured. If any bleed shows, touch up with a fine brush after tape removal.