
Introduction
Stucco is a layered exterior finish you apply in coats to protect and decorate a wall. Doing it right means preparing the surface, choosing the right materials, and following a logical sequence. This article walks you through practical steps and common stop points so you can DIY with confidence.
We’ll cover surface prep, material options, and the tools you’ll need for stucco work. You’ll also get a straightforward, step-by-step plan and honest notes on where things commonly go wrong. If you’re unsure about any spec or rule, check the product label, manufacturer instructions, or local requirements before proceeding.
Key takeaways
- Prepare surface by removing debris and repairing cracks before stucco application.
- Gather approved basecoat, scratch coat, brown coat, finish coat, lath, fasteners, mesh.
- Use proper hand tools and hawk, trowel, mixing blades, plasterer’s mixer, netting.
- Apply coats in correct sequence, monitor key points, and maintain adhesion guidelines.
- Cure and seal with moisture control practices; avoid rapid drying and cracking.
- Safety note: wear eye/face protection, respirator when sanding, and dispose debris properly.
Table of Contents
- Introduction
- Key takeaways
- Tools and Materials Checklist
- Site Preparation and Inspection
- Applying the Basecoat(s) — Lath, Scratch, and Brown Coats
- Finish Coat Techniques and Textures
- Curing, Sealing, and Moisture Control
- Clean-Up, Disposal, and Final Inspection
- Maintenance, Troubleshooting, Common Pitfalls, and Budgeting
- Conclusion
- FAQ
Tools and Materials Checklist
Start with a prioritized list of core tools, equipment, and PPE you’ll rely on. Include trowels, hawk, margin trowel, mixing paddles, a drill with a mixer, a straightedge, mixing buckets, and a lightweight finishing float for screening. Verify compatibility of tools with the selected stucco system from the product data sheet or manufacturer notes.
Outline materials and system options clearly, distinguishing cement-based base coats from acrylic or elastomeric finishes, plus bonding agents, reinforcing mesh, water, and appropriate sealants or primers. Provide guidance on selecting compatible products and matching bagged mixes to climate and substrate, then review safety protocols and safe handling practices. Check labels, batch consistency, and supplier reliability as part of a down-selection process.
Essential Tools and Safety Gear
Before you start, ensure you have all the necessary tools and safety equipment to avoid any mishaps.
- Trowels (4″ & 12″): For applying and smoothing stucco. Don’t skip; wrong trowel size causes application issues.
- Hawk: Holds material while working. Essential for efficient application.
- Margin Trowel (6″): Finishes edges, prevents over-smoothing. Miss this, risk uneven surfaces.
- Mixing Paddles & Drill: For mixing stucco. Skip, face inconsistent mix and poor adhesion.
- Straightedge (10′ level): Ensures even application, prevents dips or humps. Miss this, expect uneven surfaces.
- Lightweight Float: Screens and finishes surface. Skip, risk rough, inconsistent finish.
- Safety Glasses/Goggles: Protect eyes from debris. Don’t skip; risk eye injury.
- Dust Mask/Respirator: Protect lungs from dust. Skip, risk respiratory issues.
- Gloves & Long Sleeves/Pants: Protect skin from cement burns and irritation. Miss this, expect skin damage.
Quick rule: Always prioritize safety gear alongside tools for a smooth, safe job.
Materials, Mixes, and Compatibility
Choose the right materials and mixes to ensure your stucco system performs well and lasts.
- Cement-based Base Coats (Scratch/ Brown Coat): Check for compatible cement type with your climate. Wrong mix, expect poor adhesion or cracking.
- Acrylic/Elastomeric Finishes: Ensure they match your base coat and substrate. Mismatch, risk delamination or poor finish.
- Bonding Agents: Confirm compatibility with your chosen stucco system. Skip, expect adhesion issues.
- Reinforcing Mesh/Lath: Check for proper gauge and size. Wrong mesh, risk cracking or delamination.
- Water: Use clean, drinkable water. Impure water causes poor curing and weak adhesion.
- Sealants/Primer: Ensure they’re compatible with your stucco system. Mismatch, expect poor seal or finish.
- Stucco Mix Type (Traditional 3-coat vs One/Two-coat): Choose based on climate and substrate. Wrong mix, expect poor performance.
- Cure Time: Understand expected cure time for your chosen system. Skip, risk damaging surface before fully cured.
- Substrate Compatibility: Check if your chosen stucco bonds well with your substrate. Incompatible, expect adhesion issues.
Quick rule: Always check product labels and consult local codes to ensure compatibility and compliance.
Site Preparation and Inspection
Assess the substrate type first, noting concrete, masonry, existing stucco, or drywall. Look for delamination, efflorescence, or loose materials that need repair before proceeding. Document any issues that could affect adhesion.
Check moisture, humidity, temperature range, wind, and sun exposure to anticipate curing behavior. Clean the surface by removing dirt, grease, and contaminants, and repair cracks or flaking areas. Plan protective measures for nearby surfaces and determine safe access routes for the crew.
Inspect and repair the substrate
Before you start applying stucco, check your substrate for any issues that could compromise your work.
- Check for rot: Tap the surface with a hammer. If it sounds hollow or feels soft, there’s rot.
- Inspect siding: Look for loose, damaged, or missing pieces. Tighten or replace as needed.
- Examine flashing: Ensure it’s intact and directing water away from the substrate.
- Check moisture: Use a moisture meter to test for excess dampness. High readings may indicate rising damp or leaks.
- Inspect cracks: Small hairline cracks are okay, but larger ones need repair before stuccoing.
- Look for efflorescence: White powdery deposits could signal moisture issues that need addressing.
- Check substrate type: Confirm it’s suitable for stucco (concrete, masonry, existing stucco).
- Assess delamination: Peeling or flaking indicates underlying problems that must be fixed.
- Mask adjacent surfaces: Use drop cloths or plastic sheeting to protect windows, doors, and other areas from debris.
- Cover plantings: Shield shrubs, flowers, and grass with tarps or cardboard to prevent damage.
- Set up barriers: If working indoors, seal off areas with plastic sheeting to contain dust.
- Check scaffolding: Ensure it’s stable, level, and secure before climbing. Inspect regularly during use.
- Use safe ladders: Extend ladders at least 3 feet above the landing point for stability. Secure them if possible.
- Maintain working height: Keep your work area within a comfortable reach to prevent falls.
- Optimize workflow: Plan your work sequence to minimize moving around and maximize efficiency.
- Establish de-brief points: Set times during the day to reassess conditions, adjust plans if needed.
- Temperature: Apply stucco when temps are between 40°F – 90°F (4°C – 32°C).
- Humidity: Keep humidity levels below 85% to prevent curing issues.
- Wind: Avoid working in high winds (>10 mph or 16 km/h) as it can disrupt application and curing.
- Rain: Do not apply stucco if rain is forecast within 24 hours of application.
- Sun exposure: Direct sunlight can speed up drying, potentially causing cracks. If possible, avoid direct sun during the first few days.
- Stop point: persistent moisture: Halt work if you encounter persistent moisture or rising damp. Address the cause before resuming.
- Stop point: unstable substrate: If the substrate becomes unstable (e.g., due to heavy rain), stop work and reinforce as needed.
- Stop point: equipment failure: If tools break or malfunction, replace them before continuing.
Quick rule: Always address any substrate issues before applying stucco. Ignoring them can lead to costly repairs down the line.
Protecting adjacent surfaces and setting up access
Safeguard your surroundings and set up a safe workspace before you start stuccoing.
Quick rule: Always prioritize safety. Protect your surroundings and set up a safe workspace before you start any task.
Weather, scheduling, and stop-point checklist
Check weather conditions and schedule accordingly to ensure optimal stucco application and curing.
Quick rule: Always check weather conditions and schedule your work accordingly. Stop work immediately if you encounter any stop-point issues.
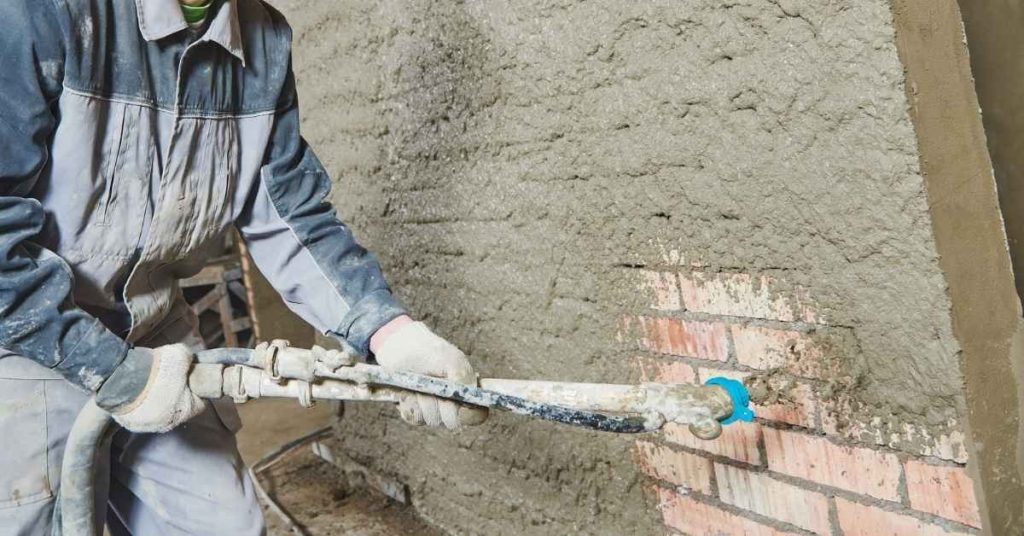
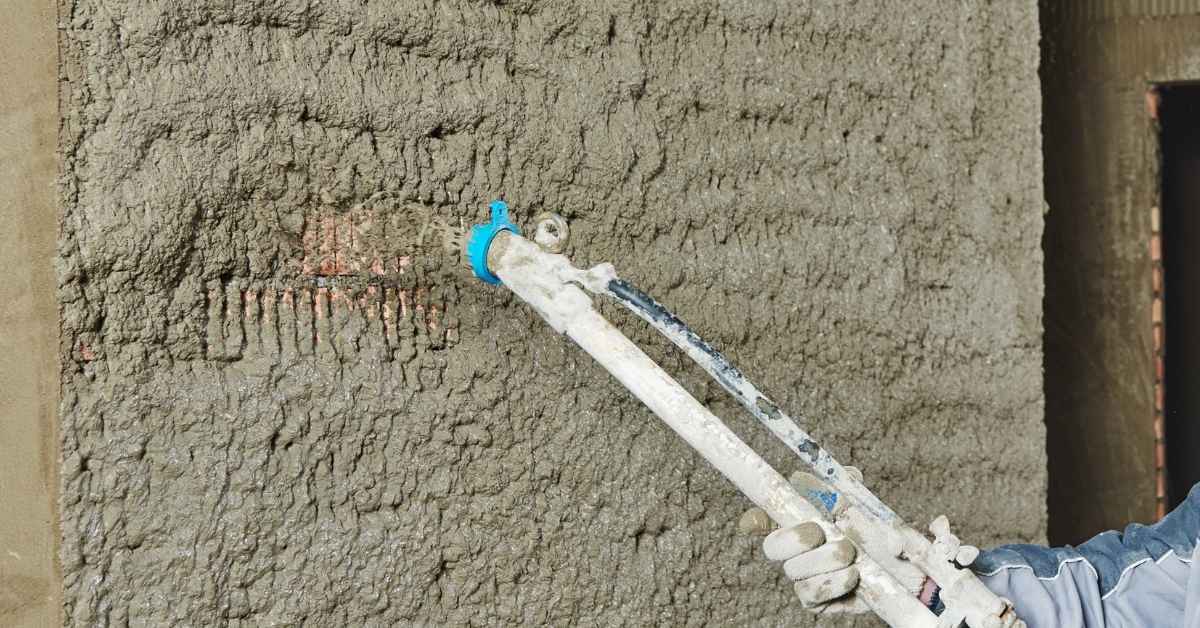
Applying the Basecoat(s) — Lath, Scratch, and Brown Coats
Inspect lath installation and receive confirmation on material type, fasteners, spacing, corner beads, and secure attachment. Ensure lath is plumb and ready to receive the scratch coat without movement. Prepare the scratch coat mix and apply to the target thickness with proper trowel technique.
Embed reinforcement mesh correctly, overlapping seams for continuous strength without tearing. Mix and apply the brown coat to achieve the intended homogeneous layer and a uniform finish suitable for the final parging. Monitor curing timing and moisture, pausing between coats as needed and protecting the coat from rapid drying.
Installing lath/mesh and flashing
The first step to a solid stucco job is installing the lath. You’ve got two choices: wood or metal.
Wood: Use 1/2″ thick boards, spaced 6″ apart. Fasten with 8d nails every 4-6″.
Metal: Install 10-gauge galvanized lath, with 3/8″ spacing. Secure with 1-1/4″ or 1-5/8″ screws, spaced 7/8″ apart.
Terminate edges with corner beads to prevent cracking. Flashing and control joints should be integrated to keep moisture out.
Mixing and applying the scratch coat
The scratch coat is your first layer of protection. Mix cement, sand, and water in a 1:4:2 ratio by volume.
Apply with a trowel, aiming for 1/8″ to 1/4″ thickness. Use a straight edge to level it out.
Create a scratch pattern with a comb or brush. This helps the brown coat bond better. Let it cure for at least 24 hours before inspecting and moving on.
Brown coat application and leveling
The brown coat is your final layer before parging. Mix cement, sand, and water in a 1:4:2 ratio again.
Apply at about 3/8″ to 1/2″ thickness. Embed fiberglass or metal mesh where needed for extra strength. Overlap seams for continuous coverage.
Use a straight edge and level to ensure it’s smooth and even. Let it cure for 48 hours before inspecting and moving on to the final parging stage.
Finish Coat Techniques and Textures
Outline finish coat options such as smooth, sand, dash, or synthetic textures and explain where each suits different architectural styles. Discuss color strategies, pigment considerations, and UV fade resistance. Provide a detailed sequence for applying each texture, including base coat prep and final texture formation.
Include clear quality control checkpoints and stop points, such as moisture tests, consistent trowel pressure, and edge alignment. List tools and workflow tips for efficiency, plus environmental factors like temperature and humidity that influence curing. Mention protection of surrounding surfaces during finish work.
Choosing Texture and Color Methods
When it comes to finish coats, you’ve got options. Let’s break ’em down.
Textures: Smooth, sand, dash, or synthetic? It depends on your home’s style. Smooth for modern, sand for rustic, dash for Mediterranean, and synthetic for unique looks.
Coloring: You can add pigment to the mix (universal tinted) or paint later (traditional palette). UV-resistant tints help prevent fading.
Test samples on-site before committing. Apply a small patch of each texture and color option you’re considering. Let ’em cure, then check ’em out in different lights.
Application Techniques for Common Textures
Now let’s get into the nitty-gritty of applying those finish coats.
Smooth: Use a straight-edged trowel. Hold it flat, apply even pressure. Work in small sections, overlap strokes to avoid lap marks.
Sand: Same as smooth, but use a notched trowel instead. The grooves create the texture. Again, work in small sections, overlap strokes.
Specialty textures: These require specific tools and techniques. Read the manufacturer’s instructions carefully. Practice on scrap material before tackling your walls.
Visual Quality Checkpoints and Touch-Ups
Once you’ve finished applying the final coat, it’s time for a quick inspection. Catching issues early saves time and money.
- Uniform texture: Check for consistent texture across panels. Inconsistencies mean rework or touch-ups.
- Pinholes or cracking: These need to be patched before sealing or full cure. Use a patching compound, let it dry, then sand and skim.
- Color uniformity: Check for any blotchy spots. If found, lightly mist with water, let it sit, then re-trowel.
- Edges/joins alignment: Ensure they’re straight and smooth. Any misalignment needs to be corrected before full cure.
- Adhesion test: Gently scratch the surface. If material comes off, it’s not adhering properly. This could mean redoing that section.
Quick rule: If you find issues, address them immediately. Once the stucco cures fully, touch-ups become much harder and more noticeable.
Curing, Sealing, and Moisture Control
Describe curing methods appropriate for stucco over concrete, including moisture management and expected durations for uniform hardening. Explain the difference between moist-curing and ambient curing and how conditions affect shrinkage and cracking. Emphasize checking substrate readiness before proceeding with sealing or further coating.
Address moisture risks and stop points, such as trapped moisture or damp surfaces, and outline best-practice timelines before sealing. Compare penetrating versus film-forming sealers and explain when each is appropriate for new stucco or existing finishes. Include a practical workflow with surface prep, moisture checks, and weather considerations to avoid failures.
Curing schedule and methods
Proper curing is crucial for your stucco to harden uniformly without cracks or shrinkage. Here’s how:
Moist-curing: For the first 72 hours, keep the surface damp but not wet. Mist it lightly every few hours. Ideal temperature: 50-80°F (10-27°C). Humidity: 70-90%.
Ambient curing: After initial moist-curing, let it cure naturally for the next 3-6 weeks. Protect from rapid drying and freezing.
Sealers and breathable coatings explained
Understand your sealer options to protect and maintain your stucco:
Breathable sealers: These allow moisture vapor to escape. Use on new or repainted surfaces. Test compatibility with your finish.
Non-breathable sealers (film-forming): These block moisture but can trap it, leading to issues. Avoid using over damp surfaces or in high humidity areas.
Clean-Up, Disposal, and Final Inspection
Explain thorough tool cleaning, including scraping, rinsing, and drying, to prevent material buildup and extend tool life. Highlight safe disposal of leftover stucco, slurry, and debris, and advise on local disposal options and prohibitions for wash water. Emphasize containment and compliance with environmental rules if washing near storm drains or waterways.
Provide a final walkthrough checklist to verify surface finish, curing, protection removal, and coating compatibility. Include notes on warranty readiness, like retaining data sheets, photos, and a maintenance plan. Ensure all steps align with the project plan and supplier requirements.
Tool cleaning and care
Clean your tools immediately after use to prevent hardened residue buildup.
- Scrapers: Scrape off excess stucco, rinse with water, let dry, then store.
- Trowels: Clean thoroughly, rinse, dry, and oil lightly before storing.
- Mixer: Clean immediately after use, remove any buildup, and dry completely.
- Hoses: Flush out, drain, and coil up for storage.
- Pumps: Drain, clean, and lubricate as per manufacturer’s instructions.
- Safety gear: Clean and store properly to maintain functionality.
Quick rule: Regular cleaning extends tool life and prevents costly repairs.
Waste handling and environmentally safe disposal
Proper waste management keeps your site clean and protects the environment.
- Leftover stucco: Bag and label for proper disposal or recycling. Check local regulations.
- Curing slurry: Contain, filter, and dispose of according to local waste management guidelines.
- Debris: Separate into categories (wood, metal, concrete) for proper disposal.
- Wash water: Do NOT let it enter storm drains. Use silt barriers and contain for proper disposal.
- Chemical additives: Dispose of according to manufacturer’s instructions and local regulations.
Quick rule: Always check with your local waste management department before disposing of any materials.
Final inspection and documentation
Thoroughly inspect your work to ensure it meets standards and is warranty-ready.
- Surface finish: Check for uniform texture, color, and no visible defects.
- Curing: Ensure even curing with no cracks or pop-outs. Use a magnifying glass if needed.
- Joints: Inspect all joints for proper adhesion and no cracking.
- Flashing: Check that it’s intact, properly installed, and not damaged.
- Masking/protection: Ensure all has been removed.
- Coatings/sealants: Confirm they’re compatible with the finished stucco and applied correctly.
Quick rule: Document your inspection findings with photos, notes, and measurements for future reference.
Maintenance, Troubleshooting, Common Pitfalls, and Budgeting
Offer a practical maintenance schedule with seasonal inspections, crack monitoring, moisture signs, and a simple log for repairs. Include a basic approach to resealing or priming as needed. Encourage keeping a record of timing and outcomes for future projects.
Provide a troubleshooting checklist for common failure modes such as cracks, delamination, moisture intrusion, or efflorescence, with quick diagnostic steps. Outline easy patching workflows and typical DIY mistakes to avoid, and describe a budgeting method that breaks costs into materials, labor, tools, and contingencies without quoting fixed prices.
Routine maintenance and long-term durability factors
Stucco needs regular care to last. Inspect it seasonally for cracks, especially around control joints.
Preventive sealing helps keep moisture out. Flashing should be checked too, as water intrusion can cause damage.
Proper substrate prep and climate-appropriate materials boost longevity. Keep records of repairs to track trends.
Common problems and how to fix them
Cracking happens due to settlement or poor application. Fill small cracks with a matching patch material, feathering edges.
Delamination occurs when layers separate. Reassess substrate prep if it’s widespread. Moisture intrusion can cause efflorescence – white deposits. Scrub with a solution of water and acid-based cleaner.
Staining might need professional attention. Always identify root causes before fixing.
How to plan a budget and estimate costs safely
Calculate material quantities using surface area. Estimate labor hours based on complexity and size.
Get quotes from local suppliers for materials and tools. Check unit prices, waste allowances, and delivery fees.
Add contingencies (10-20%) for unexpected costs. Don’t rely on sample figures; use real-world data.
Conclusion
Finish with confidence by following these steps safely: check moisture and ventilation, verify cure times, and seal the work so the surface stays durable and looks right for years to come.
Do a final, practical check sequence: inspect prep and flatness, confirm base coats cured before applying the finish, test a small patch of texture and color in a hidden spot, then proceed in daylight with a buddy watching for cracks or dampness, keep tools clean, and dispose of waste properly. Move in a steady, planned rhythm and avoid rushing any cure or seal step.
Common mistakes to avoid include skipping the moisture test or rushing curing, skipping backer coats or proper lath alignment, and skipping protective gear or safe mixing practices. Always wear eye protection, dust mask, and gloves, work in good light, and keep a clean, dry workspace. If you’re unsure about substrate conditions, or the project involves extensive surface area, consider bringing in a pro sooner rather than later to prevent costly rework.
FAQ
What surface prep is essential before starting the stucco?
Make sure the substrate is clean, dry, and sound. Patch any loose material, repair cracks, and remove loose paint or old stucco that could delaminate. If in doubt, check the manufacturer instructions for the approved prep and primer for your wall type.
What materials and tools do I need for a basic stucco job?
Keep a lath, basecoat, finish coat, and appropriate bonding agents on hand as required by the substrate. You’ll need a hawk, trowels, plaster or stucco floats, mixing buckets, a drill with a mixing paddle, and a mixing trough. Always follow labels for mixing ratios and set times.
What’s the step-by-step process to apply stucco correctly?
Attach the lath and apply the basecoat with even pressure, then scratch or roughen as required. Apply the brown coat in a uniform layer and let it set to a firm skin. Finish with the topcoat, shaping textures as you go, and back-buff or strike to smooth where appropriate.
What safety measures should I follow during stucco installation?
Wear eye protection, gloves, and a dust mask when mixing or sanding. Work in good lighting and avoid forcing work in wet or windy conditions. If you’re unsure about a step, pause and verify with the product instructions or local guidance.