
Introduction
It’s about using the right trowel choice, backing, and pressing technique to hide visible trowel marks on glass mosaic tile. You’ll work in small, well-prepped patches and back-butter the tile to help transfer even mortar. Keep the substrate flat, clean, and dry as you set each piece.
About CTEF is one of the core topics we’ll cover, along with how to subscribe to the CTEF Blog for updates. I’ll keep this practical: choose the right trowel for glass mosaic, prep the substrate properly, and follow the manufacturer’s instructions and local rules when in doubt. If you’re unsure about any step, check the product label and guidance from the tile or mortar supplier and use safe ranges or options accordingly.
Key takeaways
- Choose a fine-notched trowel and adhesive suited for glass mosaic.
- Use back-buttering and controlled embedding to minimize trowel lines.
- Read About CTEF and compare 2 of 4 competitors before choosing.
- Subscribe to the CTEF Blog for ongoing tips and case studies.
- Prepare substrate thoroughly; clean, flat, and free of laitance before tile.
- Safety: wear eye/skin protection and follow all manufacturer instructions.
Table of Contents
- Introduction
- Key takeaways
- Why Glass Mosaic Shows Trowel Lines and the Installation Principles to Avoid Them
- Tools and Materials Checklist for Invisible Mortar Beds
- Surface Preparation and Substrate Conditioning
- Mortar Application and Embedding Techniques That Hide Trowel Lines
- Setting Techniques for Different Backing Systems to Prevent Visible Lines
- Grouting, Finishing, and Visual Checkpoints to Confirm no Trowel Lines
- Troubleshooting Common Mistakes and Repair Options
- Practical Next Steps and Trusted Sources
- Conclusion
- FAQ
Why Glass Mosaic Shows Trowel Lines and the Installation Principles to Avoid Them
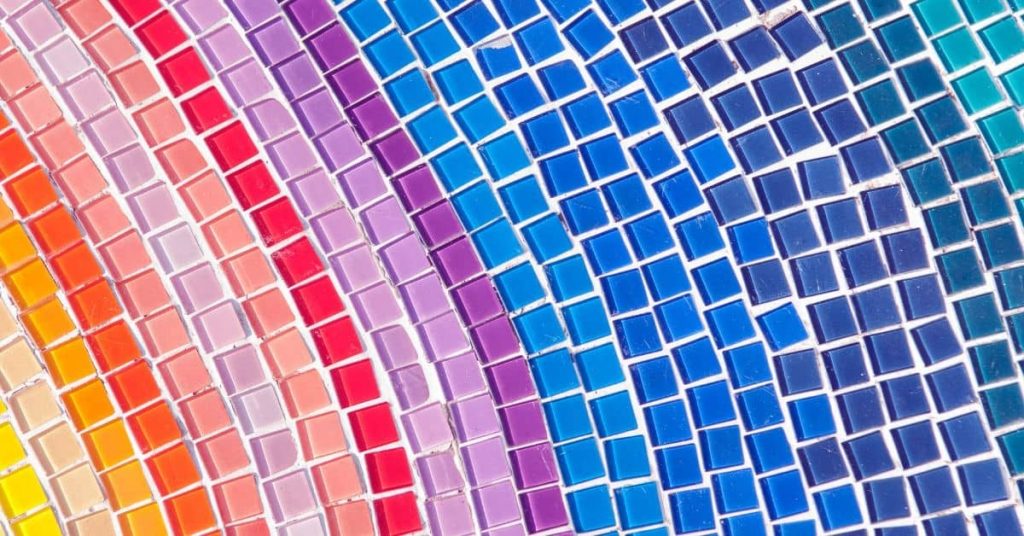
Glass mosaics show trowel lines because the tile is partially translucent and very reflective; you will check translucency, grout joint width/color, and back of the sheet before you spread mortar. Establish three goals up front: a flat substrate, full mortar transfer (back-buttering when needed), and consistent joint spacing.
These checks affect appearance and long-term performance—poor coverage telegraphs ridges and leads to visible lines, potential delamination, or grout issues. If you see ridges during a dry test or after embedding, stop and correct them rather than carry on; follow the product data sheet for compatibility and fixes.
How glass mosaic differs from ceramic and porcelain
Glass mosaics, unlike ceramics or porcelains, are translucent. This means light passes through them, making any imperfections behind the tile visible. They’re also thinner, which makes them more sensitive to substrate flatness.
Glass mosaics come in mesh-backed sheets for easy installation. But this backing can create gaps if not properly embedded. Lastly, glass moves less than ceramics or porcelains due to its rigid nature, so we needn’t worry about expansion joints as much.
Primary causes of visible trowel lines
Insufficient mortar coverage is the main culprit. If your trowel doesn’t cover the entire tile, you’ll see ridges.
Using a trowel with too small a notch can also cause lines. It won’t hold enough mortar to fully embed the tile.
Poor embedding happens when the tile isn’t properly set into the mortar. This leaves gaps that show up as lines.
Backing gaps occur if the mesh backing isn’t fully embedded in the mortar, leaving voids that reflect light and become visible.
An uneven substrate will also show through glass mosaics. Any high or low spots will create visible ridges.
Tools and Materials Checklist for Invisible Mortar Beds
Gather the trowels (flat and correctly notched), a straightedge, spacers, level, rubber mallet, depth gauge, and cleaning rags; lay out your intended mortar, backing, and grout and read the manufacturer instructions for each. Verify the thinset type and any additives on the product label so the mortar bond and color won’t cause shadowing under glass.
Using the right tools and materials saves time and avoids rework—wrong notch size or incompatible mortar will show as lines or voids later. Cross-check product data sheets, match mortar to the tile backing, and confirm trowel notch size before you start to protect any warranties.
Selecting trowel type and safe notch-size ranges
Before you start mixing mortar, use this checklist to ensure you’ve got the right tools for the job. This will help you achieve a strong, level bed that won’t crack or crumble.
- Choose trowel shape: For invisible mortar beds, use a square-notched trowel. It’s designed to spread and comb mortar evenly.
- Check trowel size: Common sizes are 6″, 8″, or 10″. Choose one that feels comfortable in your hand and can cover the area you’re working on without leaving too much mortar behind.
- Verify notch size: Notches range from 3/8″ to 5/8″. Start with a medium-sized notch, like 1/2″, for most tile installations. Check your tile and mortar manufacturer recommendations for specific guidance.
- Avoid oversized notches: Using too large a notch can lead to excess mortar, causing tiles to sit too high and creating an uneven surface.
- Check notch spacing: Notches should be evenly spaced along the trowel. This ensures consistent mortar application.
- Avoid worn-out trowels: A damaged or worn trowel can leave lines in your mortar bed, causing tiles to sit unevenly.
- Inspect trowel edges: Sharp edges are crucial for cutting and spreading mortar. Dull edges won’t give you a smooth, level bed.
- Test trowel before use: Run your gloved hand over the trowel’s notches to ensure they’re clean and free of any burrs or sharp points that could damage tiles.
Quick rule: Always start with a medium-sized notch for invisible mortar beds. You can always add more mortar if needed, but you can’t take it away once it’s set.
Mortars and additives suited for glass mosaic
Before you start mixing your mortar, use this checklist to ensure you’ve got the right materials for your glass mosaic project. This will help you achieve a strong, durable bond and prevent costly mistakes.
- Polymer-modified mortar: Check product label for ‘polymer-modified’ or ‘epoxy-based’. These mortars provide enhanced flexibility and adhesion, ideal for delicate glass tiles.
- Non-sanded mortar: Ensure the mortar is non-sanded. Sand can scratch and damage thin glass tiles during installation.
- Adhesive suitable for glass: Check if the product is recommended for glass mosaic tiles. Some mortars are not suitable for heavy or delicate tiles.
- Pot life (working time): Check the pot life on the product label. It should give you enough time to apply the mortar before it sets. Typically, 30-60 minutes is a safe range.
- Open time: Ensure the open time allows for sufficient working time after application. Open time is usually longer than pot life and ranges from 15-45 minutes.
- Additives (optional): If using additives like primers or accelerators, check manufacturer instructions to ensure they’re compatible with your chosen mortar.
- Consistency: When mixing, aim for a smooth, lump-free consistency. Too thick can cause cracking; too thin may not support the tiles properly.
- Color match (optional): If you’re using colored grout or want to match your mortar color, ensure it matches your chosen grout or tile color.
Quick rule: Always follow manufacturer instructions for mixing and application. This ensures you get the most out of your product and avoid common mistakes that can lead to rework.
Backing, sheets, and mounting methods to choose
Before you start installing your glass mosaic tiles, use this checklist to ensure you’ve chosen the right backing, sheets, and mounting methods. This will help you achieve a professional finish without any costly rework.
- Check mesh-backed sheets: Mesh provides support for loose tiles. Ensure it’s sturdy enough (check manufacturer specs) to prevent sagging during installation.
- Verify paper-backed sheets: Paper backing protects the adhesive on the reverse of the sheet. Make sure it’s intact and doesn’t peel off prematurely, which could cause tiles to fall off.
- Inspect dot-mounted mosaics: Dot mounting uses small dots of adhesive to hold tiles in place. Ensure these dots are evenly spaced and not too large, as this can affect the final grout lines.
- Check loose mosaics: If using loose tiles, ensure they’re well-supported during installation to prevent shifting or cracking.
- Choose mounting method: direct or indirect: Direct mount involves applying mortar directly onto the substrate. Indirect involves applying mortar onto a backing material first. Check local building codes and substrate conditions to determine which is suitable.
- Select appropriate thinset mortar: Refer back to your earlier checklist on mortars and additives suited for glass mosaic. Ensure it’s compatible with your chosen mounting method and substrate.
- Check trowel size: As previously discussed, use a 1/4″ or 3/8″ notch trowel for thinset mortar to ensure proper coverage and adhesion.
- Avoid over-saturating the substrate: Over-wetting the substrate can cause tiles to lift. Ensure your substrate is damp but not wet when applying mortar.
Quick rule: Always double-check manufacturer instructions and local building codes before starting any installation process to avoid costly mistakes.
Surface Preparation and Substrate Conditioning
Start by cleaning the substrate of dust, oils, and loose material and then check flatness with a straightedge and depth gauge; note high and low spots and plan to level or feather them out. Confirm the substrate type and follow any primer or waterproofing instructions on the product data sheet before applying thinset.
Preparation controls whether trowel patterns telegraph through the thinset and become visible under glass mosaics. If you skip priming, allow moisture, or ignore movement joints, you risk visible ridges, cracking, or bond failure—address any doubt by checking manufacturer guidance and local movement/joint requirements.
Flatness, deflection, and movement allowances
Before you start tiling, check your surface for flatness. Use a straightedge or level to spot any highs or lows.
Acceptable tolerances vary by tile manufacturer, so consult yours. Aim for no more than 1/8″ in 6′ for mosaic glass tiles.
Deflection happens when surfaces flex under load. Rigid substrates like plywood or cement board minimize this, reducing trowel line visibility.
Plan for movement joints where needed to accommodate substrate expansion and contraction, preventing cracking and trowel lines from showing up later.
Cleaning, priming, and waterproofing for glass installations
Start by cleaning your surface. Remove dust, oils, and residues. If there’s grout haze from previous work, use a suitable cleaner to remove it.
Primers are crucial for glass tile installations. They improve adhesion and seal the substrate. Choose one compatible with your thinset mortar and follow manufacturer instructions.
Waterproofing or uncoupling membranes might be needed depending on your installation area and local codes. These prevent moisture issues and help maintain a strong bond between tile and substrate.
Ensure your surface is dry before priming and tiling to avoid telegraphing trowel lines due to excess moisture.
Mortar Application and Embedding Techniques That Hide Trowel Lines
Mix the mortar to the consistency recommended on the bag and use the trowel notch size the manufacturer suggests; back-butter sheets when needed and apply an even combed bed so the trowel ribs collapse under the tile. Use a straightedge and occasional lift-checks to confirm full mortar coverage, adjusting trowel size if transfer is poor.
Correct application prevents voids and ridges that show through glass and keeps the installation durable and uniform. If adhesive transfer is incomplete or ridges remain, rework the area immediately—don’t grout over suspected voids; consult product instructions for rework limits.
Spread method, trowel direction, and bed thickness control
When applying mortar, consistency is key. You want a straight, even spread that hides those trowel lines.
Play it straight: Start at one end of the wall or slab and work your way across. This helps maintain an even thickness throughout.
Trowel direction: Use a consistent direction with your trowel. For example, start at the top left corner and work your way down and right. This helps create a smooth, uniform surface.
Bed thickness control: Don’t rely on numbers alone. Check your work visually. A good bed should look even, with no high or low spots. Aim for about 1/2″ to 3/4″ thick, but always check the product label or manufacturer’s instructions for specific recommendations.
Back-buttering: when and how to back-butter glass mosaics
Back-buttering is a must for glass mosaics. It fills those tiny gaps between tiles, preventing voids and ensuring full coverage.
When to back-butter: Always back-butter glass mosaics before installing. It’s especially crucial on walls with uneven surfaces or where moisture could get trapped behind the tiles.
How to back-butter: Use a notched trowel, same as you’d use for spreading mortar. Apply a thin layer of mortar (about 1/8″ thick) onto the back of the mosaic sheet or mesh. Spread it evenly, filling those little spaces between tiles. Don’t overdo it; we’re not making pizza here.
Collapsing ridges and proper embedment movement
When embedding tiles, you want to hide those trowel lines. Here’s how:
First, check base compaction. A solid base means better tile adhesion.
Now, spread your mortar using the spread method and trowel direction we talked about earlier. Aim for a consistent bed thickness of around 1/4″ to 3/8″.
Here’s where the magic happens: embedment movement.
Start by pressing the tile firmly into the mortar. Then, use a slight perpendicular rocking motion or a back-and-forth motion. This collapses trowel ridges and helps hide those lines.
But be careful, avoid excessive movement. Too much can create air pockets and voids, weakening your bond. Keep it smooth and steady.

Setting Techniques for Different Backing Systems to Prevent Visible Lines
Match your setting method to the backing: mesh-backed sheets often need light back-buttering and firm embedding, paper-backed sheets need proper wetting to avoid delamination, and dot-mounted sheets require full contact at each dot; check the tile manufacturer’s guidance for each system. Align sheets carefully, keep grout joint width consistent, and use gentle, even pressure to avoid squeezing mortar into seams.
Using the wrong technique for the backing increases seam visibility and uneven transfer, which shows as lines or shadowing. If seams don’t seat uniformly, stop and correct alignment or back-butter more—small fixes now prevent major rework later.
Working with mesh- or paper-backed sheets
Mesh and paper backing on glass mosaic tiles affects how mortar transfers to the surface. Here’s how:
Mesh-backed: Mortar passes through, creating a textured bed. Remove backing before grouting.
Paper-backed: Mortar doesn’t pass through, so apply thin-set directly on substrate, then press sheets onto it. Keep paper on until grouting.
For continuous coverage across seams, ensure each sheet’s edges are well-buttered and press firmly into mortar bed.
Handling loose mosaics and sheet alignment strategies
Before setting, dry-fit your mosaic sheets to ensure proper alignment. Here’s how:
Start from one corner, lay out full sheets first, then trim pieces to fit edges.
To transfer tiles without disturbing embedment, gently peel mesh or paper backing off, keeping tiles in place until set.
Press sheets firmly into mortar bed, ensuring consistent grout joint width and staggered seams for a uniform appearance.
Edge and trim treatment to blend transitions
For clean exposed edges and smooth transitions:
Cut edges: Score and snap tiles, then feather mortar along edge with trowel. Use grout color to blend.
Around fixtures, use a flexible grout or apply a thin layer of mortar around the fixture’s edge before setting tiles.
For end tiles, stagger seams and ensure consistent grout joint width for a seamless look.
Grouting, Finishing, and Visual Checkpoints to Confirm no Trowel Lines
Choose a grout compatible with glass and the chosen thinset and follow manufacturer timing before grouting; clean with proper sponge technique and check joints under different light angles to catch any hidden ridges. Keep an eye out for grout haze and follow the grout maker’s cleaning steps to avoid leaving streaks that mimic trowel lines.
Grouting and final cleaning reveal any remaining issues—missed voids or ridge shadows will become obvious once grout is in. If you spot lines during the visual check, follow the troubleshooting steps or consult the mortar and tile instructions before proceeding.
Choosing grout and additives for glass tile
Selecting the right grout is crucial to prevent trowel lines from showing on your glass mosaic tiles. Use this checklist when choosing grout.
- Unsanded vs. sanded: Unsanded grouts are smoother, ideal for narrow joints and highlighting glass tile details. Sanded grouts offer better stain resistance but can show imperfections in wider joints.
- Specialty grouts: Consider using epoxy or cementitious grouts with non-sanding formulas for glass tiles. They provide better adhesion, durability, and resistance to stains and moisture.
- Color choices: Opt for colors that complement your tile design. Lighter colors can make trowel lines more visible.
- Grout hardness: Harder grouts are more resistant to scratches but may require more effort to clean. Softer grouts are easier to clean but may wear down over time.
- Haze and reflection: Grout haze can accentuate trowel lines on glass tiles. Choose grouts with minimal haze potential or that can be easily cleaned without leaving residue.
- Manufacturer compatibility: Ensure the grout is compatible with your tile type, substrate, and mortar used. Incompatibility can lead to poor adhesion, cracking, or discoloration.
- Stain-resistant additives: Add stain-resistant additives to protect your grout from dirt, mold, and mildew, especially in high-moisture areas like bathrooms.
- Sealer application: Apply a sealer after grouting to enhance the grout’s durability and resistance to stains and moisture.
Quick rule: Always follow the manufacturer’s guidelines for mixing, application, and cure times to ensure optimal performance and avoid trowel line visibility.
Cleaning, haze removal, and polishing without scratching
Proper cleaning is essential to remove grout haze and buff glass tiles without causing scratches. Use this checklist for safe cleaning.
- Wait before cleaning: Allow the grout to cure for at least 72 hours before cleaning to prevent damage or haze residue from being removed.
- Use warm water: Warm water is more effective in removing haze and dirt than cold water. Avoid using hot water as it can cause tiles to expand and contract unevenly.
- Soft sponge technique: Use a soft, damp sponge to gently wipe away grout haze. Be sure to rinse the sponge frequently to avoid spreading residue.
- Multiple passes: Make several light passes with the sponge instead of applying heavy pressure in one pass. This helps prevent scratching and ensures even cleaning.
- Avoid abrasive materials: Do not use steel wool, scouring pads, or other abrasive materials as they can scratch glass tiles.
- Polish gently: Use a soft cloth to polish the tiles after cleaning. Apply gentle pressure and move in one direction to avoid creating swirl marks.
- Buff with a dry cloth: After polishing, buff the tiles with a dry cloth to remove any remaining residue or moisture.
- Avoid power washing: Do not use power washers on glass tiles as they can cause scratches and damage the tile surface.
Quick rule: Always clean and polish glass tiles gently to avoid causing microscopic scratches that can accentuate trowel lines over time.
Final visual inspection checklist
Conduct a thorough visual inspection after grouting and cleaning to ensure no visible trowel lines. Use this checklist for a comprehensive check.
- Tile backs coverage: Check that the mortar has fully covered the back of each tile, with no voids or gaps. Inadequate coverage can lead to trowel line visibility.
- Ridges and valleys: Inspect for any visible ridges or valleys in the grout joints, which may indicate improper embedding or trowel marks.
- Joint width consistency: Ensure all grout joints are of consistent width. Irregular joint widths can draw attention to trowel lines.
- Edge reveals: Check that edges and corners are properly filled with grout, without voids or gaps. Incomplete filling can accentuate trowel lines.
- Lighting angles: Inspect the tiles under different lighting angles to reveal any hidden trowel lines or inconsistencies in grout application.
- Grout color consistency: Ensure the grout color is consistent throughout. Inconsistencies can highlight trowel lines and other imperfections.
- Full embedment test: Gently press on the tiles to ensure they are fully embedded in the mortar. Any movement or wobbling indicates incomplete embedding, which may cause trowel lines to show over time.
- Sealant application: Apply a sealant to protect grout joints from moisture and stains, helping to maintain the appearance of your tile installation.
Quick rule: Inspect your work thoroughly under various lighting conditions to catch any potential issues before they become permanent.
Troubleshooting Common Mistakes and Repair Options
Diagnose by checking the usual suspects: wrong notch trowel, incomplete embedment, backing voids, or grout haze; lift a test sheet to inspect adhesive transfer and substrate flatness. For small issues, re-tamping, spot re-bedding, or careful grout haze removal may fix the problem; for major voids or damaged backing, plan to re-sheet the area per manufacturer guidance.
Quick, correct diagnosis saves time and material—ignoring the cause leads to recurring visibility problems or tile failure. If the fix isn’t obvious or the tile is loose, stop and check product instructions or get a professional opinion before full rework.
How to inspect coverage and detect voids early
Inspecting your mosaic tile installation early is crucial to prevent costly rework. Here’s how to check for insufficient coverage or trapped ridges:
Pull-and-check method: Gently pull on a few tiles in different areas. If they lift easily, there might be voids underneath.
Visual inspection: Look for any visible gaps between tiles or uneven surfaces that could indicate trapped ridges. Use a flashlight to inspect edges and corners where issues often hide.
Fixes for visible trowel lines and lippage
Visible trowel lines and lippage can be fixed in-place, but sometimes removal and reinstallation are necessary.
Grout removal: Carefully remove grout from the affected area using a grout saw or oscillating tool. Be gentle to avoid damaging tiles.
Localized re-bedding: If lines are due to insufficient embedment, clean and re-trowel the area with the correct notch size. Re-apply thinset with even pressure, checking for lippage before grouting. If voids are large (>10% of tile area) or lippage is significant (>2 mm), consider removing and reinstalling the affected tiles.
Preventative checklist to avoid rework
Use this checklist before starting your mosaic tile installation to reduce the chance of visible lines:
- Substrate flatness: Ensure the surface is clean, dry, and level. Use a straight edge to check for low spots.
- Thinset mix: Prepare thinset according to manufacturer’s instructions. Check open time before application.
- Trowel practice: Familiarize yourself with the trowel notch size and direction. Practice spreading thinset on a scrap board.
- Back-buttering: Apply thinset to the back of tiles using a notched trowel before setting them in place.
- Tile alignment: Ensure mesh-backed sheets are aligned properly and follow the layout lines.
- Edge treatment: Pay extra attention to edges and trim areas. Use L-shaped spacers or edge profiles for support.
- Grout selection: Choose a grout suitable for glass tiles. Consider using a sanded or polymer-modified grout for better adhesion and reduced haze.
- Post-install inspection: Inspect your work after setting each section of tiles to catch any issues early.
Quick rule: Regular, thorough inspections during installation are key to preventing rework. Address any issues promptly to save time and materials in the long run.
Practical Next Steps and Trusted Sources
Wrap up by reviewing PPE, handling precautions for glass, and the product data sheets for your thinset, grout, and tile; prepare questions for a pro if the substrate is complex or the install is large. Note standards and trade groups you can consult for details, and consider hiring a certified installer for challenging layouts or finish expectations you can’t meet yourself.
Following these next steps keeps the job safe and protects the finished look of the glass mosaic. When in doubt about compatibility, movement joints, or warranty conditions, verify with the manufacturer or a certified installer before proceeding.
Safety precautions for cutting, mixing, and handling glass mosaics
Glass mosaics are beautiful but can be hazardous. Always wear safety glasses, gloves, and a long-sleeved shirt to protect from sharp edges.
When cutting, use a wet saw with plenty of water to keep dust down. Ventilation is crucial – open windows or use fans to prevent inhalation.
Handle mosaics carefully to avoid breaking them. Keep work surfaces clean and free of debris to prevent scratching the glass.
About CTEF and when to consult certified tile professionals
The Ceramic Tile Education Foundation (CTEF) provides training and certification for tile installers. Certified pros follow strict standards.
Consider hiring a certified installer for complex jobs, like large patterns or challenging substrates. They know how to prevent trowel lines and ensure longevity.
Check the CTEF website for certified professionals in your area. It’s worth investing in expertise for peace of mind.
Subscribe to the CTEF Blog and further learning resources
CTEF offers a wealth of information through their blog. Subscribe for updates on best practices, troubleshooting tips, and industry news.
Manufacturer websites also provide valuable resources – installation guides, video tutorials, and specification sheets. Stay current with the latest recommendations.
Don’t forget to check out local tile stores or home improvement centers for workshops and classes. Continuous learning keeps your skills sharp.
Conclusion
Careful prep, proper embedding, and patient setting of glass mosaic will keep lines invisible, protect the substrate, and give you a durable, clean look. If you follow the checks and right techniques, you’ll save time and avoid costly damage.
Check that you’ve staged the project in a logical order: verify substrate conditioning and surface flatness, confirm you’re using the correct mortar bed and backing compatibility, apply and embed mortar evenly without dragging, set tiles with consistent pressure across backing systems, and finally cure and grout with attention to the finished seam lines. Test a small area first, then expand, and always keep safety gear within reach as you work your way across the full panel.
Avoid these common missteps: don’t rush mortar work or over-tack, don’t skip surface prep, and don’t force tiles if the backing shows through. Keep the work area clean, wear eye and dust protection, and follow manufacturer instructions for the mortars you choose. If you’re unsure about backing compatibility, or the substrate has defects, step back and reassess before proceeding—it’s cheaper to stop now than to repair later. If the project calls for unfamiliar materials or you’re not confident in the substrate conditioning, don’t hesitate to call a professional; a quick consult can prevent costly invesments and lasting damage. Stay steady, follow the steps, and the result will speak for itself.
FAQ
What trowel size and type should I use for glass mosaic tile, and how does that affect showing lines?
Use the trowel size recommended by the tile and mortar manufacturers for glass mosaic. The goal is to get a consistent bed without exaggerating ridges, so follow the label and use a flat, clean trowel. If in doubt, check the product instructions for glass tile compatibility and back-butter if required.
What mortar application technique helps hide trowel lines on glass mosaic tile?
Spread a full, even bed and work in small areas to avoid dry spots. Back-buttering the tile can help, then press firmly to seat and level. If you see ridges, adjust by re-pressing and combing only enough mortar to maintain alignment with adjacent pieces.
How should I prep the substrate for glass mosaic to prevent showing lines?
Make sure the substrate is flat, clean, and fully bonded. Patch high spots and fill low spots to reduce variations in the mortar bed. If using a waterproofing or primer, follow the manufacturer’s instructions for curing times and compatibility with glass tile.
What should I know about cutting glass mosaic tiles and selecting grout to avoid visible lines?
Cut with the appropriate glass tile nippers or a wet saw designed for glass to minimize chipping and uneven edges. Choose a grout that matches the tile style and provides uniform fill; test a small area first and follow product directions for mixing, pot life, and curing. If you see grout gaps or shadows, check substrate flatness and ensure proper bed thickness before grouting.