
Introduction
Bathroom tile layout and grout work is planning how tiles sit, where grout lines go, and how the surface stays waterproof.
This article breaks down practical, hands-on steps for laying out a shower or bath area without getting lost in theory. Think of it as a roadmap to avoid awkward cuts, misaligned edges, and stubborn gaps.
Choosing the right trowel for different tile sizes and taking care with large-cut tiles helps prevent cracks.
I’ll also touch on upgrading tools and techniques for better grout cleanup and a smoother lay, and how to handle uneven surfaces before you start to keep the finish straight and true.
Key takeaways
- Plan your layout with chalk lines and dry runs before setting tile.
- Choose trowels and materials carefully; match size to tile and mortar.
- Ensure flatness by fixing uneven framing and substrate before tile work.
- Waterproofing: seal transitions in showers and wet areas per manufacturer.
- Cutting tiles cleanly; use proper technique to prevent cracking during install.
- Safety: wear eye protection, follow local code rules, and handle adhesives safely.
Table of Contents
- Introduction
- Key takeaways
- Plan Your Tile Layout for a Professional Finish
- Choose the Right Tools and Materials Checklist
- Prepare Framing, Subfloor, and Backerboard for Flatness and Stability
- Waterproofing Strategies for Showers, Tub Surrounds, and Wet Floors
- Best Practices for Applying Thin-Set and Mortar Beds
- Cutting Tiles Cleanly—Techniques to Avoid Cracking and Chipping
- Grout Lines, Cleaning, and Finishing for a Lasting Look
- Safety, Cost Considerations, and Common Beginner Mistakes
- Conclusion
- FAQ
Plan Your Tile Layout for a Professional Finish
Start by setting clear layout goals before you place a single tile. Identify the eye level starting point, center the biggest grid, and plan focal lines to balance visual weight and avoid narrow slivers at edges. Dry-lay and map runs to preview how joints will look under real conditions.
Establish reference lines with a laser level or chalk line to create wall-to-wall grids, margins from walls, and perpendiculars for straight runs. Measure room dimensions, verify wall plumb, and check floor flatness so you can adjust the plan before adhesive goes down. Test different offsets to optimize grout lines and reduce awkward cuts.
Centering, Focal Points, and Tile Run Strategies
Start your layout at eye level for a balanced look. Center the biggest tile grid on the wall opposite the door or vanity to create a focal point.
Shift tiles left or right to minimize narrow slivers at edges. If you can’t avoid them, plan to live with it or adjust your layout.
Use half-tiles near corners and edges sparingly. It’s okay if they’re not perfect; just keep them consistent.
Using a Laser Level and Chalk Lines to Guide Layout
A self-leveling laser saves time and increases accuracy. Snap a line around the room at your desired tile height.
Use this line as a reference for your first row of tiles. It’ll help keep your layout straight and level.
Chalk lines are cheap, easy to use, and great for marking out perpendiculars. Just make sure your laser or chalk line is plumb before snapping.
Planning Cut Sizes and Mock Layout
Before you set any tile, lay them out dry on the floor. This helps you see how they’ll fit together and where cuts are needed.
Measure edge cuts carefully. You don’t want narrow slivers at walls. If you can’t avoid them, plan to live with it or adjust your layout.
Test different offsets in your dry-run. This helps optimize grout lines and avoid awkward cuts. It’s okay if some tiles are half or even quarter-sized; just keep them consistent.
Choose the Right Tools and Materials Checklist
Define essential tools and when to rent versus buy. Identify must-haves like trowels, a wet saw or tile cutter, level, and backerboard knife, and note which expensive items are sensible to rent such as a tile saw or large-format tile cutters. Gather them before you start.
Detail key materials and their roles, including thin-set mortar (latex-modified for bathrooms), the grout type, waterproofing approach, backerboard options, primers, bonding agents, and grout sealants. Include PPE and job-site safety gear and plan for substrate preparation and layout aids.
Notched trowel sizing and how to choose
Use this checklist before buying notched trowels for your bathroom tile project.
- Tile size: Check the size of your tiles. Smaller tiles need smaller notches.
- Tile thickness: Thicker tiles require larger notches to ensure proper mortar coverage.
- Manufacturer’s recommendation: Always check the tile and mortar manufacturer’s guidelines for notch size.
- 1/2 x 1/2-in. notch: This is a common choice for many standard-sized tiles (6×6, 8×8, etc.).
- Larger notches for large-format tiles: Tiles larger than 12×12 or thick tiles may require 3/4 x 3/4-in. or even 1/2 x 3/4-in. notches.
Quick rule: Always choose a notch size that allows for full mortar coverage to ensure proper adhesion and support for your tiles.
Cutting tools: wet saws, handheld options, and blades
Use this checklist to select the right cutting tools for your bathroom tile project.
- Wet saw: Rent or buy a contractor-quality wet saw for large cuts and straight lines. Ideal for tiles larger than 12×12.
- Handheld wet saw: Use with a straightedge for smaller tiles and intricate cuts. Great for DIY projects.
- Scoring tool or nippers: Suitable for small tiles, mosaics, or touch-up cuts. Not ideal for large tiles.
- Blade type: Choose diamond blades designed for ceramic tile to ensure clean cuts and blade longevity.
Quick rule: Always use the right tool for the job. Rent expensive tools like contractor-quality wet saws if you won’t use them often.
Materials: thin-set, medium-bed, grout types, and waterproofing
Use this checklist to choose the right materials for your bathroom tile project.
- Thin-set mortar: Choose latex-modified thin-set for most bathrooms. It’s flexible and resistant to moisture.
- Medium-bed/mortar: Use for large-format tiles (12×12 or larger) to provide extra support and leveling.
- Grout type:
- Sanded grout: Ideal for wide grout lines (1/8-in. or wider).
- Unsanded grout: Suitable for narrow grout lines (less than 1/8-in.).
- Epoxy grout: Durable and stain-resistant, ideal for high-traffic areas or where cleanliness is crucial.
- Waterproofing:
- Liquid membrane: Easy to apply, suitable for most bathroom surfaces.
- Sheet waterproofing: Ideal for complex areas or where extra protection is needed (e.g., shower pans).
Quick rule: Always match materials to your tile size, substrate, and moisture exposure to ensure a durable, long-lasting installation.
Prepare Framing, Subfloor, and Backerboard for Flatness and Stability
Assess framing and subfloor for flatness and stiffness. Look for warps, squeaks, deflection, and any uneven spots that could telegraph through tile. Any signs of movement should be addressed before tile goes down.
Diagnose structural issues and plan corrective steps like straightening joists, reducing deflection, and leveling high or low spots with shims or leveling compounds. Verify the subfloor is solid, clean, dry, and within flatness tolerances, addressing hollow spots and securing loose boards. Choose a suitable backerboard and follow proper sequencing with thin-set, including edge joints and fastener patterns.
Flattening framing and walls before installing backerboard
Before you lay a single piece of backerboard, you gotta make sure your framing is flat as a pancake. Here’s how:
Repair or sister crooked studs. If any studs are out of whack, straighten ’em up or add new ones alongside (sistering) to strengthen and align.
Next, shim walls for flatness. Use thin pieces of wood to fill gaps between studs and drywall. Check with a level every few feet to ensure you’re getting it right.
Check framing is plumb. Walls should be straight up and down, not leaning like the Tower of Pisa. If they are, fix ’em before moving on.
Installing and sealing backerboard correctly
Before you start, check base compaction. Soft spots mean trouble later. Once you’re good there:
Cutting’s easy – score with a utility knife, snap along the line. Keep pieces manageable.
Fastening pattern matters. Use 1/8″ or 3/16″ screws, spaced every 6-8 inches in the field and around edges. Not too close to avoid cracking, not too far for stability.
Sealing joints is crucial. Use thin-set mortar or manufacturer-recommended compounds. Apply with a 1/4″ square-notched trowel, press in tape, cover with another layer of thin-set. Let it cure before tiling.
Substrate flatness checks and tolerance tips
Before you start tiling, check your subfloor’s flatness. You don’t want any nasty surprises halfway through the job.
Grab a straightedge or level, at least as long as your tile. Place it on the floor and see if there are any gaps between it and the surface. If there are, you’ve got some high spots that need to go.
Now, check for low spots. Use the same tool, but this time look for where the straightedge dips below the surface. If it’s more than what your tile manufacturer allows (usually 1/8″ in 10′), you’ll need to level out those valleys. You might need to add some self-leveling compound or even remove some material.
Remember, if your subfloor isn’t flat, your tiles won’t be either. And that’s a recipe for disaster. So take the time to check and fix any issues now. Trust me, you’ll thank yourself later.
Waterproofing Strategies for Showers, Tub Surrounds, and Wet Floors
Explain the need for a continuous waterproofing layer to protect showers, tub surrounds, and wet floors, ensuring seamless transitions from pan to walls and corners. Follow manufacturer instructions for product use and overlap requirements.
Describe the interface between membrane, sealant, flashing, and the drain or liner, and how they tie into studs and backerboard. Outline the installation sequence from substrate prep to priming, membrane application, seam wrapping, flashing at openings, and connection to the drain assembly.
Liquid waterproofing vs. sheet membranes
Both liquid and sheet membranes are effective for waterproofing showers, but they have different strengths.
Liquid Membranes: Easy to apply with a brush or roller, great for complex shapes like niches. They create a seamless barrier but require careful application to avoid air pockets.
Sheet Membranes: Pre-formed sheets are quick to install and reduce the risk of missed spots. However, they can be tricky around corners and may require additional sealant at seams.
Critical details: corners, niches, drains, and seams
Proper treatment of these areas is crucial to prevent water bypass.
Corners: Use L-shaped corner pieces or fold sheet membranes at 45 degrees for a tight seal. Liquid membranes should be applied thickly here with a trowel.
Niches & Drains: Seal niches and drain flanges with membrane, ensuring no gaps. Use drain-specific flashing to protect the membrane from damage.
Waterproofing over backerboard and integration with framing
Apply the waterproof membrane after backerboard installation for a smooth surface.
Backerboard: Prime the board first to seal it. Apply the membrane, overlapping seams by at least 2 inches. Seal any screw or nail holes.
Framing Integration: Use flashing tape around studs and other penetrations. Lap the membrane over the tape for a continuous barrier. Ensure the membrane extends up the wall at least 6 inches to prevent water from getting behind it.

Best Practices for Applying Thin-Set and Mortar Beds
Clarify when to use standard unmodified thin-set versus medium-bed mortar for large-format tiles, focusing on proper tile sizes and weight considerations. Choose the right mortar for your substrate and climate, following label guidance.
Detail correct trowel technique, including notch size, full coverage, and back-buttering to prevent voids. Explain how to test for hollow spots and address them before grout, and outline mixing, pot life, and ambient conditions that affect cure.
Back-buttering and medium-bed mortar for large-format tile
Large format tiles, like porcelain or ceramic, need extra support to ensure full contact with the substrate. This is where back-buttering comes in.
Back-buttering involves applying a layer of thin-set or medium-bed mortar onto the back of the tile before setting it. This helps to fill any voids and ensures complete coverage, preventing hollow spots that could compromise bond strength.
Medium-bed mortars are thicker than standard thin-sets and provide better support for large tiles. They’re typically used with tiles over 15″ in size or weighing more than 2 lbs per sq ft.
Using a medium-bed mortar and back-buttering helps distribute the tile’s weight evenly, reducing the risk of lippage (uneven tile heights) and weak bonds.
Flattening thin-set ridges for mosaics and small tiles
When working with small tiles or mosaics, it’s crucial to prevent thin-set from squeezing out into the grout joints. This can make grouting difficult and result in an unprofessional finish.
The key is to flatten the notched ridges of the thin-set before setting the tiles. Use the flat side of your trowel to smooth out any peaks, ensuring a level surface for your tiles.
This technique helps prevent excess mortar from being forced into the grout joints as you press down on the tile. It’s especially important with small tiles and mosaics where grout lines are narrow.
Ensuring full coverage and avoiding voids
One of the most common mistakes in tile installation is not achieving full contact between the tile and the mortar bed. This can lead to weak bonds, hollow spots, and even tiles popping off over time.
- Check for coverage: Lift a few tiles after setting them to ensure they’re fully adhered. If they lift easily, you may need to apply more pressure or add more mortar.
- Avoid partial contact: Ensure the entire back of the tile is in contact with the mortar bed. Partial contact can lead to weak bonds and hollow spots.
- Correct partial contact: If you find a tile with partial contact, lift it carefully, add more mortar, and reset it, ensuring full coverage this time.
- Monitor mortar skinning: Keep an eye on the mortar as it sets. If it starts to ‘skin’ over before all tiles are set, you may need to remix some mortar or work faster.
By checking for coverage and correcting any partial contact issues early, you can ensure a strong bond between your tiles and the substrate, preventing future problems.
Cutting Tiles Cleanly—Techniques to Avoid Cracking and Chipping
Recommend using a high-quality wet saw with a continuous-diamond blade for large porcelain and stone tiles, and contrast with scoring and snapping for thinner or compatible materials. Ensure you have the right blade and guides for accurate cuts.
Provide step-by-step techniques to prevent cracking: proper support, slow feeding, dry-fit layout, blade lubrication, and not forcing cuts. Include alternatives for small or intricate cuts like nippers, snap cutters, and radius cutting tools, plus edge-finishing tips for natural stone.
Wet saw technique for large tiles
Alright, listen up. You’re dealing with big tiles here, so you need to take it slow and steady. First things first, always use a wet diamond saw. It’s the only way to go for these big boys.
Now, support that tile properly. You don’t want it wobbling around like a drunken sailor. Use clamps or a tile holder, whatever you’ve got. Just make sure it’s secure. Remember, we talked about this earlier – no cracked tiles on my watch.
Make shallow passes, would ya? You’re not trying to cut through a mountain here. Start slow and steady, let the blade do its job. Vibration’s your enemy, so keep that tile stable. Check your saw’s base compaction too, make sure it’s solid.
Alternative cutting methods for small or intricate pieces
When you’re dealing with tiny tiles or need to make intricate cuts, your wet saw might not be the best tool. Here are some alternative methods:
Scoring and Snapping: This is like using a tile cutter but for smaller pieces. Score the line with a tile scoring tool, then snap it along that line. It’s quick and easy, but not as precise as other methods.
Tile Nippers: These are like pliers designed to cut tiles. They’re great for small cuts and curves. Just go slow and steady to avoid chipping. Not ideal for large straight cuts though.
Angle Grinders with Diamond Blades: For really tiny cuts or intricate shapes, an angle grinder with a diamond blade can be your friend. It’s precise but takes some practice. Always wear safety gear and go slow.
For curves and cutouts, manual trim tools are your best bet. They take time but give you the control you need for those tricky cuts. Don’t rush, or you’ll end up with cracked tiles.
Preventing chips and repairing edge damage
First off, don’t be a hero. If a tile’s got a big chip or crack, it’s best to replace it. But if it’s just a small edge chip, here’s how you can fix it.
For minor chips, grab some fine-grit sandpaper (600-800 grit) and gently sand the edges. Be careful not to sand too much or you’ll make it worse. Then, use a rubbing stone or diamond pad to polish it up.
If the damage is more than just a chip, but less than half the tile’s thickness, you might be able to save it. Use a tile repair kit, follow the manufacturer’s instructions, and apply some pressure while it sets. But remember, this isn’t a permanent fix. If you can, replace the damaged tile.
And listen up, don’t try to use super glue or epoxy on your tiles. It won’t work and you’ll just make a mess. Stick to the right tools for the job.
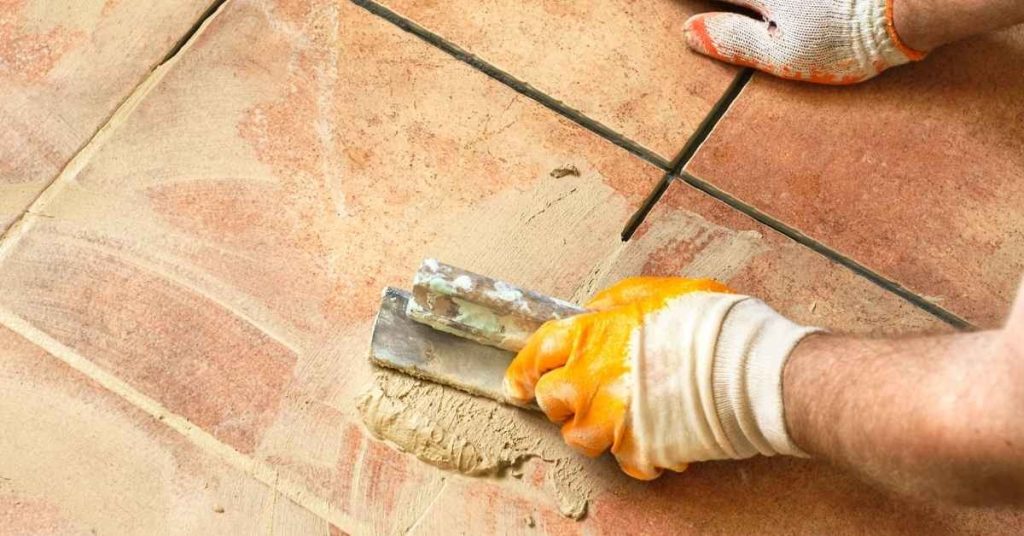
Grout Lines, Cleaning, and Finishing for a Lasting Look
Choose grout type and width based on tile size and moisture exposure, considering unsanded or sanded grout and typical joint widths. Discuss color choices to hide or emphasize joints and plan for cleaning during and after installation.
Outline sealing strategies and maintenance, including when to seal after cure and whether to use penetrating sealers or color sealers. Include finishing touches and routines to keep grout looking fresh and prevent staining, plus tips to avoid haze and over-wetting joints.
Choosing grout width and grout type
Selecting the right grout is crucial for a lasting, attractive finish. Start by considering your tile size:
Smaller tiles (12″ or less) typically use narrower grout lines, usually 1/16″ to 3/16″. This helps prevent the grout from overwhelming the tile pattern.
Larger tiles can handle wider grout lines, up to 1/4″, which can help hide any minor imperfections in the tile or subfloor. Remember to consider edge spacing and movement joints when planning your grout width.
Next, choose between sanded, unsanded, or epoxy grout. Sanded grout is more durable and suitable for floors, while unsanded is better for walls. Epoxy grout offers superior stain resistance but requires careful application.
Grout cleanup, haze removal, and finishing tips
After applying grout, follow these steps for a clean, polished finish:
Initial wipe: Use a damp sponge to remove excess grout from the tile surface. Wring out the sponge frequently to avoid spreading grout haze.
Haze removal: Wait 15-30 minutes after the initial wipe, then use a clean, damp sponge to remove any remaining haze. Rinse and wring often.
Microfiber finishing: Once the tile is mostly dry (about 2 hours), use a microfiber pad or rag to buff the grout lines. This helps remove any lingering haze and gives your grout a smooth, finished look.
Sealing, curing, and long-term maintenance
Proper sealing and care can extend the life of your grout:
Sealing: If using a sealer, apply it after the grout has fully cured (usually 72 hours). Use either a penetrating sealer for basic protection or a grout color sealer to enhance color and resistance. Avoid sealing during cleaning to prevent trapping moisture.
Curing: Allow the grout to cure fully before using the tiled area. This can take up to 28 days, but you should be able to walk on it after a few hours.
Maintenance: Clean spills promptly to prevent staining. Use pH-neutral cleaners and avoid bleach on color-sealed grout. Establish a routine cleaning plan to extend your grout’s life. Inspect for micro-cracks or chips and repair them promptly.
Safety, Cost Considerations, and Common Beginner Mistakes
List essential PPE and jobsite safety practices: eye protection, gloves, dust mask or respirator, hearing protection, non-slip footwear, proper ventilation, and a clean work area. Address ladder safety and electrical hazards where relevant.
Discuss tool rental versus purchase to save money, and note which tools are worth renting versus buying. Highlight common beginner mistakes and quick fixes, and remind readers to check local rental prices and warranties before committing.
Personal protective equipment and jobsite safety
Safety should be your top priority when tiling. Here’s what you need to protect yourself and maintain a safe workspace.
- Eye Protection: Safety glasses or goggles prevent debris from reaching your eyes. Consider renting or buying a pair with side shields for extra protection (around $10-$20).
- Gloves: Protect your hands from cuts and chemicals. Disposable gloves are cheap ($5-$10 per box), but consider investing in durable, reusable ones.
- Respirator/Dust Mask: Essential when cutting tiles or mixing thin-set to avoid inhaling dust. Rent a half-face respirator (around $20/day) or buy a disposable dust mask ($1-$5).
- Ear Protection: Use earplugs or earmuffs when operating power tools like wet saws to prevent hearing damage. Earplugs are cheap ($5-$10 per box), and some rentable earmuffs cost around $10-$20.
- Non-slip Footwear: Wear sturdy shoes with good grip to prevent falls, especially on wet surfaces. You can find suitable footwear for around $30-$50.
Tool and material cost considerations and renting tips
Before you start your project, consider the costs of tools and materials. Here’s how to save money by renting or buying smart.
- Wet Saw: Essential for cutting tiles. Rent one (around $40-$60 per day) instead of buying ($250-$350).
- Torpedo Level: Crucial for ensuring straight lines. Rent ($10-$20/day) or buy ($10-$30).
- Tile Cutter: For scoring and breaking tiles. Rent ($5-$10/day) or buy ($10-$20).
- Basic Trowels: Buy these for around $5-$10 each, as they’re cheap and durable.
- Spacers: Buy these in various sizes (around $3-$5 per pack) to ensure consistent grout lines.
- Grout Float: Buy this for around $10-$20, as it’s a one-time purchase.
Common mistakes and quick troubleshooting
Avoid these common pitfalls to ensure a successful tiling project.
- Skipping Substrate Prep: Inadequate preparation leads to tile failure. Always clean, prime, and level the surface before tiling.
- Ignoring Waterproofing: Without proper waterproofing, moisture can cause damage over time. Use a suitable membrane or liquid-applied waterproofing system.
- Wrong Trowel Size: Using the wrong trowel size can lead to improper thin-set application and tile failure. Always use the recommended trowel size for your specific thin-set and tile type.
- Improper Thinset Mixing: Incorrect mixing can result in weak bonds and failed tiles. Follow the manufacturer’s instructions carefully.
- Misplanning Layout: Poor planning leads to waste and uneven layouts. Plan your layout on paper first, considering tile size, grout lines, and any patterns or features.
Rushing grout work can lead to inconsistent joints and improper curing. Take your time, follow the manufacturer’s instructions, and allow for proper drying and curing times.
Conclusion
Finish with confidence by treating this job as a system: solid layout, flat and stable surfaces, and reliable waterproofing will protect your tile, your walls, and your wallet for years to come. When you get those basics right, the look is cleaner and the maintenance is simpler.
Start by confirming your final layout on the wall and floor, then verify flatness and level with a straightedge, lay out waterproofing where needed, mix thin-set to the right consistency, cut tiles cleanly, set with even pressure, allow proper cure time, plan your grout lines, and finish with a careful cleaning and sealing routine. If you’re unsure, test a small area first and keep to a steady pace so you don’t rush into mistakes that cost more later.
Two common mistakes to avoid are skipping waterproofing in showers or wet zones, and overworking thin-set or grout, which can trap air, cause cracking, or lead to uneven surfaces. Safety rules are simple: wear eye protection when cutting, use proper ventilation, measure twice and cut once, and never work behind a finished surface without confirming backing is solid. Plan for a dry, tidy workspace and chart your steps so you don’t skip critical stages.
If the area is irregular, large-scale tiles, or you’re dealing with complex transitions, consider bringing in a pro rather than pushing forward solo. The right call saves material waste and costly fixes. Stay patient, follow your checklist, and you’ll end up with a durable, good-looking bath that works every day.
FAQ
What trowel size should I use for different tile sizes?
Use a notched trowel that matches the tile size and substrate. Large-format tiles usually need a larger notch so the mortar fills the back evenly, not just the edges. Check the tile manufacturer’s instructions or label for recommended trowel size.
How can I prevent cracks when cutting large tiles?
Score and snap carefully to avoid forcing the blade. Use a high-quality scoring wheel and a stable cutting surface. If a cut edge is brittle, back up the tile with a piece of scrap material and cut slowly.
What tools or technique upgrades help with grout cleanup and tile leveling?
Invest in a grout float with a firm edge and a heat-resistant sponge for cleanup. Consider a leveling system for large tiles to keep joints consistent. Don’t rush cleanup; mist the grout and wipe thin layers to avoid pulling it out of joints.
How do I fix an uneven substrate before tiling?
Check for high spots and fill low spots with the appropriate patching compound. Use a long straight edge across the surface to spot high or low areas. Follow the patch manufacturer’s cure time and test for flatness again before setting tile.