
Introduction
Painting a metal front door is a time-sensitive project that requires careful planning. Understanding the timeline and duration of each step ensures you complete the job efficiently without compromising quality.
From inspection to maintenance, follow this detailed step-by-step timeline to paint your metal front door like a pro.
The Complete Timeline for Painting a Metal Front Door
Painting a metal front door involves several steps that require careful timing and attention. Here’s a comprehensive timeline to guide you through the process, ensuring you allocate enough time for each task:
- Inspection & Preparation (1-3 days): Inspect your door for any damage or rust, then clean and prepare the surface.
- Priming (1 day): Apply a rust-inhibiting primer to seal the surface and prevent future issues.
- Spot Repairs & Sanding (1-2 days): Address any repairs, then sand the door for better paint adhesion.
- Painting (2-3 days): Apply multiple thin coats of paint, allowing adequate drying time between each layer.
- Curing & Reassembly (1 day): Allow the final coat to cure completely before reassembling your door and hardware.
- Maintenance (Ongoing): Regularly inspect and maintain your painted metal front door to extend its lifespan.
Key takeaways
The preparation stage is crucial as it sets the foundation for a durable, long-lasting finish. Allocating sufficient time for this step ensures that subsequent painting stages go smoothly and result in an excellent final product.
- Inspect hinges for looseness and friction before repainting to prevent binding.
- Clean hinge surfaces, then apply chosen lubricant like silicone spray for smoother operation.
- Remove hinge pins carefully to clean and lubricate hinge barrels during maintenance.
- Use rust-inhibiting primers and paint compatible with metal doors to reduce peeling.
- Wipe down door edges and frame before painting to prevent trapped moisture.
- Wear PPE and work in dry conditions; avoid painting on wet surfaces or lead paint risk.
Table of Contents
- Introduction
- Key takeaways
- Why Painting a Metal Front Door Is Different
- Inspecting the Door: Tests to Identify Problems Before Painting
- Tools, Materials, and Safety Checklist
- Surface Preparation Steps (Detailed How-To)
- Priming and Spot Repairs
- Painting the Door: Methods, Techniques & Troubleshooting
- Curing, Reassembly, and Long-Term Maintenance
- Alternatives, Costs, and When to Call a Professional
- Conclusion
- FAQ
Why Painting a Metal Front Door Is Different
Metal doors behave differently from wood or fiberglass. They expand and contract with temperature swings, and their surface can be harder and more prone to corrosion. These traits drive primer and topcoat choices that emphasize flexibility and adhesion protection.
Expect common metal issues like peeling, rust, and bubbling when moisture gets trapped under the finish. Surface preparation and the right rust-inhibitive or etching primers help prevent those failures. Plan for a coating system that handles metal-specific stresses and long-term outdoor exposure.
Common failure modes (peeling, blistering, rust)
Metal doors face unique challenges that can lead to paint failure. Understanding these issues helps you diagnose and fix problems before they get worse.
Peeling often starts at the bottom of the door due to moisture wicking up and breaking the bond between paint and metal. It can also happen if you didn’t prepare the surface properly or used the wrong primer.
Blistering occurs when moisture gets trapped under the paint, usually because the surface wasn’t clean or dry enough before painting. This causes the paint to lift off in bubbles.
Rust forms when metal is exposed to moisture and oxygen. It can cause paint to flake off and create a rough surface that won’t hold new paint well. Galvanic corrosion, where different metals react with each other, can also cause rust.
Types of metal doors and factory finishes
Metal doors come in two main materials: steel and aluminum. Each has its own characteristics that affect how paint adheres.
Steel doors are strong but susceptible to rust if not properly protected. They often come with a factory-applied primer or paint, which you should sand lightly before painting.
Aluminum doors won’t rust but can be more prone to corrosion from dissimilar metals touching each other. They usually have a powder coat or baked enamel finish that provides good protection but may need light sanding before painting.
Powder coat finishes are durable and resistant to chipping, while baked enamel gives a smooth, glossy look. Both can be painted over, but you’ll want to ensure they’re clean and lightly sanded first for best results.
Inspecting the Door: Tests to Identify Problems Before Painting
Start with a careful visual check for peeling, blistering, corrosion, and rust through on the door surface. Note any chalky or brittle coatings or metal finish that could affect adhesion. Identify hinges and edges that may require extra prep.
Perform simple adhesion checks like a tape pull or cross-hatch test to gauge coating stability. Look for hidden rust or delamination using tapping sounds or a magnet to spot non-obvious corrosion. Plan rust treatment and surface prep based on what you find.
Visual and Tactile Inspection Checklist
Before you start painting, walk around your door with a keen eye. This checklist helps spot issues early.
- Rust: Look for red or orange spots, flakes, or powder. Tap suspect areas gently to listen for hollow sounds.
- Flaking paint: Check for loose or peeling paint. Gently scrape with a screwdriver tip to see if it lifts easily.
- Dents and dings: Inspect for any damage that could affect the finish.
- Loose trim: Tighten any wobbly hardware or trim pieces.
- Gaps: Check for spaces between the door and frame. Fill if necessary.
- Chrome/metallic finishes: Look for these as they can affect adhesion.
- Existing coatings: Identify any old, chalky, or brittle paint layers.
- Moisture intrusion: Check for water stains, warping, or soft spots.
Quick rule: If you find anything that seems off, address it before painting. It’s cheaper and easier to fix now than later.
Adhesion and Coating Tests (Rub, Solvent, Scrape)
Before you paint, test your door’s surface to ensure it’s ready for new paint.
First, gently rub the surface with a dry cloth. If powder or flakes come off, the existing finish is failing and needs removal.
Next, wipe with denatured alcohol. If it beads up or doesn’t evaporate quickly, the surface isn’t accepting new paint. Sand lightly and try again.
Finally, use a razor blade to gently scrape the surface at a 45-degree angle. If paint peels off easily, remove all existing paint before proceeding.
Rust and Corrosion Assessment
Rust can be on the surface or penetrating deep. Here’s how to tell the difference:
For surface rust, it’s usually red, flaky, and limited to the top layer. Remove with a wire brush or sandpaper, then treat with a primer designed for rust.
If you see penetrating rust, it looks like deep pitting or holes. Tap suspect areas gently. If they sound hollow, rust is inside. In this case, consider replacing the affected part or using a filler before painting.
Tools, Materials, and Safety Checklist
Gather essential tools for prep and application: marking tools, sanding blocks or a orbital sander, quality brushes and rollers, painter’s tape, drop cloths, a caulking gun, putty knife, and a metal-friendly cleaner. choose grips that suit exterior work and durability for long use. Have ready a tack cloth for final dust removal.
Choose primers and paints suitable for metal doors, including rust-inhibiting primers and exterior enamel. Consider a two-coat system and note if a rust converter is needed for bare or pitted metal. Follow safety steps for solvents and proper ventilation during use.
Recommended paints and primers for metal doors
Choose the right paint and primer to ensure your metal door’s longevity. Here’s a checklist to guide you.
- Rust-inhibiting primer: For bare or pitted metal, use a rust-inhibiting primer to prevent future corrosion. Skip this step and rust will return.
- Bonding primer: Galvanized surfaces need a bonding primer for better paint adhesion. Without it, paint may peel off.
- Exterior alkyd enamel or high-quality latex: For topcoat, use an exterior-grade paint with good durability and UV resistance. Cheaper paints won’t last as long.
- Two-coat system: Apply two coats of paint for better coverage and protection. One coat may not provide adequate coverage or longevity.
- Cure time: Allow the recommended cure time between coats and before exposing the door to weather conditions. Rushing this step can lead to poor adhesion and peeling.
- Rust converter (if needed): For bare or heavily pitted metal, use a rust converter before priming. This prevents rust from bleeding through the paint.
Quick rule: Always prime first, even if the door looks clean. Primer ensures better adhesion and longevity of your topcoat.
Safety and environmental considerations
Protect yourself and the environment while painting your metal door with these safety tips.
- Ventilation: Ensure adequate ventilation to prevent solvent buildup. Work in a well-ventilated area or use a fan to blow fumes away from you.
- Respirator (when needed): Use a respirator when sanding, stripping, or working with strong solvents to protect your lungs.
- Eye protection: Wear safety glasses or goggles to protect your eyes from debris and splashes.
- Gloves: Use gloves when handling chemicals to prevent skin irritation.
- Proper disposal of solvents/paint: Follow local regulations for disposing of paint and solvent-soaked materials. Never pour them down drains.
- Fire safety: Keep a fire extinguisher nearby when working with flammable solvents or paints.
- Lower-impact products: Consider using low-VOC or zero-VOC paints and primers to minimize environmental impact. They’re often just as effective as traditional products.
Quick rule: Always prioritize safety first, then consider the environment. It’s your responsibility to dispose of materials properly.
Surface Preparation Steps (Detailed How-To)
Cleaning and degreasing are the first step to ensure adhesion. Use a mild detergent or degreaser and warm water, then rinse and let dry completely. Contaminants left on the surface reduce bonding and durability of the finish.
Assess rust and old coatings, then remove or treat as needed. Sand to remove loose film and create a uniform matte profile without over-scarification. Deglaze, wipe with a tack cloth, and keep the environment dry and dust-free to optimize primer bonding.
Cleaning and degreasing
Start by removing any dirt, oils, and waxes from your metal door. These contaminants can prevent paint from bonding properly and reduce the durability of your finish.
Use a mild detergent mixed with warm water to clean the surface. Apply it with a soft cloth or brush, working in small sections. Rinse thoroughly with clean water and allow the door to dry completely before proceeding.
Note: Avoid using harsh chemicals like bleach or ammonia as they can damage the metal and affect paint adhesion.
Removing rust and loose paint
Inspect your door for any signs of rust or peeling paint. These areas need to be addressed before painting to prevent further failure.
For small rust spots, use a wire brush or sandpaper to remove the rust. For larger areas, you may want to use a chemical rust converter. Follow the manufacturer’s instructions carefully and wear appropriate safety gear.
If there are any loose paint chips, gently scrape them off with a putty knife or your fingernail. Be careful not to damage the underlying metal.
Sanding, feathering, and deglazing existing finish
Use sandpaper with a grit of 120-220 to lightly abrade the surface of your door. This creates a ‘tooth’ that helps paint adhere better.
When sanding, be sure to feather the edges of any peeled paint to create a smooth transition between the old and new surfaces. Be careful not to over-sand, as this can create impact points where the new paint can chip or peel.
After sanding, use a deglazer or tack cloth to remove any dust from the surface. This ensures a clean surface for your primer to bond with.

Priming and Spot Repairs
Inspect for rust, dents, and gaps, and confirm metal type before applying any product. Clean and degrease, removing loose paint and corrosion to establish a solid base for primer.
Decide on rust-inhibitive primers or bonding primers and apply as directed. For dents and gaps, choose an appropriate filler and sand flush to a smooth surface. Plan for edge and recessed areas to ensure uniform absorption of the topcoat.
Choosing the Right Primer and Application Tips
The first step after prepping your metal door is selecting a suitable primer. Here’s what you need to know:
Bare Steel: Use a rust-inhibitive, zinc-rich primer like Rust-Oleum Universal Bonding Primer. It seals the surface and provides excellent corrosion protection.
Galvanized Metal: Opt for an acrylic latex primer designed for galvanized surfaces. Zinsser Bulls Eye 1-2-3 Primer is a good choice. It adheres well to galvanizing and promotes topcoat adhesion.
Powder-Coated Surfaces: Use a conversion primer like PPG DP40LF. It converts the powder-coat surface, allowing better paint adhesion.
When applying, use a good quality brush or roller. Apply edges first, then work your way into the field. Let it dry according to manufacturer’s instructions (usually 1-2 hours) before lightly sanding with fine grit sandpaper and applying the next coat.
Filling Dents, Seams, and Damaged Areas
Before priming, address any dents or gaps on your metal door. Here’s how:
Epoxy Putty: For deep dents or gouges, use an epoxy putty like J-B Weld KwikWood. It’s easy to apply and sands smooth.
Polyester/Body Filler: For shallow gaps or scratches, use a polyester body filler. 3M High Performance Body Filler is a good option. It has minimal shrinkage and sands well.
To apply, wear gloves and follow the manufacturer’s instructions. Work the filler into the damaged area, feathering the edges to blend with the surrounding surface. Let it cure according to package directions, then sand flush using progressively finer grits of sandpaper (80-120). Wipe off dust with a damp cloth before priming.
For an invisible finish, match the filler’s color to your door’s existing shade if possible. If not, prime the repaired area first to seal it and provide a uniform base for topcoating.
Painting the Door: Methods, Techniques & Troubleshooting
Compare brushes, rollers, and spray options to suit the door size and finish you want. Each method has its place for a DIY job or a more professional look. Consider the door’s outdoor exposure when choosing the technique.
Outline a practical application plan with the recommended coat sequence and drying times. Cover bare metal versus previously painted surfaces and select compatible primers. Practice masking around glass panels and hardware to reduce cleanup later.
Brushing and rolling technique for panels and trim
For brushing, use a 2-1/2″ angled sash brush with synthetic bristles. This allows you to cut in along edges and get into corners easily.
When rolling, opt for a 9″ roller with a 3/8″ or 1/2″ nap cover. This works well on flat areas and can handle slight texture. For recessed panels, use a shorter nap (1/4″) to avoid leaving marks.
To avoid lap marks: Work in manageable sections, maintain a ‘wet edge’, and overlap each stroke slightly. Start at the top and work your way down.
For smooth surfaces: Lightly sand between coats with fine-grit sandpaper (220 or 320) to remove any raised grain and ensure an even finish.
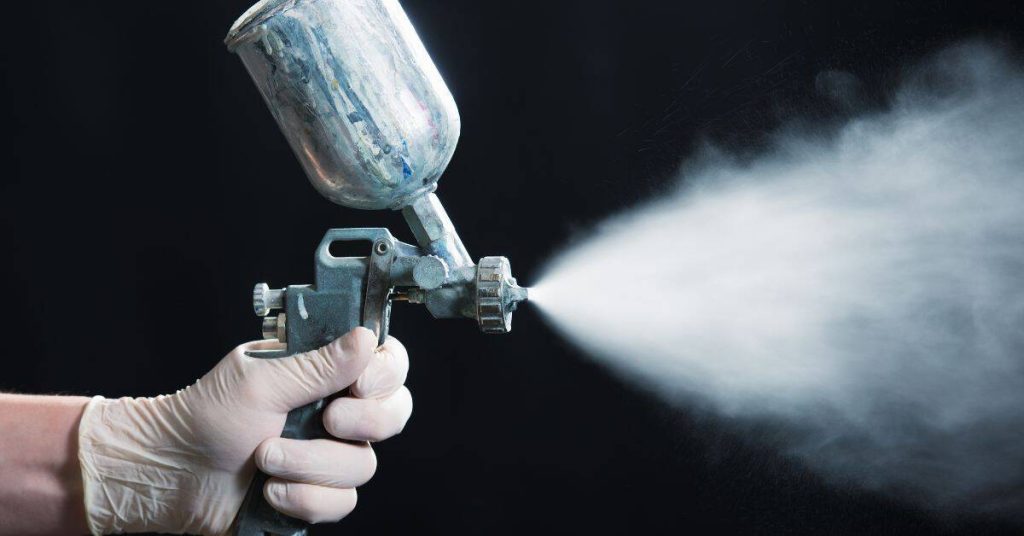
Spray painting tips (DIY and pros)
Choose a spray gun with an adjustable nozzle for varying spray patterns. For metal doors, start with a 6-8″ fan pattern.
Thinning: Follow paint manufacturer’s guidelines. Typically, thin with water or reducer by about 10-20% to improve flow and atomization.
Overlap patterns: Spray in even, side-to-side sweeps, slightly overlapping each pass (about 50%). Keep the gun moving at a steady pace to avoid buildup.
Distance and pressure: Hold the gun about 10-12″ from the surface. Maintain consistent pressure for an even coat. For pros, adjust pressure with the spray gun’s regulator.
Masking: Use painter’s tape and paper to protect adjacent surfaces. Seal edges with a light coat of paint before applying tape to prevent bleeding.
Common paint problems and fixes
Runs: Caused by applying too much paint or not allowing enough drying time between coats. Lightly sand, then recoat thinly.
Blistering: Result of moisture trapped under the paint. Ensure surface is dry and primed before painting. If it persists, scrape off blisters, prime, and repaint.
Poor adhesion: Could be due to contamination or inadequate preparation. Lightly sand, clean with a degreaser, and reprime the affected area.
Dust nibs: Caused by dust settling on wet paint. Wipe surface clean before painting, and use a tack cloth between coats. If it happens, lightly sand, vacuum, and repaint.
Curing, Reassembly, and Long-Term Maintenance
Plan curing around the weather; allow sufficient time for light coats and longer times for heavier ones, especially in cooler or humid conditions. Reattach hardware only after the coating has cured enough to avoid blistering or adhesion failure. Protect the door from rain and sun during initial curing windows.
Schedule routine maintenance to prolong the finish: wipe-downs, inspections for chips or rust, and periodic touch-ups. Keep rust-inhibiting primers or compatible products on hand for any scratch repair, and check weather seals and hardware at regular intervals.
Reattaching hardware and weatherproofing
After your paint has cured, it’s time to reattach the hardware. Before you start, ensure the surface is dust-free and dry.
Option 1: If you removed hardware for painting, clean it thoroughly before reattaching. Apply a bead of silicone caulk along the edges where the hardware meets the door to seal out water and air.
Option 2: If you painted over hardware, gently scrape off any excess paint with a razor blade or utility knife. Be careful not to damage the finish.
Check your threshold for proper alignment and adjust if necessary to prevent water intrusion. Use a weatherstripping kit to seal any gaps between the door and frame.
Maintenance tips and seasonal checks
Regular maintenance is key to keeping your painted metal front door looking its best. Here’s a simple schedule:
Monthly: Wipe down the door with a damp cloth to remove dirt and grime. Use a mild soap if necessary, but avoid harsh chemicals that can degrade paint.
Quarterly: Inspect the door for any chips or rust. Touch up small areas as needed using your leftover paint and primer.
Annually: Apply a fresh topcoat to protect against UV damage and maintain the door’s appearance. Check all hardware, including hinges, handles, and locks, for wear or corrosion. Tighten any loose screws and lubricate moving parts with a silicone-based lubricant.
Alternatives, Costs, and When to Call a Professional
Outline viable non-paint options such as powder coating, vinyl wrap, or replacing the door, and note when each might be sensible based on the door’s condition and budget. Consider how each option affects appearance, durability, and energy efficiency. Use manufacturer instructions or local rules to guide decisions.
Think through cost factors like finishes, wraps, hardware, and any removal or rust treatment work. Evaluate the door’s frame integrity and hinge alignment to decide if a professional is needed. When in doubt, request detailed quotes that cover prep, installation, and warranty implications.
Powder Coating vs. Repainting vs. Replacement
When your metal front door needs a refresh, you’ve got options beyond just painting. Let’s compare powder coating, repainting, and replacing the door.
Powder coating is durable, long-lasting, and gives a consistent finish. It’s great for doors in good condition but with worn-out paint. It’s also eco-friendly as it doesn’t use solvents. Check local suppliers for pricing and availability.
Repainting is cheaper but less durable than powder coating. It’s best for minor wear or if you want to change colors often. It requires more maintenance over time.
Replacing the door makes sense when there’s extensive damage, like rusted-through metal or warped frames. New doors offer better security, energy efficiency, and curb appeal. They’re pricier but can add value to your home.
When to Hire a Pro: Structural, Extensive Rust, or Complex Finishes
Some door issues are beyond the scope of DIY. Here’s when to call in the pros.
Structural damage like warped frames or misaligned hinges can compromise your door’s function and security. Pros have the tools and know-how to fix these safely.
Extensive rust is another red flag. If it’s not treated promptly, it can weaken the door’s structure. Pros can assess the damage, treat rust, and prevent further corrosion.
Complex finishes like intricate patterns or specialized materials may require professional application. They have the equipment and expertise to ensure a quality finish without damaging your door.
Conclusion
The key to a durable, good‑looking metal front door is finishing it in a way that respects its unique surface and keeps everyone safe. When you do it right, you get a finish that resists weather, looks tight, and doesn’t cost you more later in repairs.
Inspect, prep, prime, and paint in that order, and treat each step as a small safety check: assess rust and damage, test for flaking or seeping moisture, mask and protect frames and hardware, clean and abrade properly, apply thin coats, cure fully, reassemble carefully, and maintain a simple schedule of touch‑ups and inspections. Start with a patch test on a hidden area, then proceed in sections, and never rush a coat or skip drying times.
Common mistakes to avoid are skipping the rust and compatibility checks, over‑thinning or overloading paint, and rushing through surface prep or curing. Always wear eye protection and a mask, ventilate the area, and use the right PPE for cleaning solvents and paint dust. If the door shows severe rot, deep structural damage, or you’re unsure about primer compatibility with the existing finish, bring in a pro rather than guessing, and you’ll save time and money in the long run. Stay steady, follow the steps, and your door will perform well for years to come.
FAQ
What causes a squeaky metal front door, and where should I start looking?
Squeaks usually come from friction in hinges or a misaligned/sticking door. Check the hinges first, then see if the door binds at the frame when you open and close it.
How do I clean hinges before lubricating them?
Wipe off dirt and old grease with a rag. If hinges are stubborn, remove the hinge pins first and clean the hinge barrels, then reassemble before lubrication.
What lubricants work best for metal door hinges, and how should I apply them?
Use a light penetrating oil or silicone spray for hinges. Apply sparingly to the pivot points after cleaning, then move the door to work the lube in and wipe away any excess.
When should I remove hinge pins, and what’s the right way to do it?
Remove hinge pins if you need a thorough cleaning or if the door still binds after lubrication. Tap the pin with a small punch or screwdriver to lift it out, then clean, grease, and reinsert carefully.