
Introduction
Tile preparation and repair tools are the hand and power gear you use to set, fix, and restore tile surfaces. In practice, they cover things like surface cleaning, level checks, cutting, and grout work so you can get a solid, long‑lasting install.
Choose tools based on the job, and always check manufacturer instructions and local rules for safety and suitability. If you’re unsure about a tool’s purpose or a step, read the label, ask in-store staff, or test on a scrap area before committing.
Key takeaways
- Inspect substrate for cracks, dampness, and deflection before any re-tiling work.
- Gather tools and materials on a checklist to prevent mid-project trips.
- Test grout and adhesive bond by tapping and visual inspection after cure.
- Prepare edges and corners with proper backer support to avoid cracks.
- Follow safety rules: wear eye protection, gloves, and dust mask at all times.
- Schedule realistic repair windows to minimize demolition and disruption for occupants.
Table of Contents
- Introduction
- Key takeaways
- Common Tile Problems and Their Causes
- Tools and Materials Checklist
- Inspection and Testing Procedures
- Preparatory Steps Before Repair or Re-Tiling
- Repair Methods by Problem Type
- Preventative Techniques and Best Practices
- Safety, Common Pitfalls, and When to Hire a Professional
- Cost Considerations and Time Estimates
- Conclusion
- FAQ
Common Tile Problems and Their Causes
Tiles can show a range of issues from cracks to loose units. Each symptom points to a likely root cause such as impact, substrate problems, or movement in the setting. Identifying the underlying trigger helps prevent repeat failures.
Start by listing observed problems and tracing them to possible sources like thermal movement, moisture, or improper installation. This habit keeps you focused on the repair that will hold up long term. Always diagnose the cause before choosing a fix or patch.
Cracked and broken tiles
Tiles cracking or breaking is a common issue, often due to mechanical impact, freeze-thaw cycles, or substrate deflection.
Impact: Look for clean breaks along the edges. You might see small chips or cracks radiating from the point of impact.
Freeze-thaw: These cycles can cause hairline cracks, often in a pattern across multiple tiles. Check for signs of water intrusion and expansion joint damage.
Substrate deflection: Cracks may follow a diagonal or wavy line, indicating movement in the underlying substrate. Inspect for structural issues like settling or inadequate support.
Loose or hollow-sounding tiles
Tiles that sound hollow when tapped are likely not properly adhered to the substrate. Here’s what to look for:
Adhesive failure: Tiles may lift slightly at the edges. Tap gently; if it sounds hollow, check for missing or crumbling adhesive beneath.
Incomplete bedding: Insufficient adhesive can cause tiles to wobble or sound hollow. Inspect the back of loose tiles for signs of inadequate adhesive application.
Substrate contamination: Dirt, grease, or other contaminants on the substrate can prevent proper adhesion. Check if the substrate is clean and free from debris before reapplying adhesive.
Grout deterioration and staining
Grout problems often stem from improper mixing, lack of sealant, efflorescence, or staining agents. Here’s how to tell them apart:
Improper mix: Poorly mixed grout may crack, crumble, or discolor over time. Check the grout lines for signs of excessive drying or improper sand-to-cement ratio.
Lack of sealant: Without a sealer, grout can absorb stains and moisture, leading to discoloration. Inspect grout lines for water spots or visible staining.
Efflorescence: This white, powdery deposit indicates excess moisture in the substrate. Look for efflorescence on the surface of tiles and grout, often accompanied by a musty smell.
Staining agents: Certain substances can stain grout, such as rust from metal anchors or hard water deposits. Identify the source of the stain to prevent recurrence during cleaning or repair.
Tools and Materials Checklist
Put together a practical mix of hand tools, basic power tools, and safety gear. Gather measurement devices, mixing containers, and cutting accessories for tile work. Have a selection of adhesives, grouts, sealants, and substrate repair materials ready for common scenarios.
Consider renters or budget limits by choosing versatile tool sets and consumer-grade products. When in doubt, verify labels, manufacturer instructions, or local rules to confirm compatibility with your tile system. Keep a simple list of substitutes that fit your job size and access.
Essential hand tools
Before you start tiling or repair work, ensure these hand tools are on your jobsite.
- Tile trowel (notched and straight): Used for applying adhesive. Notched for thin-set, straight for mastic.
- Rubber float: Smooths out adhesive and presses tiles into place.
- Grout saw: Cuts through excess grout and removes old tiles.
- Spacers: Ensures even grout lines. Use size suitable for your tile.
- Leveling pliers: Adjusts tiles to ensure they’re level.
- Chisel: Removes old adhesive and cuts tiles if needed.
- Tape measure: Measures tiles and spaces accurately.
- Pencil: Marks out cutting lines on tiles.
Quick rule: Don’t skip these. They’re your basics for a smooth job.
Power tools and specialty tools
These power tools make tiling and repair jobs easier, faster, and safer.
- Wet saw: Cuts tiles safely with water to control dust. Use for straight cuts.
- Angle grinder: Grinds down old adhesive and cuts tiles. Wear safety gear.
- Oscillating multi-tool: Removes old grout, cuts tiles, and grinds down high spots. Use with proper blade.
- Sonic or electronic tester: Detects loose or hollow-sounding tiles before repair.
- Tile remover: Breaks the bond between old tiles and substrate for easy removal.
- Dust extractor: Keeps dust levels down, ensuring a safe working environment. Use with power tools.
- Safety glasses: Protects eyes from debris during cutting and grinding.
- Work gloves: Prevents cuts and protects hands from chemicals.
Quick rule: Always use safety gear when operating power tools. Keep dust levels down for a healthier workspace.
Adhesives, grout types and repair mortars
Choose the right adhesive, grout, and repair mortar for your job to ensure lasting results.
- Thinset (powdered): Used with ceramic and stone tiles. Mixes with water to form a strong bond.
- Mastic (ready-mixed): Suitable for light-duty tiling like wall tiles. Not suitable for heavy floor tiles.
- Epoxy grout: Durable, stain-resistant, and ideal for high-traffic areas or wet environments.
- Flexible mortar: Used where movement is expected, like over underfloor heating or on plywood substrates.
- Repair epoxy: Strong, waterproof adhesive for repairing cracked tiles. Can also be used as a patching compound.
- Patching compound: Fills holes and cracks in walls before tiling. Not suitable for structural repairs.
- Grout sealer: Protects grout from staining and moisture damage. Apply after grouting is fully cured.
- Tile adhesive remover: Chemical solution to soften old adhesive for easy removal during repair work.
Quick rule: Match the product to your job’s needs. Don’t cut corners with cheap, unsuitable materials.
Inspection and Testing Procedures
Begin with a thorough visual inspection of all tiled areas and substrates. Perform quick, repeatable tests that reveal hidden issues. Document what you find to guide the repair plan.
Use simple, observable checks like listening for hollow sounds, watching for movement, and noting moisture indicators. When tests indicate uncertain results, review product data sheets or manufacturer guidance to decide if a pro should be consulted.
Sound and Movement Testing
Use this checklist to identify loose, hollow-sounding tiles or areas with movement.
- Gently tap: Use a rubber mallet or coin. Listen for dull thuds (hollow) or cracks (loose).
- Map hollow areas: Mark each hollow tile to plan repairs.
- Check corners: Tiles at corners often show movement first.
- Inspect expansion joints: Ensure they’re intact and functioning properly.
- Feel for cold spots: In winter, cold tiles may indicate missing insulation or moisture issues.
- Check under furniture: Tiles under heavy objects can show signs of movement.
- Inspect around fixtures: Look for movement near toilets, sinks, etc.
- Recheck after rain: Some movement may only be apparent during or after heavy rain.
Quick rule: If more than 5% of tiles show signs of movement, consider calling a pro to assess structural issues.
Moisture and Substrate Testing
Use this checklist to detect moisture in the substrate that could cause tile failure.
- Plastic sheet test: Place a 2’x2′ plastic sheet on the floor with tape. Check after 48 hours for condensation (moisture).
- Moisture meter: Use a non-invasive moisture meter to check substrate and tiles.
- Check grout lines: Look for efflorescence, a white powdery residue indicating moisture.
- Inspect under baseboards: Check for moisture or mold growth.
- Feel for cold spots: In winter, cold tiles may indicate missing insulation or moisture issues.
- Check around plumbing: Look for water stains or leaks.
- Test after rain: Check for moisture after heavy rain.
Quick rule: If moisture levels are consistently above 16%, consider calling a pro to address the source of moisture.
Adhesion and Bond Tests
Use this checklist to test tile adhesion and identify potential bond failures.
- Pull test: Gently pull on a tile. If it lifts easily, the adhesive hasn’t bonded properly.
- Edge inspection: Remove a tile and inspect the edge for proper bonding. Look for gaps or contamination.
- Check for contaminants: Dirt, grease, or other substances can prevent adhesion.
- Inspect cured adhesive: Ensure the adhesive has cured properly. It should be firm and not crumble easily.
- Test after rain: Check for bond failure after heavy rain.
- Check around fixtures: Look for bond failures near toilets, sinks, etc.
- Inspect corners: Tiles at corners often show bond issues first.
Quick rule: If more than 5% of tiles fail the pull test, consider calling a pro to redo the adhesive application.
Preparatory Steps Before Repair or Re-Tiling
Plan the sequence from removal to final finish. Remove damaged tiles and old setting bed as needed, then clean the surface thoroughly. Ensure the substrate is level and ready for the new work before moving forward.
Bridge cracks where needed, apply primer if required, and address moisture threats upfront. Proper sequencing prevents recurrence and saves time during the actual repair or tiling phase. Verify that any primer or moisture mitigation products align with the chosen tile system by checking the label or instructions.
Safe removal and demo techniques
Start by scoring the tiles with a tile cutter to break their bond. Then, use a flathead screwdriver or a pry bar to gently lift them off. Work from one corner of the room to avoid damaging the substrate.
Safety first: Wear safety glasses and gloves. Keep the area damp to control dust. Remove any remaining adhesive with a scraper.
Demo techniques vary depending on the tile type. For example, ceramic tiles may require more force than porcelain. Be patient and persistent but avoid excessive force that could damage the substrate.
Substrate repair and leveling
Repair small holes or cracks with thinset mortar mixed to a peanut butter consistency. For larger areas, use self-leveling compounds following the manufacturer’s instructions.
For severe damage, install cement backer board. Cut it to size using a utility knife or tile saw. Secure it with thinset mortar and screws spaced every 6 inches.
To reinforce hairline cracks, apply a crack-bridging primer before applying new thinset or self-leveling compound. This helps prevent future cracking.
Moisture control and waterproofing prep
In wet areas like bathrooms, install a waterproof membrane before tiling. This prevents moisture from penetrating the substrate and causing damage.
For showers or other high-moisture areas, consider using a vapor barrier to prevent excess moisture from entering the walls. Ensure proper drainage and ventilation to avoid mold growth.
Before installing membranes, clean the surface thoroughly. Prime it with a moisture-blocking primer to seal any minor cracks or pores. This ensures a tight bond for your waterproof membrane.

Repair Methods by Problem Type
Cracks can be addressed with crack filling or re-bedding tiles, depending on depth and location. Partial tile replacement is an option when only a small area is affected. Grout repair can restore appearance and function without a full demo.
Pros and cons vary by method, with durability tied to substrate condition and product compatibility. Cosmetic fixes should not mask underlying movement or moisture issues. Always assess the root cause and refer to product instructions before proceeding.
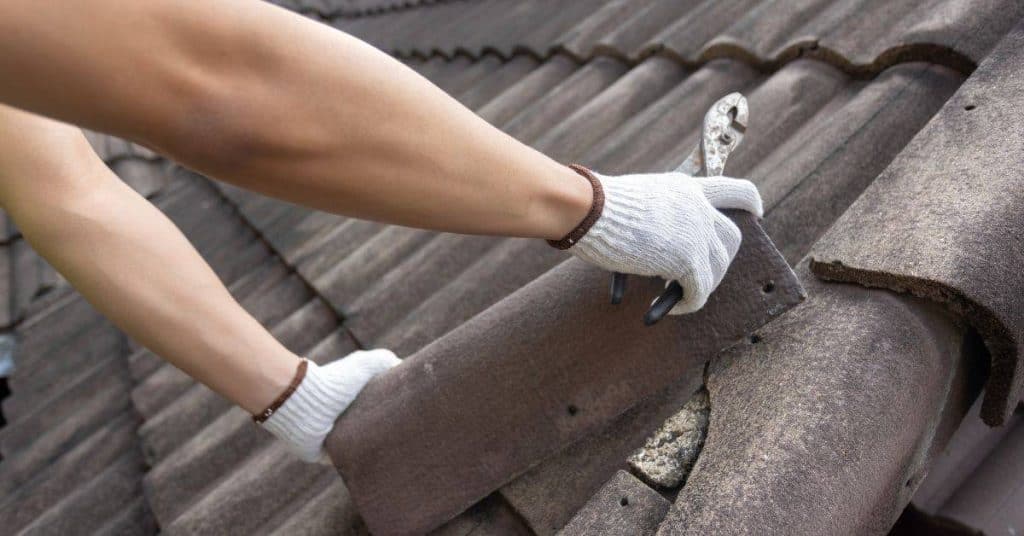
Replacing single tiles and spot repairs
First, carefully remove the damaged tile using a grout saw to cut through the grout lines. Then, use a flathead screwdriver or a tile nippers to pry off the tile.
Clean the cavity thoroughly with water and a stiff brush. Remove any remaining adhesive or old mortar with a chisel and hammer.
Wet the back of the new tile, apply thin-set mortar, and press it firmly into place. Let it set for 24 hours before grouting to ensure a seamless repair.
Fixing loose or hollow tiles
Tap the tile gently with a rubber mallet. If it sounds hollow, injectable adhesive is your friend. Drill small holes into the tile and inject the adhesive to re-bond it.
For severe cases, remove the tile, fill the cavity with fresh mortar, let it set, then relay the tile using thin-set mortar.
If tiles are loose due to movement, address the substrate issue first (see Preparatory Steps Before Repair or Re-Tiling) before re-laying them.
Grout repair, cleaning, and stain removal
To remove old grout, use a grout saw or an oscillating tool. Clean the joints with water and a stiff brush.
For regrouting, mix new grout according to package instructions. Apply it with a rubber float, working diagonally to force the grout into the joints. Let it set, then clean off excess grout with a damp sponge.
For stains, use appropriate cleaners or poultices. For deep stains, consider using color-matched epoxy grout for a better match (see Adhesives, grout types and repair mortars).
Preventative Techniques and Best Practices
Choose the right adhesive for the substrate and tile type, and ensure proper coverage. Install movement joints at appropriate intervals to accommodate expansion and contraction. Maintain a clean, stable substrate to minimize future failures.
Plan for expansion and control joints during layout, and schedule routine grout and seal maintenance. Set reminders to inspect and refresh sealants and joints as needed, and verify product guidance on intervals and compatible materials.
Proper Adhesive and Joint Selection
Choosing the right adhesive and grout is crucial for a long-lasting tile installation. The adhesive’s flexibility should match your tiles’ movement, and its porosity should suit your substrate.
Flexible adhesives are ideal for areas with high movement, like floors over concrete slabs or wooden joists. For walls, where movement is minimal, a standard adhesive will suffice.
The grout’s flexibility also matters. Match it to the tiles’ size and expected movement. Larger tiles need more flexible grouts to accommodate minor substrate movements.
Size your movement joints based on expected movement too. For larger areas or tiles, wider joints help prevent cracking due to expansion and contraction.
Installation Habits That Extend Life
Proper installation techniques significantly impact your tile’s lifespan. Here are some best practices:
Use a notched trowel to apply adhesive evenly and create grooves for better suction. The notch size depends on the tile size – larger tiles need deeper notches.
Level your tiles using tile leveling systems. This ensures a smooth, even surface and helps prevent lippage (uneven edges).
Allow curing time for the adhesive to set properly. Follow the manufacturer’s guidelines, usually 24-72 hours before grouting.
Control your environment during installation. Keep temperatures between 50°F and 80°F (10°C and 27°C) and maintain humidity levels around 30-60% to prevent issues like excessive drying or moisture retention.
Maintenance Schedule and Quick Fixes
A regular maintenance routine keeps your tiles looking good and prevents major repairs. Here’s a simple checklist:
Cleaning: Regularly clean your tiles to remove dirt, stains, and soap scum. Use mild detergents and avoid harsh chemicals.
Re-seal: Apply a new sealant every 2-3 years, or as needed, to protect grout and prevent moisture penetration.
Inspect: Regularly check for cracks, loose tiles, or other signs of wear. Address minor issues promptly to prevent them from becoming bigger problems.
For quick fixes, tackle small issues immediately:
– Tighten loose tiles with fresh adhesive.
– Re-grout cracked joints.
– Remove stains promptly to prevent them from setting in.
Safety, Common Pitfalls, and When to Hire a Professional
Be mindful of dust, silica, electrical hazards, and working near wet surfaces. Use appropriate PPE and tools that keep you safe during cutting and mixing. Avoid shortcuts that create weak spots or exposure to hazards.
Common DIY mistakes include skipping substrate prep, neglecting movement joints, and rushing repairs. If you see structural movement, large areas, or chronic moisture problems, consider bringing in a professional for a thorough assessment.
Health and tool safety
First things first, PPE is your best friend on site. That means hard hat, safety glasses, gloves, and sturdy boots. Don’t skimp.
Now, let’s talk dust. Concrete work kicks up a lot of it. So, use a dust extractor or wear a proper respirator. Your lungs will thank you later.
When cutting concrete, always use a wet saw with diamond blades. It’s slower but safer and cleaner. And for god’s sake, don’t cut dry – that’s just asking for trouble.
Chemicals and adhesives? They’re nasty stuff. Always read the label before use, follow manufacturer instructions to a tee, and keep them away from heat sources. And if you spill something, clean it up quick – don’t let it sit around.
Avoiding repair mistakes
Here are some common pitfalls to steer clear of when repairing concrete. These mistakes can lead to costly rework or even total failure.
- Skipping substrate prep: Concrete needs a clean, dry, and sound surface to bond with. Old paint, dirt, or moisture will cause your repair to fail. Always clean the area thoroughly before applying any new material.
- Using wrong adhesive: Not all concrete adhesives are created equal. Using the wrong one can lead to poor bonding, cracking, or even crumbling. Check the product label and make sure it’s suitable for your specific repair job.
- Inadequate joints: Concrete expands and contracts with temperature changes. If you don’t cut control joints at regular intervals (usually every 10-15 feet), random cracking can occur, ruining your repair work.
Double-check these points before starting any concrete repair job. It’s better to spend a bit more time preparing than to end up with a failed repair that needs redoing.
Signs you need a pro
If you’re thinking about tackling concrete repair yourself, first take a good look at the damage. Some problems are just too big or complex for DIY.
Extensive substrate damage – If more than 10% of your concrete is damaged, it’s time to call in a pro. They have the equipment and experience to handle large-scale repairs.
Ongoing moisture intrusion – Water issues that keep coming back are a sign of a bigger problem. A professional can assess the situation, find the source, and fix it right.
Large-area delamination – If chunks of concrete are peeling off, you’ve got a serious issue on your hands. This could be due to improper installation or underlying problems that only a pro can diagnose and repair.
Cost Considerations and Time Estimates
Estimate time and cost by considering tile type, access, and substrate work involved. Materials and labor show up as major drivers, with more complex or larger jobs taking longer to complete. Use local rates and multiple quotes to gauge realistic ranges.
Look for safe ways to save on costs, such as choosing proven, mid-range products or combining prep with a simple repair. Always confirm product compatibility and warranty implications by checking labels and manufacturer guidance before purchasing.
Quick DIY Repair Budgets
For minor repairs like replacing a single tile or fixing grout, budget around $10-$50 per repair. This covers materials and basic tools.
Here’s a breakdown:
$10-$20: Replacing a single tile with adhesive and grout. You’ll need the tile itself (around $3-$10), thin-set mortar ($4-$8), and grout ($5-$10).
$20-$50: Fixing grout or cleaning stains. Grout costs around $5-$10, while stain removers are about $5-$15.
When Costs Escalate
Some repairs can quickly turn into major projects. Here’s why:
Substrate Replacement: If your tiles are loose due to a failing substrate, you might need to replace it. This adds $50-$200 per square foot.
Waterproofing: If water damage is found, expect to pay $3-$10 per square foot for waterproofing materials and labor.
Large-Area Re-Tiling: Re-tiling a large area can cost $5-$20 per square foot. Ask contractors about the scope of work to understand what’s included in their estimate.
Getting and Comparing Quotes
When hiring a professional, get multiple quotes to compare. Here’s what to include:
Scope of Work: Ensure the quote includes everything needed – materials, labor, disposal fees.
Materials: Ask for specifics on brands and types of materials to be used.
Warranty: Find out if there’s a warranty on workmanship and materials. Also, ask about any manufacturer warranties that may apply.
Timeline: Understand when they can start and how long the job will take.
Ask contractors:
- About their licensing and insurance.
- For references from past clients.
- If they’ll provide a detailed breakdown of costs.
Conclusion
With durable tile work comes careful prep, steady testing, and strict safety. Focus on the basics: verify the substrate, test adhesion and moisture resistance in a small area, and don’t rush repair or re-tiling. A solid start prevents costly call-backs and keeps your space looking clean and strong.
Check the workflow in plain terms: inspect the substrate and grout lines for movement or damage, gather the right tools and materials, perform inspections and tests in a small, inconspicuous patch, dry-fit and plan your repair path, apply the chosen method by problem type, then re-test and seal or protect once the work is dry. Do the work in logical steps, document what you did, and keep the area clean and dry as you go.
Avoid common missteps: don’t skip moisture checks or over-adhesion tests, don’t rush the curing time, and don’t cover routes or surfaces you haven’t prepared. Always wear eye protection and gloves, work on a dry day, and shield adjacent fixtures. If something feels beyond your comfort zone—like widespread substrate movement, serious cracks, or rotten backing—pause and reassess before proceeding.
If the problem is deep, if you’re uncertain about the substrate, or the repair would require major re-tiling, it’s time to call in a professional. When in doubt, plan for a measured, staged approach and keep safety as the top priority. You’ve got this—finish with clean lines, solid bonding, and a space that lasts.
FAQ
What simple tests tell me if my substrate is ready for tile repair?
Look for firm, not spongy, and evenly flat surfaces. Tape tests can show if the surface is clear of dust, oil, or loose material. If in doubt, scrub a small area and re-check for bond or level changes.
Which tools should I keep handy to diagnose and fix common tile issues?
Have a hammer and chisel for loose edges, a stiff brush for dust, a straight edge or level, and basic hand trowels. A vacuum or broom helps keep the work area clean so you don’t trap debris under new tile. Use a notched trowel only if you’re sure the adhesive type matches your tile.
How do I know if I need to remove and re-layout tiles rather than just patch?
If the substrate shows significant cracks, wide voids, or repeated loose tiles, patching won’t hold. Visible hollows or lippage after test tiles usually means full or partial removal is needed. Check the manufacturer instructions for approved repair methods on your tile and substrate.
What safety checks should I do before starting any tile repair?
Wear eye protection and gloves. Clear the work area of trip hazards and dust. If you’ll be dealing with old adhesives or thinset, ventilate well and follow product labels for any specific safety steps.