

Introduction
Painting with 2026 color trends correctly means choosing on-trend hues and applying them with solid prep and technique. Start with preparing walls: clean, patch, and sand where needed, then prime if the surface is stained or glossy. Check paint labels and manufacturer guidance for compatible primers, sanding grit, and drying times before you begin.
Nail down the application approach with brushes, rollers, and proper technique, and know when to stop to avoid runs. Choose colors mindful of 2026 trends and test swatches in the room lighting before committing. Lastly, respect drying and curing times and avoid heavy coats or recoats until the surface is dry to the touch, and check product instructions for any caveats.
Key takeaways
- Test color replicas on a hidden wall under real lighting before full painting.
- Prepare surfaces thoroughly: clean, patch, sand, and prime to ensure even finish.
- Use the right brush and roller technique for smooth, consistent coats.
- Follow weather and drying cues; avoid painting during high humidity or rain.
- Choose 2026 colors with light interactions in your rooms and exteriors.
- Seal tips: ventilate workspace and store leftovers according to label directions.
Table of Contents
- Introduction
- Key takeaways
- Understand 2026 Color Trends and How They Affect Your Home
- How to Choose the Right 2026 Paint Color for Your Space
- Tools, Materials, and Eco-Friendly Paint Specs
- Prep Work — the Step-by-Step Surface Preparation Routine
- The Correct Painting Process (DIY Steps)
- Common Mistakes and Stop Rules to Avoid Trend Regret
- Cost, Durability, and Long-Term Care of Trend Colors
- Visual Signs and Examples to Look for
- Conclusion
- FAQ
Understand 2026 Color Trends and How They Affect Your Home
2026 color directions center on neutrals, nature-inspired hues, warm earth tones, and expressive accents. Think airy base neutrals, leafy greens, clay-inspired browns, and bold pops for emphasis. Reference the general vibe from Pantone and common paint-brand palettes without committing to a brand here.
These trends shape mood, space perception, and resale appeal by aligning color with room function. Calming neutrals suit bedrooms, while uplifting accents work in living areas and high-traffic zones. Balance trendy hues with timeless foundations to keep spaces versatile across years, and start with a core palette that remains adaptable.
Trend Breakdown and When to Use Each
2026 color trends are here, and they’re ready to transform your home. Let’s dive into each trend and see where they fit best.
Neutrals, like Pantone’s 2026 Color of the Year, bring calm and balance. They’re perfect for bedrooms and bathrooms. Think soft whites, warm beiges, and elegant grays.
Nature-inspired hues, such as deep blues (Benjamin Moore’s ‘Hale Navy’) or earthy greens (Sherwin-Williams’ ‘Evergreen Fog’), add a touch of the outdoors. Use them in living rooms and kitchens for a soothing, natural vibe.
Warm earth tones, like terra-cotta (Farrow & Ball’s ‘Terrera’) or mustard yellows (Behr’s ‘Baked Apple’), create cozy, inviting spaces. They’re great for dining rooms and home offices. And don’t forget those expressive accent colors! Use them sparingly in accent walls or accessories to add a pop of personality.
Matching Trends to Your Existing Decor
Before you grab that paintbrush, take a step back and look at your current decor. Here’s how to decide if a trend is right for you.
Start with your furniture. If it’s neutral or versatile, you’ve got room to play with trends. But if it’s bold and colorful, stick to neutrals or subtle shifts in color.
Next, consider your flooring. Dark floors? Opt for lighter colors on the walls. Light floors? You can go either way, but consider the balance of light in the room.
Lastly, look at your textiles. If you’ve got a lot of pattern or color, trends might overwhelm the space. But if it’s mostly solids, you’re good to go with a trendy hue. Remember, trends are meant to enhance, not overpower, what you already have.
How to Choose the Right 2026 Paint Color for Your Space
Build a practical decision framework that centers on lighting effects, room purpose, architectural style, and how you cope with future color changes. Use a quick step-by-step flow to apply it while shopping or planning. This keeps choices grounded in real-world use.
Lighting’s outsized role means daylight shifts color perception, and warm or cool artificial lighting alters undertones. Perform quick tests under different light temperatures and times of day to see how a color reads. For sampling, use 2–3 chip sizes, test on large posters or wall areas, and document readings with timestamps and lighting notes.
Step-by-Step Process
Follow these practical steps to choose the right 2026 paint color for your space, ensuring a smooth and efficient process.
- Preparation: Gather samples, clear the area, and ensure safety. Why: A clean workspace prevents accidents and allows accurate color assessment.
- Evaluate Lighting: Observe natural daylight and artificial lighting at different times of day. Why: Lighting plays a crucial role in color perception.
- Consider Room Function & Architecture: Match colors to the room’s purpose and architectural style. Why: The right color enhances functionality and complements your space’s design.
- Test Colors: Apply samples on large posters or walls, observing from different angles. Why: This helps you visualize how colors will look in various lighting conditions and perspectives.
- Document & Evaluate: Take photos with timestamps and notes on lighting context. Why: Documentation aids in comparing colors later and making informed decisions.
- Finalize Choice: Make a decision based on your observations, preferences, and the room’s needs. Why: Trust your instincts and choose a color that feels right for your space.
Lighting and Color Interaction
Understand how different types of light affect color perception to make informed paint choices.
Natural daylight shifts colors throughout the day. Example: Blues appear brighter in morning sunlight, while yellows pop at noon.
Artificial lighting alters undertones. Tip: Warm lights (incandescent) enhance warm tones; cool lights (fluorescent) boost cool tones.
Test colors under various light sources and times of day to see how they change. Why: This helps you anticipate how the color will look in your space at different times.
Sampling and Testing Protocols
Follow these sampling rules to ensure accurate color assessment before committing to a paint job.
Use 2-3 paint chip or sample sizes. Why: Multiple sizes help you visualize how the color will look on your walls.
Test colors on large posters or switchable wall areas. Tip: Avoid testing on permanent surfaces until you’re sure of your choice.
Evaluate colors from different viewing angles and over time. Why: This helps you account for lighting shifts and ensures the color works in various conditions.
Tools, Materials, and Eco-Friendly Paint Specs
List essential tools like rollers, brushes, tarps, painter’s tape, mixing tools, and safety gear, and note any room-specific tools for trim or ceilings. Include disposable cups and sanding supplies as needed. This keeps you prepared without overbuying.
Cover primers, sealers, caulks, patching compounds, and surface prep products, noting when primers are necessary. By room, suggest finishes such as eggshell, satin, or semi-gloss and explain how finish affects durability and washability. Check labels for low-VOC or zero-VOC options and any certifications, and verify guidance from manufacturers.
Tools and Consumables Checklist
Before you start painting, ensure you have all the necessary tools and consumables for a quality DIY job.
- Paint brushes: 2-2.5″ for trim, 3-4″ for walls; synthetic or natural bristles depending on paint type.
- Rollers: 9″ or 18″ with covers suitable for your surface (e.g., 3/8″ nap for textured surfaces).
- Painter’s tape: Blue or green tape, 1.5-2″ wide; ensure it’s paint-grade.
- Drop cloths/tarps: Protect floors and furniture from drips and spills.
- Primer: Essential for new surfaces, bare wood, or when changing colors drastically. Choose a primer that matches your paint type (latex/acrylic).
- Patching compounds: For filling holes, cracks, or imperfections; use spackling compound for small repairs.
- Sandpaper/grit: 120-220 grit for smoothing surfaces before painting.
- Disposable cups/tools: For mixing paint and holding brushes, rollers between coats.
- Safety gear (PPE): Gloves, goggles, dust mask, and old clothes to protect yourself from paint and debris.
Quick rule: Always check your tools and consumables before starting. Missing or incorrect items can lead to poor results or safety hazards.
Paint Types, Finishes, and Environmental Impact
Understanding paint types, finishes, and their environmental impact helps you make informed decisions when choosing your 2026 trend colors.
Latex vs. Acrylic: Both are water-based, but acrylic is more durable and stain-resistant. Latex is cheaper and easier to clean up. Choose based on your budget and project needs.
Paint finishes affect durability, washability, and sheen. For example, use eggshell for living areas (low luster, easy to clean), satin for kitchens (slightly glossier, more durable), or semi-gloss for bathrooms (most durable, resistant to moisture).
Consider the environmental impact: Low-VOC/zero-VOC options reduce harmful emissions. Durable formulations minimize waste as they last longer and require fewer coats. Look for certifications like LEED or GREENGUARD for eco-friendly assurance.
Prep Work — the Step-by-Step Surface Preparation Routine
Start with surface inspection to gauge moisture, contamination, existing coatings, cracks, and texture issues. Note environmental constraints and substrate type to set quality checkpoints before proceeding. This keeps adhesion predictable on concrete and other substrates.
Cleaning and prep timing should outline a clear protocol, including dry times and indicators. Define success criteria like no residue and dry-to-touch status. For patching and smoothing, list repair steps and curing expectations to ensure a uniform surface before primer.
Step-by-Step Process
The following sequence ensures your surface is ready for painting, maximizing paint adhesion and longevity.
- Inspect the surface: Check for moisture, contamination, existing coatings, cracks, and texture inconsistencies. Note temperature/humidity constraints and substrate type.
- Clean the surface: Degrease, remove dust, wash or power-wash, rinse, and dry thoroughly. Avoid milling loose material and etching delicate surfaces.
- Patch and repair: Fill cracks, spalls, and holes using appropriate compounds. Follow mixing ratios, application thickness, and curing times. Re-sand to achieve a uniform surface.
- Prime the surface: Select a primer based on substrate type and condition. Apply evenly, following coverage rates and recoat windows. Ensure patched areas are handled uniformly for excellent paint adhesion.
- Mask edges and fixtures: Use painter’s tape to protect edges and fixtures from overspray. Apply drop cloths to floor for protection.
- Final checks: Perform a tandem inspection of the surface, ensuring it’s clean, dry, and free of residue. Conduct a tape test to ensure adhesion before painting.
Repairing and Priming Surfaces
Preparing surfaces for paint involves filling holes, sanding glossy areas, selecting appropriate primers, and sometimes using tinted primer to match trend colors.
Filling Holes/Cracks: Use a suitable patch compound or cold-applied crack filler. Mix according to instructions, apply evenly, and allow curing time before re-sanding.
Sanding Glossy Surfaces: Lightly sand glossy surfaces using fine-grit sandpaper. Wipe clean with a damp cloth after sanding to remove dust.
Selecting Primers: Choose a primer based on substrate type and condition. For example, use bonding primers for poor adhesion, stain-blocking primers where needed, and masonry primers for masonry surfaces. Consider tinting the primer to match your trend color for better coverage.
Protecting Surroundings and Safety Precautions
Proper masking, ventilation, and disposal of materials ensure a safe and clean workspace.
Masking Techniques: Use painter’s tape to mask edges, fixtures, and areas you don’t want painted. Press down firmly to prevent paint seepage.
Ventilation and PPE: Ensure adequate ventilation when painting. Wear a respirator or dust mask, safety glasses, and gloves for protection.
Safe Disposal of Materials: Dispose of paint materials responsibly. Follow local regulations for paint disposal. Clean brushes and rollers thoroughly to minimize waste.

The Correct Painting Process (DIY Steps)
Detail a logical order from prep to final coats, including masking, cutting in, and rolling. Outline the project scope, materials, and a basic tools list so you can prepare in one go. This minimizes back-and-forth and keeps the project flowing.
Explain priming decisions, cutting in technique, and rolling sequence. Mention nap size, keeping a wet edge, and avoiding spatter. Cover drying times between coats and how to judge cure before light use, plus when to apply second coats for even color.
Step-by-Step Process
The following is a clear, numbered sequence of practical steps to guide you through the correct painting process. It starts with preparation and safety checks, then moves on to the main work, and finishes with cleanup or final checks.
- Preparation: Clean, repair, and patch any holes or cracks. Remove dust, mask edges, and protect adjacent surfaces.
- Safety Check: Ensure you have the right primer type, paint finish, and tools for your project scope.
- Priming (if needed): Apply primer to bare concrete, repairs, or areas with drastic color changes. Allow it to dry according to manufacturer’s instructions before painting.
- Main Work: Begin by cutting in and edging, then use a roller to apply paint in the recommended sequence. Maintain a wet edge to avoid lap marks.
- Final Checks: Inspect your work for any missed spots or drips. Allow the paint to dry completely before light use or applying a second coat.
Cutting In and Edge Work
Achieving clean lines around ceilings, trim, and corners is crucial for a professional-looking finish. Here are some brush techniques to help you achieve this.
Start by using a steady hand with a 1-2 inch angled brush for corners and along the ceiling. For trim, use a smaller, more precise brush.
Don’t overload your brush; maintain a clean, damp paint edge to prevent peeling. Work in small sections, maintaining a ‘wet edge’ to blend your cuts seamlessly into the main area.
Rolling, Layering, and When to Stop
When rolling paint onto walls or ceilings, follow a recommended sequence – typically from bottom to top or in the layout of your room. Choose a nap roller suitable for your surface’s texture.
Properly load your roller and maintain a wet edge to avoid lap marks. Work in ‘W’ or ‘M’ patterns to ensure even coverage. If you notice spatter, slow down your rolling speed.
Determine when to apply a second coat by checking for uniform coverage, no lap marks, and consistent sheen. Allow the first coat to dry according to manufacturer’s instructions before applying the second. Once you’ve achieved these ‘stop rules’, your painting process is complete.
Common Mistakes and Stop Rules to Avoid Trend Regret
Identify concrete pitfalls such as lighting misreads, skipping primer, incorrect sheen, or roller over-saturation that lead to poor results on concrete surfaces. Explain how these mistakes derail the final look and durability. Keep the guidance practical for DIYers working with floors, patios, or countertops.
Create decision-point stop rules for testing, priming, applying color, and finishing. Use hard pauses if criteria aren’t met, like large undertone clashes or primer adhesion failures. This helps prevent costly re-dos and trend regrets.
Visual Checkpoints and Quality Control
Before you proceed with your next step, run through this checklist to ensure a smooth painting process.
- Visible Streaks: Check for any visible streaks or lines left by the roller. If present, adjust your rolling technique or switch to a better quality roller.
- Color Inconsistency: Ensure the color is consistent across the entire surface. If not, adjust your paint mixture or application method.
- Texture Issues: Feel for any rough patches or raised areas. Sand down if necessary before proceeding.
- Drips or Runs: Check for any drips or runs, especially on vertical surfaces. If present, sand and repaint the affected area.
- Bubbles or Cracking: Look out for bubbles or cracking in the paint. This could indicate a problem with the surface prep or primer. Address these issues before proceeding.
- Edges and Corners: Ensure edges and corners are well-painted and not missed. Use a good quality brush for better control.
- Lighting Consistency: Check how the paint looks under different lighting conditions. If it appears too dark or light, adjust your paint mixture accordingly.
- Dry Time: Allow the recommended dry time before moving on to the next step. Rushing this process can lead to poor results.
Quick rule: Always check your work at each stage. A few minutes spent now can save hours of rework later.
When to Pause and Reassess
Knowing when to pause and reassess is crucial in achieving the best results. Here are some situations where you should stop and reevaluate.
Color Change: If the color reads differently after 24 hours, pause and consider adjusting your paint mixture or application method. This could be due to lighting conditions or paint drying time.
Primer Bleed-Through: If you’re seeing primer bleed-through after applying the first coat of paint, stop and sand the surface lightly before proceeding. This indicates that the primer isn’t adhering properly.
Sheen Differences: If there are unexpected sheen differences between your test patch and the actual application, pause and consider switching to a different sheen level. The wrong sheen can drastically change the look of your space.
Remember, pausing to reassess is not a sign of failure but rather a step towards ensuring a successful project.
Cost, Durability, and Long-Term Care of Trend Colors
Break down cost factors such as paint quality, primer, coats, and finishes, plus any decorative products. Consider the impact of DIY time versus professional labor. Keep budgeting realistic by accounting for the essentials first.
Discuss durability in high-traffic areas and the role of scrubbability and stain resistance. Outline a maintenance routine for cleaning, touch-ups, and re-coating intervals. Verify per-gallon coverage and batch consistency, and note warranty terms related to trendy colors and surface types.
Budgeting and Value Tips
When it comes to painting, you don’t always have to spend top dollar for quality results. Here’s where to save and where to invest.
Invest in: High-quality paint. It’ll last longer and cover better than cheaper alternatives. Don’t skimp on primer either; it helps paint adhere and reduces the number of coats needed.
Save on: Brushes and rollers. If you’re a frequent DIYer, these can be replaced as they wear out without breaking the bank.
Material costs vary by region, but expect to spend around $30-$60 per gallon of paint, plus another $15-$30 for primer. Labor will add another $20-$50 per hour if you hire a pro.
Cleaning, Touch-Ups, and Repainting Timeline
Maintaining your painted surfaces is key to keeping them looking fresh. Here are some best practices:
Cleaning: Use mild soap and water for most surfaces. Avoid harsh chemicals that can damage paint. Clean spills promptly to prevent staining.
Touch-Ups: Store leftover paint properly, with the lid tightly sealed and in a cool, dry place. Touch-ups are easiest when done soon after painting, while you still have the original paint on hand.
Repainting Intervals: This depends on finish and room use. High-traffic areas like hallways or kids’ rooms may need repainting every 3-5 years. Less-used spaces can go 7-10 years between coats. Always check for signs of wear before deciding to repaint.
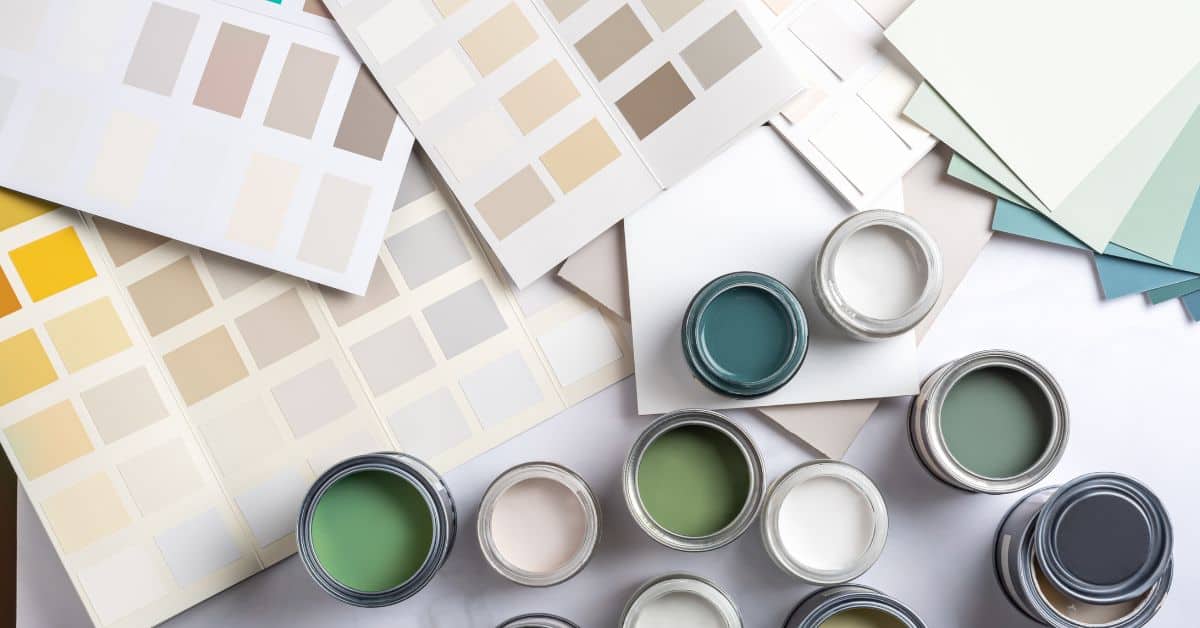
Visual Signs and Examples to Look for
Describe core 2026 trends you want readers to recognize and how they should appear on trim, walls, and ceilings. Use swatches and photos to illustrate harmonious versus clashing combinations. This helps readers visualize possibilities without committing early.
Offer visual cues for coordinating textiles, hardware, and lighting to create cohesive rooms. Include a photography-readiness checklist for accurate online presentation and resale listings. Finish with quick decision aids to evaluate visuals before locking in a color plan.
Coordination with Fixtures and Flooring
When choosing your trim color, consider the wood tones in your room. Darker woods pair well with lighter trims, while lighter woods can handle darker trims. It’s all about balance.
Metal finishes also play a role. For instance, brass or gold hardware works best with warm-toned walls and trims. Silver or nickel hardware complements cooler tones better.
For accent colors, you can go bold or subtle. Bold accents add drama, while subtle ones create a more harmonious feel. It’s up to your personal style and the look you’re aiming for.
Color Representation for Listings and Social Sharing
To capture true color, use natural light. The best time is mid-morning or late afternoon. Artificial light can skew colors.
For white balance, set your camera to ‘auto’ or use a gray card for accurate results. Also, adjust exposure to prevent blown-out highlights or lost shadows.
When describing trend colors in listings or captions, be specific. Instead of ‘blue’, say ‘navy’ or ‘cerulean’. This helps others understand the exact shade you’ve used.
Conclusion
Sticking to a solid plan yields a durable, true color that looks right in your space and keeps you safe from costly mistakes. The core idea is simple: choose the right trend color, prep properly, apply with patience, and protect your home while you color.
To finish strong, treat this as a practical checklist you can follow as you work: confirm you’re using the right eco-friendly paint type for the room, patch and clean surfaces, test the color in a small area and check for light, sheen, and coverage, mask and ventilate well, then apply in smooth, even coats with proper tool technique, and finally inspect for drips, touch up, and let it cure before moving furniture back in.
Two or three common mistakes can undo your effort: skipping the test patch and choosing a color that looks different in your lighting, skipping or skimping on surface prep, or rushing the coat and leaving lap marks or drips. A few safety rules help you avoid those: wear a mask and gloves when needed, keep windows open or use fans for ventilation, protect floors and trim, and never push through a problem area without rechecking the prep or primer first.
If the job involves tricky surfaces, large color changes, stubborn stains, or aging coatings you’re unsure about, know when to call a professional instead of pushing on alone. When in doubt, get a quick opinion before you ruin a wall or spend more on redo costs. Stay steady, follow the plan, and your new color will look solid and last. You can do this.
FAQ
How do I choose the right 2026 color trends for my space without overdoing it?
Start with a base color you already like and test swatches on a small wall. Use hue, value, and saturation to match the room’s lighting and function. Check product labels or manufacturer guidance for color recommendations and consider accent colors rather than painting large areas solid with trend colors.
What steps should I take to prep walls before applying trend colors?
Wash and dry the walls to remove dirt and grease. Scrape flaky paint and repair any holes or cracks, then sand smooth. Prime spots as needed and protect floors with drop cloths before you start painting.
Which brushes and rollers work best for applying 2026 trend colors, and how should I use them?
Use a high-quality synthetic brush for cutting in edges and a short-nap roller for smooth walls. Load the roller evenly and roll in a consistent W pattern, then fill in the gaps with light, even passes. Don’t overwork the paint; apply thin coats and keep a wet edge to avoid lap marks.
How long should I wait for drying and curing, and how do I handle cleanup safely?
Follow the paint label for dry-to-touch times and recoat windows; these vary by product and environment. Avoid rushing and keep doors open or fans on for air flow. Clean brushes and rollers with water or solvent as directed on the label, and store leftover paint properly in a labeled container.