
Introduction
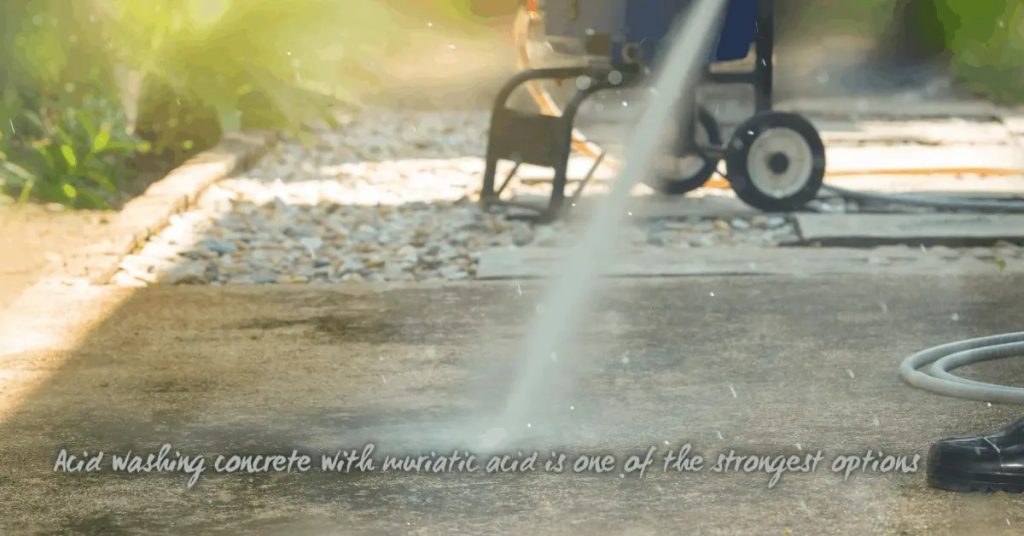
Neutralizing acid cleaners on concrete means thoroughly rinsing and neutralizing the acid so it stops etching or causing future scaling; start by flushing the surface with plenty of water and follow with a bicarbonate or other manufacturer-recommended neutralizer until pH tests indicate neutral. Use common tools—hose with spray nozzle, stiff push broom, bucket, pH test strips or meter—and check the cleaner label or manufacturer instructions for the correct neutralizer and dilution to use.
After neutralizing, continue rinsing until runoff tests neutral and then let the slab dry before applying sealers or coatings that help prevent scaling. To reduce future scaling, address causes like aggressive cleaners, poor drainage, or salt exposure and follow product labels and local guidance for cleaning frequency and protective treatments.
Key takeaways
- Identify scaling causes: acid residue, improper rinsing, or surface micro-pitting.
- Choose neutralizers per manufacturer instructions and local codes, avoiding oversaturation.
- Rinse strategy: flood with clean water, then neutralize in stages per plan.
- Tools and materials: non-metallic brushes, pails, waterproof gloves, and pH tests.
- Check for post-acid damage and address microcracks or spalling before sealing.
- Prevent future scaling with proper curing, timely sealing, and routine maintenance.
- Safety: wear eye protection, gloves, and dispose effluent according to local regulations.
Table of Contents
- Introduction
- Key takeaways
- Why Acid Cleaners Can Cause Concrete Scaling
- Neutralizer Choices and How They Work
- Step-by-Step Rinsing and Neutralization Strategy
- Tools and Materials Checklist
- Identifying and Treating Post-Acid Concrete Damage
- Preventing Future Scaling: Sealing, Curing, and Maintenance
- Safety, Environmental Handling, and Disposal Best Practices
- Cost Considerations: Prevention Versus Repair
- Conclusion
- FAQ
Why Acid Cleaners Can Cause Concrete Scaling
Acid cleaners react chemically with the cement paste by dissolving calcium hydroxide and other soluble lime phases; that mobilized calcium leaves voids in the cement matrix and weakens the bond between aggregate and paste. This chemical removal creates microstructural damage that you will later see as surface softening and powdering.
Physically, the attacked surface becomes more porous and prone to micro-cracking, which increases water ingress and makes the slab vulnerable to freeze–thaw or abrasion—both accelerate scaling. The rate and severity of attack depend on cleaner concentration, dwell time, temperature, agitation, and surface porosity; check product labels or the manufacturer data sheet for concentration and dwell recommendations and treat even mild acids with caution because long contact or high porosity can produce significant damage.
Chemical mechanisms behind scaling
Acids lower the pH of concrete surfaces. When this happens, calcium hydroxide – a key component in cement paste – starts to dissolve. This is because calcium hydroxide is alkaline and reacts with acids to form water-soluble calcium salts.
Dissolving calcium weakens the cement matrix. The surface becomes softer and more susceptible to damage. Over time, this microstructural damage manifests as scaling – small pieces of concrete flaking off.
The surface chemistry also changes. Acids can react with other compounds in the concrete, further altering its properties and making it more prone to deterioration.
Environmental and material risk factors
Material choices and environmental conditions play a significant role in how concrete responds to acid cleaners. Porous surfaces, freeze-thaw cycles, salts, previous sealers, and improper curing can all increase the risk of scaling.
- Porosity: Highly porous surfaces absorb cleaner more deeply, increasing calcium leaching and promoting surface scaling on long exposure. Look for concrete with lower water-cement ratio or densifiers to reduce porosity.
- Freeze-thaw cycles: These can exacerbate damage caused by acids. Proper air-entrainment in the concrete mix helps mitigate this risk.
- Salts: Deicing salts used on driveways and walkways can react with acid cleaners, accelerating deterioration. Rinse thoroughly to remove all cleaner and salt residue.
- Previous sealers: Some sealers can trap moisture or acids beneath the surface, leading to scaling. Ensure any sealer is compatible with acid cleaners and allows for proper vapor transmission.
- Improper curing: Concrete that hasn’t been properly cured is more susceptible to damage from acids. Follow manufacturer’s guidelines for adequate curing times and methods.
Neutralizer Choices and How They Work
Neutralization stops the acid’s chemical attack by raising surface pH and converting free acid into salts and water, so it’s a critical step before rinsing and before any sealing or repair work. Verify compatibility and dosing on the neutralizer product label or technical sheet to ensure it’s appropriate for concrete.
Common options include household bases (baking soda), commercial alkaline powders, and purpose-made neutralizers; baking soda is safe and easy to use, commercial products may be faster or buffered for concrete, and strong bases require careful handling and manufacturer guidance. Apply according to the product instructions, watch for visual cues like fizzing or reduced reaction, use PPE, test surface pH with strips or a meter, and always follow up with a full rinse to remove dissolved salts and residues before proceeding.
Common neutralizers and compatibility
When choosing a neutralizer, consider its effectiveness, ease of use, and compatibility with concrete. Here’s a quick rundown:
Baking soda (sodium bicarbonate): A common household item that works well on small areas. It’s easy to use but may not be strong enough for heavy-duty cleaning.
Trisodium phosphate (TSP) alternatives: These are stronger alkaline powders, effective in removing tough stains. However, they can be harsh and may require testing on a small area first to ensure they don’t damage your concrete.
Commercial neutralizers: Professional-grade products designed for concrete surfaces. They’re usually more potent and easier to apply but come at a higher cost.
How to verify neutralization chemically
After applying the neutralizer, it’s crucial to confirm that the acid has been fully neutralized. Here’s how:
Use pH test strips or a digital meter to check if the surface and runoff have reached a pH of around 7 (neutral). Follow these steps:
1. Rinse a small area with water.
2. Apply the test strip or meter to the wet surface.
3. If the reading is close to 7, you’re good to go. If not, reapply the neutralizer and retest.
Step-by-Step Rinsing and Neutralization Strategy
Start by clearing loose debris, sweeping the area, and identifying high-porosity patches or damaged spots so you can focus rinsing and neutralizer application where the cleaner penetrated deepest. Pre-rinse with high-flow water to lift surface residues, then inspect and brush stubborn areas before applying any neutralizer.
Apply the chosen neutralizer per its directions—common approaches use a baking soda solution or commercial alkaline rinse applied with a sprayer, allowing the product to react while monitoring with pH strips or a digital meter at intervals. Follow with at least one thorough post-neutralizer rinse and a final rinse, documenting pH readings until the surface reads near neutral; use PPE, manage rinse runoff per local rules, and let the slab dry before testing or sealing.
Step-by-Step Process
This section guides you through a practical, step-by-step rinsing and neutralization strategy to prevent future concrete scaling.
- Preparation: Inspect the surface, clear debris, wear appropriate PPE (gloves, goggles).
- Pre-rinse: Flood the area with clean water to reduce acid load. Check water pressure and quality.
- Neutralize: Apply neutralizer per label instructions, agitate gently, let it dwell as specified.
- Rinse: Thoroughly flush the surface with clean water. Test runoff pH.
- Repeat: If pH isn’t near 7, repeat neutralization and rinsing until neutralized.
Pre-rinse and Water Quality Checks
Before neutralizing, a pre-rinse with clean water reduces acid load and prepares the surface. Ensure your water is suitable.
Use potable or low-mineral water to avoid introducing new contaminants. Check water pressure; too high may damage porous surfaces.
Test water pH if unsure; it should be around 7 (neutral). If not, adjust with vinegar or baking soda before use.
Neutralizer Application and Rinsing Sequence
Apply the neutralizer safely: dilute per label, broadcast evenly, agitate gently to ensure contact with all surfaces.
Let it dwell as specified. Then, thoroughly flush the surface with clean water. Test runoff pH using food-grade strips or a digital meter.
If pH isn’t near 7, repeat neutralization and rinsing until neutralized. Be patient; this may take several cycles.
Final Verification and Dry-down
After neutralizing, verify the final pH is near 7. Inspect for any residual staining or surface softening.
Allow adequate drying time before applying sealers or making repairs. This could take several days to a week, depending on weather conditions.
Note: If you find issues during the final check, consider calling a professional for advice.
Tools and Materials Checklist
Essential PPE includes chemical-resistant gloves, eye protection or face shield, and a respirator if fumes or fine dust are present; long sleeves and boots help prevent skin exposure. For measuring and application you’ll need pH test strips or a meter, spray bottles or a low-pressure sprayer, buckets, mixing containers, brushes, squeegees, and pads appropriate to concrete work.
Select neutralizers compatible with concrete—baking soda is a common DIY choice, while commercial neutralizers offer concentrated options; check product guidance for compatibility. For larger jobs consider a pressure washer, large-volume sprayer, containment mats, and waste-collection containers, and organize tools with labels and staging areas to keep clean and contaminated items separate for safe disposal.
Personal protective equipment and safety gear
Before you start, ensure you’re well-protected against potential hazards. Here’s a quick checklist to follow.
- Gloves: Chemical-resistant gloves to protect your hands from acid exposure. Check they fit well and cover your wrists.
- Eye protection: Goggles or face shield to prevent eye injuries. Ensure they’re certified for chemical splash protection.
- Respirator: Use a respirator if fumes are present, following SDS recommendations. Test it before use and replace filters as needed.
- Long sleeves: Wear long-sleeved clothing to protect your skin from acid splashes.
- Ventilation: Ensure the area is well-ventilated to prevent fume buildup. Use fans if necessary, but keep them away from dust sources.
- Spill containment: Have spill kits ready for quick response to any acid spills to prevent damage and injury.
- Respiratory safety: Handle acids safely, following SDS guidelines. Avoid breathing in fumes or mist.
- Hearing protection: Wear earplugs if using power tools like pressure washers to protect your hearing.
Quick rule: Always follow SDS instructions for specific chemical handling and PPE requirements.
Measuring, testing, and application tools
Accurate measurement and proper tool use are key to effective cleaning. Here’s what you’ll need:
- pH strips/meter: To test the acidity of your cleaner and neutralizer. Check before and after application.
- Sprayer/bucket: Choose a low-pressure sprayer or bucket for even distribution. Avoid high-pressure sprayers that can damage concrete.
- Brushes: Stiff-bristled brushes to scrub the surface effectively. Use nylon bristles for acid-resistant cleaning.
- Rollers/squeegees: For applying neutralizer and rinsing agents evenly. Check for even coverage.
- Utility knives: To remove any adhesives or labels before cleaning to prevent damage.
- Hose/pressure washer: Use a low-pressure washer (under 1200 PSI) to rinse effectively without damaging the surface. Check your specific equipment’s recommended pressure.
- Containment materials: Use containment mats or barriers to control runoff and prevent environmental damage.
Quick rule: Always test tools and equipment before use to ensure they’re in good working order.
Optional equipment for commercial or large jobs
For larger projects, consider these optional tools to increase efficiency and manage regulatory constraints:
- Water reclamation system: To recycle rinse water, reducing waste and environmental impact. Check local regulations before use.
- Heated rinse system: For faster drying times in colder climates. Ensure it’s compatible with your neutralizer and cleaner.
- Professional pressure washer: For high-volume jobs, consider a professional-grade pressure washer for faster cleaning. Always follow safety guidelines.
- Long-handled extendable tools: To reach hard-to-access areas without risking injury or damage to the surface.
- Large-volume sprayers: For even distribution of neutralizer and cleaner over large surfaces. Check for even coverage.
- Containment mats/bags: For ongoing projects, use containment mats or bags to control runoff and prevent waste buildup.
Quick rule: Always follow local regulations and safety guidelines when using optional equipment on larger jobs.

Identifying and Treating Post-Acid Concrete Damage
Distinguish the common conditions: scaling appears as flaking and a powdery surface, spalling shows deeper chips or hollowness, efflorescence is white powdery mineral deposits, and crazing is a network of fine surface cracks. Use simple checks—scrape to see if the surface powders, tap for hollow sounds, and wipe deposits to see if they smear—to guide which repair path is appropriate.
Immediate actions are the same across conditions: flush with clean water to dilute remaining acid, neutralize if necessary, test surface pH, and remove loose material before repairs. For mild scaling clean and plan a rehabilitation or reseal; for spalling remove loose pieces and use an appropriate patch mortar; efflorescence is brushed and washed away then controlled by sealing and moisture management; for crazing clean and consider controlled fills or overlays—refer to product instructions and compatibility notes for chosen repair materials.
Scaling versus spalling and efflorescence
Post-acid damage on concrete can manifest in several ways. Let’s quickly identify them:
Scaling: This appears as a flaked, powdery surface. Tap it lightly; if it crumbles or turns to dust, you’ve got scaling.
Spalling: Deep chips with hollow sounds behind them indicate spalling. Gently tap; if it sounds like there’s nothing solid back there, that’s your clue.
Efflorescence: White mineral deposits mean efflorescence is present. Brush away some of the dust to check for these white deposits.
Repair methods for scaled areas
Once you’ve identified scaling, follow these steps:
Remove weak surface: Use a chisel or grinder to eliminate the flaky, damaged layer.
Patch with compatible mortars: Apply a polymer-modified concrete patch. It’s strong and flexible, perfect for scaled areas.
Retexture if needed: If your surface isn’t smooth anymore, use a broom finish or other texturing method to match the surrounding area.
Reseal after full repair: Only apply sealers once the patch is fully cured. This prevents recurrence and keeps moisture out.
Preventing Future Scaling: Sealing, Curing, and Maintenance
Sealing reduces moisture movement and salt migration, which helps prevent moisture-driven scaling and efflorescence; decide between penetrating and film-forming sealers based on traffic, exposure, and manufacturer guidance. Proper curing of new concrete minimizes dusting and micro-cracking that lead to scaling—follow the curing compound or concrete supplier recommendations and use moisture-retention methods as advised for your climate.
Prepare surfaces thoroughly and ensure the slab is dry and fully cured before applying sealers to avoid trapping moisture or contaminants under the film. Establish a maintenance schedule with periodic inspections, gentle cleaning that preserves the sealer, and a re-seal interval appropriate for the product and use; avoid aggressive acidic cleaners and confirm cleaner compatibility with the sealer manufacturer before use.
Selecting and applying sealers
Sealers play a crucial role in preventing moisture-driven scaling and efflorescence. They create a barrier to stop water, salts, and other contaminants from penetrating the concrete.
Breathable sealers are ideal as they allow moisture vapor to escape while blocking liquid ingress. Choose compatible sealers that match your existing concrete type and use conditions – indoor or outdoor, high-traffic areas, chemical exposure.
Penetrating sealers soak into the concrete, providing protection from within. Film-forming sealers sit on top, creating a physical barrier. Both have their uses; choose based on your needs.
Routine maintenance and monitoring schedule
A regular maintenance schedule helps catch scaling early and preserves sealer integrity. Here’s a simple checklist:
Inspect your concrete every 3-6 months for signs of scaling, efflorescence, or cracks. Check pH levels after any cleaning to ensure neutrality.
Perform gentle cleaning annually using mild detergents and water to remove dirt and grime. If scaling is present, consider a light acid wash, but avoid aggressive treatments unless necessary.
Re-seal every 1-5 years depending on traffic, weathering, and the sealer type used. Always ensure your concrete is clean, dry, and free of contaminants before re-applying.
Safety, Environmental Handling, and Disposal Best Practices
Always use appropriate PPE when handling acids or neutralizers—gloves, goggles, and respirators as needed—and keep an eyewash/shower source accessible per site safety norms. Control ventilation and avoid working downwind of fumes; consult the safety data sheet for first-aid steps and spill-response procedures for the products you’re using.
Contain and treat rinse water: neutralize residues, check pH before discharge, and follow local regulations for disposal or off-site transfer; don’t assume rinse water can be dumped to storm drains. Keep a spill kit and secondary containment on hand, document handling and disposal actions, and consult local authorities or waste contractors if you’re unsure of discharge rules or classification of generated waste.
On-site safety and emergency steps
Safety is paramount when handling acids and neutralizers. If you’re exposed, act fast:
- Skin contact: Rinse immediately with water for at least 15 minutes.
- Eye contact: Rinse continuously with clean water for at least 15 minutes, lifting the upper and lower eyelids occasionally. Seek medical help if irritation persists.
- Inhalation/Ingestion: Move to fresh air or seek medical attention immediately.
Always keep a first aid kit nearby with eyewash station and follow your Safety Data Sheet (SDS) guidelines for specific products.
Neutralization and disposal of rinse water
After cleaning, neutralize runoff to prevent environmental harm. Use a pH meter or test strips:
- For acids (pH < 7), use sodium bicarbonate (baking soda) or calcium hydroxide.
- For alkalis (pH > 7), use citric acid or acetic acid (vinegar).
Target pH: Aim for 6-9, close to neutral. Check local regulations for wastewater discharge. If required, use water treatment systems before disposal.
If you’re unsure about disposal methods, contact your local environmental agency or waste management department. Always follow their guidelines to protect the environment and avoid fines.
Cost Considerations: Prevention Versus Repair
Major cost drivers include materials (neutralizers, sealers, patch mortars), labor time, equipment rental (pressure washer, pH meter), downtime, and waste disposal. Investing time and materials in proper rinsing, neutralization, and sealing reduces the likelihood of repeated damage and large-scale repairs later.
Frame decisions by comparing minimal-clean approaches to a full neutralize-and-seal workflow and weigh immediate expense against avoided future repair and downtime; create a project budget listing materials, estimated labor, equipment needs, and contingency for safety or permit requirements. If unsure about quantities or replacement intervals, check product literature and consult local contractors or suppliers to refine estimates for your situation.
Cost factors to evaluate
When planning your concrete rinsing and neutralization project, consider these cost drivers:
Materials: Neutralizers, cleaners, sealants, and pH testing kits vary in price. Choose quality products for best results.
Labor: Hire experienced help or allocate time if DIY. Rates differ by region and skill level.
Equipment Rental: Pressure washers and pH meters are essential. Rental costs depend on duration and supplier.
Downtime: Minimize business interruption during the project. Schedule work around peak hours or days off.
ROI of good rinsing and maintenance
A well-maintained concrete surface requires less frequent and costly repairs:
Minimal Rinse vs Full Neutralization + Sealing: Investing in full neutralization and sealing upfront prevents future scaling, reducing repair costs over time.
Extended Surface Life: Proper maintenance extends the lifespan of your concrete. Avoid premature replacement or expensive repairs.
Payback Period: Estimate based on avoided repairs and extended surface life. For instance, a $500 upfront investment might save you $200 in annual repairs, paying for itself within two years.
Conclusion
Carefully neutralizing acid cleaners and rinsing properly protects the concrete from future scaling, keeps the surface looking even, and reduces costly repairs. If you follow a steady rinse and neutralization routine, you build durability and safety into the work from day one.
First, perform a quick, practical check: identify any remaining acid residue, select an appropriate neutralizer, test a small patch, rinse thoroughly in stages, neutralize as directed, rinse again until the water stays neutral, allow the surface to dry, and then seal and maintain as needed. Do each step in a calm, deliberate sequence, and document what you did so you know what to repeat on future projects.
Common mistakes to avoid are skipping a test patch, over-mixing or using too much neutralizer, and rushing the rinse with weak water flow or incomplete drying. Always wear eye protection and gloves, work in a ventilated area, and keep the cleanup water contained and disposed of properly. A simple rule of safety: test first, rinse thoroughly, and never assume a patch is fully neutralized until you see neutral readings and the surface dries clear.
If the job feels out of reach, or you encounter damaged or deeply etched concrete, it makes sense to call in a pro now rather than guessing. For DIY effort, stay focused on the core tasks—test small areas, follow the neutralizer directions, seal promptly, and plan ongoing maintenance. Stay steady, stay safe, and you’ll protect the concrete and your wallet.
FAQ
What causes scaling on concrete surfaces after cleaning?
Scaling happens when the concrete surface loses its outer layers or the surface becomes rough due to chemical attack or improper rinsing. Acid cleaners can pull away minerals if left on too long or not neutralized, and leftover moisture or salts can crystallize as the surface dries.
What types of acid cleaners are commonly used for cleaning concrete?
Common options include acidic cleaners designed to remove mineral deposits. Check the product label for dilution requirements and usage limits. Always follow the manufacturer’s instructions and local rules for disposal and ventilation.
What steps and products are required to neutralize acid cleaners after use?
Rinse thoroughly with clean water to dilute the residue. Apply a neutralizing agent per the product label and follow with another thorough rinse. Verify the pH of the surface with an appropriate test if you have doubts, and never leave chemical residue behind.
How can I prevent future scaling after the initial cleaning?
Seal or coat the surface as recommended for your concrete type, and ensure proper curing and drainage. Maintain regular cleaning with neutral rinses and address any standing moisture promptly to minimize salt crystallization.