
Introduction
Drywall is the quicker, more economical choice, while plaster offers a more durable and high-end traditional finish.
You’ll learn how to compare material costs, installation timelines, and finish quality to make an informed choice.
The guide walks through practical considerations and simple rules of thumb for when plaster is worth the extra effort and when drywall is the safer bet.
Key takeaways
- Drywall offers faster installation; plaster requires skilled labor and longer cure times.
- Drywall is generally better for sound control with proper insulation.
- Plaster delivers superior finish and unique textures when properly applied.
- Moisture resistance varies; use cementitious or moisture-rated drywall in damp areas.
- Costs: drywall cheaper upfront; plaster costs rise with skilled labor needs.
- Safety and code: verify local rules; plaster dust requires containment.
Table of Contents
- Introduction
- Key takeaways
- What is drywall and where it’s used
- What is plaster and where it’s used
- Construction methods: how each material is applied
- Performance comparison: durability, sound, and moisture resistance
- Cost comparison and budgeting
- Finishing, painting and aesthetics
- DIY considerations and common mistakes
- Safety, environmental impact, and building code considerations
- Conclusion
- FAQ
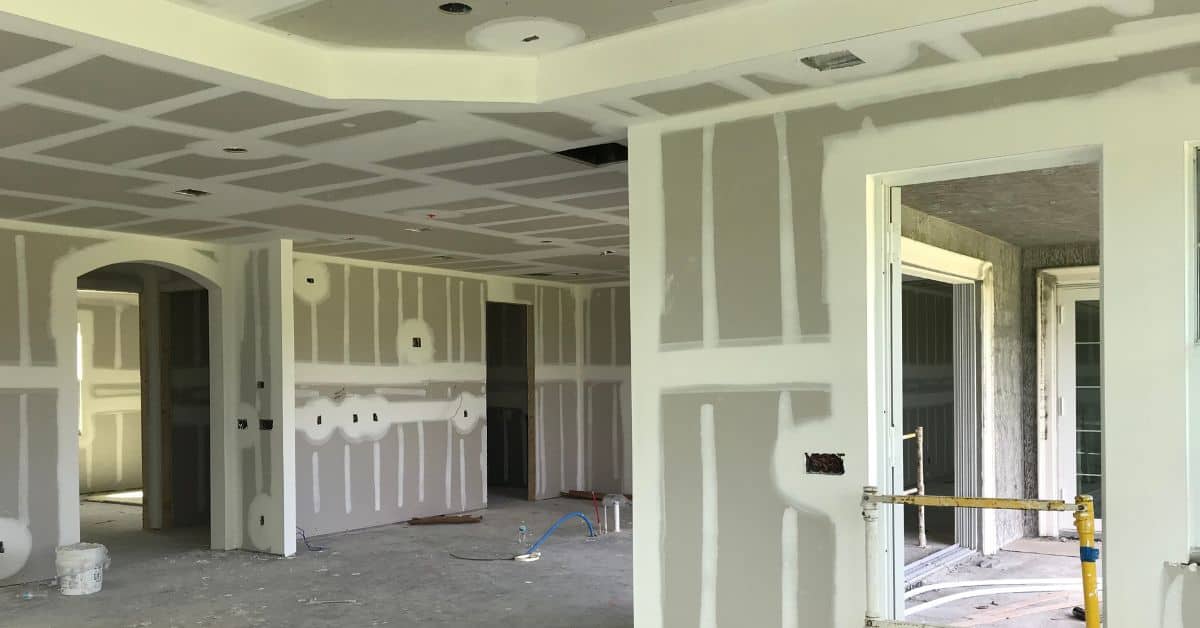
What is drywall and where it’s used
Drywall is gypsum core sandwiched between paper facing, or similar non-paper facings in some products. You’ll hear gypsum board, sheetrock, and plaster used in conversations, but plaster is a different system. There are several common types: standard paper-faced boards, moisture- or mud-resistant variants, fire-rated boards, and some cement board or fiberglass-reinforced options for special jobs.
In homes, you’ll use drywall for interior walls and ceilings, basements, and attached garages; in many commercial spaces, it forms partitions and ceilings. Choose based on moisture, occupancy, finish level, and acoustic needs, and remember you may need moisture barriers or backing in wet areas. Plaster can work in some spaces, but drywall is usually preferred for DIY due to faster install and easier finishing; always check the label or datasheet for the right type to match your project.
Drywall types and components
Drywall, also known as gypsum board or sheetrock, is a panel made of gypsum plaster pressed between two thick sheets of paper. The core material provides the strength and fire resistance, while the paper facing gives it stability during installation.
Standard drywall comes in various thicknesses, with 1/2-inch being the most common for walls and 5/8-inch preferred for ceilings due to its added rigidity. For moisture-prone areas like bathrooms or basements, you’ll want to use a moisture-resistant board such as Greenboard or a mold-resistant variant.
Cement board is another option, especially useful in kitchens and wet areas where it can serve both as a base layer for tile work and provide extra durability against water damage. Fiberglass-reinforced panels are also available for high-moisture environments but are less common for general use.
Typical installation scenarios
Drywall is the go-to material in new construction projects, especially when speed and cost-efficiency are key factors. It’s ideal for interior walls and ceilings where a quick finish is needed without compromising on quality.
In residential settings, drywall is commonly used for partition walls, bedrooms, living rooms, and hallways. For commercial spaces like offices or retail stores, it’s favored in creating flexible partitions that can be easily adjusted as needs change.
Basements and garages often use moisture-resistant drywall to prevent mold growth. In kitchens and bathrooms, a combination of cement board for the base layer and standard drywall above is typical due to its water resistance properties.

What is plaster and where it’s used
Plaster is a traditional lime mix or modern gypsum and cement-based mixes, each with its own properties. In practice you lay it in layers—a scratch coat, a brown coat, and a finish coat—and you choose a finish like troweled, smooth lime, venetian, or textured stucco depending on look and moisture.
For DIY homeowners, plaster shines in restoration and high-end interiors where authenticity, acoustics, and long life matter, but it needs substrate prep, bonding agents, and careful movement under framing. Understanding when plaster is practical and when drywall is easier helps you plan jobs, avoid cracks, and pick the right finish for maintenance and aesthetics.
Plaster systems and finishes
When it comes to plaster, there are a few key systems you need to know. The traditional three-coat system involves applying a scratch coat, followed by a brown coat, and finally the finish coat. This method is great for achieving smooth, durable surfaces.
A one-coat system is quicker but requires a strong substrate like masonry or metal lath. Venetian plaster offers an elegant look with its layered technique that creates depth and texture. Skim coating is another option where a thin layer of plaster is applied over drywall for a smooth finish.
The choice of finish can really set the tone for your space. Smooth lime finishes are classic, while venetian plaster adds a modern flair with its unique patterns. Textured stucco provides a rustic charm and excellent soundproofing properties. Each finish has its own maintenance requirements, so choose wisely based on how you plan to use the room.
Historic and specialty uses
Plaster is often chosen for restoration projects in older homes because it can replicate traditional finishes exactly. It’s also great for adding decorative moldings that give a home an authentic look.
In high-end interiors, plaster offers unparalleled customization with artisan finishes like venetian or polished lime. These finishes not only enhance the aesthetic but also add value to your property.
Areas prone to moisture, such as bathrooms and kitchens, can benefit from cement-based plasters which are more resistant than gypsum. However, proper substrate preparation is crucial for these applications.
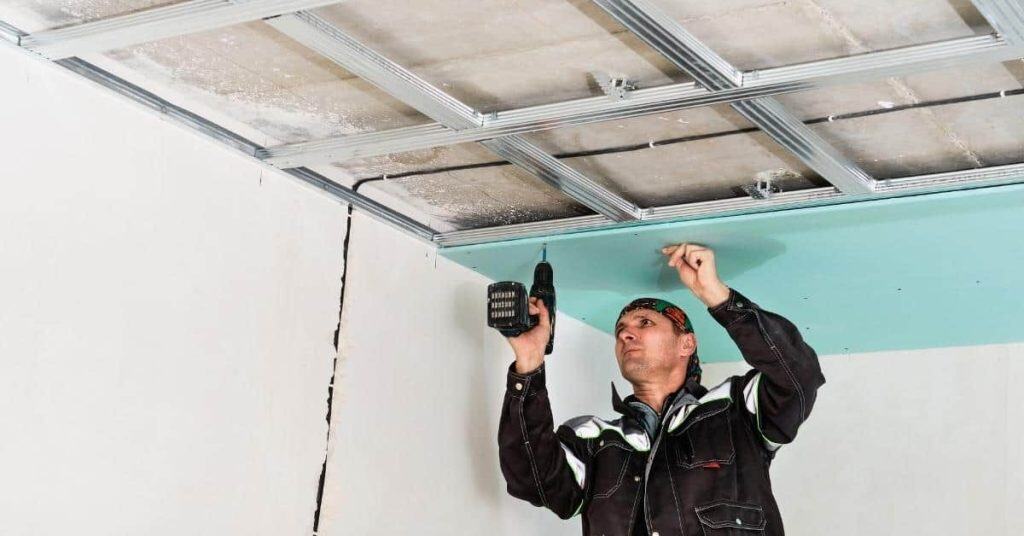
Construction methods: how each material is applied
Drywall and plaster each follow a distinct build path: drywall goes framing → hanging panels → mudding and taping → sanding and finish levels, while plaster runs lath → base coats → brown/top coats → skim coats and curing. You’ll see steps overlap where joints and corners need attention, but the material behavior and thickness drive the process in different directions.
Understanding the flow helps you plan your shop time, material needs, and what to check before paint or wallpaper goes on. It matters for finish quality, drying windows, and avoiding cracks, so watch fastener spacing, bead use, coat bonding, and how each system handles moisture and airflow in your space.
Tools and materials checklist
Use this list before starting any drywall or plaster project to ensure you have everything needed.
- Drywall panels: Check dimensions, quality; missing panels delay work.
- Screws/nails: Correct length/type for studs/rafters; wrong size weakens joints.
- Mud/tape: Joint compound and paper tape; insufficient mud leads to cracks.
- Trowels/hawks: For plaster application; improper tools waste material.
- Lath strips: Metal or wood for plaster base; missing laths weaken structure.
- Sandpaper: Various grits for smoothing; skipping sanding leaves rough spots.
- Paint brushes/rollers: For final coat; poor quality affects finish.
- Mixing buckets: Clean and ready; dirty buckets ruin plaster consistency.
Quick rule: Always double-check your materials list to avoid delays on the job site.
Time, skill and labor differences
Drywall installation is generally faster than plaster due to fewer steps involved. Drywall requires hanging panels, taping seams, and sanding, while plaster involves lath installation, multiple coats, and curing time.
The skill level required for drywall is moderate; basic training covers most tasks. Plaster work demands higher expertise, including precise application techniques and understanding of material properties to avoid defects like cracking or uneven surfaces.
Project timelines vary widely but typically, drywall projects can be completed in days, whereas plaster jobs may take weeks due to drying times between coats and overall curing periods.
Performance comparison: durability, sound, and moisture resistance
Drywall and plaster differ in durability, sound control, and moisture handling. Baseline performance is about how much abuse they tolerate, how well they resist cracking, and how they block sound, with plaster often delivering a stiffer finish and drywall offering easier repairs and quicker installs. Check the label or manufacturer instructions for exact metrics and pay attention to how the substrate and finish layers influence the results.
In practical terms, drywall tends to be faster to install and easier to repair, while plaster can feel more rigid and may require more skilled work to finish well. For moisture and wet areas, note how cementitious plaster and gypsum drywall manage humidity and mold risk, and plan proper sealing and maintenance. This matters because finish level, fasteners, and sealants all affect long-term upkeep and future retrofit options.
Longevity and Maintenance Needs
Drywall tends to have a shorter lifespan compared to plaster, mainly due to its susceptibility to moisture damage. Drywall is often repaired with quick patch jobs using joint compound, which can lead to weaker spots over time. Plaster walls, on the other hand, are more durable and require less frequent repair.
When it comes to repairing dents or cracks in drywall, you’ll need to cut out damaged sections and replace them with new pieces of gypsum board. This process is quicker but can be noticeable if not done perfectly. Plaster repairs take longer since they involve reapplying plaster over the affected area, which needs time to set properly.
Plaster walls are also more resistant to long-term wear from daily use and impact damage. They maintain their integrity better in high-traffic areas or where furniture might bump into them frequently. Drywall can show signs of wear faster but is easier to replace if it gets damaged.
Maintaining plaster requires regular cleaning and sealing to prevent moisture intrusion, which could lead to mold growth. With drywall, you need to keep an eye out for water damage and address any leaks promptly to avoid structural issues.
Moisture and Mold Considerations
In wet areas like bathrooms or kitchens, using moisture-resistant drywall is crucial. It has a special core that resists water damage better than standard gypsum board. Plaster walls can also be made moisture-resistant by applying cement-based plaster instead of traditional lime plaster.
Maintaining both materials involves regular cleaning and sealing to prevent mold growth. For drywall, use mold-resistant paints or sealants designed for high-humidity environments. With plaster, a good quality sealer will help keep out moisture and reduce the risk of mold formation.
When dealing with water damage in either material, quick action is key. Drywall should be removed and replaced immediately to prevent further deterioration. Plaster can sometimes be repaired by scraping off damaged areas and reapplying fresh plaster over them.
In humid climates or environments where moisture is a constant concern, opting for cementitious plaster offers better protection against mold and water damage compared to drywall. However, it’s more labor-intensive and costly to install initially.

Cost comparison and budgeting
This section breaks out costs into material versus labor and flags the main price drivers for drywall and plaster in DIY projects. Look up local ranges for material per sheet or per linear foot and for labor by the hour, since prices swing with finish level, room size, location, and added features. Higher finish levels, run of corner beads, moisture barriers, acoustic work, or unusual shapes push budgeting up and can catch you off guard if you don’t plan ahead.
This matters because location, supply chains, and trades availability can swing what you actually pay, and project specifics like basement versus exterior or moisture exposure shift the plan. Use a simple budgeting workflow: estimate quantities, apply local price ranges, add a contingency, and compare drywall versus plaster totals; if unsure about moisture barriers or fire ratings, check the label or datasheet and local rules.
Typical project cost drivers
The main factors driving the costs of a drywall or plaster project include the size of the area, the level of finish quality required, and any special conditions like access issues. For instance, a larger room will naturally increase material needs, pushing up both material and labor costs.
Finish quality is another biggie. A Level 4 drywall finish might suffice for most rooms, but a higher-end Level 5 finish or intricate plaster topcoats can significantly bump up the budget due to more time-consuming application and sanding processes. Similarly, adding features like moisture barriers or acoustic treatments will also hike costs.
Access issues are often overlooked but can be costly. Tight spaces, high ceilings, or remote locations require specialized equipment and extra labor hours, driving up expenses. Always factor in these variables when planning your budget to avoid surprises down the line.
When higher cost is justified
Paying more for a plaster finish or opting for a Level 5 drywall job can be worth it in certain scenarios. For example, rooms with critical lighting needs like photography studios benefit from the smoother surface of plaster, which minimizes light reflection issues.
In historic restoration projects, plaster is often essential to maintain authenticity and structural integrity. The extra cost here is justified by preserving heritage and meeting strict building codes or aesthetic standards.
Lastly, luxury homes or commercial spaces aiming for high-end aesthetics might opt for the superior finish of plaster or a Level 5 drywall job. While more expensive upfront, these finishes offer a sleek look that enhances property value and client satisfaction.
Finishing, painting and aesthetics
The way a surface looks and accepts finish differs a lot between drywall finishes and plaster, and that choice steers your prime, paint, textures, and decorative treatments. It also affects how sheen reads and how well textures or wallpapers lay down without showing through. Expect priming needs to vary by material and finish level, so plan accordingly.
This matters because DIY results hinge on matching primer to substrate and understanding porosity, which changes drying time, coverage, and final color perception. Use this to decide when to lean toward drywall with modern finishes or choose plaster for rich textures in moisture-prone spaces, and always start with test patches and check product labels for compatibility.
Painting and priming requirements
When it comes to painting, drywall and plaster have different needs. Drywall is typically smoother and more uniform, making it easier to paint with a standard primer like an oil-based or latex primer. For drywall, you can use a good quality latex primer to seal the surface and prepare for paint.
Plaster, on the other hand, often requires a bit more attention. Plaster walls are usually denser and less porous than drywall, which means they need a different approach when it comes to priming. For plaster, you might want to use an oil-based primer or a specialized plaster sealer to ensure the paint adheres properly and doesn’t show any imperfections.
Lime plasters can be tricky due to their porosity, so using a stain-blocking primer is crucial. This helps prevent any underlying stains from bleeding through and ensures your final coat of paint looks clean and uniform. Remember, proper priming is key for both materials to achieve the best results when painting.
Achieving plaster look with drywall
To mimic a plaster finish on drywall, you can use skim coats or apply venetian-style plasters over your standard drywall. A skim coat is a thin layer of joint compound applied to the surface to smooth out any imperfections and create a uniform base for painting.
For a more decorative look, consider applying venetian-style plaster. This involves multiple layers of colored plaster that are troweled in different directions to achieve unique patterns. It’s labor-intensive but can give your walls an elegant, textured finish similar to traditional plaster.
You can also add decorative moldings and trim work to enhance the look further. These details not only improve aesthetics but also help hide any minor imperfections that might be present on drywall surfaces. By combining these techniques, you can achieve a sophisticated plaster-like appearance without the complexity of actual plaster application.
DIY considerations and common mistakes
Know which drywall and plaster tasks you can safely tackle yourself and which ones definitely need a pro, then set a quick decision rule: if it involves hidden moisture, structural concerns, or complex texture work, treat it as pro territory. Focus on surface condition, moisture control, substrate repairs, and accurate material quantities, then lock in safety basics like PPE, dust containment, ventilation, ladders, and basic electrical awareness before you mix a single compound.
Follow a simple workflow: prep, prime, apply in thin coats, sand and finish, then cure and schedule paint, while keeping real-world timelines in mind and checking curing guidance for your chosen products. Watch for common mistakes that drive cost and ruin finish quality: improper mud or joint compound consistency, insufficient substrate prep, over-sanding, moisture management errors, and skipping curing or priming steps, because those slipups are highly visible and hard to fix after the fact; when in doubt, check the product label or manufacturer instructions and tailor your approach to what you actually have on hand and the room you’re working in.
Step-by-step tips for DIY drywall
This sequence helps you hang, tape, and finish drywall to a professional standard.
- Hang the sheets straight and level. Use a laser level to ensure plumb lines are accurate. Check by tapping lightly; if it sounds hollow, adjust.
- Secure with screws every 8 inches along edges and 12 inches in center. Screws should sink slightly into drywall but not break through. Tighten until flush with surface.
- Tape joints with fiberglass mesh tape. Apply compound over tape, feathering out to smooth finish. Sand lightly after drying; check by running hand over surface for bumps.
- Prime the entire wall before painting. This seals gaps and ensures a uniform paint job. Check primer coverage by looking for even color across all surfaces.
When to hire a pro for plaster work
If you’re dealing with complex textures, historic matches, or large skim coats, it’s time to call in the experts. A professional can handle intricate designs and ensure your walls look flawless.
For instance, if you need to replicate ornate patterns on historical buildings, a skilled plasterer is essential. They have the tools and techniques to match existing finishes precisely without damaging surfaces.Large areas requiring skim coats also demand professional expertise to avoid unevenness or cracking during drying.
Safety, environmental impact, and building code considerations
This section covers dust control, VOCs, disposal, recyclability, and how finish choices and assemblies affect fire ratings and inspection items. It highlights protecting indoor air quality during drywall and plaster work, choosing low‑VOC finishes, and understanding waste management requirements. You should also check finish level documentation and whether plaster lath or drywall framing affects what inspectors look for.
Why it matters: good practices save you time and avoid surprises at inspection. Use this as a checklist—verify proper moisture barriers, air sealing, and waste handling with local rules, and read product labels or datasheets for curing times and disposal guidance. If in doubt, confirm with the manufacturer or your local building department before you start.
Health and safety best practices
When working with drywall or plaster, it’s crucial to protect yourself from dust and other hazards. Wear a respirator mask and gloves at all times during installation to avoid inhaling harmful particles and skin contact.
Set up dust containment barriers around your work area to keep the rest of your home clean and safe. Use wet sanding techniques or HEPA vacuum cleaners for finishing to minimize airborne dust.
Make sure there’s good ventilation in the room, either by opening windows or running fans. This helps reduce indoor air pollution and keeps you breathing easier while working.
Remember, proper safety measures not only protect your health but also ensure a smoother project without delays due to illness or injury.
Environmental and sustainability factors
Both drywall and plaster have different environmental impacts. Drywall is easier to recycle, with many facilities accepting gypsum waste for reuse in new products. Plaster, on the other hand, has a higher embodied energy due to its production process.
If you’re looking at sustainability, consider low-VOC finishes and paints that minimize harmful emissions during curing. Natural plaster options like lime or clay plasters can offer better recyclability and lower environmental footprints compared to traditional gypsum products.
Opt for materials with high recycled content where possible, such as drywall made from reclaimed paper pulp. This reduces the demand for virgin resources and lowers overall waste generation.
By choosing eco-friendly options and minimizing waste during installation, you can contribute positively to environmental conservation efforts while building or renovating your home.
Conclusion
Choose your path based on where the wall lives, how you want it to perform, and what risks you’re willing to manage. Drywall is quick and affordable, plaster lasts where moisture and sound control matter, and both demand proper finishing to look right and stay durable.
Test a small section first, plan for access to studs and moisture sources, and follow a clear sequence: assess the wall, select the material, prepare the surface, install or repair, skim and finish, then prime and paint. Work methodically, keep cuts clean, set fasteners properly, and don’t skip safety gear. Check local code requirements and environmental impact notes before you start anything big.
Two common mistakes to avoid are rushing the install and skipping a moisture check in rooms with humidity or leaks. Always seal gaps, use the correct fasteners for the substrate, and never sand dust without a mask and containment. If you’re mixing plaster or binding compounds, follow label directions and work in a well-ventilated area to prevent dust exposure and heat buildup in closed spaces.
If the project involves retrofitting in tight spaces, high-moisture zones, or structural concerns, or if you’re unsure about code compliance, it’s smarter to call a pro than to push on. Stay safe, keep tests small, and finish with even coats and clean edges for a durable, good‑looking result that lasts. You’ve got this.
FAQ
What is the main difference between drywall and plaster?
Drywall is built from gypsum boards mounted on studs. Plaster is applied as a wet mix over lath. Drywall goes up quick; plaster takes longer and needs more finish work.
Which lasts longer and holds up better in a home?
Plaster can last a long time if kept dry and in good repair. Drywall tends to crack if the house settles or the framing shifts. If you live in a new house, drywall is usually fine; in older homes with a lot of movement, plaster can be tougher to fix.
How does cost and install time compare?
Drywall is cheaper and faster to install. Plaster costs more and takes longer because it’s a multi-step process. Plan for higher labor hours with plaster and longer dry times between coats.
Should I repair or replace existing walls with plaster or drywall?
If you have moisture or big cracks, fix the root cause first. Small cracks in plaster can be repaired; big gaps may need patchwork or replacement. If you’re remodeling, drywall is easier to work with and offers a cleaner finish, but plaster can match older homes better.