
Introduction
DIY concrete for fence posts in wet soil means setting posts in a stable base using bell holes, a layer of gravel, and tricks to manage frost movement. This method helps keep posts upright when the ground is soggy. Plan to pour and cure with attention to drainage and stability and to follow local guidance.
Begin by digging a bell-shaped hole, lay in a gravel base, then set the post and backfill with concrete. Backfill around the post as you pour and check that the post stays plumb. Always read the product label and local rules for mix ratios, curing times, and frost-related recommendations.
Key takeaways
- Plan permits and local rules before trenching or pouring concrete near property lines.
- Use bell holes with prepared gravel base and ventilated formwork for stability.
- For wet soils, ensure proper drainage and avoid standing water around posts.
- Always brace posts during setting and wear eye/hand protection on site.
- Choose concrete mix for outdoor posts with adequate workability and curing time.
- Plan frost-heave resistant strategy: spacing, backfill, and drainage around holes.
Table of Contents
- Introduction
- Key takeaways
- Planning, Permits, and Upfront Decisions
- Tools and Materials Checklist
- How Wet Soil and Frost Heave Affect Fence Posts
- Bell Holes Vs. Straight Shafts and When to Use Each
- Drainage and Gravel Strategies for Wet Sites
- Step-by-Step Installation with Bell Holes and Bracing
- Concrete Selection, Mixing, Placement, and Curing Best Practices
- Frost-Heave Tricks and Long-Term Stability Tactics
- Conclusion
- FAQ
Planning, Permits, and Upfront Decisions
Before you touch dirt, check local building codes and setback rules for fences. Locate underground utilities and confirm property boundaries with a professional survey if needed. Decide on fence height, post spacing, and whether you’ll use bell holes or straight shafts as part of your technique plan.
Read labels or manufacturer instructions for any products you’ll use, and verify permit requirements with the local jurisdiction. Outline decision points that affect digging depth, bracing method, and backfill approach so you don’t have to backtrack later. If in doubt, ask the inspector or a knowledgeable pro to confirm your plan before you start.
Check local codes and utilities
Before you start, call your local building department. They’ll tell you what permits you need and any rules about fence posts.
Verify these:
1. Depths: How deep should your holes be?
2. Setbacks: How far from property lines can you place your posts?
3. Inspections: When do inspectors need to check your work?
Also, call 811 before digging. They’ll mark any underground utilities so you don’t hit them.
Choosing post type and location
Pick your fence posts wisely. Wood, metal, or composite – each has pros and cons.
Consider these:
1. Wood: Cheap but needs regular maintenance.
2. Metal: Durable, low-maintenance, but more expensive.
3. Composite: Long-lasting, eco-friendly, mid-range price.
Next, plan your post layout. Posts should be straight and evenly spaced. Grade your site to help water drain away from posts.
Tools and Materials Checklist
Assemble a DIY-friendly toolkit: basic digging tools, a post hole digger or auger, measuring tape, level, and chalk or string. Have a mixing container, wheelbarrow, shovel, rubber mallet, and a wood or plastic rule for square checks. Don’t forget safety gear and a sturdy brace system for posts during setting.
Gather materials like concrete mix appropriate for wet conditions, gravel for backfill, and any form boards or braces you’ll need. Consider optional items for difficult sites, such as a powered auger, tamper, landscape fabric, or extra bracing lumber. Always check product labels for compatibility with wet soils and local rules before purchasing.
Essential tools and safety gear
Before you start any concrete work, especially when creating a bell-hole for underground utilities, use this checklist to ensure you have all the necessary tools and safety equipment. This will help you work efficiently and safely.
- Shovel (square-nose): For digging out soil. Check it’s in good condition with no bent or broken parts.
- Pickaxe: To break up hard-packed soil. Ensure the handle is secure and not wobbly.
- Wheelbarrow: For transporting soil and concrete. Check it’s sturdy, with no wobbly or broken wheels.
- Concrete mixer (electric or manual): To mix your concrete. Ensure it’s in working order and the motor (if electric) is functioning.
- Hoover float: For leveling and finishing concrete. Check for any damaged edges that could leave marks.
- Tamping bar: To compact concrete around forms. Ensure it’s straight and not bent or twisted.
- Formwork materials (plywood, 2x4s, stakes): For shaping the bell-hole. Check all pieces are in good condition with no splits or cracks.
- Tape measure: To ensure accurate dimensions. Test it by measuring a known distance to confirm its accuracy.
- Safety glasses: To protect your eyes from debris. Check they fit well and aren’t cracked.
- Work gloves: For handling materials. Ensure they’re not worn out or torn.
- Steel-toed boots: To protect your feet from falling objects. Check they’re in good condition with no loose or missing toes.
- Hard hat: To protect against head injuries. Inspect it for any cracks or damage.
Quick rule: Always wear your safety gear before starting work to prevent serious injuries.
Material options and specs explained
Before you start mixing or pouring, use this checklist to ensure your materials are right for the job. Check these things before you begin to avoid costly mistakes.
- Concrete type: Bagged mix, ready-mix, or fast-setting? Check product labels and local building codes to confirm what’s needed for your project.
- Cement-to-aggregate ratio: Aim for a range of 1:3 to 1:6 by volume. Too much cement makes concrete expensive; too little weakens it. Check manufacturer recommendations.
- Gravel/aggregate size: Use clean, angular gravel in sizes ranging from 3/8″ to 1-1/2″. Smaller for slabs, larger for footings. Check local standards or consult a pro if unsure.
- Sleeve placement: For reinforced concrete, sleeves should be placed before pouring. Ensure they’re clean, undamaged, and correctly positioned to avoid rebar corrosion later on.
- Water-cement ratio: Aim for a range of 0.45 to 0.6 by weight. Too much water weakens concrete; too little makes it hard to place. Check manufacturer recommendations.
- Admixtures: These can improve concrete’s properties, but they’re not always necessary. Check if your project requires any, and follow the manufacturer’s instructions for proper use.
- Concrete age at pour: Freshly mixed concrete is strongest. Try to pour within 90 minutes of mixing. After that, strength starts to decline.
- Curing method: Concrete needs moisture to gain full strength. Plan for curing by checking local standards or consulting a pro if unsure about methods like plastic sheeting or ponding water.
Quick rule: Always check local building codes and consult product labels before starting any concrete project. This ensures you’re using the right materials and following safety guidelines.
How Wet Soil and Frost Heave Affect Fence Posts
Wet soils change how loads transfer from the post to the ground, especially with high water tables and clay versus sand textures. Saturated ground can shift more as it freezes or thaws, which affects alignment and stability. These conditions demand careful backfill and drainage planning.
Seasonal freezing can alter frost depth and movement, so consider long-term stability and anchoring. Verify local frost guidance and follow manufacturer instructions for backfill and curing to reduce movement over time. If unsure, check local extension service guidance or a qualified pro’s recommendation.
Soil behavior and drainage signs
Wet soil can cause big problems for your fence posts. Here’s how to spot poorly draining soils on-site:
Look for standing water after rain or snow melt. If it takes days to disappear, that’s a sign of bad drainage.
Dig a small hole, fill it with water, and see if it drains within 24 hours. If not, you’ve got slow-draining soil.
Clay soils are usually the culprit. They swell when wet and shrink when dry, causing instability for your posts.
Mechanisms of frost heave and risk indicators
Frost heave is no joke. Here’s what causes it and how to spot risky conditions:
When water in the soil freezes, it expands by about 9%. This can lift your fence posts right out of the ground.
Risk increases with clay soils, shallow frost lines (common in northern climates), and areas where water collects and sits.
To minimize risk, you’ll need to take extra steps when installing posts in these conditions. More on that later.
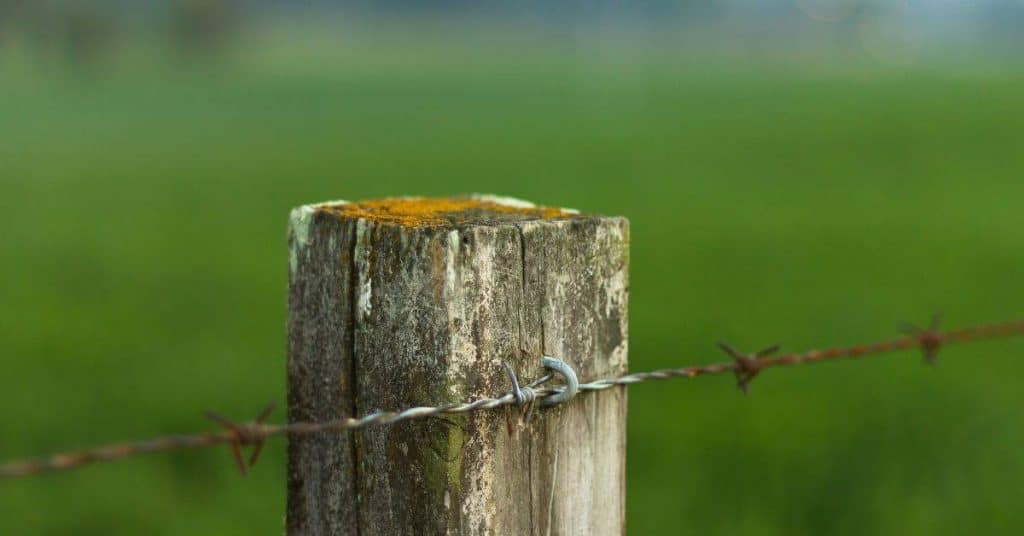
Bell Holes Vs. Straight Shafts and When to Use Each
Bell-hole foundations reduce point load and improve frost resistance by distributing load into undisturbed soil at multiple depths. This approach helps in areas with weak surface soils or where water ponds near the post line. Use bell holes when you expect stronger freeze-thaw cycles or uneven ground to better manage movement.
Straight-hole pours can be sufficient on well-drained sites with stable soils and adequate post size. For tight spaces or simple fences, a straight hole may be faster, but verify that it meets your local guidance and manufacturer recommendations. If conditions are borderline, consult that guidance before proceeding.
Bell-hole design principles and benefits
A bell hole is like a widened base for your fence post, providing mass and anchoring. It’s not about exact dimensions; it’s about creating a stable foundation.
The wider base helps resist uplift forces from frost heave or wind loads. Think of it as a tripod – the wider the base, the steadier it stands.
In wet soil, bell holes help distribute weight and pressure evenly, reducing the risk of posts popping out during freeze-thaw cycles.
When to choose straight shafts, gravel sockets, or sleeves
Straight shafts are simpler and quicker but offer less frost resistance. They’re best for dry, stable soils with no frost heave risk.
Gravel sockets provide better drainage and some frost protection. Use them in slightly wet soil where you need extra stability but don’t expect major frost heaving.
Concrete sleeves or footings with sleeves offer the most frost resistance. They’re ideal for wet, frost-prone soils and heavy loads like tall fences or windy areas.

Drainage and Gravel Strategies for Wet Sites
Create a passive drainage plan that moves water away from posts and concrete, using a gravel bed beneath the post and a gradual slope away from the fence line. Keep grading gentle and consistent to avoid perched water near the foundation. A well-drained bed helps the concrete cure more evenly in wet soils.
Use landscape gravel and a fabric barrier as needed to prevent sifting and soil intrusion, but avoid overcomplicating the setup. Check local guidance on backfill materials and layering so you stay within recommended practices for your region.
Building an effective gravel base and drainage layer
A clean, well-graded gravel layer is your first line of defense against water buildup around fence posts. It provides a path for water to drain away from the post.
Use ¾-inch or 1½-inch washed gravel. Avoid pea gravel; it’s too fine and can compact over time, blocking drainage.
Spread the gravel in a 4-6 inch layer, extending at least 2 feet beyond the post on all sides. This creates a solid base for your post and encourages water to move away from it.
For wetter sites or where you’ve identified poor drainage, consider digging a larger drainage trench. Fill this with gravel, sloping it downwards to direct water away from the post.
Surface grading, gutters, and site-level fixes
Preventing water from pooling around your fence posts starts with proper surface grading. Ensure the ground slopes away from the post, encouraging water to flow away.
For larger areas or where natural grading isn’t enough, consider creating swales. These are shallow ditches that collect and redirect water. Dig them at least 6 inches deep and slope them gently towards a lower point on your property.
If you have gutters, ensure they’re directing water away from your fence line. If not, consider installing diversion tactics, like downspout extenders or dry wells, to move water away from the posts.
Regularly inspect and maintain these grading and drainage features to keep them working effectively over time.
Step-by-Step Installation with Bell Holes and Bracing
Mark the fence line, set string lines, and dig the bell holes to the planned outline. Place bracing for the posts and verify plumb before pouring. Keep the site organized so you can pour in a controlled sequence and meet backfill requirements without delays.
Pour the bell holes with steady, even concrete and strike off flush with desired post height. Bracing should be maintained during curing, and keep the area free from disturbance until the concrete gains sufficient strength per the instructions.
Step-by-Step Installation Process
Follow these practical steps to install fence posts using bell holes and bracing, ensuring a solid foundation even in wet soil.
- Preparation: Check weather, gather tools, and wear safety gear. Safety first: call 811 before digging to locate any underground utilities.
- Mark post locations accurately using string lines or stakes. Ensure posts are level with the ground when installed.
- Dig bell holes: Use a post hole digger, following your marked depths and widths. In wet soil, consider adding extra depth for frost heave protection.
- Form and set the post: Temporary forms help maintain bell shape. Check alignment and plumb before pouring concrete. Pro tip: use a level and string line for accurate plumb.
- Pour concrete: Mix according to package instructions, then pour into hole around the post. Use a shovel or trowel to remove air pockets. Allow some space at top for gravel backfill.
- Brace the post: Temporarily brace posts using 2x4s and screws to keep them plumb while concrete sets. Check: use a level to ensure posts remain plumb.
- Backfill in layers: Add gravel first, then concrete mix. Compact each layer with a tamper or plate compactor for stability. Leave 2-3 inches of gravel at the top for drainage.
- Final checks and cleanup: Once concrete has set (usually 24 hours), remove braces and check post alignment again. Clean up tools and materials.
Digging, forming, and setting the post
Safely dig bell holes, create temporary forms, and set your fence posts with these steps.
Use a post hole digger to excavate bell holes. In wet soil, consider adding extra depth for frost heave protection. The bell should be wider than the post and extend at least 1/3 of the post’s above-ground height.
Create temporary forms using cardboard or plastic sheeting to maintain the bell shape during concrete pouring. Ensure the form is secure and won’t shift when you pour concrete.
Check: Before pouring, ensure your post is plumb (vertical) using a level and string line. Adjust as needed before setting the post in place.
Bracing, backfill order, and finishing touches
Proper bracing, backfilling, and surface treatments ensure your fence posts remain stable in wet soil.
Temporarily brace posts using 2x4s and screws to keep them plumb while concrete sets. Check: use a level to ensure posts remain plumb throughout the setting process.
Backfill in layers: Add gravel first, then concrete mix. Compact each layer with a tamper or plate compactor for stability. Gravel at the top aids drainage and prevents water from pooling around your post.
Finishing touches: Once concrete has set (usually 24 hours), remove braces and check post alignment again. Apply a surface sealer to protect against moisture and prolong post life.
Concrete Selection, Mixing, Placement, and Curing Best Practices
Choose a concrete product appropriate for wet conditions and follow the manufacturer instructions for mixing and additives. Plan batches so you won’t run short mid-pour, and maintain a consistent water-to-concrete ratio as directed. Respect label guidelines for working time and cure conditions.
Place concrete around the post with controlled placement, tamping, and consolidation to avoid air pockets. After placement, brace the post, protect from temperature extremes, and follow common-sense curing steps while adhering to product guidance for curing duration and moisture needs.
Choosing mixes and mixing/pouring tips
For wet soil, choose a mix with high cement content for better strength. Bagged mixes are convenient but may not offer the best value. Fast-set products can speed up your project but might compromise long-term durability.
Ready-mix is often the best bet. It’s consistent and you can specify the mix design. Always check supplier guidance for strength and setting times.
Pro tip: Mix only what you can pour in 30 minutes to prevent setting before placement.
Consolidation, curing, and waterproofing options
Minimize voids by vibrating the concrete as you pour. For small pours, use a simple hand-held vibrator.
Cure in wet soil by keeping the area moist for at least 7 days. Cover with plastic sheeting if needed. Don’t let it dry out too fast.
Waterproof with a simple coat of bitumen or a waterproofing membrane to reduce long-term moisture contact and prevent frost heave.
Frost-Heave Tricks and Long-Term Stability Tactics
Pair bell holes with good drainage and proper backfill to reduce frost-related movement, and ensure the top of the post remains above potential water pooling. Use gradual grading away from the fence to prevent water from settling near the base. Keep adjustments simple and focused on passive improvements.
Know when professional input is warranted, such as if movement exceeds expectations or if your site has unusual soil conditions. Plan routine checks for alignment and contact local resources for guidance on long-term maintenance and safety.
Insulation, sleeves, and vertical clearance strategies
Frost heave happens when water freezes and expands. To protect your fence posts, you need to limit this expansion’s impact.
Use sleeves made of non-conductive materials like plastic or fiberglass. They create a thermal break, reducing frost transfer from the ground to your post.
Allow for some vertical movement clearance. This lets your posts move slightly as the soil freezes and thaws, minimizing stress and damage.
While specific R-values aren’t crucial here, these strategies help minimize frost penetration and keep your posts stable.
Ongoing monitoring, repair techniques, and when to call a pro
Regularly check your fence posts for signs of trouble. Tilt, looseness, or heave could indicate frost issues.
For minor repairs, you can reset the post, add underpinning (extra gravel or concrete), or improve drainage around the base.
But if you notice significant movement, cracks in the post, or multiple posts affected, it’s time to call a pro. These could be signs of serious soil instability or structural damage.
Don’t hesitate to consult with a licensed engineer or contractor if you’re unsure about your site conditions or repair needs. It’s better to address these issues early before they become major problems.
Conclusion
Get this right and you’ll have a fence that stands firm, looks straight, and you can trust for years in wet ground. Safety, proper drainage, and solid concrete work keep posts from wobbling, heaving, or failing when frost hits.
Before you dig again, confirm your plan and permits are in place, lay out the bell hole or shaft choice for each post, gather and check tools and mix materials, step through the bell hole, bracing, and curing routines, and verify frost-heave controls and long-term stability tactics are ready to execute in the field.
Common mistakes to avoid include rushing the hole preparation or concrete placement, skimping on drainage or gravel, and skipping bracing or proper curing. Never pour concrete without a proper base or drainage path, never ignore frost-related movement, and never work with wet concrete in freezing conditions without a plan. Follow the simple safety rules: test a small area first, keep openings clear, wear eye and hand protection, and never compromise form or bracing just to save time.
If soil conditions feel beyond what you can safely handle—extremely soft ground, standing water, or a long stretch of posts—call in a pro for the layout, drainage, and post-setting plan. With careful steps and discipline, you’ll have a sturdy, durable fence line that resists moisture and frost and stays straight as you build. Stay smart, stay patient, and keep the work tight to the plan.
FAQ
What signs tell me frost heave risk is high and I should brace or adjust my setup?
Look for ground that stays soggy or fluctuates with the weather. If the soil heaves after freezes, brace the post and check for plumb regularly during the first weeks after setting. Use proper bracing and recheck alignment often, since bad frost movement can ruin a fence fast.
How should I prep a hole in a wet site to avoid washing out gravel and settling?
Dig the hole to the needed width and depth, then add a stable layer of clean granular material or gravel at the bottom. Lightly compact the base, but don’t over-tamper; you’re aiming for a firm but not powdery subgrade. Follow the concrete product label and local guidance for any restrictions on excavation in wet soil.
What curing steps are safe when the site stays wet, and why is curing important?
Keep the new concrete protected from direct splash and rapid drying. If the label allows, use a damp curing method or a cover to maintain moisture during the initial cure. Don’t rely on open air drying in constant wet conditions; follow the manufacturer’s instructions and local recommendations for curing duration and methods.
What do I do if the site is too wet to pour safely?
Wait if drainage is poor and the ground won’t hold shape. Consider temporary bracing and let the soil dry or divert water away before proceeding. If you’re unsure, check the concrete bag label and manufacturer instructions, and consult local guidance for safe timing and weather considerations.