

Introduction
Concrete sealer failures are coatings that whiten, peel, or make surfaces unexpectedly slippery. These issues usually show up after a year or two of use, not right away, and they come from improper sealing, surface prep, or weather. Understanding what goes wrong helps you spot red flags early and plan the right steps for your project.
To avoid these problems, choose the right sealer for your surface and follow the label directions for prep, application, and curing. Know that different sealers have different maintenance needs, and some jobs may require a recoat or spot repair. Always check product labels and local requirements, and ask about conditions like porosity, previous coatings, and foot-traffic when planning.
Key takeaways
- Assess whitening, peeling, and slipperiness early; document conditions and surface wear.
- Thoroughly clean and prep surface; follow label requirements for etching if needed.
- Select sealer type by intended use, porosity, and maintenance expectations.
- Apply with approved tools; respect cure times and manufacturer instructions.
- Safety: wear PPE, ventilate, avoid skin contact, and keep children away.
- Consult two reliable resources and compare related products like topical sealers.
Table of Contents
- Introduction
- Key takeaways
- Quick Overview: What Whitening, Peeling, and Slipperiness Look Like and Why They Matter
- Root Causes of Common Sealer Failures
- Types of Concrete Sealers and Typical Failure Modes
- Proper Surface Preparation and Application Methods
- Troubleshooting and Practical Fixes for Specific Failures
- Maintenance Practices to Prolong Sealer Life
- Safety, Environmental, and Regulatory Considerations
- Cost-Effectiveness, Product Selection, and Planning Guide
- Conclusion
- FAQ
Quick Overview: What Whitening, Peeling, and Slipperiness Look Like and Why They Matter
Whitening appears as a chalky or milky film on the surface, often indicating moisture or release agents trapped under the seal. Peeling shows edge-lifts or surface flakes where the coating fails to adhere. Slipperiness refers to a glossy or slick film that compromises traction underfoot or for vehicle tires.
These modes affect function and safety by reducing water repellency and increasing porosity, which invites moisture intrusion and substrate damage. Early diagnosis helps you plan spot touch-ups or a full re-seal before repairs escalate in cost or complexity. Use quick checks like visual inspection, moisture tests, scratch tests, and water beading behavior to guide your next move.
Visual symptoms and inspection tips
Before you start any repairs, inspect your concrete surfaces thoroughly. This checklist helps identify failure signs.
- Whitening: Look for chalky residue or white patches, especially in areas exposed to sunlight.
- Peeling: Check edges and corners for lifted or flaked sealer film. Peeling often starts here due to UV exposure.
- Slipperiness: Test traction by walking on the surface after a light rain or sprinkle some water. Slippery areas will feel smooth and lack grip.
- Moisture test: Place a few drops of water on the surface. If they bead up and roll off, the sealer is intact. If they soak in, moisture intrusion may be occurring.
- Scratch/peel test: Gently scratch or peel back a small edge of the film to check its adhesion. Poorly bonded sealers will lift easily.
- Surface damage: Inspect for cracks, chips, or other substrate damage that could worsen with moisture intrusion.
- Timing: Note when failures first appeared. Recent issues may require immediate attention, while older ones might have slowed progression.
- Pattern and location: Map out where failures are occurring. This can help pinpoint causes, like excessive sun exposure or poor drainage.
Quick rule: Regular visual inspections are key to catching failures early and preventing costly repairs.
Performance and safety implications
Concrete sealer failures impact more than just appearance. They can compromise durability, stain resistance, traction, and even pose safety hazards.
Durability: Failed sealers allow water to penetrate the concrete, leading to freeze-thaw damage in colder climates or alkali-aggregate reactions over time.
Stain resistance is also compromised. Dirt, oil, and other contaminants can seep into unprotected pores, making surfaces harder to clean.
Traction: Slippery surfaces pose a significant safety risk. Reduced traction underfoot or vehicle tires increases the likelihood of slips, trips, and falls.
Liability: Hidden substrate damage can worsen with moisture intrusion, leading to costly repairs and potential liability issues if injuries occur due to unsafe conditions.
When to repair versus replace
Deciding whether to spot fix, recoat, or remove and replace the sealer depends on severity, substrate condition, and timing of failures.
Spot fixes: Minor whitening or peeling in small areas can often be addressed with touch-up applications. However, if the underlying concrete is damaged, further action may be needed.
Recoating might be sufficient for widespread but mild failures, provided the original sealer was compatible and properly applied. If failures are extensive or severe, full removal and re-application may be necessary.
Full removal: Consult a professional if you’re unsure about the extent of damage or if failures are due to incompatible sealers. They can assess substrate condition and recommend appropriate repairs. Timing is crucial; don’t wait too long, as further moisture intrusion can exacerbate problems.
Root Causes of Common Sealer Failures
Whitening, peeling, and slipperiness each point to distinct physical or chemical mechanisms such as moisture migration, efflorescence, improper adhesion, UV degradation, or inappropriate recoat intervals. The observed symptoms connect directly to how a sealer interacts with the substrate and environment.
Different sealers and substrates influence outcomes: film-forming versus penetrating sealers behave differently on concrete, stamped patterns, or overlays. Surface prep quality, porosity, and cure conditions dramatically shape whether failures occur and how they progress over time.
Causes of whitening (efflorescence, moisture, and reaction products)
White haze on your sealed concrete isn’t always a sign of failure. It could be efflorescence, a natural process where salts from within the concrete migrate to the surface. This happens when moisture is trapped during curing or later due to water penetration.
Improper curing can also lead to whitening. If your concrete was sealed too soon after pouring, it might not have dried properly, causing a white residue on the surface.
Sometimes, whitening occurs due to chemical reactions between the sealer and the concrete or other substances present. This could be due to incompatible products or contaminants in the substrate.
To distinguish efflorescence from other causes, wait for it to disappear naturally. If it persists after a few weeks, you might have another issue at hand.
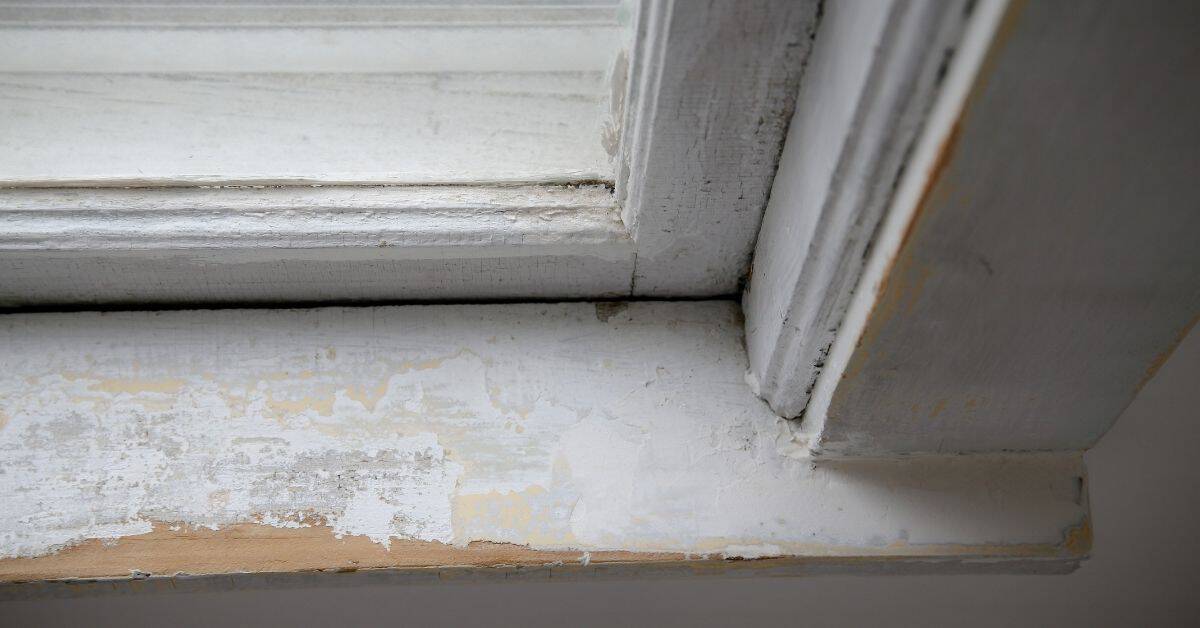
Causes of peeling and delamination (prep, adhesion, and incompatibility)
Peeling sealers often result from poor surface preparation. If the concrete wasn’t properly cleaned, profiled, or primed, the sealer won’t adhere well.
Incompatible products can also cause peeling. Using a water-based sealer over an oil-based primer, for instance, can lead to delamination. Similarly, applying a new sealer over an old one that hasn’t been properly removed can cause issues.
Substrate movement due to settling, temperature changes, or moisture expansion can also cause peeling. This is more common in older structures or those built on unstable soil.
Contamination from release agents, form oils, or other substances can prevent the sealer from bonding properly, leading to peeling.
Causes of slippery surfaces (film buildup, wear, and contaminants)
A thick film-forming sealer can make your concrete surface too glossy, reducing friction and increasing the risk of slips. This is more common with solvent-based sealers or topcoats.
Accumulated residue from dirt, grease, or other substances can also make surfaces slippery over time. Regular cleaning can help prevent this, but if left untreated, these contaminants can build up and reduce traction.
Traffic wear can also contribute to slipperiness. High foot traffic areas or those subject to heavy equipment may see the sealer’s top layer wear away, exposing a smoother, more slippery surface underneath.
To diagnose slipperiness issues, look for signs of film buildup, residue accumulation, or excessive wear. Addressing these can help improve traction and safety.
Types of Concrete Sealers and Typical Failure Modes
Penetrating or impregnating sealers target porosity and moisture control, while film-forming sealers create a visible layer on top. Densifiers or chemical hardeners work to improve surface strength. Specialty sealers address niche exposures or finishes and may respond uniquely to wear conditions.
Common failure cues are linked to each class: penetrating sealers may show whitening from moisture; film-forming sealers can peel or whiten from incorrect film thickness or UV attack; densifiers may exhibit reduced hardness or dusting; specialty sealers may fail under specific chemicals or wear. Diagnose by class, then plan the appropriate remedy and recoat strategy.
Penetrating/Impregnating Sealers and Densifiers
These sealers soak into concrete’s pores, making them great for repelling water and salts. They don’t change the surface appearance much.
Common failures: If you see salt stains or reduced water beading after a while, it might be time to reapply or switch to another class.
Densifiers chemically react with concrete to harden it. They’re good for increasing durability but don’t provide much surface protection.
Typical issues: If you notice dusting or reduced hardness over time, consider recoating or using a different sealer.
Film-Forming Sealers (Acrylics, Epoxies, Polyurethanes)
These sealers create a protective layer on top of the concrete. They come in various gloss levels and wear resistance.
Common failures: Blistering, peeling, or chalking could indicate improper application, UV damage, or chemical attack. Slippery surfaces might be due to film buildup or contaminants.
Proper surface prep is crucial for these sealers. Inadequate cleaning or curing can lead to adhesion problems and eventual delamination.
Avoid: Don’t apply film-formers over damp or poorly cured concrete, as this can trap moisture and cause failure.
Material Specs and Performance Standards
Checking material specifications ensures you’re getting the right sealer for your needs.
- Slip-Resistance: Look for products with high coefficient of friction (COF) ratings to prevent slippery surfaces. Aim for COF ≥ 0.60 for pedestrian areas and ≥ 0.80 for ramps.
- VOCs: Check volatile organic compound levels to ensure they meet local regulations and indoor air quality standards.
- Adhesion: Make sure the sealer has good adhesion properties to bond well with your concrete surface.
- Wear Resistance: Consider abrasion resistance ratings, especially for high-traffic areas. Look for products with high Taber or Taborer values.
- Moisture Vapor Transmission (MVT): For interior applications, choose sealers with good MVT rates to prevent moisture buildup and potential damage.
Proper Surface Preparation and Application Methods
Prep steps must be tailored to sealer type and substrate condition, including cleaning, moisture testing, and surface profiling. Remove contaminants and perform necessary repairs before sealing. Ensure the surface is dry and mature as required by the product label.
Follow clear application guidelines for mixing, priming, and sequencing in multi-part systems. Control temperature and humidity windows and use proper back-rolling or tipping techniques to avoid lap marks and pinholes. Document and adhere to timing between prep and sealing and post-application care.
Tools and materials checklist
Before you start, make sure you’ve got the right tools and supplies. This list covers cleaning, testing, safety, and application essentials.
- Pressure washer: For thorough cleaning. Skip it? You’ll leave dirt that ruins adhesion.
- Stiff-bristle broom: To remove loose debris after washing.
- Concrete cleaner: To remove tough stains and contaminants.
- Moisture meter: To test concrete moisture. Skip it? You might seal a wet surface, causing peeling later.
- Relative humidity tester: For in-situ RH checks. Skip it? High humidity can cause application issues.
- Surface grinder or scarifier: To profile the surface and remove laitance.
- Safety glasses: Protect your eyes from debris and chemicals.
- Gloves: To protect hands from chemicals and sharp edges.
- Respirator: For protection against dust and fumes. Skip it? You risk health issues.
- Tape and plastic sheets: For masking edges and protecting nearby areas.
- Sealer-specific primer: Some sealers require a primer for better adhesion.
- Roller, sprayer, or trowel: Depending on your sealer type. Skip it? You won’t apply the sealer evenly.
- Back-rolling tool (if needed): To remove bubbles and ensure even film thickness.
Quick rule: Always check your tools and materials before starting. Missing something can lead to application failures.
Application best practices by sealer type
Different sealers need different conditions and methods for the best results.
Penetrating sealers: Apply in two thin coats with a roller or sprayer. Let each coat dry for 24 hours before applying the next. Ideal temperature range is 50-90°F (10-32°C).
Film-forming sealers: Apply using a roller, trowel, or airless sprayer. Follow the manufacturer’s mixing instructions and apply in thin, even coats. Let each coat dry according to the sealer’s specifications.
Quick rule: Always follow the manufacturer’s guidelines for your specific sealer type. Ignoring these can lead to application failures.
Visual checkpoints and quality-control during application
During application, keep an eye on these signs to ensure your sealer is going on right.
- Coverage: Check that you’re covering the entire surface evenly. Miss a spot? You’ll have unprotected concrete.
- Film uniformity: Look for even film thickness. Too thick or thin? You might get lap marks, pinholes, or peeling later.
- Bubbles: Check for bubbles forming on the surface. If you see them, back-roll to remove.
- Tackiness: Feel the surface after application. Too tacky? You might be over-wetting the surface.
- Drying time: Keep track of drying times between coats. Too short or long? You could end up with poor adhesion or a rough finish.
- Edges: Check that edges are properly sealed to prevent peeling later.
- Temperature and humidity: Monitor these during application. Out of range? You might get application issues.
Quick rule: Regular visual checks help catch problems early, preventing costly rework or failures.
Troubleshooting and Practical Fixes for Specific Failures
For whitening, verify moisture intrusion, surface preparation gaps, or incompatible coatings. For peeling, confirm adhesion and film formation quality, along with substrate porosity and cure conditions. For slipperiness, assess film thickness, residues, and surface texture.
Implement short-term fixes safely, such as spot cleaning and resealing after proper curing, or light mechanical etching where compatible. Long-term remedies focus on proper prep, selecting the right sealer class, and scheduling reapplications. When signs exceed DIY scope, involve a professional for moisture testing and substrate repair.
Remedies for whitening and salt bloom
Whitening on concrete surfaces, often due to efflorescence or salt bloom, can be unsightly. Here’s how to tackle it:
Cleaning: Use a stiff brush and mild detergent solution to scrub the affected area. Rinse thoroughly.
Drying: Ensure the surface is completely dry before sealing. This may take several days or weeks, depending on humidity levels.
Salt removal: If salt bloom is the culprit, you’ll need to remove it. Use a solution of muriatic acid (1 part acid to 5 parts water) and a stiff brush. Rinse well and neutralize with a solution of baking soda (1 pound per gallon of water).
Full substrate remediation: If whitening persists, you may need to grind off the top layer of concrete and start over.
How to handle peeling and delamination
Peeling or delaminating sealer is a sign of poor adhesion. Here’s how to address it:
Test patches: Before stripping the entire surface, test different cleaning methods and primers on small areas to find what works best.
Mechanical removal: Use a scraper or power washer to remove loose sealer. Be careful not to damage the substrate.
Adhesion restoration: After removing the old sealer, clean and prepare the surface properly. Apply a suitable primer before re-sealing.
Strip and start over: If peeling is extensive or you can’t restore adhesion, strip the entire surface and start with proper preparation and application.
Reducing slipperiness and restoring traction
Slippery surfaces are a safety hazard. Here’s how to improve traction:
Anti-slip additions: Add anti-slip aggregates (like sand or glass beads) to your sealer or apply an anti-slip coating.
Surface abrasions: Lightly abrade the surface with a grinder or sander to increase texture. Be careful not to damage the substrate.
Product swaps: Consider switching to a sealer that provides better traction, like an acrylic sealer with added aggregates.
Safety testing: After making changes, test the surface for slip resistance using a suitable method, such as the ‘heel-toe’ test or a portable slip tester.
Maintenance Practices to Prolong Sealer Life
Establish a practical cleaning cadence using gentle cleaners that minimize wear. Adapt frequency to traffic, environment, and sealer type, avoiding harsh acids that can degrade coatings.
Set regular inspection intervals with a simple checklist for wear, UV degradation, whitening, peeling, and water beading. Use spot repairs to address localized issues and plan resealing before failures become widespread. Maintain records of products, application dates, and maintenance actions.
Routine cleaning and stain management
Keep your concrete clean to maintain sealer performance. Use a mild, pH-neutral cleaner for routine cleaning. Avoid harsh acids or alkaline cleaners that can degrade sealers.
For oil or chemical spills: Absorb with cat litter or sawdust first, then use a degreaser specifically designed for sealed concrete.
Regularly remove dirt and stains to prevent buildup. A soft-bristle broom or a gentle pressure washer can help maintain your sealer’s lifespan.
Monitoring and recoat indicators
Inspect your sealed concrete regularly for signs of wear. Check for:
– UV degradation: Faded color or chalky appearance.
– Water beading failure: Water no longer beads up on the surface, indicating sealer loss.
Check adhesion in low-visibility areas by applying tape and pulling it off. If the sealer comes off with the tape, it’s time for a recoat.
Seasonal and traffic-related care tips
Freeze/thaw cycles: Ensure your concrete is clean before winter. Remove any dirt or debris that could trap moisture and cause damage.
Deicing salts: While they won’t harm sealers, they can leave a white residue (efflorescence). Rinse off excess salt to prevent this.
Heavy loads and high-traffic zones: These areas may require more frequent inspection and touch-ups. Consider applying additional coats or using a heavier-duty sealer in these areas.
Safety, Environmental, and Regulatory Considerations
Wear appropriate PPE, including gloves, eye protection, and a respirator where needed, plus good ventilation during application and curing. Consider indoor air quality and choose low-VOC options when possible.
Learn local regulatory requirements before selecting or applying sealers, including disposal rules and slip-resistance standards. Review MSDS/SDS, product data sheets, and supplier guidelines to ensure compliance. Consider the broader environmental impact and certifications when selecting products.
Personal protection and on-site safety
Safety’s our top priority. Here’s what you need:
PPE: Gloves, goggles, and a respirator. No exceptions.
Contain spills immediately to prevent slip hazards and skin contact.
Ventilation: Ensure the area’s well-ventilated. Open windows or use fans if indoors.
VOCs, emissions, and environmental best practices
Solvent-based sealers have high VOCs, bad for indoor air. Water-based are safer.
Low-VOC options exist. Check labels or ask the manufacturer.
Mitigation: Use in well-ventilated areas. Consider fans or open windows.
Never apply sealers in enclosed spaces without proper ventilation.
Storage, transport, and disposal guidance
Store sealers in cool, dry places. Keep them away from heat sources and flames.
Transport: Secure containers to prevent spills. Follow local hazmat rules for transportation.
Disposal: Follow product labels and local hazardous-waste regulations. Don’t pour down drains or into the ground.
Clean-up: Use absorbents for spills. Dispose of used materials according to local rules.
Cost-Effectiveness, Product Selection, and Planning Guide
Think through lifecycle value: initial material and application costs, cure time, and expected service life. Weigh penetrating versus film-forming options based on use-case and traffic.
Use a simple decision framework that considers foot traffic, surface condition, porosity, moisture, and ventilation. Create a planning checklist with surface area, coats needed, drying times, weather constraints, and budget buffers. Include maintenance planning to keep long-term costs predictable.
Comparing cost, durability, and performance
When choosing a concrete sealer, don’t just focus on the upfront material cost. Consider the entire lifecycle to get the best value for your money.
Recoat frequency: Some sealers last longer than others. A higher initial investment might mean fewer recoats over time, saving you money in the long run.
Maintenance needs: Easier-to-clean surfaces require less elbow grease and fewer cleaning products, reducing maintenance costs.
Failure risk: Cheaper options may not perform as well or last as long, leading to costly repairs or reapplication. Weigh the risks against the benefits.
How to choose the right sealer for your surface and use-case
Matching the right sealer to your concrete’s needs ensures optimal performance and longevity. Consider these factors:
Substrate type: Different sealers work best on various concrete types, such as plain, stamped, or colored.
Exposure: Outdoor surfaces need protection from UV rays, while indoor ones might require resistance to chemicals like oil or gas spills.
Traffic and desired appearance: High-traffic areas need tougher sealers. Consider the finish you want – glossy, satin, or matte.
Slip requirements: If safety is a concern, opt for an anti-slip sealer to prevent accidents.
Related products, tools, and resources to consider
To ensure a successful sealing project, consider these additional items:
- Moisture meters: Measure concrete moisture levels before sealing. Rent or buy – around $50-$200.
- Cleaners: Pre-cleaning ensures better sealer adhesion. Expect to spend $15-$30 per gallon.
- Primer: Some sealers require a primer for optimal performance. Around $20-$40 per quart.
- Anti-slip additives: Enhance slip resistance, especially for wet areas. Around $15-$30 per gallon.
- Tech sheets and contractor references: Consult manufacturer tech sheets for application guidelines. Ask local contractors for their recommendations.
Conclusion
Protecting your concrete and your safety starts with clear, deliberate steps: fix failures now, test materials, and follow proper prep and application practices to keep whitening, peeling, and slipperiness from returning.
Move forward with this practical check: inspect a small, inconspicuous area to test your sealer and any repair products, clean and etch or roughen only as needed, allow proper drying times, apply per label in civil weather, reseal in a temperature window, and recheck hardness and slip resistance after cure. If unsure, confirm product compatibility, test a tiny patch, and document your results before widening the work scope.
Avoid common mistakes like rushing through cleaning without removing old sealer, skipping surface profiling, or applying in damp or cold conditions. Do not mix products or skip safety gear, and always ventilate work areas and keep kids and pets clear. A simple safety rule: if you don’t know the surface needs, test first, wait for full cure, and wear eye and skin protection at every step.
If the problem persists or if you face extensive peeling, deep whitening, or ongoing slipperiness after a repair attempt, bring in a professional. They can verify sealant compatibility, perform targeted surface preparation, and apply a durable, code-compliant finish. Stay confident, stay safe, and finish strong with a solid, lasting seal that looks good and performs well.
FAQ
What causes whitening, peeling, or slippery surfaces after sealing concrete?
Whitening can come from moisture trapped under a film or excess sheen from the sealer. Peeling means the coating didn’t bond well to the surface or was applied over damp or dusty concrete. Slipperiness usually happens when a non-slip additive isn’t used or the film is too slick for the area.
How can I prevent these common sealer failures?
Always test a small area first and follow the manufacturer’s guidance on surface prep, drying, and cure times. Clean and dry the slab, remove curing compounds, and avoid applying in high humidity or extreme temps. Use the right sealer for the surface and consider a non-slip option for walkways or work areas.
What are the proper steps for applying a concrete sealer to avoid issues?
Mix and apply per the label, using the recommended roller or sprayer technique. Ensure the surface is clean, dust-free, and fully dry before application. Apply in thin, even coats and follow the recoat times exactly as instructions indicate.
What maintenance practices help extend sealer life and prevent resurfacing problems?
Regular cleaning with mild detergent and a soft brush keeps the surface from buildup. Reapply only when the old sealer shows wear or according to the manufacturer’s timeline. Avoid harsh cleaners that can degrade the film, and reseal high-traffic areas when you notice dullness or surface staining.