
Introduction
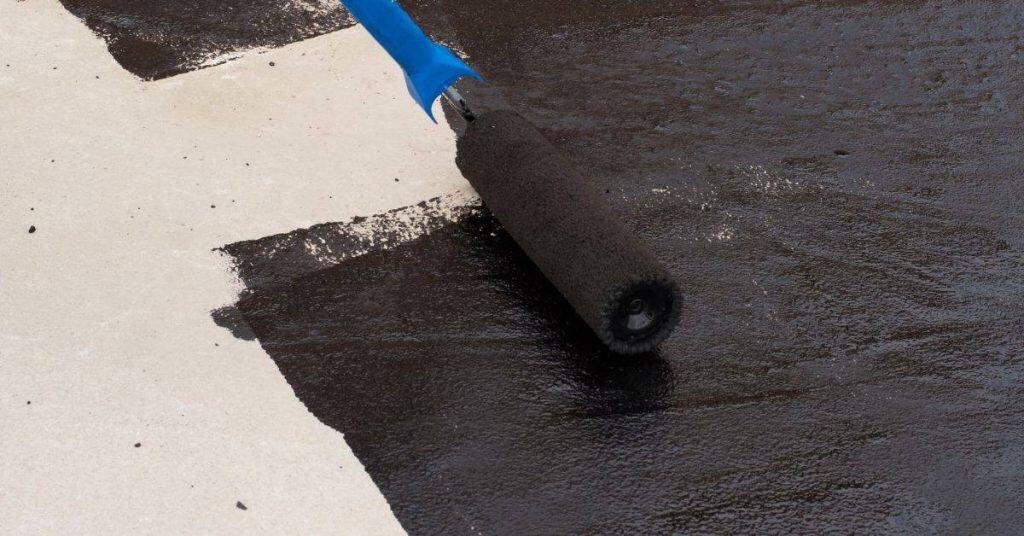
A concrete sealer is a surface coating intended to protect and seal a concrete floor. When it becomes slick or peels, traction is lost and the risk of slips increases. This article explains practical ways to add traction without peeling the finish.
There are penetrating sealers that soak in and film-forming coatings that sit on top. Each type has its tradeoffs for bite, wear, and peeling, and failures usually show up as slick spots or hazy surfaces. To avoid problems, follow the product label, manufacturer instructions, and any local rules, and test a small area before applying to the whole floor.
Key takeaways
- Understand concrete sealers vs coatings: sealers penetrate; coatings form film.
- Penetrating sealers offer durability but may reduce friction; film-forming can add traction.
- Slippery finishes caused by improper sealing require assessment before traction.
- Test dry/finish conditions and pick traction approaches that won’t peel finish.
- Options include non-slip additives, broomed textures, and careful mechanical abrasion if needed.
- Follow manufacturer guidance and local rules; safety gear and ventilation are essential.
Table of Contents
- Introduction
- Key takeaways
- What Is a Concrete Sealer Vs. a Concrete Coating?
- Why Sealed Concrete Becomes Slippery (Root Causes)
- Assessing Your Floor Before Adding Traction
- Methods to Add Traction Without Peeling the Finish
- Choosing the Right Products and Additives
- Step-by-Step Application Process to Preserve Finish
- Common Mistakes That Cause Peeling or Poor Grip—and How to Avoid Them
- Testing Traction, Maintenance, and When to Call a Pro
- Conclusion
- FAQ
What Is a Concrete Sealer Vs. a Concrete Coating?
A penetrating sealer is designed to enter the concrete pores, while a film-forming coating creates a tangible layer on the surface. Penetrants include silane/siloxane and acrylic sealers, whereas coatings include epoxy, polyurethane, and acrylic film-types. Understanding the difference matters for slip resistance, durability, and how the surface feels underfoot.
Penetrating sealers bond by soaking in and reducing porosity, leaving the surface with its natural texture visible. Coatings build a protective film that can change texture and grip, and they may require primers or adhesion promoters for reliable overcoats. Compatibility with overlays, toppings, or existing finishes also guides the choice and risk of peeling or whitening when layering.
Penetrating sealers versus film-forming sealers
Concrete sealers fall into two main categories: penetrating and film-forming. Understanding the difference is crucial for maintaining traction and preventing peeling.
Penetrating sealers, like silane/siloxane or acrylic, soak deep into concrete pores. They react chemically with the concrete to create a barrier against moisture and chemicals without changing the surface texture. This means they won’t smooth out the grip you get from natural concrete roughness.
Film-forming coatings, such as epoxy, polyurethane, or acrylic, sit on top of the concrete. They create a layer that can alter the surface feel and may smooth out some of the natural traction. However, this depends on the specific product and its application method.
Common sealer and coating chemistries
Concrete sealers and coatings come in various chemical compositions, each with its own finish and traction characteristics:
Acrylic sealers are versatile. They can be either penetrating or film-forming depending on the formulation. As a film-former, they provide good durability but may slightly reduce traction. As a penetrant, they maintain natural texture while offering protection.
Silane/Siloxane is a popular choice for penetrating sealers. It reacts with concrete to form a strong bond, providing excellent moisture resistance without altering the surface feel.
Epoxy coatings are tough and durable film-formers. They offer good traction but can become slippery when wet. They’re often used in high-traffic areas or where chemical resistance is needed.
Polyurethane/Polyaspartic coatings provide excellent wear resistance and UV stability. They can be either matte or glossy, depending on the formulation, and may slightly reduce traction compared to natural concrete.
Why Sealed Concrete Becomes Slippery (Root Causes)
A sealed surface can become slick when a high-gloss film reduces friction, or when a hydrophobic seal leaves little micro-texture for grip. The issue isn’t moisture alone, but how the coating interacts with the surface texture and contaminants. Testing for friction during work helps identify slip risk early.
Root causes include surface gloss masking texture and wear that polishes away micro-slip. A non-porous, smooth layer may repel water but fail to provide traction in wet conditions. Contaminants like soap, wax, or cleaner residues can further reduce friction and increase slip risk.
Surface gloss and film properties
When concrete is sealed, a thin layer of material sits on top. This can make the surface feel smooth and shiny – that’s high-gloss. But here’s the catch: while it looks nice, this low-friction film reduces traction.
Imagine walking on ice. It’s slippery because there’s no texture for your shoes to grip onto. The same thing happens with a high-gloss sealer when it’s wet or contaminated. Water can’t soak in, and contaminants like dirt or soap residue sit on top, making the surface even slicker.
To minimize this risk, consider using a matte or semi-gloss sealer instead of a high-gloss one. They still protect your concrete but maintain some texture for better grip.
Contaminants, wear, and environmental factors
Over time, stuff lands on your sealed concrete. Oil from cars, dust from the air, even algae if it’s outdoors. These contaminants can reduce traction by filling in tiny gaps in the texture.
Heavy foot traffic also wears down the sealer over time. Scraping tools or dragging objects across the surface can smooth out the texture too. This is especially true with film-forming sealers that sit on top of the concrete.
Freeze-thaw cycles can also cause problems. Water seeps into tiny cracks, then freezes and expands, breaking off bits of concrete. This leaves a smoother surface that’s harder to grip.
To keep traction, clean your sealed concrete regularly. Remove contaminants before they build up. And be gentle when cleaning – use soft brushes or pads to avoid wearing down the sealer.
Assessing Your Floor Before Adding Traction
Identify the current sealer type, its age, and condition to gauge compatibility with traction methods. This helps decide whether to add additives, mats, or touch up with a coating. Document your observations for reference during work.
Inspect for peeling, dullness, cracks, or spalling and note any moisture problems first. Cleanliness matters, since oil, grease, or dirt can trap moisture and undermine traction improvements. Mechanical prep or chemical cleaners may be needed before proceeding.
Visual checkpoints and simple adhesion/compatibility tests
Before you start, use this checklist to assess your concrete floor’s current condition. It helps ensure any traction-enhancing method will stick and work as expected.
- Blisters or bubbles: Check for signs of delamination. If present, the sealer might not be compatible with new treatments.
- Sheen changes: Look for dull patches or areas with excessive gloss. These could indicate uneven sealing or contamination.
- Adhesion test: Use a sharp object to lightly scratch the surface. If the sealer flakes off, it’s not well-adhered and may need re-sealing.
- Compatibility patch test: Apply a small amount of your chosen traction-enhancing product in an inconspicuous area. Monitor for any adverse reactions (e.g., bubbling, discoloration).
- Peeling or flaking: Inspect edges and corners. If the sealer is peeling, it might not be compatible with new treatments.
- Crystallization: Check for white, salt-like deposits. These indicate moisture-related issues that need addressing first.
- High spots or cracks: Inspect for uneven surfaces or structural damage. These can hinder traction work and should be addressed before proceeding.
- Spalling: Look for areas where the concrete is flaking off. This indicates serious damage that needs professional attention.
Quick rule: If you find any major issues, address them first or consult a professional to avoid wasting time and materials.
Safety, substrate, and environmental considerations
Before choosing a traction method, consider these factors to ensure your project goes smoothly and safely.
Temperature and humidity: Most products have ideal application ranges. Check the manufacturer’s recommendations and adjust your schedule accordingly.
Ventilation is crucial when using chemicals or applying new sealers. Ensure your workspace has adequate airflow to prevent fumes from building up.
Slip hazards: Be mindful of existing slippery areas, especially during application and drying times. Tape off these zones or use warning signs to prevent accidents.
Also consider the environmental impact of your chosen products. Opt for low-VOC or eco-friendly options when possible.
Methods to Add Traction Without Peeling the Finish
Set a clear goal: raise slip resistance without changing the finish or risking delamination. Confirm compatibility with the existing sealer and substrate before choosing a method. Planning helps avoid costly rewrites later.
Use three proven approaches: topcoat additive blends to boost traction, broadcast aggregates in the final coat or surface, and subtle texture changes like light brooming or stippling. Follow manufacturer guidance for materials, steps, cure times, and test slip resistance during the process.
Anti-slip additives mixed into a topcoat
Mixing fine non-slip particles, like aluminum oxide or silicon carbide, into your final sealer or topcoat is an effective way to increase traction. These particles create micro-texture on the surface without altering gloss or increasing delamination risk.
Compatibility with your existing sealer and substrate is crucial. Always check manufacturer guidelines before mixing additives. Incorrect mixing can lead to poor adhesion and increased slip risk.
The key to success lies in even distribution. Overmixing can cause the particles to clump, while undermixing leaves areas of reduced traction. Follow your additive’s specific application instructions for best results.
Broadcast aggregates and surface-applied grit
Broadcasting grit into a wet topcoat creates durable texture and is often preferable when you need more traction than additives alone can provide. This method works best with water-based sealers, as solvent-based ones may dissolve or dislodge the aggregate.
Choose aggregates that are compatible with your sealer and substrate. Common options include silica sand, aluminum oxide, or garnet. Larger particles (e.g., #20-50 mesh) provide more texture but can be less durable; smaller ones (#80-120 mesh) offer better durability but less traction.
To apply, spread the aggregate evenly onto the wet sealer using a squeegee or trowel. Work quickly to ensure even coverage before the sealer dries. After application, remove any excess material with a stiff-bristle broom and allow the surface to cure according to manufacturer guidelines.
Choosing the Right Products and Additives
Define your target slip resistance and finish type to guide selection. Consider how the space is used, such as wet areas or high-traffic zones, when choosing additives or coatings. Realistic expectations help you pick the right path.
Catalog non-slip grits and anti-slip coatings, noting typical grain sizes, durability, and whether they are penetrating or film-forming. Check datasheets for substrate compatibility, cure times, recoat windows, moisture tolerance, and any safety or VOC limits.
Common non-slip additive materials and trade-offs
Choosing the right non-slip additive is crucial. Each material has its pros, cons, and specific uses.
- Silica Sand: Inexpensive, natural look. But it can stain and wear out quickly.
- Aluminum Oxide: Durable, long-lasting. More expensive. Can feel harsh underfoot.
- Ceramic Beads: Smooth, comfortable to walk on. Less durable than metal oxides. Can be pricey.
- Quarry Grit: Inexpensive, rough texture for high-traffic areas. Can be too coarse for some tastes.
- Polymer Beads: Soft, non-abrasive feel. Good for wet areas. Can be pricey and may not last as long.
How to pick particle size, profile, and amount safely
Particle size affects traction and appearance. Larger particles provide more grip but can feel harsh.
Manufacturers recommend sizes based on use. For example, smaller particles for floors, larger for high-traffic areas.
Profile refers to how much the particle stands above the surface. A higher profile provides more traction but can wear down faster.
Always follow manufacturer guidelines for loading (amount) to avoid over-application, which can cause cracking or peeling.
Step-by-Step Application Process to Preserve Finish
Start with a concise prep that focuses on preserving the finish: clean, remove contaminants, and test a small area for compatibility. Verify the existing sealer’s type and check for solvent interactions before applying any traction product. This minimizes unexpected finish lifting.
Plan three stages: test patch, method choice (penetrating vs film-forming), and post-application care. Include environmental controls, moisture checks, and decontamination steps to prevent peeling or hazing. End with curing guidelines and inspection steps for even traction.
Step-by-Step Process
The following is a clear, numbered sequence of practical steps to help you apply traction to your sealed concrete while preserving the finish.
- Preparation and safety checks: Ensure the surface is clean, dry, and free from contaminants. Check for any cracks or damage that needs repair. Put on appropriate safety gear, including gloves and eye protection.
- Test patch application: Choose a non-critical spot to apply a small test patch of sealer/traction product. Follow manufacturer’s guidance for application and let it cure as directed.
- Main work: Based on the test patch results, proceed with applying the chosen traction product using the recommended tools (roller, pad, squeegee, or sprayer). Work in manageable sections to ensure even coverage.
- Curing and inspection: Allow the applied traction product to cure according to manufacturer’s instructions. Inspect the surface for any signs of hazing, peeling, or finish lift.
- Cleanup and final checks: Once cured, perform a final check to ensure uniform traction without altering the finish. Clean up your workspace, removing any residual materials and disposing of them properly.
Surface preparation: cleaning, repair, and profile
Proper surface preparation is crucial to ensure the traction product adheres well and lasts longer. It involves degreasing, removing contaminants, repairing cracks, and achieving the proper surface profile.
Degreasing removes any dirt, oil, or grease that could interfere with adhesion. Use a suitable degreaser and follow the manufacturer’s instructions for application and cleanup.
Remove contaminants such as paint, rust, or other foreign materials using appropriate solvents or tools. Ensure all contaminants are removed to prevent delamination of the traction product.
Repair any cracks or damage on the surface using a suitable concrete repair material. Allow it to cure completely before proceeding with traction application. The final step is to achieve the proper surface profile, which helps the traction product bond better and provides better grip. This can be done by lightly abrading the surface with fine-grit sandpaper or using a chemical etcher as recommended by the traction product manufacturer.
Applying additives or broadcast media correctly
Correct application of additives or broadcast media is crucial to ensure even distribution, proper bond, and prevent overloading the film. Here’s how to do it right:
When mixing additives, follow the manufacturer’s guidelines for mixing ratio and technique. Ensure the additive is well incorporated into the sealer or topcoat before application.
For broadcast media, use a clean, dry, and flat surface to mix the material with the sealer or topcoat. Stir gently but thoroughly to ensure even distribution. Avoid overloading the film by applying too much broadcast media at once. Start with a thin layer and gradually build up as needed.
During application, use a visual checkpoint to ensure even distribution of additives or broadcast media. Look for any areas where the material might be clumping or not adhering properly. Adjust your technique accordingly to achieve uniform coverage without overloading the film.
Common Mistakes That Cause Peeling or Poor Grip—and How to Avoid Them
Identify failure modes such as peeling versus slipping, and understand why they happen with a traction add-on. Quick diagnostics can save you from repeating mistakes.
Incompatible overcoating and layering, inadequate prep, and excessive aggregate are common culprits. Material and texture decisions strongly affect grip and peeling risk, so choose finishes that match the space and use. Pay attention to cure windows and timing to prevent premature coating failures.
Overcoating incompatible sealers and adhesion failures
Applying the wrong topcoat over an existing sealer can cause delamination, leading to peeling or poor grip. Always check compatibility before applying a new coat.
To avoid this, test adhesion first by applying a small patch of the new sealer on an inconspicuous area. Let it cure according to the manufacturer’s instructions, then try to scratch or peel it off. If it lifts easily, choose another product.
Incompatible primers or underlayments can also cause issues. Ensure you’re using products designed to work together and follow the recommended application sequence.
Errors in application technique and aggregate selection
Mistakes during application can lead to poor traction or peeling. Here are some common errors to avoid:
- Uneven broadcast: Ensure aggregates are evenly distributed for consistent grip.
- Too-heavy aggregate loads: Overloading can cause the sealer to peel under stress.
- Improper mixing: Inadequate mixing can lead to clumps and inconsistent results.
- Incorrect particle size: Using aggregates that are too small or large for your needs can compromise traction.
- Ignoring manufacturer’s guidelines: Always follow the recommended application process and product ratios.
To correct these issues, evenly distribute aggregates, follow mixing instructions, and choose appropriate particle sizes. If problems arise, spot re-sand or re-apply the affected areas.
Testing Traction, Maintenance, and When to Call a Pro
Perform in-field traction checks that are repeatable and simple to interpret, using methods like dry and wet slip checks or heel tests. Visual cues also help determine if deeper inspection is needed.
Establish a routine maintenance plan with appropriate cleaners and reseal intervals based on traffic and conditions. Recognize signs that professional remediation is needed, such as persistent slick spots or delaminating finishes, and document tests and results for future reference.
Simple tests and professional slip-resistance measurements
Before you start, do some quick traction checks. No fancy tools needed.
Wet/Dry Swipe: Run your hand over the surface, wet and dry. Feel for any slick spots.
Heel Drag: Drag your heel across the surface. It should catch a bit, not slide smooth.
If these tests pass, great! If not, or if it’s a high-risk area like a ramp or pool deck, consider ANSI/ASTM lab testing or hire a pro for an assessment.
Maintenance and reconditioning without stripping the finish
Keep your concrete clean to preserve traction. Here’s how:
Cleaning Cadence: Clean every 3-6 months, depending on traffic.
Cleaner Choice: Use non-acidic, non-abrasive cleaners. They won’t strip your sealer.
Reconditioning: If traction’s reduced, try a light grit blasting. It renews texture without lifting the sealer. But be gentle – too much can damage it.
Conclusion
Add traction without peeling the finish by checking the floor first, choosing the right product, and applying it in a controlled, tested way. The goal is safer footing and a durable look that lasts.
First, test a small area and follow the step-by-step process to preserve the finish. Confirm the current sealer type, read product labels, and choose an additive or method that suits your floor. Then proceed in measured stages: prep, test patches, apply in thin coats or with the approved grit additive, monitor cure times, and recheck traction after a short test drive with foot traffic and light equipment. Work in good light, keep a clean surface, wear slip-resistant footwear, and never rush through curing or dry times.
Common mistakes to avoid include using the wrong product for a sealed surface, skipping the small-area test, applying too thick a coat, or pushing through cure times that aren’t respected. Safety rules are simple: test first, follow manufacturer directions, wear eye and skin protection, neutralize or clean spills promptly, and stop if you see peeling, discoloration, or new slip hazards. If your floor shows persistent peeling, uneven wear, or you’re unsure about compatibility, call a pro. Stay focused, work steady, and you’ll end up with better grip and fewer costly mistakes.
FAQ
What is the difference between a concrete sealer and a concrete coating?
A sealer soaks into the surface or sits as a very thin film to slow moisture and stain uptake. A coating sits on top and creates a new surface layer with added texture or color. Know which you’re using by checking the product label or data sheet.
What are the main pros and cons of penetrating sealers vs. film-forming coatings?
Penetrating sealers are usually easier to DIY, don’t change the look much, and keep the floor slippery when wet if not textured. Film-forming coatings can add color or texture, but they can peel if the surface isn’t prepped well. Read manufacturer instructions to match your goal and conditions.
What common problems show up with sealers, and how can I avoid them?
Peeling, whiteness, or hazy film happen from improper prep, applying over damp surfaces, or applying too thick. Make sure the floor is clean and dry, follow pot-life or cure guidance, and use compatible products. If in doubt, test a small area first and consult the product label.
What should I check before DIY installing a sealer or coating?
Check whether the product is penetrating or film-forming and confirm finished look and slip resistance expectations. Verify surface preparation steps, cure times, and compatibility with any existing coatings. If you can’t confirm, ask the manufacturer or a local pro before proceeding.