

Introduction
Concrete masonry block types vary and this guide helps you choose the right blocks for your DIY project.
You’ll learn practical guidance on selecting blocks, understanding basic tools, and avoiding common mistakes to get solid, durable results.
Key takeaways
- CMUs provide durable, modular building blocks for walls, foundations, and partitions.
- Plan block sizes and bond patterns before purchase to avoid waste.
- Mix mortars to specified ratios; adjust water for workable but not runny consistency.
- Wear eye protection, gloves, and hearing protection when cutting or mixing.
- Rake joints properly, clean excess mortar, and cure to avoid cracks.
- Inspect blocks for cracks and water absorption; seal or replace as needed.
Table of Contents
- Introduction
- Key takeaways
- Overview of Concrete Masonry Blocks (CMUs) and When to Use Them
- Choosing the Right Block for Your DIY Project
- Mortar and Masonry Mixes — Composition and Best Practices
- Tools, Materials Checklist, and Safety Gear for DIY Masonry
- Step-by-Step DIY Guide: Laying and Repointing Concrete Blocks
- Common Mistakes and How to Avoid Them
- Aftercare, Maintenance, and When to Call a Pro
- Conclusion
- FAQ
Overview of Concrete Masonry Blocks (CMUs) and When to Use Them
Concrete masonry blocks (CMUs) come in several types—standard, split-face, architectural, lightweight, and glazed—each with clear DIY use cues for walls, veneers, or decorative accents. They offer quick build options and easy sourcing compared to brick and poured concrete, with different looks and weights to match project goals. Consider whether you need durability, texture, or a finished surface when choosing between them.
For DIYers, CMUs can save time and money on exterior walls or decorative features, but they have tradeoffs like weight, limited insulation, and water management needs. Knowing how each type behaves helps you plan structural versus decorative work, interior versus exterior finishes, and appropriate reinforcement or joints. Avoid common mistakes by matching block type to the goal, ensuring proper alignment and drainage, and prioritizing flashing and backfill where moisture can hide.
Common CMU Sizes and Terminology
When selecting concrete masonry units (CMUs), it’s crucial to understand the terminology. The nominal size of a block is its stated dimension, but the actual dimensions are slightly smaller due to mortar joints. For example, an 8-inch block has an actual width of about 7-5/8 inches.
A wythe refers to a continuous vertical section of masonry one unit wide. In walls, you might have single or double wythes depending on the thickness needed for load-bearing requirements. The cores in CMUs are hollow spaces that can be filled with reinforcing materials like rebar or grout to increase structural integrity.
The face shell is the outer layer of the block that provides its aesthetic and protective qualities. It’s important to choose a block size based on your project needs, such as wall thickness for load-bearing walls versus non-load-bearing applications where thinner blocks might suffice.
Block Materials and Surface Finishes
The choice of materials and finishes can significantly impact the appearance, durability, and ease of installation of your concrete masonry units. Different aggregates give blocks unique textures and colors, while pigments offer a range of hues.
- Precast aggregate: Used for standard CMUs; look for high-quality aggregates to avoid cracking or staining issues. Ensure proper curing to maintain strength.
- Split-face: Provides a natural stone-like appearance; check for consistent texture and color across blocks. Avoid using in areas prone to moisture, as it can lead to surface deterioration.
- Architectural: Offers detailed designs and finishes; specify the exact finish you need based on project requirements. Ensure proper alignment during installation to maintain aesthetic consistency.
- Glazed: Provides a smooth, glossy finish; look for high-quality glazing that adheres well to the block surface. Avoid using in areas exposed to direct sunlight or harsh weather conditions as it can fade over time.

Choosing the Right Block for Your DIY Project
Choosing the right block starts with the wall’s job: structural load-bearing or veneer only. Then weigh climate, insulation needs, moisture management, and how frost cycles could bite your finish. Look at options: CMU for strength, ICF for higher insulation, and veneer-grade blocks for good looks with less interior work.
This matters because it affects how you frame the wall, what kind of insulation you add, and how you finish the surface later. It also guides handling, cost, and future repairs, so you don’t paint yourself into a corner. Check local conditions, wall height, openings, lintels, mortar compatibility, and a simple decision flow to pick the right block for your project.
Matching Block to Climate and Exposure
When selecting concrete masonry blocks, it’s crucial to consider your local climate. In areas with frequent freeze-thaw cycles, choose blocks that are frost-resistant. Frost-resistant CMUs have a lower water absorption rate, reducing the risk of cracking due to ice expansion.
In coastal regions or high-moisture environments, look for blocks treated with sealants like silanes or siloxanes. These sealants protect against salt and moisture damage without affecting breathability. Proper sealing can extend the life of your masonry by preventing water intrusion that leads to corrosion and spalling.
For areas prone to high winds or hurricanes, consider using reinforced CMUs with higher compressive strength. This will ensure your walls are not only structurally sound but also resilient against extreme weather conditions. Additionally, use mortar with a lower water-to-cement ratio for better durability in wet climates.
Cost vs. Performance Tradeoffs
Choosing the right concrete masonry block involves balancing upfront costs against long-term performance and maintenance needs. Hollow-core blocks, for instance, offer good insulation properties at a lower cost compared to solid blocks or insulated concrete forms (ICFs). However, they may require additional exterior insulation to meet energy efficiency standards.
ICFs provide superior thermal performance but come with higher initial costs due to their complex manufacturing and installation processes. While ICFs can significantly reduce heating and cooling expenses over time, the upfront investment might be prohibitive for some DIY projects.
Consider your project’s specific requirements before making a decision. If you’re building in an area with harsh winters or high energy costs, investing in higher-performance blocks like ICFs could pay off quickly through reduced utility bills and lower maintenance expenses over the life of the structure.
Mortar and Masonry Mixes — Composition and Best Practices
Mortar is more than mud. It’s a deliberate mix of cement, lime, sand, and water chosen to match your block work, and the type of mortar matters for strength, flexibility, and durability. Different mortar types—N, S, M, and O—have distinct purposes, so you pick based on the block, climate, and load your wall will bear. Don’t guess; check the product label or datasheet to confirm suitability and any environmental limitations. The goal is a bond that holds, yet smooths over irregularities in a masonry joint without feathering or cracking.
In practice, mix design affects how the wall performs day to day: aggregate size and sand quality influence porosity and creep, lime-to-cement balance affects workability, and water content alters set time and shrinkage. Batching and mixing should follow a clean sequence with proper equipment, and you should adjust for temperature or humidity as needed. Plan simple quality checks like feel tests, early drag resistance, and curing behavior, and address any signs of poor bond or excessive porosity before continuing with grouting or further work.
How to Mix Mortar Correctly (Ratios & Consistency)
Getting the right mix ratio is key. For Type N mortar, a common choice for general masonry work, use one part cement, one part lime, and six parts sand. This gives you a good balance of strength and flexibility.
Mixing starts with dry ingredients first. Add water gradually until it reaches a peanut-butter-like consistency. It should be wet enough to stick together but not too soupy. If it’s too thick, add more water; if too thin, add sand.
Use your hands or a trowel to test the mix. The mortar should hold its shape when squeezed and release easily from your fingers without crumbling. This ensures good workability and bond with blocks.
Additives, Bonding Agents, and Color Mortars
Mortar additives can improve performance in specific conditions. Waterproofing agents help prevent water penetration, while plasticizers make the mortar more workable without adding extra water.
Bonding agents are crucial for ensuring a strong bond between blocks and mortar, especially on surfaces that might be dusty or have low absorption rates. Apply these before laying your first course to maximize adhesion.
For aesthetic purposes, color mortars can match the block joints perfectly. Choose pigments carefully to ensure they don’t affect the mortar’s performance. Test a small batch first to see how it looks and behaves under different conditions.
Tools, Materials Checklist, and Safety Gear for DIY Masonry
This section lays out the core hand tools, power tools, consumables, and PPE you’ll need for basic CMU work and repointing. It covers what each tool does, how to use it without damaging blocks or joints, and practical tips on keeping tools sharp, clean, and ready to go. You’ll also find transport tips and simple maintenance reminders.
You’ll learn when to rent versus own certain power tools, plus setup and dust-control steps to keep the work zone safe. It explains why a complete kit saves time, reduces mistakes, and helps you stay on schedule while protecting the masonry and neighbors.
Essential Hand Tools and Power Tools
Before you start your CMU project, make sure you have the right tools on hand to ensure a smooth process.
- Trowel: Use for spreading mortar. Check that it’s clean and sharp. Skipping this can lead to uneven joints.
- Cold Chisel: For cutting blocks. Ensure it fits your hammer well. Missing this tool means more time wasted with a hacksaw.
- Hammer and Point: Essential for setting blocks in place. Make sure the point is sharp. Without, you’ll struggle to set blocks accurately.
- Stiff-Bristle Brush: For cleaning mortar off tools. Keep it clean and ready. Neglecting this can damage your tools over time.
- Mortar Mixer: Rent or buy based on project size. Ensure it’s set up correctly with dust control measures in place. Missing setup steps leads to mess and wasted materials.
- Rotary Hammer/Drill: For drilling holes. Check for proper bit fit before use. Skipping this step can damage your drill.
- Angle Grinder with Diamond Blade: For cutting blocks. Ensure blade is sharp and secure. Dull blades waste time and effort.
Quick rule: Always check tools are clean, sharp, and ready to use before starting work.
Safety and Site Prep
Before you begin any CMU project, ensure your site is safe and prepared for the job ahead.
- Respirator/Gloves: Protect against dust. Check fit before use. Missing this can cause health issues.
- Eyewear Protection: Prevent debris from entering eyes. Ensure glasses are clean and secure. Skipping this step risks eye injuries.
- Ladder/Scaffold Safety: Secure ladders or scaffolding properly. Check stability before use. Neglecting safety can lead to falls.
- Dust Control Measures: Use dust sheets and vacuums. Ensure coverage is complete. Missing this causes mess and health risks.
- Weather Protection for Curing Mortar: Cover work area with plastic or tarp if needed. Check weather forecast before starting. Skipping protection can ruin your mortar joints.
Quick rule: Always prioritize safety gear and site prep to prevent accidents and ensure quality work.

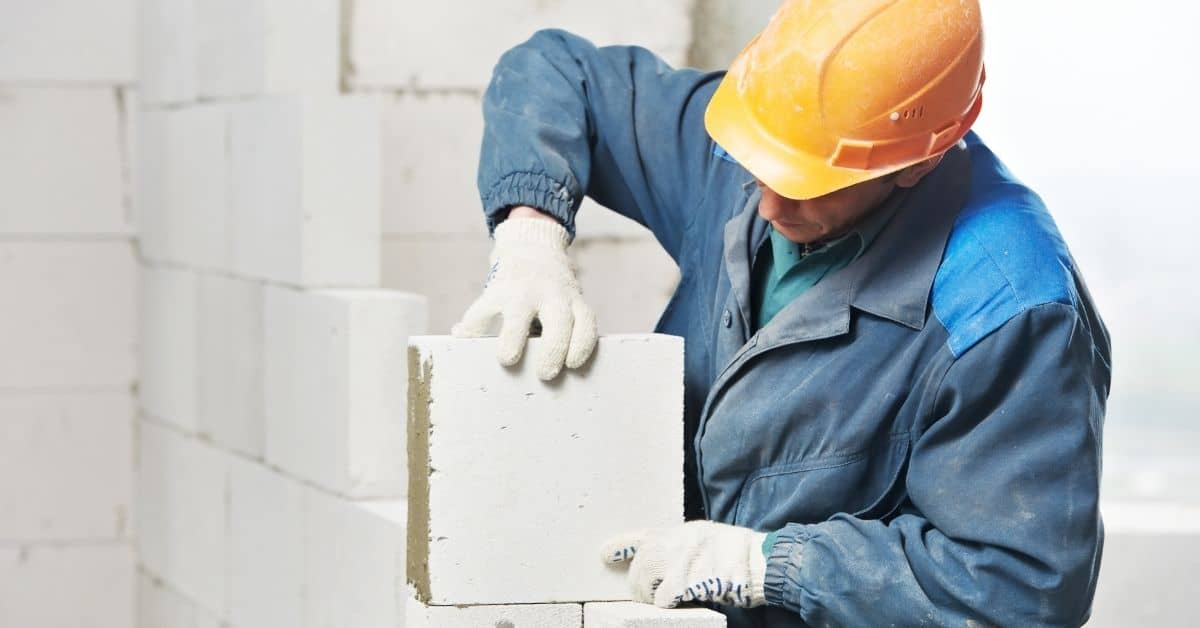
Step-by-Step DIY Guide: Laying and Repointing Concrete Blocks
This step-by-step guide walks you through preparing the site, laying blocks, tooling joints, and curing for both new walls and repointing existing blockwork. You’ll learn how to assess the foundation and moisture exposure, establish a true string line, and set blocks with consistent joint width while protecting work during the curing phase.
Getting the prep, layout, and jointing right saves you from cracks, gaps, and rework, and it helps you end up with straight, plumb walls that shed water rather than trap it. Following the sequence also makes repointing blend with the old work and helps you spot and fix issues early, so you stay ahead of weather, safety, and durability concerns on a DIY schedule.
Step-by-Step Process
This sequence ensures your concrete block wall is laid correctly and safely.
- Check the foundation for levelness, moisture exposure, and structural integrity. Gather all safety gear like gloves and goggles.
- Lay out a true string line to establish alignment and mark corner blocks and control joints accurately with chalk lines.
- Mix mortar according to ratio guidelines and apply it evenly across the block bed joint. Seat each block gently without gaps, tapping lightly to ensure levelness.
- Finish joints by tooling them concave or flush as needed, ensuring a consistent texture throughout the wall.
- Cover the newly laid blocks with plastic sheeting to protect from harsh weather conditions during curing time.
Preparing Foundations, Layout, and First Course
Start by ensuring your foundation is level and free of debris. Use a laser or chalk line to establish a true string line for alignment.
Mark the corner blocks accurately with a plumb bob and set them in place first. This sets the baseline for the entire wall’s layout.
Install the first course carefully, checking each block is level and aligned properly. Use spacers or shims to maintain consistent joint width throughout.
Laying Course-by-Course and Finishing Joints
Maintain a consistent bond pattern as you lay each course, ensuring structural integrity. Place control joints at specified intervals to allow for thermal expansion.
Apply mortar evenly across the bed joint before seating blocks gently without gaps. Tap lightly with a rubber mallet to ensure proper alignment and levelness.
Finish joints by tooling them concave or flush as needed, ensuring a consistent texture throughout the wall. This not only looks professional but also enhances weather resistance.
Common Mistakes and How to Avoid Them
The common DIY mistakes all start with poor prep and a weak bond to the substrate, so the first rule is to get the surface clean, dry, and sound before you touch a block. Verify no dust, oils, or loose mortar, plan for proper bonding with the block face and any primer needs, and choose the mortar and mixing approach with care so you don’t chase cracks later. Mind the orientation and layout of the blocks, keep cores aligned, avoid voids behind the wall, and check level and plumb as you go, because misalignment shows up as cracks and misfit joints.
Water management and curing are the quiet killer; avoid overwatering during setting and apply a simple curing routine to prevent shrinkage cracks. Keep joint width uniform, use the right tooling pattern, and address any cold or raised joints promptly, because sloppy joints ruin strength and appearance. If you spot signs of inadequate prep, wrong mortar, improper bedding, or poor curing, plan rework or patching and learn from it on the next block project.
Mistakes During Mixing and Application
Avoid these common errors that can weaken your concrete masonry structure.
- Over-mixing mortar: This can cause the mortar to lose its strength. Mix until it’s stiff but workable, not beyond.
- Under-mixing mortar: Inadequate mixing leads to inconsistent quality and weak joints. Ensure thorough mixing for uniform consistency.
- Adding too much water: Excess water makes the mortar weaker as it dries. Measure carefully to maintain proper slump or hand-squeeze feel.
- Poor packing of blocks: Inadequate pressure on joints can result in weak spots and cracks. Use a jointer tool to ensure full mortar coverage and compaction.
Maintaining the right mix and application techniques is crucial for strong, durable concrete masonry walls.
Structural and Weatherproofing Errors
Avoid these critical mistakes that can compromise your wall’s integrity and longevity.
- Skip reinforcement: Lack of proper steel bars or mesh weakens the structure. Always include necessary reinforcements for added strength.
- Omit weep holes: Without drainage, water builds up inside walls causing damage. Ensure all courses have adequate weep vents to allow moisture escape.
- No flashing: Missing flashings let water seep into the wall cavity leading to rot and deterioration. Install proper flashing at roof lines and around openings.
- Inadequate sealant: Gaps without sealants allow water intrusion, causing leaks and damage. Seal all joints and penetrations thoroughly with appropriate sealants.
Making these mistakes can lead to costly repairs down the line. Proper planning and attention to detail are key for a weatherproof structure.
Aftercare, Maintenance, and When to Call a Pro
Aftercare, curing and maintenance keep a new concrete job from cracking, staining, and weather damage. Focus on moisture control, sensible temperature and humidity, proper curing methods, and protecting surfaces from rapid drying or freezing; then clean and seal as recommended and inspect regularly. If you see cracks, efflorescence, spalling, or joint gaps that keep widening, that’s a sign to step back and call a pro.
This approach helps you catch issues early and extend color and performance without guesswork. It matters because DIY fixes can backfire if curing is rushed, sealing is improper, or water keeps intruding; the right routine protects your investment and saves headaches later. If you notice structural cracks, major settlement, repeated water entry, or leaning walls, don’t press your luck—to avoid unsafe outcomes, bring in a qualified professional and discuss your findings from the inspection notes and product labels.
Maintenance Schedule and Visual Checkpoints
Use this checklist every season to keep your concrete block walls in top shape.
- Spring: Inspect for winter damage, cracks, spalling. Look for signs of water entry or ice damage.
Skipping can lead to structural issues and costly repairs. - Summer: Check sealant wear, reapply if needed. Test joints for separation, repoint as necessary.
Ignoring these steps can cause moisture penetration and weakening of the structure. - Fall: Clean efflorescence with a mild detergent solution. Inspect for any new cracks or spalling.
Efflorescence left untreated can weaken the block over time. - Winter: Protect exposed surfaces from freezing and rapid drying. Cover walls if heavy snow is expected.
Failing to cover can cause cracking and weakening of mortar joints.
Quick rule: Regular checks catch issues early, saving you money and hassle down the line.
Cost Breakdown: DIY vs Professional and Tool Investment
Compare costs to decide if hiring a mason is worth it for your project.
- Mortar mix: $50-$100 per bag, depending on quantity. Buy in bulk for savings.
Note: Mixing large quantities requires a mortar mixer or wheelbarrow. - Renting tools: Power trowels and jointers can be rented from tool shops for about $20/day.
Tip: Renting is cheaper than buying if you only need them once. - Sealant costs: Penetrating sealants range from $15-$30 per gallon, surface sealants are more expensive at $40-$60.
Note: Quality sealants last longer and protect better against water damage. - Labor time: DIY projects take 2-3 times longer than professional work due to learning curve.
Warning: Rushing can lead to mistakes that cost more to fix later. - Hiring a pro: Rates vary, but expect $50-$100 per hour for skilled masons.
Tips: Professionals often have discounts on bulk materials and tools.
Conclusion
Getting durable, good-looking CMU work hinges on safe practice and sound fundamentals. If you plan, test, and follow the basics, you’ll avoid costly fixes and finish with a solid, lasting structure.
Start by confirming your block type fits the project, gather the right mortar mix, test a small area first, set up your guardrails or a stable work surface, wear proper safety gear, mix to the correct proportions, lay in straight, level courses, keep joints consistent, allow proper curing, and inspect each course as you go before repointing or sealing. Follow this flow in order, and you’ll stay on track from start to finish.
Two common mistakes to avoid are using damaged blocks or weak mortar and skipping proper curing or moisture control. Don’t rush joints, don’t over- or under-trowel mortar, and don’t work in wet or freezing conditions. Always use PPE, keep a clean work area, and don’t compromise footing or ladders—steady hands beat haste, and safety saves repairs later.
If the project scope grows beyond simple repairs or you encounter unstable soil, cracking foundations, or high-load walls, it makes sense to call a pro. When in doubt, slow down and get a second pair of eyes. Stay deliberate, protect yourself, and you’ll finish strong and ready for the next job.
FAQ
What are common concrete masonry block types?
There are hollow blocks, solid blocks, and lintel blocks. Most DIY projects use hollow blocks because they’re lighter and cheaper. Solid blocks are stronger but harder to handle and more costly.
How do I choose the right block for DIY projects?
Pick blocks that fit your load and climate. For walls, use hollow blocks with cores filled later if you need strength. Check local codes and buy blocks with good quality and consistent size.
What mistakes should I avoid when laying blocks?
Don’t skip curing time. Don’t mix too much water or mix too lean. Avoid weak joints, bad mortar thickness, or uneven footing. Small mistakes add up fast and ruin the wall.
What basic tools do I need for block work?
You’ll need a level, a straightedge, a masonry trowel, a masonry chisel, and a masonry hod or bucket. A rubber mallet helps seat blocks. Have a mixer or mortar pan and a hawk for mortar ready to go.