

Introduction
Bond failure happens when a concrete patch peels because the new mix won’t adhere to the old surface.
It means the patch didn’t bond well to the substrate due to contamination, moisture, or a weak surface. Fixing it starts with identifying the rough spots and cleaning up before rework.
To redo it correctly, start by removing the loose patch and cleaning the area. Roughen the surface with a stiff brush or grinder to create a key, and remove dust. Use a compatible bonding agent or primer if the product label allows, then apply fresh concrete and compact it well, and cure properly.
Key takeaways
- Inspect peeling patch to distinguish bond failure from surface contamination before repair.
- Always dry and clean the area thoroughly to maximize new bond strength.
- Use manufacturer instructions for compatible repair materials and surface prep steps.
- Use PPE and set up containment to manage dust and spills.
- Allow adequate cure by following guidelines and protecting from rain or foot traffic.
- Document any repairs with photos and notes for future maintenance planning.
Table of Contents
- Introduction
- Key takeaways
- Quick Diagnosis — Identify the Type of Failure
- Common Root Causes of Bond Failure
- Assessing the Damage and Choosing a Repair Strategy
- Tools and Materials Checklist
- Surface Preparation: the Most Critical Step
- Choosing the Right Repair Material and Bonding Approach
- Step-by-Step Redoing the Patch Correctly
- Quality Control, Testing and Preventing Recurrence
- Conclusion
- FAQ
Quick Diagnosis — Identify the Type of Failure
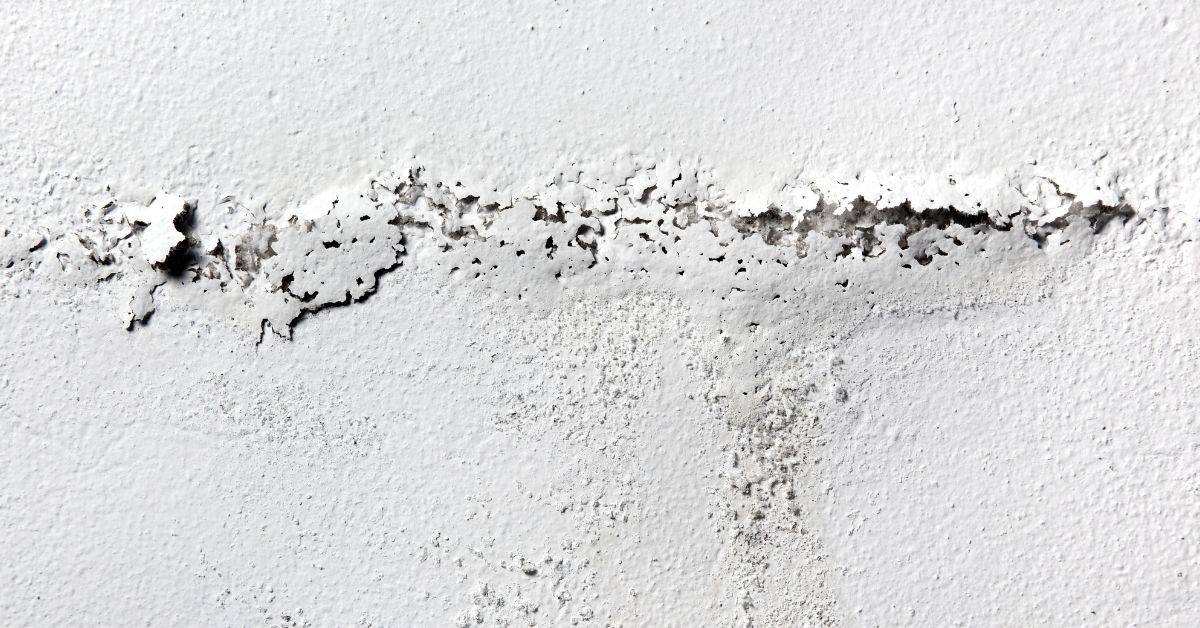
Start by looking at a patch that is peeling or chalking. Determine if the bond at the interface is failing, or if the patch itself is cracking and spalling. If the substrate remains solid while the patch peels away, you may be dealing with a bond issue; if the patch breaks with the surface, it’s a cohesive failure. Knowing the category guides the repair path and material choice.
Note what the surrounding slab looks like and whether there is movement or cracking nearby. Compare the patched area to intact concrete to spot differences in hardness or texture. For guidance, consult product data sheets or manufacturer instructions to confirm how to classify failures in your material system.
Adhesive vs cohesive vs substrate failure
The first step is to figure out what kind of failure you’re dealing with. There are three main types:
Adhesive Failure: This happens when the bond between the patch and the existing concrete breaks down. You’ll see flakes or sheets peeling off, often starting at edges or corners.
Cohesive Failure: Here, the patch itself is breaking apart, not just peeling off. You’ll find crumbling pieces or chunks falling out. It’s like the concrete has turned to gravel.
Substrate Failure: This means the existing concrete beneath the patch is failing. You might see large sections lifting or breaking away, often with the patch still attached.
Typical visual patterns and where peeling starts
Next, take a close look at how the peeling is happening. The pattern can give you clues about what’s going on:
Edge Delamination: If peeling starts at the edges or corners, it’s often an adhesive failure. Water or other contaminants may have gotten in and weakened the bond.
Center Delamination: When peeling starts from the center and works its way out, it could be a sign of excessive loading or substrate failure.
Map Cracking: If you see a network of cracks spreading out like a map, it’s likely a cohesive failure. The patch itself is breaking apart under stress.
Environmental and loading clues
Finally, consider the conditions your concrete has been under. These can point to the root cause:
Moisture: Too much water can weaken bonds and cause peeling. Look for signs of excessive moisture or poor drainage.
Freeze-Thaw Cycling: Repeated freezing and thawing can break down concrete over time. If you’re in a cold climate, this could be the culprit.
Thermal Cycling: Big temperature swings can also cause problems. Check if there are any heat sources nearby that might be causing excessive thermal cycling.
Traffic/Load History: Heavy traffic or loads can cause peeling, especially if the concrete wasn’t designed to handle them. Think about how much weight and use your concrete has been under.
Common Root Causes of Bond Failure
Bad surface preparation tops the list. If the old patch isn’t clean or roughened, adhesion will suffer. Contamination, laitance, or dust can prevent a proper bite. Check the patch area for any slick or oily films from curing aids or release agents.
Moisture and vapor drive behind the slab often sabotages bonding. Look for dampness or high humidity in the repair zone. Incompatible materials, improper mixing or curing, and excessive substrate movement are also common culprits to rule out. When in doubt, verify with the product label or instructions before proceeding.
Surface contamination and laitance
Contaminants like oils, dust, or curing compounds on your substrate can prevent concrete from bonding properly. These substances create a barrier that stops the concrete’s adhesive and chemical bond from forming.
Laitance is a weak, fatty layer that forms on fresh concrete surfaces during curing. If not removed, it can also hinder bonding. Use a stiff-bristle broom or wire brush to scrub off laitance before applying new concrete.
Tip: Always clean and prepare your substrate thoroughly before applying new concrete.
Moisture, vapor drive and trapped water
Excessive moisture or high relative humidity (RH) in your substrate can cause blistering and peeling of concrete finishes. Trapped water under the concrete can also create similar issues.
Rising moisture from below can push up on the concrete, breaking its bond with the substrate. This is known as vapor drive. To prevent this, ensure your substrate is dry and free of trapped water before applying new concrete.
Tip: Use a moisture meter to test your substrate’s moisture content before starting work.
Material incompatibility and movement
The right materials are crucial for a strong, lasting bond. Incompatible products or excessive stiffness can lead to cracking, staining, and weak bonds.
- Incompatible concrete mixes: Use compatible concrete mixes designed for your specific application. Check the mix design and specs before purchasing.
- Excessive stiffness: Stiff concrete has less flexibility to accommodate movement. Use appropriate amounts of plasticizers or superplasticizers to maintain workability.
- Lack of joints: Control joints help relieve stress from drying shrinkage and temperature changes. Include them in your design to allow for differential movement.
- Incompatible primers or bonding agents: Ensure the primer or bonding agent you use is compatible with both your substrate and new concrete.
- Improper curing: Inadequate curing can lead to weak, brittle concrete. Follow manufacturer’s guidelines for proper curing.
Assessing the Damage and Choosing a Repair Strategy
Assess the extent and depth of the damage to decide on spot repair, local replacement, or larger remediation. Map out how far the damaged area reaches and whether the underlying slab carries any structural load concerns. Safety and access—like working from edges or on stairs—should shape your plan.
Decide if the patch can be salvaged with a bonding agent and resurfacing or if you need to remove and replace sections. Consider how movement, exposure, and traffic will affect the long-term performance. Check manufacturer guidelines or local code requirements if structural repair is involved.
Scope: spot repair vs full replacement
The first step is to decide whether you can get away with a partial repair or if you need to remove and replace the entire affected area. Here’s how to tell:
Spot Repair: If the peeling is limited to a small, well-defined area (less than 1 sq ft), and there are no signs of structural damage, a spot repair might be sufficient.
Full Replacement: If the delamination covers a large area, or if you notice any cracks spreading from the affected zone, it’s usually best to remove all damaged concrete and replace it. This ensures a strong bond with the new patch.
Simple field checks and tools for assessment
Before you start any work, you need to map out the extent of the damage. Here are some simple yet effective methods:
- Tap/Knock Test: Gently tap the concrete surface with a hammer. A dull thud indicates delamination.
- Visual Mapping: Mark out the edges of the affected area using chalk or paint to get an accurate measurement.
- Moisture Meter: Use one to check for trapped moisture, which could be causing the problem. Rentals start at around $30/day.
- Chisel and Hammer: Gently chip away at the edge of the delamination to determine its depth.
- Core Drilling: If you have access to a core drill (around $50/day), this can provide a more accurate picture of the damage’s extent.
When to involve an engineer or specialist
While many minor repairs can be done by homeowners, there are times when it’s wise to call in a professional. Here are some red flags:
Structural Cracks: If you notice any cracks that seem to be getting wider over time, or if they’re running diagonally, this could indicate structural issues.
Large Areas of Delamination: If the affected area is larger than 2 sq ft, it might be best to have a professional assess the damage and plan the repair.
Repeated Failures: If you’ve patched the same area before and it’s peeling again, there might be an underlying issue that requires professional diagnosis.
Tools and Materials Checklist
Gather a hammer, chisel, scraper, wire brush, and a stiff broom for mechanical prep. Have safety gear ready: eye protection, gloves, and a dust mask. Bring mixing containers, a trowel, and a float for applying repair material.
Prepare a small supply of compatible repair mortars, epoxy, or polymer-modified mixes as recommended by the product instructions. Have a moisture meter or moisture testing method if needed, and ensure you can verify working range and pot life of the product. Always confirm compatibility on the product label or manufacturer data sheet before starting.
Mechanical tools, PPE and safety items
Before you start any repair work, make sure you have the right tools and safety gear. This checklist helps ensure your job goes smoothly and safely.
- Chisels: For removing damaged concrete. Check they’re not blunt; dull chisels can damage good concrete.
- Grinders: For smoothing surfaces. Ensure they’re in working order to avoid injuries.
- Wire brushes: For cleaning surfaces. Inspect bristles for wear and replace if necessary.
- Vacuum: For dust control. Test it before you start to prevent mess and health issues.
- Safety glasses: To protect your eyes from debris.
- Dust mask: To protect your lungs from concrete dust.
- Gloves: For handling chemicals and rough surfaces. Check they’re not worn out to prevent cuts.
- Knee pads: For comfort during prolonged kneeling. Ensure they’re in good condition for proper protection.
Quick rule: Always prioritize safety first. Use the right PPE and tools in good working condition to prevent accidents and rework.
Repair materials: patch mortars, bonding agents and primers
Having the right repair materials on hand ensures a strong bond between the old and new concrete. This checklist helps you choose compatible products.
- Patch mortar: For filling voids. Check it’s compatible with your existing concrete; incompatible mixes can cause further failure.
- Bonding agent: To improve adhesion between old and new concrete. Ensure it’s suitable for your substrate and patch material.
- Primer: For preparing surfaces. Check it’s designed for your specific repair; using the wrong primer can reduce bond strength.
- Epoxy resin: For heavy-duty repairs. Ensure it’s compatible with your substrate and patch material, and follow manufacturer guidelines for mixing.
- Polyurethane sealant: For filling small cracks. Check it’s flexible enough to accommodate movement; rigid sealants can crack under stress.
Quick rule: Always check manufacturer instructions for compatibility and working conditions. Using incompatible materials or incorrect application methods can lead to further bond failures.
Testing and measuring tools
Before applying any repair material, test your surface preparation and verify adhesion with these tools. This ensures a strong, lasting repair.
- Moisture meter: To check for trapped water. Moisture can weaken the bond between old and new concrete.
- Straightedge: For checking level surfaces. A warped surface can lead to weak spots in your repair.
- Level: To ensure your repair is even. Uneven repairs can crack under stress.
- Small pull tester: To test adhesion before applying the final patch. Weak adhesion can cause peeling.
- Professional pull-off test: For larger, critical repairs. This ensures your repair meets industry standards for bond strength.
Quick rule: Always test your surface preparation and verify adhesion before applying the final patch. Skipping these steps can lead to premature failure of your repair.
Surface Preparation: the Most Critical Step
Remove all loose material and reveal clean, sound concrete. Aim for a textured profile that will hold the patch material. Eliminate all surface contamination, including oils, sealers, and laitance before priming.
Check the moisture condition of the substrate and address any excess water or vapor issues. If you’re unsure about surface prep specifics, refer to the product instructions or consult the label for the recommended surface profile. A proper prep sets the stage for a durable repair.
Mechanical profiling methods
Before you start, you need to prepare the surface. This means getting rid of any loose material and creating a profile that your new concrete can bond with.
The best way to do this is by using mechanical methods. Here are three options:
- Chipping: Use a chipping hammer or a similar tool to remove loose material. This works well on small areas and is easy to control.
- Grinding: For larger areas, consider using a concrete grinder. It can create a consistent profile and remove laitance (that weak top layer).
- Shot/abrasive blasting: This is ideal for big jobs or when you need to remove old paint or rust. It’s powerful but requires proper safety measures.
Choose the method that suits your job best, and always follow safety guidelines.
Cleaning: dust, oils and chemical residues
The next step is to clean the surface. Dust, oils, and chemical residues can all prevent your new concrete from bonding properly.
Start by removing any loose dust with a vacuum or brush. Then, use one of these cleaning methods:
- Pressure wash: This works well for most surfaces. Just be careful not to damage the substrate.
- Detergent degrease: For oily areas, use a detergent designed for concrete. Follow the instructions carefully.
Avoid using acids or harsh cleaners. They can damage the surface and create harmful fumes.
Getting the substrate to the right saturation/condition
Now, you need to make sure your concrete is in the right condition for bonding. This usually means it’s damp but not wet.
The best way to check this is by doing a simple test. Sprinkle some water onto the surface. If it beads up and doesn’t soak in, your concrete is too dry. If it soaks in quickly, it’s too wet.
If you’re using a bonding agent or primer, follow its instructions for the correct moisture condition. Some products work best on damp surfaces, while others are designed for dry ones.
Choosing the Right Repair Material and Bonding Approach
Compare cementitious repair mortars, polymer-modified mixes, and epoxy systems. Each has different movement tolerance, curing times, and surface finishes. Selection should consider substrate condition, exposure, and expected wear.
Understand how the repair system bonds to the substrate and how it handles movement. Look up the manufacturer’s guidance to ensure the chosen material matches your scenario, and verify any required primers or bonding agents. Do not rely on memory alone—check the label or data sheet for details.
Pros and cons: cementitious, polymer-modified, epoxy
The choice of repair material depends on the job’s requirements. Here are pros and cons of common types:
Pros
- Cementitious: Affordable, easy to mix and apply.
- Polymer-modified: Improved adhesion, flexibility, and durability.
- Epoxy: Excellent bond strength, chemical resistance, and fast curing.
Cons
- Cementitious: Limited flexibility, susceptible to cracking under movement.
- Polymer-modified: Higher cost, may require specialized application equipment.
- Epoxy: Slower curing in cold temperatures, strong odor during application.
Choose based on your budget, the substrate’s condition, and expected exposure.
Bonding agents, primers and admixtures: when and how to use them
Bonding agents and primers enhance adhesion between the repair material and substrate. Admixtures improve mortar properties.
Always follow product datasheets for compatibility and application timing.
Apply bonding agents or primers using a brush, roller, or sprayer. Ensure even coverage and allow the recommended open time before applying the repair material.
Admixtures are mixed into the mortar. They improve workability, accelerate curing, or provide other beneficial properties.
Thickness limits, feathering and layering strategy
Apply repair materials in thin layers to ensure proper bonding and curing. Follow manufacturer guidelines for maximum application thickness.
Feathering the edges of each layer helps distribute stress evenly and prevents delamination.
Allow recommended intercoat times before applying subsequent layers. This ensures adequate curing and prevents contamination between layers.
For thick repairs, use a step-by-step approach, applying thin layers with proper feathering and allowing adequate curing time between each layer.
Step-by-Step Redoing the Patch Correctly
Begin with removal of all failed material down to sound concrete. Clean the area and prime if the system requires it. Mix the repair material following the exact instructions for consistency and pot life.
Apply in the recommended thickness and any required layback or compaction steps. Smooth and finish as directed, and protect the patch during the cure period. Follow product-specific cure guidance from the label or manufacturer instructions.
Step-by-Step Process
Follow these practical steps to redo the patch correctly, ensuring a strong bond and lasting finish.
- Preparation: Check safety, gather tools, and prepare the area.
- Remove failed patch: Use controlled methods to avoid damage (see next section).
- Main repair work: Apply bonding agent, first layer, and build up layers as needed.
- Finishing: Match adjacent texture and perform final checks.
- Cleanup & protection: Clean tools, protect the patch during cure, and monitor progress.
Safe removal of failed patch and substrate preparation
Safely remove the failed patch and prepare the substrate for a strong bond.
Wear appropriate PPE, including safety glasses, gloves, and dust mask.
Use a chisel or grinder with a vacuum attachment to control dust. Remove all loose material and any remaining bonding agent or primer.
Clean the exposed substrate using a wire brush or pressure washer to remove dust, oils, and chemical residues. Ensure the surface is sound and ready for bonding.
Applying bonding agent and first repair layer
Properly apply a bond coat or primer, mix your patch mortar correctly, and key in the first layer for mechanical lock.
Mix bonding agent according to manufacturer’s instructions. Apply evenly using a brush or roller, ensuring full coverage.
Mix patch mortar thoroughly, following the recommended water-cement ratio. Allow it to rest and remix if necessary for even consistency.
Apply the first layer (key coat) using a trowel or squeegee. Work it into the substrate, creating mechanical interlocks. Ensure the layer is even and well-bonded before proceeding.
Building up layers, finishing, and curing/protection
Build up layers as required, finish to match adjacent texture, and protect the patch during cure.
Apply subsequent layers (feathering if necessary) following the same mixing and application techniques. Ensure each layer is well-bonded before proceeding.
Finish the final layer using a float or trowel to achieve the desired texture. Match adjacent surfaces as closely as possible.
Protect during cure: Cover the patch with plastic sheeting, keep it moist, and avoid contamination. Monitor progress and remove protection once fully cured (usually 28 days).
Quality Control, Testing and Preventing Recurrence
After cure, perform simple adhesion checks as advised by the product. Monitor the patch for cracks, crazing, or delamination over time. Establish routine checks to catch issues early.
Implement prevention measures such as proper control joints, drainage, and protective coatings if appropriate. Record what worked and what didn’t, and rely on product instructions or local requirements to tailor future repairs.
Visual inspection and simple adhesion tests
Before you start any repair work, it’s crucial to inspect the failed patch thoroughly. This helps identify the cause of failure and ensures you fix it right the first time.
- Check for cracks: Even tiny hairline cracks can indicate underlying issues. If present, mark them for further investigation.
- Inspect edges: Delamination often starts at the edges. Check if the patch is lifting off there.
- Look for discoloration: Yellowing or dark spots could signal moisture intrusion or chemical contamination.
- Feel the surface: A spongy or soft feel might indicate delamination or improper curing.
- Tap test: Gently tap the patch with a hammer. A dull sound indicates poor bonding, while a clear, ringing sound suggests good adhesion.
- Probe test: Use a small screwdriver to gently scratch the surface. If it easily peels off, you’ve got delamination.
- Professional pull-off test: For verification, use a pull-off tester. This should be done by a professional if you’re unsure how to interpret results.
- Check surroundings: Look for signs of movement or settlement that could cause recurring failures.
Quick rule: Always inspect and test before you start repairs. It saves time and money in the long run.
Preventive measures: joints, drainage, coatings
Preventing future failures starts with addressing movement and moisture. Here’s how:
Control joints: These allow concrete to expand and contract without cracking. Ensure they’re properly spaced and cut deep enough.
Improve drainage: Standing water weakens concrete over time. Ensure proper grading, install drains if necessary, and keep gutters clean.
Use compatible surface treatments: Protective coatings can prevent moisture intrusion and UV damage. Choose one compatible with your repair material to avoid future issues.
Maintenance, documentation and when to call a pro
Regular maintenance is key to preventing recurring problems. Here’s how:
Keep a repair log: Note down all repairs, their causes, and what you did to fix them. This helps track trends and anticipate future issues.
Schedule regular inspections: Once or twice a year, thoroughly inspect your concrete for any signs of distress. Early detection saves money in the long run.
When to call a pro: If you’re seeing recurring failures, suspect complex underlying issues, or aren’t sure about test results, don’t hesitate to call a professional. It’s better to be safe than sorry.
Conclusion
Fixing a peeling patch is about getting the bond right again, safely, so the repair lasts and looks right for years. A solid method starts with good surface prep, the right materials, and careful testing before you finish.
First, check what failed, prep the area thoroughly, choose the repair system that matches the old material, apply it in the correct order, and verify the bond with a small test area before returning to full use. Work in clean, dry conditions, follow the product instructions, and err on the side of extra surface prep and longer cure times if you’re unsure.
Common mistakes to avoid include skipping proper surface cleaning or profile, using the wrong bonding method for the material, and rushing the cure without protecting the patch from moisture or traffic. Safety rules are simple: wear eye protection and gloves, keep the area well ventilated, don’t mix or apply under extreme heat or cold, and test a patch first to catch issues before you commit the whole repair.
If the patch sits on an area with structural load, uncertain substrate, or persistent moisture, or you’re unsure about the repair material and bonding approach, call a professional. When you do push forward, stay patient, check your work at each stage, and aim for a durable finish you can trust to resist future peeling and damage. You’ve got this—plan it right, do it right, and you’ll restore strength and appearance with confidence.
FAQ
What are the telltale signs that a patch is peeling due to bond failure?
Peeling edges, lifting patches, or a glossy film breaking away from the surrounding concrete are common signs. If you can slide a corner with your fingernail or see a soft, hollow feel under the surface, bond failure is likely. Always confirm by gently testing a small area before proceeding.
How should I verify the patch is ready for a redo without wasting time?
Make sure the old patch is firmly desawned and free of loose material. The surface should be clean, dry, and slightly rough to the touch. If in doubt, follow the manufacturer’s instructions for any recommended surface readiness tests.
What are the critical surface prep steps I must not skip before redoing the patch?
Remove all loose material and contaminants, then clean the surface thoroughly. Roughen the surface to give the new patch something to grip, and ensure the area is dry. Check that any cure-sealing or paint coatings are fully removed or compatible with the repair material.
What are common mistakes during a patch redo, and how can I avoid them?
Don’t apply patch material over a wet or oily surface. Don’t force a patch into place without proper seating and curing time as directed by the material you’re using. Always follow the product label for mixing, application, and curing guidance, and inspect the patch before it fully sets. If you’re unsure, stop and verify with the manufacturer or a local pro.