

Introduction
Edge thickening is adding extra concrete at the edge of a slab to strengthen it and slow cracking. It helps when you’re edging against forms or when a transition needs more support. If you’re deciding whether you need it, consider the load, use, and the edge exposure—check the project details and local guidelines.
Do it by hand if you’re not using a paver or machine, keeping extra material under the edge and feathering toward the center. Keep forms tight, edges clean, and monitor the pour so the extra mix stays where it’s supposed to be. Always follow the product label and local rules for any additives or methods you use, and verify curing and finishability before removing forms.
Key takeaways
- Thoroughly inspect edge thickness and forms before pouring to prevent misalignment.
- Specify thickened edges when slab edges bear loads or future expansion joints.
- Use proper reinforcement layout per design to resist curling and cracking.
- Wear eye protection and gloves; follow safe forming and curing practices.
- Inadequate formwork or early loadings cause unsightly edges; plan curing windows.
- Inspect visually after curing and repair any chips or delaminations promptly.
Table of Contents
- Introduction
- Key takeaways
- What a Concrete Edge Thickening Is and Why It Matters
- When to Specify Thickened Edges for Slabs Versus Pads
- Design Considerations and Decision Checklist
- Configuration, Sizing Approach, and Reinforcement Principles
- Materials, Specs, and Standards Explained
- Construction Step-by-Step: Preparation, Forming, Placing, and Curing
- Inspection, Common Problems, and Visual Checkpoints
- Repair, Retrofit Options, Alternatives, and Cost Factors
- Conclusion
- FAQ
What a Concrete Edge Thickening Is and Why It Matters
A thickened edge means the outer edge of a concrete slab is built up thicker than the middle. That extra thickness helps the edge carry more weight and resist cracking there. In plain terms, it puts a little extra protection right where most edge problems start.
Compared with a uniformly thick slab, a thickened edge helps spread loads to the rest of the slab and gives the edge more stiffness. It also helps the edge tolerate frost and weathering better and keeps the edge from chipping when you remove forms.
Definition and purpose
A concrete edge thickening is a built-in footing, where the slab’s edge is made thicker to carry concentrated loads and resist edge failure. It’s like giving your slab a strong, supportive ‘sole’ at the edges.
The thickened edge distributes loads more evenly across the entire slab, reducing stress on the edges and preventing cracking or crumbling under heavy loads.
Think of it as a structural reinforcement that works with gravity. It’s stronger where you need it most – at the edges, where loads are typically heaviest.
How it differs from footings, beams, and reinforced slab edges
A thickened edge is different from isolated footings. Footings are separate structures placed under columns or walls to distribute loads. A thickened edge is part of the slab itself, providing support along the entire length.
It’s also not the same as a grade beam. Grade beams run underneath a wall and provide support at intervals. A thickened edge supports the entire edge of the slab continuously.
Reinforced slab edges are strengthened with additional steel reinforcement. While this does help, a thickened edge provides extra strength through increased concrete volume, making it more effective against heavy loads and frost heave.
When to Specify Thickened Edges for Slabs Versus Pads
Thickened edges are worth considering when a slab or pad will take concentrated loads or be touched by traffic. They also help if the soil is weak or if the area needs extra edge durability during freeze-thaw cycles.
In practice, use thickened edges on slabs that bear heavy use or sit on poor ground; pads get lighter, isolated loads with less edge exposure. Check the label or datasheet for exact requirements and follow local rules and manufacturer instructions for your project.
Concentrated and Point Loads (Equipment, Columns, Forklifts)
Thickened edges are crucial when heavy equipment or concentrated loads bear on your slab or pad. These loads can cause stress and cracking if not properly distributed.
- Heavy Equipment: Thicken edges where forklifts, cranes, or other heavy machinery operate to spread their weight evenly.
- Columns and Posts: Add thickness around columns supporting your slab. This helps transfer loads safely.
- Forklift Traffic Areas: Thicken edges in high-traffic zones to prevent damage from frequent, concentrated loads.
- Load Path Assessment: Work with a designer to ensure loads are evenly distributed and transferred safely to the ground.
- Rentable Tools: Use a concrete edge form system for easy thickening. Expect to spend around $10-$20 per linear foot.
Frost Heave, Freeze-Thaw Cycles, and Climate Factors
In cold climates, water in the soil freezes and expands, pushing up on your slab or pad—a process known as frost heave. Thickened edges can help mitigate this.
Edge thickening: Adds mass to reduce the impact of freezing and thawing cycles.
To determine if edge thickening is necessary, consult local geotechnical data to understand your area’s typical frost depth. Then, add extra thickness below this level.
Consider using an air-entraining admixture in your concrete mix for added freeze-thaw resistance.
Soil Bearing Issues and Edge Support on Soft or Variable Soils
Poor or non-uniform soil can lead to settling, heaving, or other issues. Thickened edges can provide additional support in these situations.
Soft Soils: Add thickness to help distribute loads more evenly and reduce settlement.
If your site has variable soils, consider alternative soil improvement measures like compaction or stabilization. A geotechnical report will help you understand your site’s specific needs.
Geotechnical Report: This provides crucial data on your site’s soil conditions and helps determine the best course of action.
Design Considerations and Decision Checklist
Design starts with what loads the slab will carry, what the soil can support, frost risk, how you’ll use the space, and what the local rules expect. Gather these inputs before finalizing any design.
Knowing this helps you choose a solid plan and avoid overthinking or underbuilding. It keeps you from guessing and points you to the label or datasheet for specifics when you need a number. If any item isn’t clear, check the product instructions and local guidelines before you commit.
Assessing structural loads and intended use
Before you start designing, understand the forces your slab or pad will face.
- Live loads: What’s the heaviest weight it’ll bear? (Check local codes for typical values.)
- Dead loads: Consider the slab/pad’s own weight. Calculate it if needed.
- Dynamic loads: Any impact or moving forces? (E.g., traffic, machinery.)
- Concentrated loads: Point loads from columns, equipment?
- Uniformly distributed loads (UDL): Evenly spread weights?
- Edge loads: How much force at the edges? (More than UDL.)
- Load combinations: Add live + dead, and consider worst-case scenarios.
- Factor of safety: Ensure your design can handle more than calculated loads.
Quick rule: If you’re unsure about any load, err on the side of caution. Overestimating is better than underestimating.
Geotechnical inputs and frost-depth verification
Your soil’s strength and behavior affect your design. Here’s what you need to know.
- Bearing capacity: How much weight can the soil support? (Get this from a geotech report.)
- Settlement potential: How much will the slab/pad sink over time?
- Frost depth: How deep does the ground freeze in your climate?
- Soil type: Is it cohesive (clay) or granular (sand/gravel)?
- Moisture content: Does it vary seasonally? (Affects strength.)
- Organic content: High organic matter can cause long-term settlement.
- Expansive soils: Some soils swell when wet, causing damage. Check your area’s geology.
- Soil compaction: Will you improve the soil’s strength with compaction?
Quick rule: If you don’t have a geotechnical report, get one. It’s crucial for accurate design.
When to involve a structural engineer vs prescriptive methods
Know when you need professional help or can use simple, pre-set methods.
- Unusual loads: If your loads are out of the ordinary, get an engineer’s input.
- Commercial structures: Most commercial projects require engineered designs.
- Local codes: Check if your area requires engineered solutions for certain projects.
- Complex geometries: Non-standard shapes or openings need engineering review.
- Thickened edges over 12″ (300mm): Prescriptive methods may not apply; consult an engineer.
- Edge-to-thickness ratios outside typical ranges: Get professional advice for thin or very thick edges.
- Soil issues: If your site has significant soil problems, get a geotech’s input.
- Frost heave concerns: In cold climates, consider engineering to mitigate frost heave.
Quick rule: When in doubt, consult an engineer. It’s better to be safe than sorry (and risk costly mistakes).
Configuration, Sizing Approach, and Reinforcement Principles
Edge width, embedment depth, reinforcement type, and how the edge transitions to the slab are chosen based on the overall layout and expected use. Designers pick these details, but you must verify the values with the applicable code or an engineer.
This matters because the right setup helps prevent cracking, spalling, and edge failures after you’re pouring and using the slab. Always check the label or datasheet for any numbers and confirm with the code or a local pro if you’re unsure; when in doubt, follow conservative, safe guidance and avoid guesswork.
How width, depth, and slope are determined
The size of your thickened edge depends on load distribution, soil support, and constructability. Practitioners use calculations or code tables to set dimensions.
Width: It’s typically 1.5 to 2 times the slab thickness. Too narrow might cause cracking under heavy loads.
Depth: It should extend below the frost line and reach competent soil. Check local codes for exact depths.
Slope: A slight slope (usually 1/8″ per foot) helps water runoff, preventing ponding and freeze-thaw damage.
Reinforcement layout and anchorage basics
Reinforcement is crucial for edge thickening’s strength. Follow these principles:
Continuous reinforcement: Bars should extend from the slab into the thickened edge, providing continuous support.
Proper development/anchorage: Ensure bars are properly anchored at both ends to transfer forces effectively.
Corrosion protection: Use coated rebar or apply sealants to prevent corrosion, especially in harsh climates. Always follow design drawings for exact reinforcement details.
Joints and transitions between thickened edge and slab field
Control and construction joints help manage cracking in concrete. Detail them carefully:
Control joints: Cut these into the slab at regular intervals (usually 10-15 feet apart) to control where cracks form.
Construction joints: These separate pours of concrete. Ensure they’re properly detailed and reinforced for strength.
Transitions: Detail the transition between the thickened edge and slab field to avoid stress concentrations. A smooth, gradual transition reduces stress points and prevents cracking.
Materials, Specs, and Standards Explained
Materials, specs, and standards are the backbone of a solid concrete job. Choose the right mix and materials for your project, and check the main standards or code documents to follow. Always confirm local requirements before you pour.
Knowing the rules helps you avoid weak spots, cracks, and failed pours. Read labels and manufacturer instructions, and talk to your local supplier or building department if you’re unsure. When in doubt, follow a safe, conservative approach and verify what applies where you live.
Concrete mixes, admixtures, and durability considerations
The right concrete mix is crucial for your thickened edges. You’ll need to consider strength, slump, and air entrainment.
Strength: Thicker edges take more load, so they need stronger concrete – typically 4000 psi or higher.
Slump: Slump controls workability. For thickened edges, use a medium slump (around 5-6 inches) to ensure proper consolidation and finish.
Air entrainment: If you’re in a freeze-thaw area, ask for air-entrained concrete. It has tiny bubbles that help water expand and contract without cracking the concrete.
Reinforcement types, coatings, and corrosion mitigation
Reinforcement gives your thickened edges strength. Common options are rebar or welded wire mesh.
Rebar: It’s strong and versatile. Use #4 or #5 bars for most thickened edges.
Welded wire mesh: It’s lighter, easier to handle, and good for smaller projects.
To prevent corrosion, maintain proper cover (at least 2 inches), use epoxy coatings, or opt for stainless steel reinforcement where needed.
Relevant codes, standards, and documentation to check
Always follow local building codes and relevant design standards. In the US, that’s usually the International Building Code (IBC) and ACI 318 for reinforced concrete.
Keep project drawings on site. They’re your guide to dimensions, reinforcement, and other details.
Geotechnical reports are vital too. They tell you about soil conditions, bearing capacity, and frost depth. Don’t start work without them.
Check with local authorities for any additional rules or requirements. It’s your responsibility to know the codes that apply to your project.
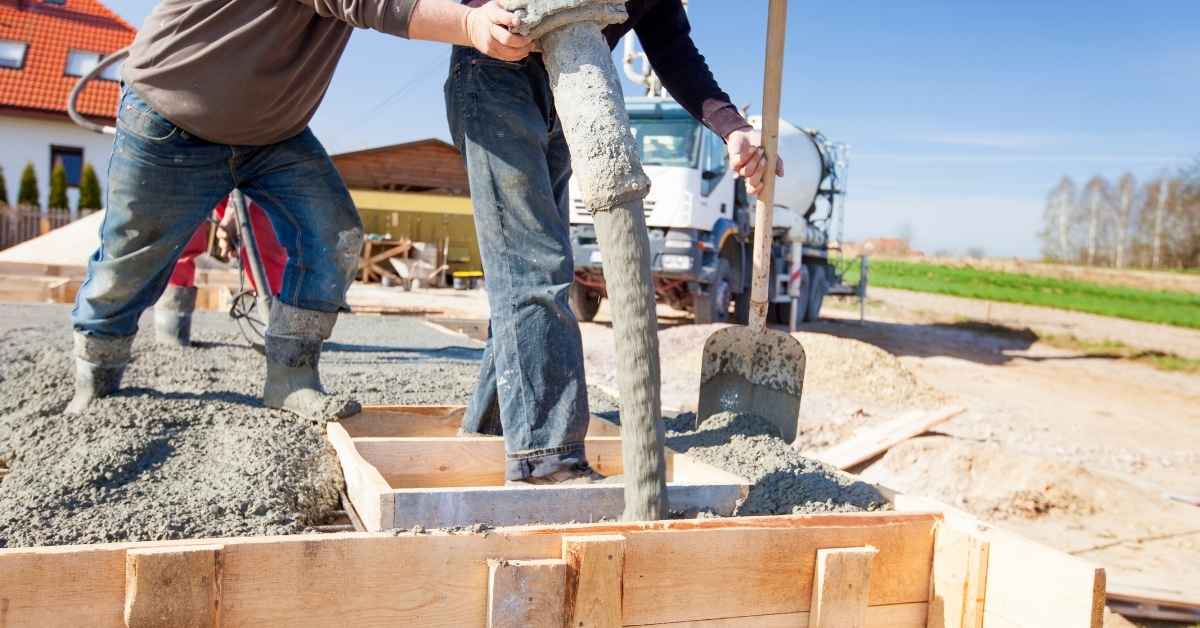
Construction Step-by-Step: Preparation, Forming, Placing, and Curing
This section lays out a practical, step-by-step checklist from site prep through curing. Follow the sequence: prep, formwork, placement, finishing, and curing. It focuses on avoiding common mistakes and staying on track.
Used correctly, this plan helps you spot problems early and keep the project moving. It translates the steps into real, doable actions you can check day by day. If you’re unsure about a product instruction or timing, check the label or datasheet before proceeding.
Step-by-Step Pouring Process
The following steps guide you through the concrete pouring process, from preparation to final checks.
- Preparation and safety: Clean the area, lay out safety measures like barriers, and ensure proper ventilation. Check your materials – concrete, reinforcement, forms – are ready.
- Form setup: Assemble forms accurately, level them, and secure with braces. Ensure they’re square and plumb.
- Reinforcement placement: Lay reinforcing bars as per your plan. Use chairs to maintain proper cover.
- Concrete pouring: Start at the farthest point from where you’ll exit. Pour slowly, allowing concrete to flow into forms. Keep it level with forms.
- Consolidation and finishing: Vibrate concrete to remove air pockets. Strike off the surface, then use a bull float for initial smoothing. Finally, use a trowel for final finish.
- Curing: Cover the slab with plastic sheeting or keep it moist using sprinklers. Protect from freezing and rapid drying.
- Final checks: After 24 hours, check for any signs of cracking or settlement. If unsure, consult a pro.
Site preparation and formwork best practices
The site’s condition and formwork quality directly impact your slab’s success. Start right:
Compact the subgrade thoroughly to prevent settling. Use a plate compactor for best results.
Align forms accurately using strings or lasers. Ensure they’re level, plumb, and square. Brace them temporarily to maintain stability during placement.
Use proper form materials – plywood, OSB, or steel – in good condition. Seal joints with tape or foam to prevent leaks.
Placement, consolidation, and finishing tips
Proper placement, consolidation, and finishing ensure a strong, durable slab. Here’s how:
Pour from one side to the other, allowing concrete to flow into forms. This ensures edge-to-field continuity.
Consolidate concrete using a vibrator to remove air pockets. Work from the bottom up, ensuring no voids remain.
Finish the surface carefully. Use a bull float for initial smoothing, then a trowel for final finish. Avoid overworking the surface to maintain edge strength and reduce defects.
Curing, protection, and early-age care
Proper curing is crucial for concrete’s strength development. Protect your slab during its first critical days:
Cover the slab with plastic sheeting to retain moisture. Keep it wet using sprinklers or occasional misting.
Protect from freezing temperatures. If freezing is imminent, heat the slab or use insulated blankets.
Keep traffic off the slab until it reaches 75% of its design strength – usually around 3 to 7 days. Check local recommendations for your specific mix.
Inspection, Common Problems, and Visual Checkpoints
This section walks you through a quick, practical checklist for every stage: before you pour, while you pour, and after the concrete sets. Look for common signs like moisture on surfaces, cracking, misalignment, or honeycombing that tell you something is off. If you see these symptoms, don’t ignore them—they usually mean design or construction needs fixing before it bites you later.
A DIY homeowner gains by catching issues early and fixing them with the right guidance from product labels and manufacturer instructions. Following the checklist helps you prevent weak spots, uneven finishes, and costly rework, saving time and money on the project. If the instructions aren’t clear, check the label or datasheet for the specific material and consult local rules before proceeding.
Pre-pour inspection checklist
Before you pour, ensure everything is in place and ready. Use this checklist to double-check.
- Form geometry: Check forms are level, square, and properly braced.
- Reinforcement placement: Verify rebar layout matches plans; check anchorage points.
- Subgrade condition: Ensure base is compacted, stable, and free of debris.
- Embedded items: Check positions of anchors, inserts, or other embeds.
- Geotech report: Verify subgrade strength meets design requirements.
- Mix design: Confirm concrete mix matches approved design for strength and durability.
- Weather conditions: Check temperature and humidity are within acceptable ranges.
- Form release agent: Ensure forms are properly coated to prevent adhesion.
Quick rule: A thorough pre-pour check saves time and money by preventing costly mistakes.
Post-pour defects, causes, and immediate remedies
After pouring, inspect your work for any issues. Here’s what to look out for.
- Edge settlement: Check for sunken edges; could be due to weak subgrade or excessive bleeding. Support with additional fill if necessary.
- Cracks: Look for hairline cracks; may indicate shrinkage, plastic settlement, or thermal movement. Monitor and consult a specialist if widening occurs.
- Honeycombing: Inspect surface for voids; likely due to poor consolidation. Break out and re-consolidate affected areas.
- Pop-outs: Check for small pieces breaking off; often caused by improper finishing or excessive water in mix. Refinish and monitor closely.
Quick rule: Address defects promptly to prevent further damage and maintain slab performance.
Long-term performance monitoring (settlement, cracking, drainage)
After the initial cure, keep an eye on your slab’s long-term performance with these simple checks.
- Settlement: Monitor slab level over time; excessive settlement may indicate subgrade failure or inadequate support. Relevel and underpin if necessary.
- Cracking: Check for recurring cracks; could be due to ongoing movement, thermal changes, or inadequate reinforcement. Seal and monitor closely.
- Drainage: Ensure water drains away from slab edges; poor drainage can lead to edge deterioration. Improve grading or install drainage systems as needed.
Quick rule: Regular monitoring helps catch potential issues early, saving you time and money in the long run.
Repair, Retrofit Options, Alternatives, and Cost Factors
Here you’ll see how to decide between repairing a thickened edge, retrofitting it, or replacing it. It covers options like isolated pads, piers, soil stabilization, and the main cost drivers you’ll face.
Think about load transfer, space constraints, and how long you want the solution to hold up. Your choice affects labor, materials, and disruption, so pick the option that fits what you’re willing to manage. When in doubt, check the label or datasheet for guidance.
When retrofitting an existing slab is feasible
Retrofitting can be a cost-effective solution when your existing slab needs thickening. But it’s not always feasible. Here’s when you should consider it:
Existing Slab Condition: If the existing slab is in good condition, with no major cracks or damage, retrofitting might work. But if it’s badly damaged, replacement could be safer and more cost-effective.
Load Requirements: Retrofitting can increase load-bearing capacity. But it won’t double it. If your new loads are significantly higher than the existing ones, you might need a completely new slab.
Alternatives: isolated footings, piers, and soil improvement
Sometimes, thickening the edge of your slab isn’t the best solution. Here are some alternatives:
Isolated Footings or Piers: These can be useful when you need to support a specific load, like a heavy machine or column. They’re cheaper than thickening an entire slab but require careful design and installation.
Soil Improvement: If your soil is weak, improving it might be a better solution than thickening your slab. This could involve compaction, stabilization, or even replacing the soil with better material.
Major cost drivers and estimating considerations
Before you start any work, it’s important to understand what drives the cost of thickening a concrete slab:
Site Preparation: This includes clearing the area, leveling the ground, and setting up forms. It can be a significant part of the total cost.
Concrete Volume, Reinforcement, and Access: These are all direct costs that depend on the size and complexity of your project. Make sure to factor them into your estimate.
Conclusion
Safety and durability are non negotiable here—the right edge thickening protects the slab, preserves appearance, and keeps people safe from cracks and edge failures. Do it with care, and you’ll avoid costly replacements and annoying repairs later.
Check the need and sequence in a real-world way: verify if you’re thickening for a slab or a pad, size the edge to the expected loads, set up the form and reinforcement, prepare the base, place and compact in the correct order, cure properly, and then inspect for defects and address any issues before final closure.
Common mistakes to avoid include skipping a solid subbase or drainage, over-tightening forms, and rushing curing. Always wear proper PPE, keep the work area clean, test a small area first, and follow basic safety rules to prevent cold joints, shrinkage cracks, or binding in the edge.
When the geometry is complex, loads are high, or you encounter unexpected ground conditions, call a professional instead of pushing on alone. If you push through with the steps outlined, you’ll finish confident and ready to move to the next project with a solid, durable edge that lasts.
FAQ
How do I know if my slab needs a thicker edge?
Look for a visible distinction where the edge sits higher or wider than the main slab. Check the project notes or manufacturer instructions for any edge thickening recommendations. If in doubt, check local guidance or ask the supplier what they suggest for your footprint.
What signs indicate problems with edge thickening after I pour?
Cracks, spalling, or poor edge support often show up near the edge. If the edge looks hollow or breaks away easily, stop and assess the form and reinforcement. Review the curing pattern and follow manufacturer or local rules before proceeding.
How should I set up forms and reinforcement for a thickened edge?
Use sturdy forms that won’t bow under the weight. Place any required reinforcement as directed by the design or product instructions, ensuring proper coverage. Secure the forms and rebar so the edge thickness stays consistent during pour and cure.
Which materials should I use for edge thickening and how do I choose?
Choose concrete mix and accessories per the project specs and product labels. Always read the datasheet and follow the manufacturer’s guidance for the edge details. If you’re unsure, compare options and check local rules or instructions from the supplier.