
Introduction
Yes, you can install tile on plywood, but it requires proper prep and support. Plywood alone isn’t a guaranteed tile surface; you need a stable, well-prepared substrate. Start with a clean, dry surface and follow the underlayment and adhesive guidance from the tile product you’re using.
Check the plywood for moisture, delamination, and overall condition before you begin, and follow manufacturer instructions for underlayment and thinset. If you see any loose boards or flex, fix them or consider a more suitable substrate. Do a small, test area to confirm bonding and movement before committing to the whole project.
Key takeaways
- Confirm plywood is structurally sound and rated for heavy tile loads.
- Check for moisture content and ensure subfloor is dry before tile.
- Use exterior-grade or reinforced backer board when plywood substrate is questionable.
- Install proper underlayment and transition between plywood and other surfaces.
- Wear eye protection and a dust mask during inspection, cutting, and mixing.
- If damage or soft spots appear, repair or replace before tiling.
Table of Contents
- Introduction
- Key takeaways
- When It Is Acceptable to Install Tile on Plywood
- Pre-Installation Inspection and Structural Checks
- Preparing the Plywood for Tile
- Tile Selection and Setting Materials for Plywood Substrates
- Common Problems and Troubleshooting During Installation
- Moisture and Waterproofing Considerations
- Repairing or Replacing Plywood Subfloor Before Tiling
- Tools, Materials Checklist, and Safety Tips
- Conclusion
- FAQ
When It Is Acceptable to Install Tile on Plywood
Tile can go over plywood when the subfloor is solid and properly supported. Look for room uses that don’t demand extreme stiffness and long-term moisture exposure. Avoid tile over plywood if you can’t meet the substrate and support requirements or if the plywood is damaged.
Check the local guidance and product labels for thickness, grade, and installation limits. Use common sense about how the floor will be loaded, lived on, and moved across. When in doubt, verify with the manufacturer instructions and consider upgrading the subfloor for a safer install.
Recommended Plywood Types and Thicknesses
When tiling over plywood, you want a smooth, strong base. Here’s what to look for:
Plywood Grade: Use at least Grade B/BB. This grade has minimal defects and is suitable for tile installation.
Thickness: For floor tiling, use a minimum of 1/2″ (12mm). For wall tiling, 1/4″ (6mm) is sufficient, but consider using 1/2″ (12mm) for added stability.
Layers: Use at least two layers of plywood, staggered to avoid joints lining up. This adds strength and reduces the risk of warping.
Suitable rooms and use cases
Tile on plywood works best in dry interior rooms. Here’s where it’s acceptable:
Dry areas only: Bathrooms, kitchens, and laundry rooms are off-limits unless you’ve got a solid, waterproof barrier underneath. Check your local building codes for specific rules.
Use cases include:
- Walls: Living room, bedroom, or home office walls can handle tile on plywood.
- Floors: In dry areas like hallways, closets, or bedrooms. But remember, plywood isn’t as rigid as concrete, so avoid heavy foot traffic if possible.
Exceptions: Never use tile on plywood in basements or other damp areas. And avoid heavy loads – like appliances or pianos – on top of your tiled plywood surface.
Pre-Installation Inspection and Structural Checks
Start with a visual check of all plywood panels for knots, warping, or water staining. Look for any loose or squeaky areas that you can’t leave unrepaired. Inspect joists and the overall framing for solid, well-supported structure.
Assess deflection by checking if the space between joists seems appropriate for the tile size you plan. Verify fastener type, spacing, and condition to ensure no loose panels will move under load. Reference the appropriate standards and your local rules when in doubt.
Checking joist spacing and deflection limits
Before you start tiling, ensure your subfloor is structurally sound. Use this checklist to verify joist spacing and acceptable deflection.
- Joist spacing: Measure between joists. Ideal spacing is 16″ or 24″. Anything else might cause issues later on.
- Deflection check: Divide the span of the joist by 360. If it’s less than that, deflection is within acceptable limits (L/360).
- Excessive deflection: If L/360 is too high, use a long straight edge to check for deflection. Too much ‘bounce’ means you’ll need sister joists or additional support.
- Sagging floor: Check for sagging in the middle of longer spans. This could indicate excessive deflection or damaged joists.
Quick rule: If your subfloor doesn’t pass these checks, fix it before tiling to prevent future problems.
Inspecting plywood condition and fastening
Before you lay a single tile, inspect your plywood subfloor for any signs of damage or weakness. Here’s what to look for:
- Rot: Check for soft spots or discoloration. If found, replace the affected area.
- Delamination: Tap the floor with a hammer. A hollow sound indicates delamination. Sand and refasten if necessary.
- Squeaks: Locate squeaky spots by walking around. Tighten or replace screws as needed to eliminate squeaks.
- Fastener integrity: Ensure all fasteners are secure and none are missing. Replace any damaged ones.
Quick rule: A solid, well-fastened subfloor is key for a successful tile installation.
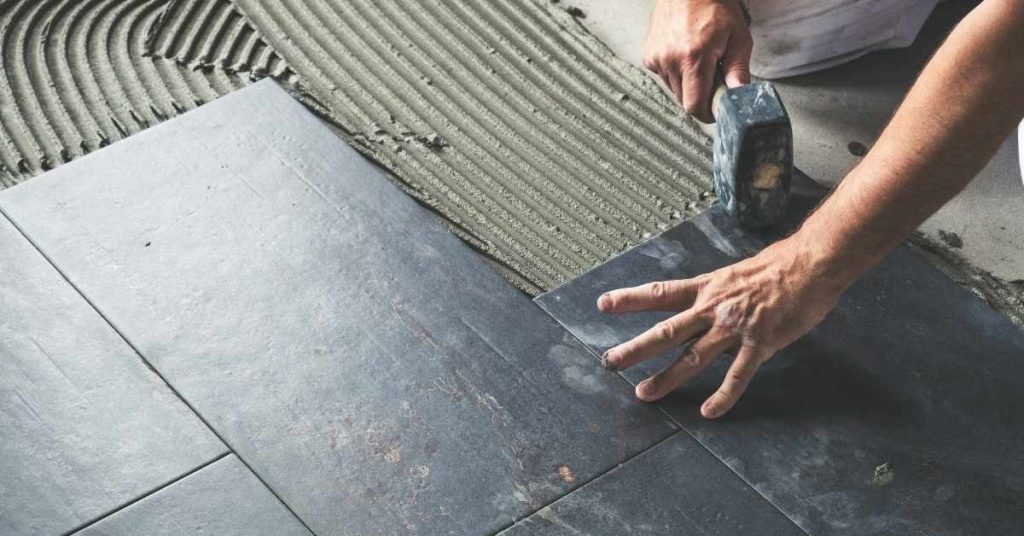
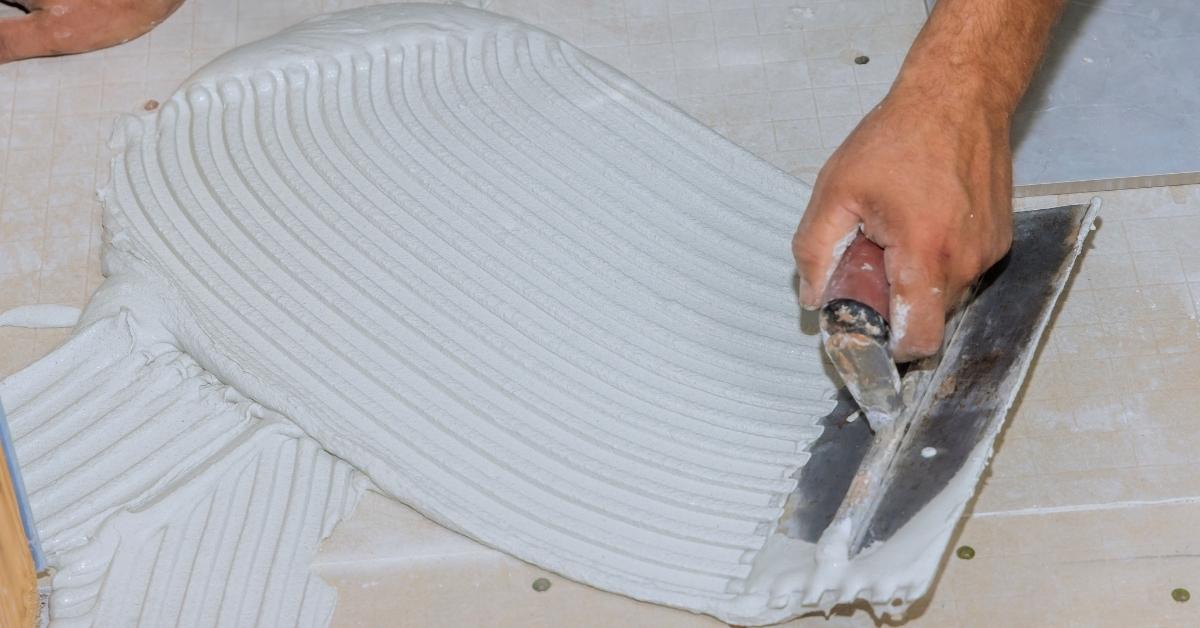
Preparing the Plywood for Tile
Begin with a thorough cleaning to remove dust, oils, and debris. Make sure the surface is dry and free of flaking coatings before you proceed. Fill any large gaps or gouges to create a flat base.
Level high spots and feather low areas as needed. If using underlayments or decoupling membranes, follow the product instructions for coverage and bonding. Check the label for any prep steps required by the adhesive you will use.
Leveling, screwing, and filling gaps
First things first, you need to ensure your plywood is flat. Use a long level or straight edge to find any high spots.
Screw down any loose boards using 1-5/8″ or 2″ screws, spacing them about 6″ apart. Stagger seams for added strength.
For uneven spots, use a self-leveling compound or thinset mortar to fill gaps and create a smooth surface. Let it dry according to the manufacturer’s instructions.
Underlayment and membrane options
Before tiling, you’ll want to add an underlayment or decoupling membrane. This protects your tile from cracks in the plywood.
Cement backer board is a common choice. It’s easy to install but can be heavy and prone to cracking if not properly supported.
Uncoupling membranes, like Schluter Ditra, are flexible sheets that move with the substrate, preventing cracks from transferring to your tile. They’re more expensive but offer better protection.
Fiber cement sheets are another option. They’re lightweight and durable, but they may not provide the same level of crack prevention as uncoupling membranes.
Tile Selection and Setting Materials for Plywood Substrates
Choose tile types and sizes that suit a plywood subfloor and the room’s use. Consider thickness and weight limits, and how the tile will be supported by the subfloor. Always verify compatibility with the substrate and the adhesive you intend to employ.
Pick a mortar or adhesive that is rated for plywood and exterior or interior use as applicable. Confirm transfer from the product label or data sheet and follow any open time or priming requirements. When unsure, check with the manufacturer instructions and local installation guidelines.
Matching tile size and weight to subfloor rigidity
Plywood subfloors have a certain amount of flex. Heavier or larger tiles can crack if the subfloor moves too much. So, match your tiles to your subfloor.
For large-format tiles (12″ x 24″ or bigger) and heavy stone tiles, you’ll need a stiffer assembly. Consider using 3/4″ plywood instead of 1/2″.
If your subfloor isn’t stiff enough, opt for smaller tiles. They’re lighter and can handle more movement.
Mortar and thinset choices
Plywood subfloors need a strong bond with your tile. Use thinset mortar or adhesives designed for plywood.
If you’re using a membrane, make sure your mortar is compatible. Some membranes require special adhesives.
For areas with movement (like near tubs or showers), use a flexible, polymer-modified mortar. It can handle some flex without cracking.
Common Problems and Troubleshooting During Installation
Be alert for hollow sounds after tapping tiles; this can indicate voids under the setting bed. If you hear a dull thud, recheck the substrate and adhesive coverage. Knock-on effects may show up as lippage or uneven grout lines later.
Cracking grout and shear failures often point to movement or inadequate bonding. If you see flashing cracks, pause and revisit prep, adhesive choice, or substrate stability. Document what you observe and adjust your approach according to product instructions and site conditions.
Addressing hollow spots and bond failures
If your tiles sound hollow when tapped, you’ve got a problem. This means the tile isn’t properly bonded to the plywood.
Causes: Insufficient mortar or thinset, improperly prepared surface, or movement in the subfloor.
To fix, re-bed the tile using fresh mortar. Remove it, clean off any old adhesive, and reapply a generous amount of mortar before setting it back in place. If it’s a widespread issue, you might need to spot-fix multiple tiles.
Preventing and repairing tile or grout cracks
Cracks in your tiles or grout are signs of movement. This could be due to improper substrate preparation, or the plywood moving underfoot.
Prevention: Ensure your plywood is properly prepared and level. Use expansion joints in large areas to accommodate natural movement. Consider using an isolation membrane for extra protection.
Repair: For tiles, remove any loose material, clean the area, and reapply fresh grout or mortar as needed. For grout, chip out the old grout, clean the area, and apply new grout.
Moisture and Waterproofing Considerations
Plywood can absorb moisture, so assess ambient humidity and potential water exposure before tiling. Use moisture-sensitive products only where permitted and follow cure recommendations. Plan for ventilation and drying during installation and curing.
Decide between vapor barriers and full waterproof membranes based on room type and expected moisture levels. Rely on product labels, installation guides, and local code requirements to choose the right approach. If in doubt, consult the membrane manufacturer’s instructions and local rules.
Wet-area requirements and code considerations
Plywood’s not the best choice for wet areas like showers, bathrooms, or laundry rooms. It can swell, warp, or delaminate with moisture.
Building codes often require a waterproof membrane over plywood in these areas. Check your local codes before starting.
If you’ve got existing plywood in a wet area, consider replacing it with water-resistant options like cement board or greenply (exterior-grade plywood).
Installing waterproof membranes over plywood
To protect your plywood subfloor, use a compatible waterproof membrane. You’ve got two main options: sheet membranes and liquid-applied membranes.
Sheet Membranes: These are like big plastic sheets. They’re easy to install but can be tricky around corners. Use construction adhesive for extra hold.
Liquid-applied Membranes: These are paint-like coatings that you roll or spray on. They’re flexible and great for complex areas. Follow the manufacturer’s instructions for application and drying times.
Repairing or Replacing Plywood Subfloor Before Tiling
Evaluate whether patches or full replacement are needed by testing for softness, rot, or extensive damage. If the panel is compromised, plan for removal and replacement sections with appropriate fasteners and backing. In some cases, sistering joists can help; verify framing compatibility first.
Proceed with patching or panel replacement using compatible materials and follow proper sequencing. Ensure the repaired area is flat, clean, and ready for the chosen underlayment or membrane. Always cross-check the repair approach with manufacturer guidelines and local requirements.
Patching small damaged areas
If you find localized rotten or delaminated sections, don’t try to patch them with just a bit of new plywood. That’s like trying to fix a broken bone with a Band-Aid.
Here’s how to do it right:
First, cut out the damaged area using a jigsaw or circular saw. Make sure you’ve got good, solid wood around all edges – at least 2 inches on each side. Then, measure and cut a new piece of plywood to fit snugly into that hole.
Use construction adhesive along the edges before nailing or screwing it in place. Fill any gaps with wood filler, let it dry, then sand smooth. Now you’re ready for tiling.
When to fully replace the subfloor
Sometimes, patching just won’t cut it. Here are signs that tell you it’s time for a full replacement:
Widespread rot or delamination. If more than 15% of your subfloor is damaged, it’s better to start fresh.
Sagging or bouncy spots. These indicate weak joists underneath. You might need to sister them (add new joists alongside the old ones) before installing a new subfloor.
Mold or mildew. This could mean moisture issues that won’t go away with just a patch job.
Safety first: When removing old subflooring, wear gloves and safety glasses. Use a pry bar to lift off the old plywood, then remove any remaining nails or screws before installing your new subfloor.
Tools, Materials Checklist, and Safety Tips
Gather a basic set of hand tools, a trowel for your mortar, a level, and a chalk line. Have a cutting tool, utility knife, and a scraper on hand for surface prep. Stock PPE such as eye protection, gloves, and a dust mask for dust and fumes.
Bring the recommended underlayment or membrane, adhesive, grout, and seals, plus fasteners and spacers. Plan for disposal of waste and a clean workspace to reduce slip hazards and trips. Always follow the manufacturer instructions and your site safety rules for best results.
Essential Tools and Materials List
Before you start tiling, make sure you have all the necessary tools and materials. This checklist will help you ensure a smooth installation.
- Circular saw: For cutting plywood to size.
- Jigsaw: For making curved cuts in plywood.
- Drill: With mixing paddle attachment for mortars and thinsets.
- Trowel set (notched and straight): For applying mortar or thinset.
- Level: To ensure your tiles are even.
- Spacers: To maintain consistent grout lines.
- Underlayment (if needed): Like cement board, to add rigidity and moisture resistance.
- Adhesive (mortar or thinset): Matching your tile’s weight and size.
- Grout: For filling spaces between tiles.
- Sealer: To protect grout from moisture and stains.
- Optional: Tile nippers: For cutting small pieces of tile to fit edges.
Quick rule: Having the right tools and materials ensures a professional-looking finish and prevents common installation issues.
Safety and Worksite Best Practices
Prioritize safety during your tiling project to protect yourself and your workspace. Follow these guidelines for a safe and efficient job.
- Dust control: Use a wet saw or vacuum attachment to minimize dust when cutting plywood.
- Ventilation: Ensure proper airflow, especially when using adhesives and grout.
- Proper lifting: Lift with your knees, not your back, to prevent injury.
- Cutting treated plywood: Wear gloves and a long-sleeved shirt to protect from chemicals.
- Adhesive precautions: Follow manufacturer’s instructions for mixing and handling adhesives. Avoid contact with skin and eyes.
- Fire safety: Keep a fire extinguisher nearby when working with open flames, like when using a propane torch to remove old adhesive.
- Eye protection: Wear safety glasses or goggles when cutting, drilling, or mixing materials.
- Hearing protection: Use earplugs or earmuffs when operating power tools for extended periods.
Quick rule: Always prioritize safety. A few extra minutes spent on precautions can prevent serious injuries and damage.
Conclusion
Tiles on plywood can last if you respect the limits, verify the subfloor, and follow a solid, no-nonsense plan. The goal is a durable, clean look that won’t crack or fail under daily use, and that starts with safer, smarter prep.
First, confirm the subfloor is structurally solid and dry. Inspect for water damage, rot, or loose sheets, then repair or replace as needed. Verify moisture levels, square and flat the surface, and address any high spots before you lay a single tile. Choose compatible setting materials for plywood and install a proper moisture barrier if required, then follow the manufacturer’s cure times and work in a clean, dry space. Finally, test a small area first to confirm bond and shrinkage before tiling the whole area.
Common mistakes to avoid are skipping the moisture check, using the wrong thinset or backer board for plywood, and rushing the prep or cure times. Never skip surface prep or rely on a flimsy subfloor. Wear appropriate safety gear, keep the work area dry, and work in small steps so you can catch problems early and prevent costly reversals.
If you see signs of structural failure, widespread rot, or persistent moisture issues, call a professional rather than pushing ahead. When you do finish, you’ll have a safer floor that looks right and lasts longer—so stay deliberate, stay safe, and keep the project moving with confidence.
FAQ
Is it safe to tile directly over plywood without any prep?
No. Plywood alone isn’t a guaranteed long-term tile base. Check the plywood for movement, delamination, or soft spots and follow manufacturer instructions for any underlayment or fastener requirements before tiling.
What should I do if my plywood feels bouncey or flexes under load?
That’s a sign the subfloor needs work. Do a simple bounce test and then inspect for loose fasteners or damaged sheets. Repair or replace damaged areas and follow with the appropriate underlayment and backer board as specified by the tile product instructions.
How do I know which underlayment or backer board to use with plywood?
Always read the tile setting material label and the backer board manufacturer instructions. Look for compatibility with plywood, moisture tolerance, and installation methods recommended for your substrate and climate.
What moisture issues should I watch for before tiling over plywood?
Check for moisture in the plywood and surrounding area. If you see current or past moisture, fix the source first and use the approved moisture barrier or waterproofing system per the product instructions and local guidelines.