
Introduction
Leveling a subfloor for tile means making the floor surface flat, stable, and ready to receive tile so you don’t get cracks or hollow spots. This is a hands-on task that starts with checking the current floor and ends with a smooth base for your tile setting. Take your time to plan out the steps and gather the right materials before you begin.
Using self-leveling underlayment helps fill low spots and create a uniform surface. Patching cracks and voids with appropriate filler and following product instructions is crucial for long-lasting results. Assess subfloor conditions, test moisture where required, and check surface stability before applying anything.
Key takeaways
- Proper subfloor prep prevents tile lippage and early failures; assess flatness early.
- Use self-leveling underlayment following manufacturer instructions for best results.
- Patch weak spots and cracks prior to leveling to avoid telegraphing through tile.
- Test moisture and surface stability to decide if repairs or extra prep needed.
- Gather tools, materials, and safety gear; follow ventilation and skin protection rules.
- Expect cure times and coverage may vary; plan for slow, steady progression.
Table of Contents
- Introduction
- Key takeaways
- Why Proper Subfloor Leveling Matters for Tile
- Assessing the Existing Subfloor
- Types of Self-Leveling Underlayment and How to Choose
- Tools and Materials Checklist
- Surface Preparation: Step-by-Step Before Applying Self-Leveler
- How to Mix and Apply Self-Leveling Compound Correctly
- Common Problems, Troubleshooting, and Mistakes to Avoid
- Safety, Costs, Curing, and Long-Term Care
- Conclusion
- FAQ
Why Proper Subfloor Leveling Matters for Tile
Uneven or unstable subfloors are a principal cause of tile failures. Cracked tiles, lippage, and grout cracking are common symptoms that show up when the floor isn’t truly flat or stable. Tile is less forgiving than other coverings once it’s installed and mortared in place.
Verify flatness with a straightedge and feeler gauges, and check slopes with a laser level or level string. Document tolerances and confirm they meet the project’s requirements before proceeding with leveling. Plan pre-leveling checks like moisture testing, damage assessment, and contaminant removal to protect bond strength and longevity.
How leveling prevents tile failure
A flat, rigid, and well-bonded underlayment is key to preventing tile failures. It distributes loads evenly across the entire surface, reducing stress points that can cause cracking or lippage.
Imagine a tile as a small island in a sea of grout. If the ‘sea’ (grout) isn’t level, it puts extra pressure on the edges of the ‘island’ (tile), leading to cracks and uneven surfaces.
Proper leveling ensures even distribution of weight, preventing these issues and extending the life of your tile installation.
Tile-specific risks and flatness expectations
Tiles are less forgiving than other floor coverings. They require a flatter, more rigid surface to perform well long-term.
Before you start tiling, check your tile’s specific requirements. Different tiles have different tolerances for flatness and joint size. Some may need a perfectly level surface, while others can tolerate minor imperfections.
Consult the Tile Council of North America (TCNA) or your manufacturer’s guidelines to ensure you’re within acceptable tolerances. Relying on guesswork can lead to costly mistakes and void warranties.
Assessing the Existing Subfloor
Begin with a clear picture of structural soundness and deflection to decide if leveling is appropriate. Flatness tolerance guides whether remedial work is needed before applying a leveling compound. If the subfloor shows signs of movement, repair, or excessive bounce, address it first.
Moisture content and sources must be identified and controlled before leveling proceeds. Ensure the surface is clean, porous, and bond-ready, free of coatings that would interfere with adhesion. Plan for fastener checks, seam integrity, and any necessary deck or panel repairs before applying patching materials.
Inspecting for damage, movement, and deflection
Before you start any work, give your subfloor a thorough once-over. You’re looking for signs of rot, movement, or loose areas that could cause squeaks.
Rot shows up as soft, crumbly wood. If it’s minor, you might be able to repair it yourself. But if it’s extensive, consult a pro – it could be a sign of bigger issues like moisture problems.
Movement and deflection are signs your subfloor isn’t solid. Tap the floor with a hammer; if it sounds hollow or feels bouncy, that’s movement. Deflection is when the floor slopes or sags. Both need attention – check local building codes to see what’s acceptable in your area.
Loose or squeaky areas are common and usually easy to fix. But if they’re widespread, it might be a sign of bigger issues. Always err on the side of caution – if you’re unsure, consult a structural or flooring pro. It’s better to spend a bit more upfront than end up with costly repairs later.
Moisture testing protocols
Before you start any work on your subfloor, it’s crucial to test for moisture. Here’s how:
1. Visual Inspection: Check for signs of moisture damage like warping, discoloration, or mold.
2. Moisture Meters: Use a reliable moisture meter to measure the moisture content in your subfloor. The safe range is typically between 12-15%. If it’s higher, consider moisture mitigation or a moisture-mitigating underlayment.
3. Calcium Chloride Test: This test can confirm if there’s active moisture present. Follow the manufacturer’s instructions and check local rules for disposal of used materials.
Measuring flatness and level
Before you start pouring self-leveler, you need to know how much material you’ll need. That means measuring your subfloor’s highs and lows. Here’s how:
Tools you’ll need: Straightedge (at least 4′ long), Level (4′ torpedo level works best), Laser level (optional, but helpful for larger areas).
Start by laying your straightedge across the subfloor. Place it on joists if possible, to check base compaction. Then, use your level or laser to find high and low spots.
Mark each high spot with a ‘H’ and its height above the straightedge. Mark each low spot with an ‘L’ and its depth below the straightedge. This will help you plan how deep you need to pour your self-leveler.
Types of Self-Leveling Underlayment and How to Choose
Common categories include cement-based, gypsum-based, polymer-modified, and rapid-set underlayments. Each has general use cases and performance traits, like bond strength and flow characteristics, that suit different substrates. Read product data sheets carefully to match the right type to the project needs.
Match substrate compatibility with prep prerequisites and environmental conditions. Look for guidance on moisture mitigation, cure times, and warranty limits, and note any exclusions or cautions in the datasheet. Use a simple decision framework to compare subfloor types, moisture, flatness needs, and tile size.
Cement- versus gypsum-based mixes
Self-leveling underlayments come in two main types: cement-based and gypsum-based. Both have their pros and cons, so let’s dive into what you need to know.
Cement-based mixes are tough and durable. They’re great for heavy traffic areas like garages or commercial spaces. But they can be a pain if you’re not careful. They set fast, so you’ve got to work quick. And they’re not too keen on moisture – check the product spec sheet for exact limits.
Gypsum-based mixes, on the other hand, are more forgiving. They’re easier to work with and have a longer open time. They’re also less sensitive to moisture. But they might not be as tough as cement-based ones. Check your substrate – if it’s concrete, you’ll likely need a cement-based mix for strength.
Rapid-setting and polymer-modified options
When time’s tight or you’ve got a tricky subfloor, consider these speedy and strong underlayments.
Rapid-setting: These mixes cure fast – think hours, not days. Great for quick turnaround projects like rental properties or when you’re on a tight schedule. They’re usually cement-based, so check local codes and manufacturer guidelines for suitability.
Polymer-modified: These blends have added polymers for enhanced strength and flexibility. They’re perfect for uneven or damaged subfloors as they can bridge minor cracks and level out imperfections. They’re also more resistant to moisture, making them a good choice for basements or damp areas. But remember, proper base compaction is still crucial before applying.
Both types are easy to apply, but keep in mind they can be more expensive than standard mixes. Always read the label and follow manufacturer instructions for best results.
Selecting by thickness, bond, and load requirements
First off, you gotta decide on the right thickness for your underlayment. It’s all about what you’re layin’ it over.
Check base compaction. If it’s solid, you might get away with a thin mix (1/4″ to 3/8″). But if it’s not, you’ll need somethin’ thicker (3/8″ to 1/2″) to fill in the gaps.
Now, some surfaces don’t bond well with underlayment. If that’s your case, you’ll need a primer or bonding agent. Always follow manufacturer instructions for the best results.
The last thing you wanna think about is how much traffic or load your floor will see. For heavy stuff like machinery or furniture, go with a high-performance mix. But if it’s just light foot traffic, a standard mix should do fine.
Tools and Materials Checklist
Stock essential tools for mixing, spreading, and monitoring: a drill with a paddle, a gauge rake or notched trowel, a long straightedge, a screed, and a mixer or rental option. Have a clean workspace and plan for transport of materials to the jobsite. Keep a rigid plan for tool setup and workflow.
Safety gear and PPE are non-negotiable: eye protection, chemical-resistant gloves, a respirator or dust mask, knee pads, hearing protection, and workwear suited to cementitious blends. Always read SDS and data sheets for every product to verify requirements.
Essential tools for a proper job
Before you start, make sure you have all these essential tools and materials to ensure your self-leveling underlayment job goes smoothly.
- Mixing drill/paddle: To mix the underlayment evenly. A drill with a paddle attachment is crucial for consistent mixing.
- Gauge rake or notched trowel: For spreading the underlayment at the correct depth. A gauge rake or notched trowel helps maintain consistency across the surface.
- Long straightedge and screed: To level and smooth the underlayment. Use a long straightedge to check for level, then use a screed to remove excess material.
- Margin trowel: For spreading primer or sealers. A margin trowel helps apply these materials evenly around the edges of the room.
- Mixer (or rental): If you’re working on a large area, consider renting a mixer to save time and energy.
- Safety glasses: To protect your eyes from debris and chemicals. Always wear safety glasses when mixing or spreading underlayment.
- Chemical-resistant gloves: To protect your hands from harsh chemicals in the underlayment and primers.
- Dust mask or respirator: To protect your lungs from dust and fumes. Wear a dust mask or respirator when mixing, spreading, or sanding the underlayment.
- Knee pads: For comfort and protection while working on your knees. Knee pads help prevent injury and make the job more enjoyable.
- Hearing protection: To protect your ears from loud equipment like mixers or grinders. Wear hearing protection when using power tools.
- Dedicated workwear/coveralls: To protect your clothing and keep you clean during the job. Wear coveralls to prevent underlayment or primer from getting on your regular clothes.
Quick rule: Always read the product’s SDS and data sheets before using any tool, equipment, or material to ensure safe handling and proper use.
Pro and optional equipment that speeds work
While not essential, these tools can help you work faster and achieve a better finish on your self-leveling underlayment job.
- Mixing pump: For large jobs, consider renting a mixing pump to speed up the mixing process significantly.
- Laser level: To ensure your underlayment is perfectly level. A laser level helps you achieve a precise, flat surface for tiling.
- Spike roller: For compacting and smoothing the underlayment. A spike roller helps remove air pockets and ensures a smooth finish.
- Long-handled finishing tools: To reach hard-to-get-to areas. Long-handled tools like trowels or scrapers help you spread and smooth underlayment in corners or along walls.
- Bonding agents (optional): For improved adhesion between the underlayment and tile. Bonding agents can be applied to enhance the bond strength, preventing delamination.
- Fiber-reinforced mortars (optional): For added strength and durability. Fiber-reinforced mortars contain fibers that help improve the underlayment’s resistance to cracking and shrinking.
- Waterproofing or crack repair options (optional): To protect against moisture and prevent cracks. These materials can be applied to address specific concerns in your subfloor, such as high moisture areas or potential crack locations.
Quick rule: Rent tools for large jobs or when you need specialized equipment. Always consult product data sheets to ensure compatibility with your chosen underlayment and other materials.

Surface Preparation: Step-by-Step Before Applying Self-Leveler
Define the scope by subfloor type, current condition, and target tolerances before any patching or priming begins. Identify cracks, spalling, and moisture issues to guide repairs and priming strategy. Establish a plan that keeps edges and transitions clean to prevent telegraphing.
Clean thoroughly to remove debris, oils, and residues, then repair cracks and voids per manufacturer guidance. Plan moisture tests and vapor control if needed, and select a primer that suits the substrate. Prepare a staged workflow to maintain consistent flow and minimize early-set risks.
Step-by-Step Process
Follow these practical steps to prepare your subfloor for self-leveling underlayment. This sequence ensures a solid foundation for your tile installation.
- Inspect and measure the subfloor for flatness, levelness, and any damage. Refer back to Assessing the Existing Subfloor if needed.
- Gather necessary tools: broom, vacuum, degreaser, primer, patching compounds, trowel, tape measure, level, and safety gear like gloves and goggles.
- Remove loose debris with a broom. Vacuum thoroughly to eliminate dust.
- Degrease the surface using an appropriate cleaner. Stubborn spots may require scrubbing. Allow it to dry completely.
- Inspect for cracks, holes, or other damage. Categorize them by width and movement risk. Address any loose substrate edges.
- Repair cracks and holes using suitable patching compounds. Embed mesh or lath as needed. Follow cure times carefully.
- Test the subfloor for moisture using a RH meter or other appropriate method. Address any excess moisture before proceeding.
- Apply primer or bonding agent according to manufacturer’s instructions. Ensure proper coverage and allow it to dry.
- Install perimeter isolation strips and expansion joint treatment as needed. Check that adjacent surfaces (walls, fixtures) are protected from bonding.
Cleaning, Degreasing, and Contaminant Removal
Thorough cleaning is crucial for self-leveler adhesion. Remove all contaminants to ensure a successful application.
Start by removing loose debris with a broom or shop vacuum. Then, use a degreaser suitable for your subfloor type to tackle oils, adhesives, and other stubborn residues. Never apply self-leveler over unclean surfaces.
For high-traffic areas or spots with heavy adhesive residue, you may need to scrub the surface using a stiff-bristle brush. Always follow safety guidelines when handling chemicals.
After degreasing, perform a final sweep and vacuum to remove any remaining dust or debris. The subfloor should be clean and dry before priming.
Patching vs Full-Depth Repairs
Understanding when to spot repair and when to do full-depth repairs is key to successful self-leveling. Here’s how to decide:
For minor cracks or holes, spot patching with a suitable compound is usually sufficient. Ensure the patch is well-bonded, level with the surrounding subfloor, and fully cured before proceeding.
However, if you find wide cracks, spalling, or delamination, full-depth repairs may be necessary. This involves removing damaged material, preparing the area, and replacing it with a new patch that’s well-bonded to the existing subfloor.
In severe cases where the subfloor is extensively damaged or structurally unsound, replacement might be required. Consult a professional if you’re unsure about the extent of repairs needed.
Priming and Edge Isolation
Proper priming and edge isolation are vital for controlling absorption, preventing bonding issues, and ensuring even flow of self-leveler.
Choose a primer or slurry coat suitable for your subfloor type. Apply it evenly according to manufacturer’s instructions. This promotes better adhesion and helps control moisture migration.
Install perimeter isolation strips along walls and fixtures where the self-leveler meets. These prevent unwanted bonding and allow for expansion and contraction. Use an appropriate tape or membrane product for this purpose.
Protect adjacent surfaces (walls, fixtures) from bonding by applying a suitable barrier material or using painter’s tape. This prevents self-leveler from adhering to these areas and ensures it flows correctly onto the prepared subfloor.
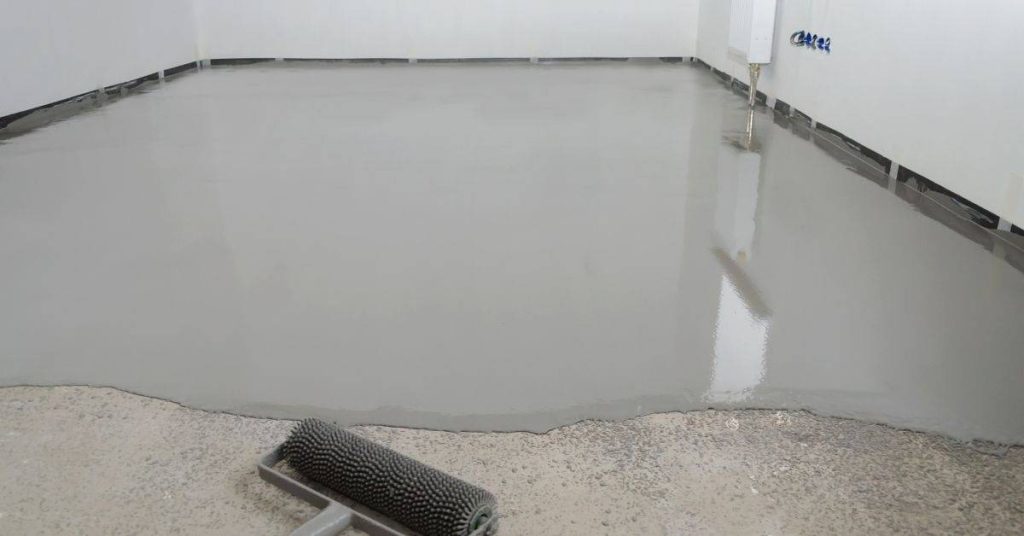
How to Mix and Apply Self-Leveling Compound Correctly
Start with a pre-work check of substrate readiness, then review the product’s pot life and primer needs. Decide batch sizes that fit the working time and room conditions. Plan pours to minimize cold joints and ensure continuous coverage.
Mix water and powder to a lump-free, pourable consistency using a clean pail and paddle. Prime if required and allow proper tack time. Pour, spread, and feather edges in planned sequences, then protect the surface during cure and note any deviations from instructions for future reference.
Step-by-Step Process
The following is a clear, numbered sequence of practical steps to mix and apply self-leveling compound correctly. This will help you achieve a uniform flat surface for your tile installation.
- Preparation and Safety Checks:
– Confirm substrate moisture, adhesion, and flatness.
– Read and note the specific self-leveling compound’s pot life, cure time, and primer requirements.
– Decide batch size to match pot life and room conditions (temperature/humidity). - Mixing:
– Measure water exactly per product instructions.
– Add powder gradually, mixing to a lump-free, pourable but self-supporting consistency.
– Use a paddle mixer in a clean pail and periodically scrape sides. - Substrate Preparation and Priming:
– Ensure a clean, dry surface.
– Apply primer if required and allow proper tack time.
– Address any small cracks or voids per manufacturer guidance. - Pour Plan and Working Time:
– Plan pour points to minimize cold joints.
– Pour within the specified pot life.
– Work in small, coordinated batches to maintain a continuous surface without seams. - Spreading, Leveling, and Finishing:
– Use a gauge rake or trowel to spread, tilt, and feather edges.
– Employ a spiked roller or roller to pop air and remove surface air voids.
– Avoid overworking once the surface is self-leveling. - Curing, Protection, and Next Steps:
– Keep the slab protected from rapid drying.
– Note cure times before tile installation.
– Document any deviations from instructions for future reference.
Mixing, Pot Life, and Working Times
Correct water ratios are crucial for a successful self-leveling compound application. Always measure water exactly per product instructions.
Use a clean pail and paddle mixer to combine the powder and water. Add the powder gradually, mixing until you achieve a lump-free, pourable but self-supporting consistency. Periodically scrape the sides of the pail to ensure all materials are well incorporated.
Pot life is the time during which the mixed compound remains workable after mixing. It’s essential to plan your pours within this window to avoid premature setting. Working in small, coordinated batches helps manage pot life effectively.
Consider room conditions when deciding batch size. Warmer temperatures and higher humidity can speed up the setting process, so adjust your batch size accordingly. Always refer to the product instructions for specific guidelines on mixing, pot life, and working times.
Pouring, Spreading, and De-Airing Techniques
A consistent pouring technique is key to achieving an even self-leveling compound surface. Plan your pour points strategically to minimize cold joints, which can weaken the final product.
Use a gauge rake or screed to spread the compound evenly across the substrate. Tilt and feather edges to ensure a smooth transition from the main area to the perimeter. Be mindful not to overwork the surface once it begins to self-level.
To remove entrapped air and achieve a smooth finish, employ a spiked roller or regular roller. These tools help pop air bubbles and eliminate surface air voids that could compromise your tile installation. Work in small sections to maintain control over the process and ensure consistent results.
Common Problems, Troubleshooting, and Mistakes to Avoid
Common failure modes include bond failures at edges, poor flow, pinholes, and uneven cure. Each issue affects how the tile will perform and how long it will last. Recognize the symptoms early to prevent costly fixes later.
Follow a diagnostic workflow that checks substrate moisture, porosity, contamination, and mixing accuracy. Apply corrective steps like repair, priming, and proper placement techniques, and use a decision tree to guide next moves. Stay aware of DIY-specific limits and common missteps to avoid compromising the result.
Bond failure and delamination — causes and fixes
Delamination occurs when the self-leveling compound peels off from the substrate. This is usually due to inadequate surface preparation or using the wrong primer.
Inadequate Surface Preparation: If the substrate isn’t clean, dry, and free of contaminants, the bond will fail. Ensure you’ve followed the step-by-step surface prep guidelines.
Wrong Primer: Using an incompatible primer can lead to delamination. Always use a primer recommended by the self-leveler manufacturer and follow their instructions for application.
To test for bond failure, perform a pull test: stick some duct tape on the surface, let it sit for 24 hours, then pull it off. If the compound comes off with it, you’ve got a bond issue. To repair, grind out the affected area, clean it, and re-prime before applying more self-leveler.
Flow issues, pinholes, and surface defects
Poor flow can lead to pinholes, voids, or an uneven surface. Here’s how to troubleshoot:
Re-priming: If the primer is old or not compatible, it might cause poor flow. Re-prime the surface with a fresh coat of the recommended primer.
Remixing: Incorrect water-to-powder ratio can affect flow. Follow the manufacturer’s mixing instructions precisely.
Feathering Repairs: For pinholes or voids, grind out the area, clean it, and apply a small amount of self-leveler, feathering it out to blend with the surrounding surface.
Common DIY mistakes and how to avoid them
Here are some common DIY errors and how to prevent them:
- Skipping Moisture Tests: Moisture can ruin your self-leveler. Always perform a moisture test before application.
- Incorrect Mixing: Follow the manufacturer’s mixing instructions to the tee. Too much or too little water can cause flow issues and strength problems.
- Rushing Curing: Allow the self-leveler enough time to cure properly. Rushing it can lead to uneven curing, shrinkage patterns, and reduced performance.
- Overworking the Mix: Overmixing or working the compound too much can introduce air bubbles and weaken the mix.
- Insufficient Ventilation: Proper ventilation is crucial during mixing and application. Inadequate ventilation can lead to health issues and poor curing.
- Delaying Joint Control/Expansion Gaps: Install joint control materials or create expansion gaps as recommended by the manufacturer to prevent cracking due to substrate movement.
By avoiding these common mistakes, you’ll ensure a successful self-leveling underlayment application that supports your tile installation.
Safety, Costs, Curing, and Long-Term Care
Ventilation and containment are essential to keep the jobsite safe during leveling prep. Use appropriate eye, skin, and respiratory protection, plus fall protection where needed. Maintain a clean, organized work area to reduce trip hazards and exposure.
Plan for curing verification before tiling, including moisture checks and surface dryness. Budget for materials, tools, and potential contingencies, and compare local prices with product data. Establish a maintenance plan to inspect and reseal or relevel as needed to prevent tile failures over time.
Safety precautions and personal protective equipment
Protecting yourself and your workspace is crucial when working with self-leveling underlayment.
- Respirator: Use a respirator compatible with cement dust to protect your lungs. Some models are $20-$50, but consider renting for single projects.
- Gloves: Wear gloves to protect your hands from chemicals and wet materials. Disposable gloves are around $1 each.
- Eye protection: Use safety glasses or goggles to shield your eyes from dust and debris. Expect to pay $5-$20 for a pair.
- Hearing protection: Wear earplugs or earmuffs when using power tools near the work area. Basic earplugs are around $10 for a pack of 10.
- Fall protection: If working at height, use harnesses and lanyards to prevent falls. Rentals start from $25/day.
Cost factors and DIY vs professional tradeoffs
The cost of self-leveling underlayment projects varies based on several factors. Material type, area size, prep needs, and labor all play a role.
Material type: Different compounds have varying prices per square foot. Expect to pay $2-$5 for basic compounds, $5-$10 for high-performance ones.
Area size: Larger areas require more material, increasing costs. Consider hiring a pro for big jobs to avoid mistakes and rework.
Prep needs: If your subfloor requires extensive prep work like patching or priming, factor in those additional costs. DIY can save on labor but may increase material costs if mistakes are made.
Curing verification and maintenance after install
Ensuring the underlayment has fully cured is vital before tiling. Here’s how to confirm it and maintain the surface.
Cure verification: Follow product-specific cure times, usually 24-72 hours. Check for a dry, smooth surface with no ridges or laitance. Use a moisture meter if unsure; they start from $30.
Protect the surface until tiling by keeping it clean and free of debris. Cover it with plastic sheeting if necessary to prevent contamination.
Maintenance: Inspect your underlayment periodically for signs of settlement, edge compression, or joint movement. Reseal as needed to maintain a tight bond between the underlayment and tiles. Schedule re-checks or releveling every 5-10 years to prevent tile failures.
Conclusion
A solid tile job starts with a flat, stable subfloor. When you level correctly, you get durability, a clean look, and fewer callbacks. Do the prep right, and you’ll avoid cracks, pops, and failed tile work down the line.
Run this as a simple plan: assess the subfloor and choose the right self-leveling underlayment, gather the tools and materials, clean and prime, mix to the correct ratio, pour and spread in small sections, comb and feather to a true level, verify flatness, cure fully, and then test for movement or spring before you tile. Work in small steps, test often, and stay within the manufacturer’s guidelines for mixing, application, and curing times.
Avoid these common pitfalls: skip priming or surface prep, mix the compound too thin or too thick, and pour over a damp or dirty surface. Wear eye protection and gloves, ventilate the area, and don’t rush the cure. If moisture tests show red flags, if the subfloor has extensive damage, or if you’re unsure about level or span, don’t push ahead—call a pro. When you respect the process and stay focused on safety, you’ll finish with a solid, professional result that lasts. Stay steady, measure twice, and you’ll get there.
FAQ
Why is proper subfloor preparation essential before using self-leveling underlayment?
A level, clean base prevents cracks and hollow spots. If you skip prep, the self-leveler can fail or chip under tile. Prep sets the stage for a durable tile install.
What patching techniques should I use for cracks, holes, or delaminated patches?
Fill holes and cracks with an appropriate patch material per the product label. Scrape, clean, and prime the area before applying any underlayment. Follow manufacturer instructions for cure and coverage.
How do I assess subfloor conditions in an older home before leveling?
Check for moisture, movement, and loose sections. Test for surface stability by pressing and tapping; feel for give or hollow spots. Use moisture tests or consult the product guidelines for acceptable conditions and repairs.
Do I need different prep steps if I’m installing tile vs. another flooring type?
Yes. Tile needs a very solid, flat base; other floors may tolerate more movement. Read the underlayment and flooring manufacturer instructions for prep requirements and compatibility. When in doubt, verify with labels, datasheets, or local guidance.