

Introduction
A fine crack confined to a dry plaster finish is often cosmetic. A crack that is widening, extending, displaced, or accompanied by bulging plaster, sticking doors or windows, or matching damage elsewhere needs investigation. This article is a homeowner triage guide, not a structural diagnosis.
Crack width alone cannot tell you whether a wall is structurally unsafe. Consider what is cracked (plaster, masonry, or framing), its location and pattern, any step or offset across it, moisture, related distortion, and whether it changes over time. Older buildings can show historic or seasonal movement; the important question is whether movement is ongoing and affecting safety or use. Historic England’s guidance on structural movement likewise treats crack patterns as evidence to investigate in context, rather than as a diagnosis by themselves. Related guidance: Plaster Over Cement Board: Step-by-Step Timeline and Duration Guide.
Key takeaways
- A stable, dry crack limited to plaster or a finish joint is commonly suitable for monitoring and, later, cosmetic repair.
- Progressive widening, new branching, displacement, bulging, loose material, or distorted openings are more important warning signs than a single crack-width number.
- Inspect both accessible sides of the wall and relevant exterior areas before deciding that a crack is plaster-only.
- Stop leaks and investigate dampness before filling or painting a crack.
- Document cracks with dated, like-for-like photos and measurements before repair.
- Do not pry off plaster, inspect concealed structural parts, remove supports, or improvise shoring.
Table of Contents
- Introduction
- Key takeaways
- Hairline Vs Structural Cracks — Clear Definitions and How to Measure
- Common Causes of Cosmetic Plaster Cracks
- Causes and Signs of Structural or Movement-Related Cracks
- DIY Inspection and Classification: What Homeowners Can Check Safely
- Professional Assessment Methods and What a Report Should Include
- Repair Options by Crack Type (Cosmetic to Structural)
- Costs, Timelines and How Scope Affects Pricing
- Warning Signs That Require Immediate Action
- Conclusion
- FAQ
Hairline Vs Structural Cracks — Clear Definitions and How to Measure
A cosmetic crack is usually confined to the plaster surface or a finish joint, is dry and stable-looking, and has no associated bulging, displacement, or distortion. A movement-related crack may pass through the plaster and its backing, recur after repair, extend or branch, or appear with other changes in the building.
Do not use labels such as “hairline,” or any single millimetre measurement, as a safety threshold. Measure the crack so you can compare it later, but assess the result with its pattern, material, location, moisture condition, and change over time.
Visual characteristics and common patterns
Plaster-only cracks may be fine surface fissures from shrinkage, finish movement, weak bonding, or loss of plaster key. They can also occur at joints between materials.
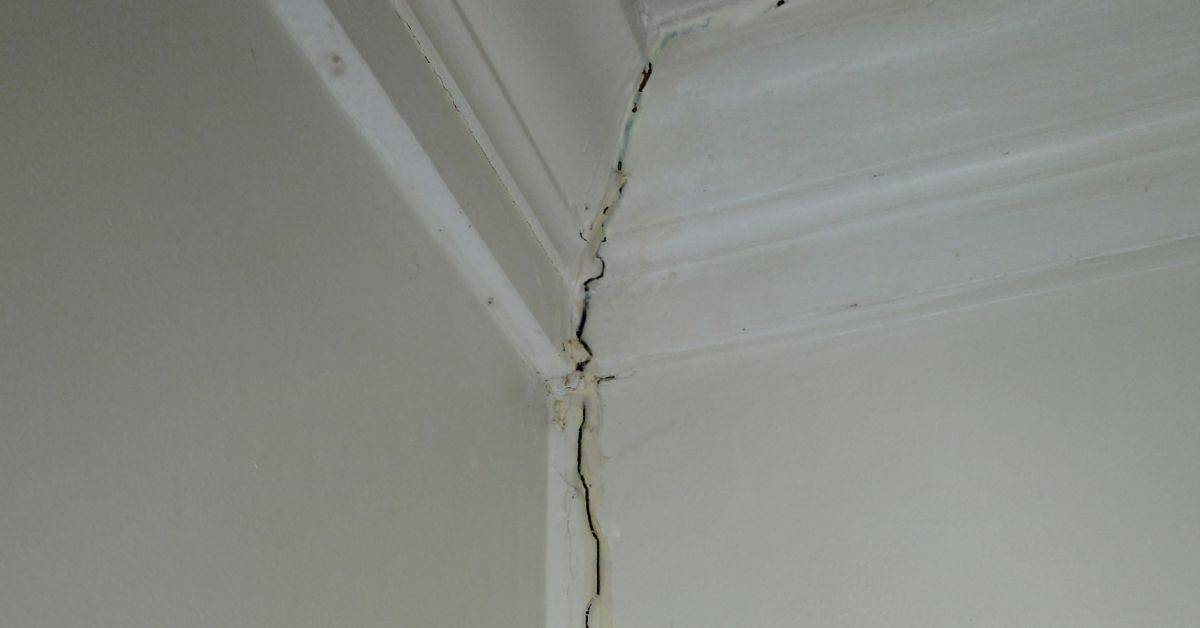
Cracks at interfaces—such as wall-to-ceiling junctions, corners, repaired areas, openings, or an extension meeting an older structure—can result from different materials moving differently. That does not by itself prove structural failure.
Cracks through masonry or framing deserve more attention, especially where there is a visible step across the crack, loose masonry, bulging, leaning, or related exterior damage. Diagonal and stair-step cracks can be useful clues, but neither pattern identifies a cause on its own. A crack above a door or window can relate to finish movement, framing, an arch or lintel, or masonry; concern rises when it is accompanied by sagging, displacement, rust staining, localized bulging, or cracking in the surrounding masonry.
How to measure and log cracks (simple, repeatable method)
Use a ruler or purpose-made crack gauge, a phone or camera, a pencil, and a notebook or digital log. In good, consistent lighting, photograph the whole wall for context and then the crack close up with a scale beside its widest point. Record the date, room, wall, height, length, direction, widest observed opening, material affected, nearby doors or windows, dampness or staining, and any visible displacement.
Mark the crack ends lightly with pencil only if that will not damage the finish. Recheck from the same viewpoint every 2–4 weeks at first and after leaks, storms, nearby excavation, unusual vibration, or alterations. This is practical monitoring guidance, not an engineering interval: seasonal patterns may need longer observation. Clear widening, extension, branching, separation, bulging, or new sticking openings matters more than a universal numerical cutoff.
Common Causes of Cosmetic Plaster Cracks
Fine, stable cracks can result from plaster shrinkage, minor building movement, or movement at a joint between unlike materials. They should remain superficial and should not be assumed harmless if they recur, become damp, or develop alongside other movement signs.
Shrinkage and Curing-Related Cracks
Newly plastered or repaired areas can develop fine surface fissures as the material dries and cures. They are more likely to be cosmetic when they remain confined to the finish, stay dry, and do not change after the repair has had time to dry and settle.
Thermal and Humidity Cycling
Temperature and humidity changes can cause differential movement between plaster, lath, timber, masonry, ceiling elements, and previous repairs. Cracks often appear near corners, openings, and junctions. A crack that follows a stud or joist line is not, by itself, a reliable diagnosis.
Materials and Workmanship Problems
- Weak bonding or poor key: cracking, hollowness, or local separation where plaster has not adhered well.
- Movement at joints: cracks at corners, around openings, or where repairs meet older finishes.
- Unsuitable mix, excessive water, or overworking: weak or finely crazed finishes that may crack during drying.
- Loose lath or mesh: localized cracking or detached plaster that needs assessment before patching.
Causes and Signs of Structural or Movement-Related Cracks
Movement-related cracking can have many causes: changes in support, moisture-related deterioration, alterations, movement between building elements, defective openings, or ground conditions. A homeowner should document evidence, not attempt to diagnose foundation, lintel, wall-tie, or load-path problems remotely.
Foundation and ground movement (settlement, subsidence)
Uneven ground support can contribute to cracking, but a vertical crack does not automatically mean settlement and a diagonal crack does not automatically mean subsidence. Look instead for a developing pattern: cracks continuing through different materials, stepped exterior masonry cracking, new gaps, distorted openings, sloping or uneven surfaces, or changes after drainage problems, excavation, or severe weather.
Where safely accessible from ground level, note exterior cracks, render damage, displaced brickwork, overflowing gutters, failed downpipes, standing water, and changes to ground levels. Do not climb, remove masonry, enter unsafe voids, or probe structural elements.
Differential movement at junctions and across materials
Walls, ceilings, additions, openings, and repairs may move differently. A crack at a junction may be a finish issue, but repeated opening, a growing gap, displacement, or matching cracking on the other side of the wall calls for a routine professional inspection.
Moisture-driven problems (rot, corrosion, and ongoing leaks)
Staining, salts, mould, a musty odour, soft plaster, peeling paint, or recurring dampness are reasons to stop cosmetic work and find the moisture source. Check accessible plumbing, roof leaks, gutters, downpipes, windows, condensation, and exterior defects. Do not seal or paint damp plaster; repair only after the source has been addressed and the affected material is appropriately dry.
DIY Inspection and Classification: What Homeowners Can Check Safely
Keep DIY inspection non-destructive. Do not lift floorboards, pry loose plaster, cut into walls, remove masonry, use a borescope in structural elements, or cover a crack before you have documented it. Wear safety glasses, gloves, and a dust mask if handling small amounts of loose, dry plaster; stop if material is falling or the wall feels unsafe.
Visual checklist and simple tests (tap, probe, moisture)
- Compare both sides: Inspect the opposite side of the wall where accessible, plus nearby wall-to-ceiling and wall-to-floor junctions.
- Check nearby openings: Note gaps, rubbing, sticking, or new misalignment at doors and windows.
- Look for displacement: A visible step, separation, bulge, lean, sag, loose material, or crack running through masonry is a stronger warning sign than orientation alone.
- Check moisture clues: Look for staining, salts, soft plaster, peeling paint, mould, odour, or active leaks.
- Tap gently only on sound-looking areas: A hollow sound can indicate detached plaster or a void, but it does not identify the cause. Do not tap bulging or loose areas.
- Record context: Note recent leaks, decoration, repairs, excavation, storms, vibration, or changes to the property.
Quick rule: If you see movement, dampness, or loose material, document it and do not disturb the area.
How to map and monitor a crack over time
- Photograph: Take one wider photo and one close-up with a ruler or crack gauge in the same position each time.
- Log: Record date, location, length, direction, widest observed point, materials affected, moisture signs, and associated symptoms.
- Use a purpose-made monitor if needed: A crack gauge or tell-tale installed to its manufacturer’s instructions can record relative movement at that point. It cannot identify the cause or confirm safety.
- Recheck consistently: Revisit every 2–4 weeks initially and after relevant events. Keep the baseline photos even if you later repair the finish.
- Escalate meaningful change: Seek advice if the crack clearly widens, extends, branches, separates, becomes damp, or coincides with distorted openings or exterior damage.
Professional monitoring is selected to suit the building, suspected movement, and monitoring points; it is not based on one universal homeowner threshold. RICS measured-survey guidance similarly treats monitoring frequency and reference points as project-specific.
Safety and immediate precautions
- Restrict access: Keep people away from falling material, pronounced bulging, sagging, separation, or rapidly changing damage.
- Control active water safely: If a plumbing leak is involved, isolate the supply only if you can do so safely and know the correct shutoff.
- Do not improvise shoring: Temporary props can create dangerous new loads or worsen instability.
- Do not conceal evidence: Avoid filling, sealing, or repainting an active or unexplained crack before documentation and assessment.
Quick rule: Leave the affected area if there is immediate collapse concern, keep others away, and contact emergency services or qualified emergency building professionals as appropriate.
Professional Assessment Methods and What a Report Should Include
Arrange a routine inspection when a crack recurs after repair, extends or changes, appears with minor opening distortion, crosses materials, or is linked to localized dampness. Seek prompt assessment for cracks through masonry or framing, displacement, bulging, leaning, sagging, loose masonry, or a suspected safety risk.
The appropriate professional and report name vary by location. Depending on the issue, this may be a competent building surveyor, structural engineer, building-envelope specialist, or other qualified inspector. Give them your dated photos, log, details of leaks or alterations, and information about when the damage first appeared.
Monitoring tools and techniques
Professionals may map crack patterns, establish fixed reference points, measure movement, inspect interior and exterior conditions, and assess moisture and construction details. A purpose-made crack gauge can supplement your photo log, but a meter reading or tell-tale result should be interpreted in context.
What engineers and surveyors check and document
A useful report explains the areas inspected and any limits to inspection; describes the affected materials and crack patterns; records measurements and associated moisture or distortion; considers likely causes and urgency; and sets out next steps. It should distinguish observations from conclusions and state whether further investigation or monitoring is needed.
When to commission a full structural survey
Consider a more detailed structural evaluation when there is persistent progressive damage, several related warning signs, substantial uncertainty about support or load paths, or any concern about safety. Fees, scope, terminology, and turnaround vary by country, region, access, building type, and urgency, so ask what the inspection includes before appointing anyone.
Repair Options by Crack Type (Cosmetic to Structural)
Repair the cause before the appearance. Cosmetic patching is appropriate only for a dry, stable crack that appears confined to plaster or a finish joint and has no warning signs. Repeatedly filling a crack that reopens only hides an active problem. Related guidance: Plaster Crack Repair That Lasts: Stabilize Movement Before You Patch.
Cosmetic repairs: patching, reinforcement and redecoration
First photograph and log the crack. Confirm there is no active moisture source and that the plaster is dry. Wear safety glasses, gloves, and a dust mask for sanding. Remove only material that is already loose, then clean dust from the surface without digging into the wall.
Use a patch material labelled for plaster and follow its preparation, layer thickness, drying, sanding, priming, and painting instructions. Apply thin layers rather than one heavy fill. Reinforcement tape or a flexible filler may suit some finish joints, but use materials compatible with the existing plaster system. Stop if the crack reveals loose backing, deep separation, dampness, or renewed movement.
Replastering, re-bonding and substrate repairs
Hollow, detached, or delaminating plaster may need local stabilization, re-bonding, patching, or replastering by a suitable tradesperson. Do not assume that screws, adhesives, or removal are safe without knowing what sits behind the finish, especially near openings or suspected load-bearing areas.
Structural remedial works (underpinning, wall ties, drainage, tree root works)
Structural repairs depend on a confirmed cause. Drainage work, repairs to openings, foundation work, wall-tie work, and tree or ground interventions are not general DIY crack repairs. They require an appropriate diagnosis and, where applicable, qualified design, local approval, and competent installation.
Costs, Timelines and How Scope Affects Pricing
There is no reliable universal cost or timeline for crack investigation or repair. Price depends on location, access, building age and construction, the area affected, the required professional scope, testing, and whether the cause is cosmetic, moisture-related, or structural.
What to include in an itemised quote and tender brief
For anything beyond a small cosmetic patch, ask for a written scope that separates diagnosis, moisture repairs, stabilization or structural work, plaster repairs, redecoration, access, exclusions, and warranties. Compare like-for-like scopes rather than choosing solely on a headline price.
Typical project timelines and factors that extend them
Investigation may require a single visit or a longer monitoring period. Repair should follow only after the cause and moisture condition are understood. Access, weather, drying, specialist availability, approvals, and discoveries once finishes are opened can all extend the work.
Permit, building-control, and insurance requirements are jurisdiction- and policy-dependent. Check with your local building department before structural alterations or work affecting openings or supports. Check your own insurance policy before assuming a cause or repair is covered; coverage depends on the insured event, exclusions, deductible, and policy terms.
Warning Signs That Require Immediate Action
Use this triage as a guide, not a structural diagnosis.
| What you observe | What to do |
|---|---|
| Fine, dry, stable-looking crack confined to plaster or a finish joint; no bulging, displacement, dampness, or opening distortion | Photograph, measure, inspect accessible opposite and exterior sides, monitor, then repair only when the crack appears inactive and the plaster is dry. |
| Crack recurs after filling, extends or branches, changes with seasons, occurs at a material junction, or appears with minor sticking doors or localized dampness | Arrange a routine inspection by a competent professional. Investigate moisture before cosmetic repair. |
| Crack passes through masonry or framing; visible displacement, bulging, leaning, sagging, loose masonry, major opening distortion, or rapidly changing damage | Restrict access and seek prompt professional assessment. Do not remove material or improvise shoring. |
| Falling plaster or masonry, severe bulging or separation, sudden movement, an unsafe wall or ceiling, or immediate collapse concern | Leave the affected area if safe, keep others away, and contact emergency services or qualified emergency building professionals. |
Emergency steps to reduce risk before professionals arrive
Cordon off the area and avoid vibration, loading, demolition, or cosmetic work nearby. Photograph what you can do safely, including a wider view for context. If there is an active leak, take safe steps to stop the water source, but do not enter an unsafe area to do so.
How insurers and building regs may be involved
Keep photos, measurements, dates, invoices, and professional reports. If a significant event may be covered, contact your insurer promptly and follow its instructions before authorizing major work. Local rules may require approval for structural repairs; the local authority or building department can explain requirements in your area.
Conclusion
Start with context, not a crack-width cutoff. Check whether the damage is dry and confined to plaster, inspect the accessible opposite and exterior sides, look for displacement or distortion, document a baseline, and monitor before filling. Address moisture first.
A stable plaster-only crack can usually be repaired once it is dry and has shown no meaningful change. A crack that progresses, recurs, crosses into masonry or framing, or appears with bulging, loose material, or distorted openings needs professional assessment. If there is an immediate safety concern, keep away from the area and seek urgent help.
FAQ
How can I tell whether a plaster crack is cosmetic or movement-related?
A cosmetic crack is more likely to be dry, stable, and limited to the plaster finish or a joint. Treat a crack as a movement concern if it clearly widens, extends, branches, shows an offset, recurs after filling, crosses into masonry or framing, or appears with bulging, dampness, loose material, or sticking doors and windows. Width alone is not a diagnosis.
What commonly causes cosmetic plaster cracking?
Fine surface cracking can result from plaster shrinkage, curing, weak bonding, minor movement at joints, and differential movement between plaster and adjacent materials. It should still be monitored if it is new or if the cause is uncertain.
Should I fill a crack before monitoring it?
No. Photograph and measure it first. If it is damp, recurring, changing, or accompanied by warning signs, investigate the cause rather than filling it. Fill only a dry, stable-looking plaster-only crack after monitoring and following the patch product instructions.
When is a plaster wall crack an emergency?
Act urgently if plaster or masonry is falling, the wall or ceiling is severely bulging, sagging, leaning, separating, or changing suddenly, or if there is an immediate collapse concern. Keep people away and contact emergency services or qualified emergency building professionals as appropriate. Related guidance: How to Repair a Bulging Plaster Wall (Flatten, Replace, or Re-Key?).