
Introduction
Feather-edge thickness for repair mortars is the minimum thickness you should aim for at the feathered edge of a repair, as defined by the product you choose. Because different products have different requirements, always check the label and the manufacturer instructions for the exact minimum. If in doubt, consult local rules or a pro before starting.
Application conditions, substrate, and curing environment all affect acceptable feather-edge thickness. Always verify product specifications and warranty terms from the manufacturer, and note that some warranties hinge on following minimums and prep steps. If you can’t find a clear number, use conservative practice and document conditions.
Key takeaways
- Feather-edge repairs require product-specific minimum thickness as defined by manufacturer instructions.
- Check product data sheets, standards, and local rules to set safe minimums before mixing.
- Have a clear plan for applying in thin layers and avoiding run or slump.
- Expect varying wall or substrate conditions to affect achievable feather-edge thickness safely.
- Use proper safety gear and ventilation; never exceed recommended working conditions.
- Include a documented warranty check and support path if performance fails.
Table of Contents
- Introduction
- Key takeaways
- What “Feather-Edge” Means and Why Minimum Thickness Matters
- Minimum Thickness Guidance by Product Type (How to Set Safe Minimums)
- Material Specifications and Standards That Determine Minimum Thickness
- Mixing, Pot Life, and Application Variables That Affect Feather-Edge Success
- Tools, Materials Checklist and Visual Checkpoints
- Shelf Life, Storage, Safety and Handling
- Planning, Cost Estimation, Warranties and Available Support
- Common Mistakes, Troubleshooting and Long-Term Maintenance
- Conclusion
- FAQ
What “Feather-Edge” Means and Why Minimum Thickness Matters
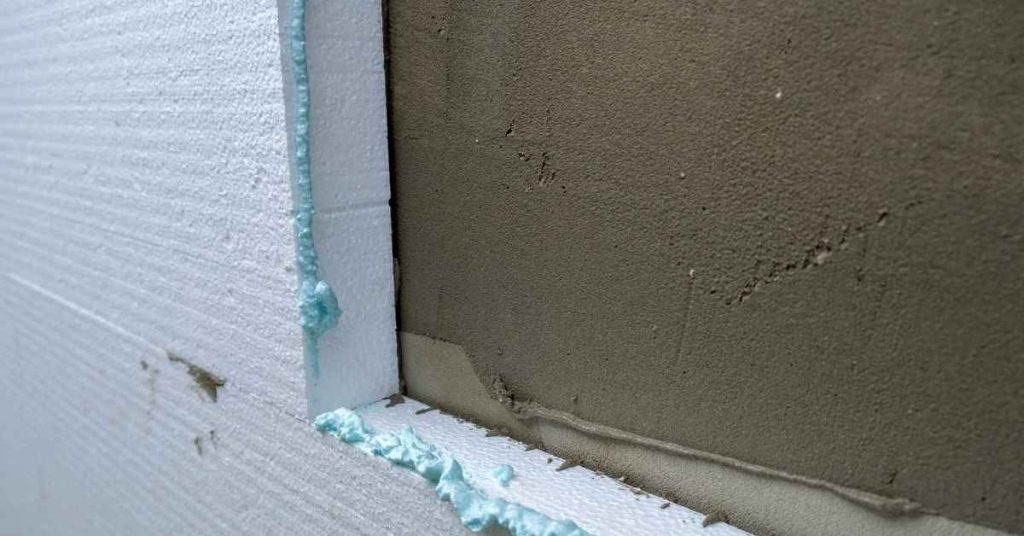
In repair mortars, feather-edge refers to a very thin, tapered edge that blends into the surrounding material rather than a full-thickness patch. It is distinct from thicker overlays and from conservative sections where a visible step is acceptable. Different product types carry different practical thickness ranges, which you should verify on the label or in the data sheet.
Minimum thickness matters because it influences adhesion to the substrate, bond durability, and the risk of shrinkage cracking under loads or environmental changes. Always check the manufacturer data sheets and technical bulletins for final requirements. Key verification steps include assessing substrate condition, surface prep, compatible primers or additives, and measuring actual thickness with a gauge or template.
Definition and common uses
Feather-edge in repair mortars refers to applying a thin layer of mortar, typically less than 10mm thick. This technique is used for surface repairs, skim coats, and smoothing out uneven surfaces.
It’s not about full-thickness sections or conservative builds. Here are typical thickness ranges by product type:
- Epoxy mortars: 3-6mm
- Cement-based mortars: 5-10mm
- Polymer-modified mortars: 2-8mm
Why minimum thickness is a critical design parameter
Minimum layer thickness matters for adhesion, durability, and cracking risk. Here’s why:
Adhesion: Thinner layers bond better to the substrate.
Durability & Cracking Risk: Insufficient thickness increases shrinkage, reduces strength, and shortens service life unless the product is formulated for feather-edge use. It also raises cracking risk under load or environmental cycling.
When feather-edge is acceptable vs when build-up is required
The need for feather-edge or a minimum recommended build-up depends on several factors:
Substrate Condition: Feather-edge is fine for sound, clean substrates. But if it’s damaged, you’ll need to build up the mortar.
Load & Exposure: For areas under heavy load or severe exposure (like freeze-thaw cycles), a thicker build-up might be necessary even if the substrate is sound.
Minimum Thickness Guidance by Product Type (How to Set Safe Minimums)
Major product classes that typically require minimum thickness guidance include cementitious repair mortars, polymer-modified mortars, epoxy or vinyl-ester repair mortars, slurries, and plaster-based patch mortars. These classes appear in DIY and professional contexts with varying expectations. Always confirm current values on the product data sheet.
Provide conservative, checkable minimum-thickness figures for each class, with practical ranges for patch, skim coat, bed, or overlay. Clarify when feathering or partial fills are acceptable and note warranty considerations that may affect applicability. Surface prep, substrate compatibility, and curing environment all influence minimum thickness, so verify the latest specs before starting and follow a clear decision flow if a minimum isn’t stated.
Polymer-modified cementitious repair mortars
Many polymer-modified mortars are designed to be applied at feather-edge or thin-film levels. However, always check the product datasheet for the manufacturer’s recommended minimum thickness.
Why? Incorrect application can lead to delamination and reduced durability.
Some products may require a primer to achieve optimal adhesion and minimum thickness. Follow the manufacturer’s guidelines for best results.
Standard cement-based patching compounds
Traditional cementitious patchers typically need a measurable minimum build, not just a feather-edge application. Follow the specified minimum layer thickness and staging for multiple lifts.
Why? Thin applications can crack or delaminate under stress.
Cement-based products are usually compatible with most substrates but ensure the surface is clean, dry, and free of contaminants before applying.
Epoxy, polyurethane, and hybrid systems
Resin-based mortars can often be feathered thinner than cementitious products. However, strict surface preparation, correct mix ratios, and temperature control are crucial per technical data.
Why? Incorrect application can result in poor adhesion, reduced durability, or accelerated degradation.
Always follow the manufacturer’s guidelines for surface prep, mixing, application temperatures, and curing. Some systems may require specific safety measures like personal protective equipment (PPE).
Material Specifications and Standards That Determine Minimum Thickness
Key performance values that constrain minimum thickness include compressive strength, flexural strength, adhesion to substrate, shrinkage and cracking potential, and water absorption. These interact with substrate type and exposure conditions to guide your thickness decisions. Higher strength or better adhesion can reduce required thickness, while greater shrinkage or moisture exposure may require a thicker overlay.
Standards to consult include US references like ASTM C270/C1714 for mortars and repairs and ASTM D4541 for bond strength, plus EN 1504 for concrete repair products. Use these as a framework but defer to product data and local rules. A quick on-site checklist should address prep quality, expected loading, repair mortar type, exposure, and the minimum thickness indicated by the data sheets.
Compressive, Flexural, and Adhesion Strength Implications
Higher compressive and flexural strengths allow for thinner repair mortar sections. This is because stronger materials can withstand greater loads without failure.
Adhesion strength to the substrate is equally important. Better adhesion means the repair material can grip the substrate better, reducing the risk of delamination under stress or movement.
However, always match these strengths to your expected loading and movement conditions. Thinner sections might not be suitable for heavily loaded areas or where significant movement occurs.
Shrinkage, Thermal Movement, and Permeability
Products with higher shrinkage potential may need thicker sections to avoid cracking. This is because as the mortar dries and shrinks, it can pull away from the substrate or itself, causing cracks.
Similarly, greater permeability (or water absorption) might necessitate thicker overlays. This is to ensure the repair material doesn’t absorb too much moisture from its surroundings, leading to excessive shrinkage or deterioration.
Special admixtures can help mitigate these issues. But if in doubt, consult with a professional or the manufacturer’s recommendations for your specific product and conditions.
Relevant Standards and Test Methods to Reference
When setting minimum thickness, always refer to applicable standards. In the US, look at ASTM C270/C1714 for mortars and repairs, and ASTM D4541 for bond strength. For Europe/International, consult EN 1504 series for concrete repair products.
These standards provide guidelines on test methods to assess compressive/flexural strength, adhesion/bond strength, shrinkage, water absorption, etc. Conduct these tests on cured repair material samples to ensure your chosen product meets the required performance values.
Also, review the product’s technical data sheet. It should list test results that can help you make informed decisions about minimum thickness based on the specific product’s properties and expected conditions.
Mixing, Pot Life, and Application Variables That Affect Feather-Edge Success
Define precise mixing ratios and water/additive guidance for feather-edge mortars, noting any product-specific deviations and how small changes affect film thickness and bond. Follow the label for allowable variations and document any adjustments you make on-site. Keep mix consistency uniform across the repair area.
Pot life and working time vary with temperature and humidity, so pace your application accordingly to avoid early stiffening or tackiness. On-site variables like ambient and substrate temperature, moisture content, and air humidity influence feather-edge performance. Cleaning, dust control, and proper curing protocols also play a role in achieving a durable thin edge.
Mixing ratio and pot life considerations
Follow measured mix ratios to ensure optimal workability. Too much water can weaken the bond, while too little may cause cracking.
Pot life shortens as temperatures rise. Stir your mortar frequently to maintain consistency and prevent early stiffening.
Small changes in mix ratio or pot life can significantly impact film thickness and bond strength at ultra-thin sections.
Ambient and substrate temperature, and humidity
Cold conditions (<60°F/15°C) can slow curing, requiring thicker sections. Hotter temperatures (>80°F/27°C) may cause rapid stiffening or early drying.
High humidity (>85%) can extend tackiness time and promote mold growth. Consider using additives to improve water resistance in humid conditions.
Moisture content in the substrate should be minimal (<15%). Excess moisture can weaken bond strength and cause delamination.
Application technique and layer control
Use a trowel or squeegee to apply mortar, working it into the substrate. For feather-edge application, use a straight edge to create smooth, ultra-thin layers.
Spray application can provide better control over thin sections but requires proper equipment and technique.
Apply multiple lifts if necessary, allowing each layer to tack before applying the next. However, be mindful of extended open time and pot life at higher temperatures.
Tools, Materials Checklist and Visual Checkpoints
Ensure you have the essential hand tools (trowels, darbies, gauges), mixing equipment, and appropriate PPE ready before starting. List materials by product type and note required bonding agents or aggregates. Keep batch sizes manageable to maintain consistency.
For thickness checks, use visual cues and simple measurement methods like gauge sticks or straightedges. Outline the workflow from mix to cure, with clear passes to maintain uniformity. Be prepared to rework defects and follow cure indicators to confirm performance.
Tools and Materials Checklist
Before you start your feather-edge repair, ensure you have all the necessary tools and materials at hand. This will save you time and prevent delays.
- Gauges: Feather-edge gauges or wet-film gauges to monitor thickness (1/8″ – 3/16″ for most repairs).
- Trowels: Smooth trowel (6″-12″) and darby (10″-14″) for application and consolidation.
- Bonding primer: To improve adhesion, especially on smooth surfaces or when using thin repairs.
- Mixing equipment: Drill with paddle mixer, or mixing tub and shovel for small batches.
- PPE: Safety glasses, gloves, dust mask, and protective clothing (country-specific regulations may vary).
- Repair mortar: Choose the right product type based on your earlier calculations (see ‘Minimum Thickness Guidance by Product Type’).
- Additives: Polymer modifiers, accelerators, or retarders as per manufacturer’s instructions.
- Bonding agent: If required, to improve adhesion between old and new concrete.
- Aggregate: Check aggregate size is suitable for thin repairs (max. 3/8″ for feather-edge).
- Calibrated straightedge: To check levelness and detect high or low spots during application.
Quick rule: Always double-check your tools, materials, and PPE before starting. Missing something can lead to poor repairs or safety hazards.
Visual Checkpoints and Thickness Gauges
Regularly inspect your feather-edge repair during application and curing to ensure it’s within the desired thickness range and free of defects.
- Wet-film/feather gauge: Use this to measure thickness at multiple points. Aim for 1/8″ – 3/16″.
- Calibrated straightedge: Check levelness and detect high or low spots (tolerance: ±1/32″).
- Visual cues: Look for consistent color, texture, and sheen across the repair.
- Shrinkage: Watch for early signs of shrinkage cracks during curing.
- Cracking: Inspect for hairline or wider cracks, indicating insufficient thickness or poor consolidation.
- Adhesion gaps: Check for any visible gaps between the repair and the substrate, suggesting poor bonding.
- Pinholes: Look for small holes on the surface, indicating trapped air during application.
- Mounding: Inspect for areas where the mortar is thicker than desired, leading to uneven repairs.
Quick rule: Regular visual checks help catch issues early. Address any problems promptly to maintain repair quality.
Surface Preparation Checklist
A well-prepared surface is crucial for successful thin repairs. Follow this checklist before applying your feather-edge mortar.
- Clean substrate: Remove all dirt, dust, and loose material using a wire brush or vacuum.
- Sound substrate: Ensure the existing concrete is structurally sound with no major cracks or delamination.
- Remove contaminants: Use a degreaser if necessary to eliminate any oils or grease that could hinder adhesion.
- Pre-wetting/priming: Lightly wet or apply a bonding primer to the surface to improve mortar adhesion and prevent premature drying.
- Profile edges: Use a grinder or chisel to create a slight bevel at the edge of the repair area (45° – 60°).
- Remove laitance: If present, remove the weak, fuzzy layer from the surface using a wire brush or acid etching.
- Check moisture content: Ensure the substrate is dry enough for repair (moisture meter reading: < 4%).
- Tack-free surface: Allow any previously applied primer or sealer to become tack-free before proceeding with repairs.
Quick rule: Skipping surface preparation steps can lead to poor adhesion, premature failure of the repair, and increased risk of defects.
Shelf Life, Storage, Safety and Handling
Understand how shelf life affects workability and set behavior for feather-edge repairs. Learn to read lot codes or expiry marks and anticipate changes in performance as products age. Plan adjustments accordingly and avoid using clearly degraded material.
Store products in suitable conditions—temperature and humidity control, away from moisture and direct sun, kept sealed and off the floor. Degraded shelf life can shorten pot life and affect bond, so perform quick checks and follow recommended corrective actions or discard criteria as needed.
Shelf Life and Recommended Storage Conditions
Check the product label for its shelf life. Most feather-edge repair mortars have a lifespan of around 6 to 12 months from manufacture.
Store materials in dry, temperature-controlled conditions:
- Ideal temperature: between 50°F (10°C) and 80°F (27°C)
- Relative humidity: below 70%
Keep containers sealed, off the floor, and rotate stock to use oldest first. Direct sunlight and moisture can degrade products.
PPE, Ventilation and Safe Handling
Wear appropriate personal protective equipment (PPE): gloves, eye protection, and a respirator where silica is present.
For cementitious mortars:
- Use a Type P100 respirator with organic vapor cartridges
- Avoid dust generation; wet down surfaces before mixing
For resin-based mortars:
- Wear chemical-resistant gloves and eye protection
- Ventilate the area; use fans or open windows
Waste, Disposal and Cleanup
Clean up spills immediately using damp rags or mops. Do not use water alone as it may cause the material to harden.
Proper disposal:
- Dry waste: treat as hazardous waste; follow local regulations for disposal
- Wet waste: allow it to cure, then dispose of in regular trash (check local rules)
Leftover materials should be stored properly or disposed of responsibly. Always check local guidelines for safe disposal.
Planning, Cost Estimation, Warranties and Available Support
Set a budget framework that accounts for feather-edge thickness by product type, waste factors, and labor. Use it to guide decisions and prevent surprise costs during repairs. Keep notes on unit pricing and coverage expectations for comparison.
Check warranty coverage specifics and what documentation is required. Identify support channels such as manufacturer tech help, local distributors, and training opportunities. Plan procurement with lead times and regional price variations in mind, including policies on returns or substitutions.
Cost comparison and estimating material needs
The materials you choose for your feather-edge repair will greatly impact the final result. Here are key factors to consider when comparing costs and estimating material quantities.
- Product Type: Different products have varying unit prices, coverage, and performance characteristics. For instance, polymer-modified cement-based mortars offer superior bond strength but come at a higher cost than standard repair mortars.
- Number of Lifts: Feather-edge repairs often require multiple thin lifts. Estimate conservatively to account for waste and overapplication. Remember, it’s easier to add another lift than to fix a weak bond caused by applying too thickly.
- Labor Skill: Experienced applicators can achieve better results with less material. Factor in labor costs when comparing products.
- Avoid Cheap Materials: Low-cost materials may seem attractive, but they often lead to problems like cracking, staining, or weak bond strength. Always check product specifications and ratings before making a decision.
- Consider Admixtures: Some products require admixtures for specific applications. Factor in these additional costs when comparing products.
Warranties, local availability and “national strength/local touch”
Understanding warranties is crucial when choosing a feather-edge repair product. Most manufacturers offer warranties on their products, but coverage varies.
Typical warranty considerations include the duration of coverage, what’s covered (e.g., cracking, delamination), and any exclusions (like improper application or substrate failure). Always check the fine print.
To confirm local product availability and warranty coverage, contact your nearest distributor or manufacturer’s representative. They can provide up-to-date information and help you navigate any regional variations in product offerings or warranties.
Involving a manufacturer’s technical rep early on can also be beneficial. They can provide job-specific guidance, ensure the chosen product is suitable for your project, and help troubleshoot any issues that may arise during application.
Expert advice and contact options
Don’t hesitate to reach out to experts when planning your feather-edge repair. They can provide invaluable guidance tailored to your specific project.
Manufacturer Technical Support: Most manufacturers offer toll-free technical support lines. Their experts can help you choose the right product, understand application techniques, and troubleshoot any issues that arise during the repair process.
Local Sales Reps: Contacting your local sales representative can also be beneficial. They know the regional market well and can provide insights into which products work best in your area’s specific conditions.
Certified Applicators: For complex repairs, consider hiring a certified applicator. They have undergone specialized training and can ensure your repair is done right the first time. Many manufacturers offer lists of certified applicators on their websites.
Common Mistakes, Troubleshooting and Long-Term Maintenance
Identify common causes of feather-edge failures, including not meeting the stated minimum thickness, inadequate surface prep, improper mixing or curing, and substrate movement. Map these to simple DIY-friendly troubleshooting steps you can follow on site.
Establish a practical diagnostic workflow and product-type specific remediation paths for fixes. Outline a safe, repeatable method for reapplication, including priming if needed and cure strategies. End with a simple maintenance plan and inspection schedule to catch issues early.
Common application mistakes and quick fixes
To ensure a successful feather-edge repair, avoid these common pitfalls.
- Insufficient surface preparation: Skipping this step can lead to poor adhesion. Solution: Always follow the surface prep checklist.
- Wrong mix ratio: Incorrect proportions can weaken the mortar. Solution: Double-check your materials and follow the manufacturer’s guidelines.
- Using high-shrink products too thinly: This can cause cracking. Solution: Always apply these products at their minimum recommended thickness.
- Not allowing proper cure time: Rushing this step can compromise the repair. Solution: Follow the cure plan and be patient.
Addressing these issues promptly will save you rework and ensure a lasting repair.
Troubleshooting performance issues
If your feather-edge repair isn’t performing as expected, follow these diagnostic steps to identify the problem.
Delamination: Check for moisture or substrate incompatibility. Use a moisture meter and perform a compatibility test. If the issue persists, consult lab analysis.
Cracking: Inspect for over-thickness or substrate instability. Use a thickness gauge and check for substrate movement. If the cause isn’t clear, perform test patches.
Poor bond: Assess the cure status. Check for signs of incomplete curing like a tacky surface or flexibility. If unsure, perform a cure test. If the problem persists, consider consulting an expert.
Inspection schedule and maintenance tips
Regular inspections and maintenance will extend the service life of your feather-edge repairs. Use this checklist to keep your repairs in top shape.
- Visual inspection: Check for cracks, delamination, or other signs of distress every 3-6 months.
- Moisture content check: Test for excess moisture annually using a moisture meter. Excessive moisture can cause damage over time.
- Substrate stability check: Inspect for signs of substrate movement or instability every 6-12 months. Address any issues promptly to prevent further damage.
- Sealant application: Apply sealants as needed to protect the repair from water intrusion and other environmental factors.
- Patching touch-ups: Perform minor repairs as needed to maintain the integrity of the feather-edge repair. Follow the re-application procedure for best results.
- Cure and regeneration plan review: Revisit the cure plan annually to ensure optimal cure conditions are maintained.
- Record keeping: Keep detailed records of all repairs, including dates, materials used, and any issues encountered. This will help with future maintenance and troubleshooting.
Quick rule: Inspect your feather-edge repairs regularly to catch potential problems early and extend their service life.
Conclusion
Get this right and you’ll have a repair that looks good, holds up, and won’t pop apart later. The core rule is to respect the product’s minimum feather-edge thickness and follow safe handling every step of the way.
Apply this as a simple, repeatable process: verify the product’s minimum thickness for your mix, test a small area first, mix exactly as the label directs and within pot life, set the feather-edge to the recommended thickness, work in the correct temperature and humidity window, pace your work to avoid over-wetting, and protect the cured area from moisture and damage until it’s fully set. If you can’t confirm any of those details, pause and check the manufacturer’s data before proceeding.
Common mistakes to avoid are over-thinning or overloading the mix, skipping a trial patch, and guessing at thickness or cure time. Always wear proper PPE, keep the work area well ventilated, and plan for safe cleanup and storage of leftovers. If the job involves critical joints, unknown surfaces, or you’re unsure about the product’s compatibility with the substrate, call a pro instead of pushing on. Stay disciplined, test first, and you’ll finish with a durable repair that lasts.
FAQ
What is the feather-edge thickness guideline for repair mortars, and how should I interpret it for my project?
Feather-edge thickness is about how thin the repair layer can be while still sticking to the surface. Check the product label or datasheet for the minimum recommended thickness. If you’re unsure, contact the manufacturer or your local supplier to confirm before proceeding.
How do product specifications affect minimum feather-edge thickness?
Different repair mortars specify different minimums in their instructions. Always read the exact product instructions and look for the stated minimum thickness, then plan your application around what it allows. Do not guess between products—use the datasheet as your guide.
What about warranties on feather-edge repairs—what should I verify?
Warranties often rely on applying the product within its recommended thickness, curing method, and conditions. Check the warranty language for any thickness or curing requirements, and document the job with notes and photos. If a question comes up, ask the manufacturer or distributor for written guidance before proceeding.
What application conditions impact feather-edge success?
Surface prep, moisture, temperature, and cure time all matter. If conditions aren’t within the product’s stated range, the minimum thickness guidance can change or the repair might fail. Verify conditions from the label and plan to adjust or delay if needed.