
Introduction
Budget friendly concrete forms are temporary structures that shape poured concrete while keeping costs low. They rely on simple materials, careful setup, and reuse where possible to save money. This guide covers common causes of form problems, quick checks you can do, and practical fixes you can try.
Forms fail for simple reasons like moisture, movement, or poor bracing. You’ll learn quick checks you can do with basic tools, and practical fixes you can try on the job site. If you see a spec or rule from a manufacturer or local code that differs, check it before proceeding.
Key takeaways
- Plan budget, select compliant forms, and confirm local codes before setup.
- Check for warp, edge misalignment, or loose stakes prior to pouring.
- Use tight, reinforced ties and release plan to prevent leaks and bulges.
- Cure forms with concrete and avoid rapid stripping to prevent cracks.
- Do a DIY-friendly test with a small mock pour to diagnose performance.
- Source affordable, code-compliant materials; verify labels and manufacturer instructions; wear safety gear.
Table of Contents
- Introduction
- Key takeaways
- Common Causes of Problems with Budget Concrete Forms
- Visual Checkpoints and Inspection Checklist
- DIY-Friendly Tests to Diagnose Form Performance
- Fixes and Cost-Effective Improvements for Common Failures
- Material Specs, Safe Ranges, and Sourcing Tips
- Step-by-Step Affordable Form-Building Workflows
- Curing, Stripping, and Finishing Without Costly Mistakes
- When to Upgrade from Budget Forms or Call a Pro
- Conclusion
- FAQ
Common Causes of Problems with Budget Concrete Forms
Form failures and rough finishes usually start with the basics. Cheap or reused panels can bow or warp, throwing alignment off. Missing or weak bracing allows movement when concrete loads settle, which leads to leaks and misalignment.
Other frequent culprits are shortcuts like skipping proper sealing at joints, using inadequate support for tall or long spans, and not accounting for moisture in the substrate. Pay attention to condition of fasteners, hinges, and ties, as loose hardware is a common source of trouble on budget builds.
Material-related causes
Choosing the wrong materials for your concrete forms can lead to leaks, bowing, and even collapse. Here are some common issues:
- Thin plywood: Thin sheets bend under pressure, causing uneven surfaces and potential leaks.
- Warped boards: Warped forms create weak spots where concrete can leak or seep through.
- Low-grade fasteners: Cheap nails and screws pop out easily, leading to form failure and poor finishes.
- Inadequate reinforcing materials: Skimping on rebar or mesh weakens the final structure, increasing risk of cracking and damage.
- Low-quality concrete mix: A weak mix doesn’t set properly, resulting in a poor finish and potential structural issues.
Design and preparation causes
Poorly designed or prepared forms can lead to major problems. Ensure your forms are:
Properly braced to prevent bowing and collapse during pouring.
Adequately tied together to maintain form integrity under pressure.
Cut to the correct geometry for your desired final shape, with proper angles and dimensions.
The site should be well-prepared, level and stable to support the forms without shifting.
Installation and operational causes
Mistakes during pouring, vibration, and stripping can damage both your forms and the final casting. Keep these tips in mind:
Pour evenly to avoid overstressing one part of the form.
Vibrate properly to remove air bubbles without damaging the formwork.
Allow sufficient curing time before stripping forms to prevent damage and ensure a strong bond.
Distribute loads evenly during pouring to avoid overstressing any one part of the form.
Visual Checkpoints and Inspection Checklist
Before any pour, inspect all form surfaces for obvious damage, splinters, or loose panels. Look for gaps between panels or at corners that can trap concrete or create honeycombing. Ensure bracing and studs are straight and firmly anchored to resist movement.
Check for uneven top surfaces, sagging sections, or any signs of movement since the last setup. Look at joints and fasteners for tightness, and verify that there are no deformities that could transfer to the finished pour.
Pre-pour checklist
Before you start pouring, ensure your forms are in top shape to prevent leaks and deformation.
- Check alignment: Use a level or laser level to ensure forms are straight. Misaligned forms can cause cracks and uneven surfaces.
- Verify level: Ensure the base of your form is level. An unlevel base can lead to a sloped, unusable surface.
- Inspect bracing: Check that braces are secure and evenly spaced. Inadequate bracing can cause bulging or collapse during pouring.
- Check tie placement: Ensure ties are properly placed and accessible for removal after curing. Missing or incorrectly placed ties can weaken the structure.
- Examine seal integrity: Inspect seams, corners, and joints for gaps or cracks that could cause leaks.
- Check form material: Ensure forms are in good condition with no major defects. Damaged forms can transfer imperfections to the concrete.
- Inspect base preparation: Check that the base is clean, dry, and free of debris. A poor base can cause settling or cracking over time.
- Verify form height: Ensure forms are at the correct height for your desired slab thickness. Incorrect height can lead to an improperly thickened slab.
Quick rule: Always double-check your forms before pouring. A few minutes of inspection can save hours of rework.
Mid-pour and post-pour checkpoints
Monitoring during and after the pour ensures a successful concrete job.
- Watch for bulging: Keep an eye out for any bulges in your forms. Bulging indicates inadequate bracing or excessive pressure from the concrete.
- Check for seepage: Inspect form joints and seams during the pour. Seepage can indicate a problem with your form’s seal or bracing.
- Monitor curing environment: Ensure temperature and humidity are within acceptable ranges (50-80°F, 40-70% RH) for proper curing.
- Check concrete finish: Inspect the surface of your concrete. A rough or uneven finish can indicate problems with form release agents or finishing techniques.
- Verify form removal timing: Allow forms to remain in place until the concrete has gained sufficient strength (usually 24-72 hours). Removing forms too early can cause cracking or deformation.
- Inspect cured surface: After removing forms, check for any signs of damage, such as cracks, chips, or discoloration.
- Check slab level: Use a level to ensure your slab is still level after form removal. Settling can occur if the base was not properly prepared.
Quick rule: Regularly inspecting your concrete during and after pouring helps catch potential issues early, saving you time and money in the long run.
DIY-Friendly Tests to Diagnose Form Performance
Run a light, hands-on check by pressing on panel panels and corners to see if anything flexes. A simple straight-edge or string line can reveal bowing or misalignment before you pour. Listen for any creaks that might indicate loose bracing or weak ties.
Test for leaks with a small, controlled moisture check along the base and joints. Check for gaps under edges by inspecting if the concrete would escape when you lightly press on the form. Verify that the form holds its shape when you apply light pressure along lengths and corners.
Water test for leaks and seam integrity
Before you pour, give your forms a quick water test to check for leaks. Fill a garden hose with water and spray along the seams and joints.
Look for any water escaping through gaps or cracks. If you find leaks, mark them with tape or chalk. Small leaks can be patched with form release agent or caulk before pouring.
Remember: Even small leaks can cause major issues during the pour and affect your final slab’s strength.
Load and stiffness checks
To test your form’s bracing and panel stiffness, apply some spot loads. Use temporary supports like 2x4s or 4x4s to create a makeshift beam across the forms.
Gently place weights (like sandbags or water-filled jugs) on top of these supports. Watch for any deflection or movement in the forms. If they flex too much, you may need additional bracing or temporary supports.
Safety first: Never apply loads that could cause your forms to collapse. Start light and gradually increase as needed.
Mock-pour and sample section
Before committing to a full pour, consider doing a mock-pour or pouring a small sample section. This helps validate your form behavior and gives you an idea of the final finish.
Mix up a small batch of concrete and pour it into a corner or small section of your forms. Let it cure, then remove the forms to see how it looks. If there are any issues with the surface or edges, you can address them before the main pour.
Tip: This step also helps you fine-tune your concrete mixing and pouring process for the full pour.
Fixes and Cost-Effective Improvements for Common Failures
Replace or reinforce torn or bowed panels with stiffer boards or add back bracing to restore alignment. Tighten or relocate loose ties and add diagonal supports where needed to reduce racking. Seal obvious gaps at joints with appropriate sealant or backer material as a temporary measure.
Improve finish quality by adding clean, appropriate spacers at corners and ensuring consistent edge supports. If you see seepage, address the most vulnerable joints first and consider additional bracing or a temporary dam as a low-cost stopgap.
Sealing and gap fixes
Budget-friendly concrete forms can spring leaks at seams, costing you extra concrete. Seal them up tight with these simple methods.
Use caulk for small gaps between form boards. Apply it in a smooth bead along the seam, then press the boards together to create a good seal.
For larger gaps or cracks, use duct tape. Press it firmly into place, overlapping the edges of the gap by at least an inch.
If you’ve got a big gap, try using thin scrap wood. Cut it to size, wedge it into the gap, and secure it with nails or screws. This will keep your concrete from leaking out.
Reinforcing and bracing solutions
Floppy forms lead to poor concrete finish. Here’s how to brace them on a budget.
Drive stakes into the ground every 2-3 feet along the bottom of your form. This keeps it from shifting during pouring and vibrating.
Add extra studding or cross-bracing to your forms where they need extra support. Reuse old materials if you can, like leftover 2x4s or scraps of plywood.
Brace forms at corners and any points where the form changes direction. This helps distribute pressure evenly and keeps your forms from bulging out.
Fastener and tie alternatives
Expensive fasteners don’t have to be your only option. Here are some budget-friendly solutions.
Use rebar ties for securing form boards together. They’re cheap, easy to use, and can be reused if you bend them back carefully after pouring.
For heavier duty applications, try making your own DIY tie system. Drill holes in the form boards, then insert rebar or bolts through them. Secure with nuts and washers.
Know your load limits though. DIY ties might not be strong enough for large pours. Always test your setup before pouring to make sure it’s secure.
Material Specs, Safe Ranges, and Sourcing Tips
When choosing panels, verify the plywood or OSB condition and how it will interface with the pour. Check that supports, studs, and ties are appropriate for the span and load you expect, and confirm the recommended spacing with the manufacturer or supplier. Look for labeled safety and usage guidance on all components you plan to reuse.
Always cross-check any quantity estimates with the product label or data sheet, and follow local rules or job site requirements for form materials. If in doubt, compare options based on durability, moisture resistance, and compatibility with your concrete mix and project type.
Recommended minimal material specs
The materials you use for your concrete forms directly impact the final result. Cheap doesn’t always mean good.
- Plywood thickness: 1/2″ to 3/4″. Thinner can warp, thicker is overkill. Look for ‘CD’ or ‘C-D’ rating. Avoid plywood with voids or delamination.
- Stud spacing: 16″ on center (OC). Wider spacing can cause form deflection. Use 2x4s for strength and rigidity.
- Tie spacing: 8″ OC at the bottom, 12″ OC above. Closer ties prevent bulging. Use rebar or wire ties rated for your pour size.
- Form release agent: Use a suitable agent to prevent bond and make stripping easier. Don’t skip this step.
- Hardware: Use proper screws, nails, or staples. Cheap hardware can fail, causing leaks or form collapse.
Where to buy budget materials safely
Sourcing materials wisely can save you money without compromising quality. Here’s how:
- Salvage yards: Find reclaimed wood for cheap. Inspect for warping, rot, or contaminants. Avoid if unsure.
- Reclaimed wood suppliers: Buy from reputable sources. They often have graded materials. Check ratings before buying.
- Rental options: Rent forms for a small fee. It’s cheaper than buying new. Ensure they’re in good condition.
- Avoid hidden costs: Warped or contaminated wood can cause leaks, staining, or weak bond. Inspect before use.
- Buy used hardware: Purchase used screws, nails, etc., from hardware stores or online. Ensure they’re in good working order.
Step-by-Step Affordable Form-Building Workflows
Plan your setup with a simple layout and cut panels to size before bringing them to the job. Assemble and square the forms on a clean, level base, then brace firmly at corners and along long spans. Double-check alignment and hold fasteners before starting any pour.
Install edge supports and ensure an even surface for the pour with consistent heights. Keep tools ready for quick adjustments, and maintain a clear path for concrete to flow without interruptions. Finish the workflow with a final check for any gaps or movement that could affect the pour quality.
Step-by-Step Process
This step-by-step guide walks you through affordable form-building workflows, ensuring safety and a quality final finish.
- Preparation: Check weather, gather materials (forms, ties, rebar, concrete), and ensure a safe work area. Safety first, wear appropriate gear.
- Layout: Mark out dimensions accurately using stakes and strings. Square corners with a 3-4-5 triangle method.
- Base Preparation: Compact soil using a plate compactor to prevent settling. Add a layer of gravel for drainage if needed.
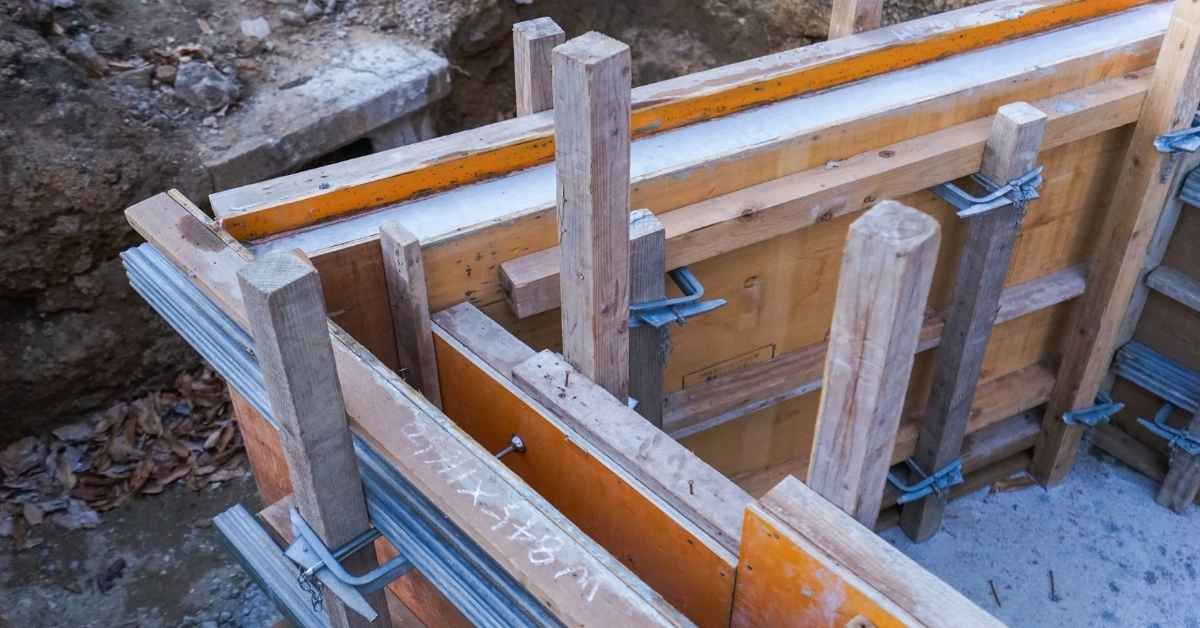
- Form Assembly: Assemble forms, ensuring they’re level and plumb. Use shims as necessary. Secure with ties or clamps every 16-24 inches.
- Bracing: Braces should be at right angles to the form face. Use 2x4s or 2x6s, spacing them every 4 feet. Tighten braces securely.
- Rebar Placement (if applicable): Place rebar as per your plans. Ensure it’s centered and properly supported.
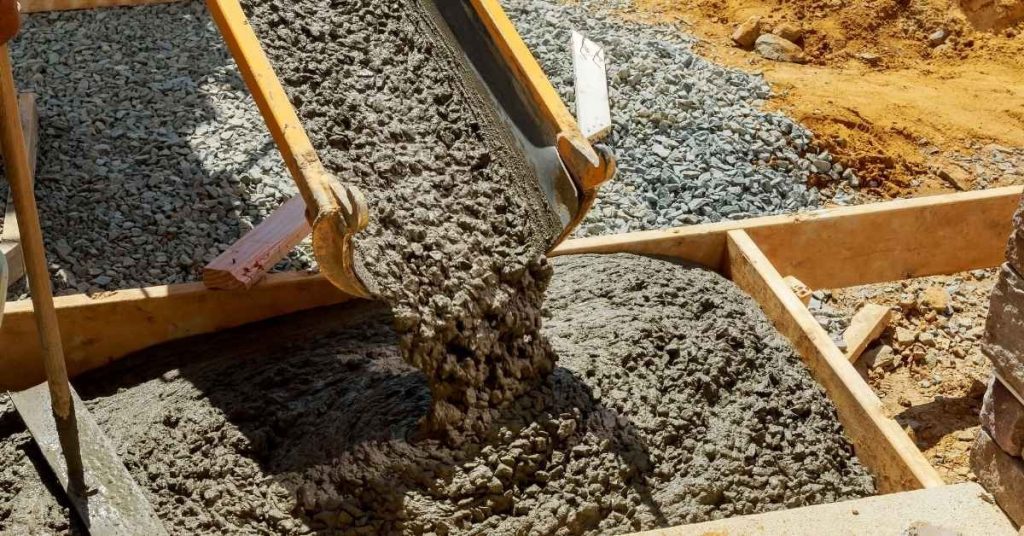
- Main Pour: Pour concrete from one corner, working towards the opposite. Use a shovel or rake to spread and consolidate. Vibrate with an immersion vibrator if available.
- Finishing: Strike off excess concrete, then use a bull float to smooth the surface. Allow it to cure before removing forms.
- Cleanup/Final Checks: Remove forms after 24-72 hours (depending on weather). Inspect your work for any issues and address immediately.
Building forms for a small slab
Creating affordable forms for a small slab involves careful layout, base preparation, and efficient use of materials. Here’s how:
Start by laying out the slab dimensions using stakes and strings. Ensure corners are square.
Compact the soil beneath, then add a layer of gravel for drainage if needed. Assemble your forms (plywood or OSB), securing them with screws or nails every 6-8 inches.
Brace the forms using 2x4s at right angles to the form face, spacing them every 3 feet. Pour concrete from one corner, working towards the opposite. Use a shovel or rake to spread and consolidate.
Footing and pier form workflow
Forming footings and piers affordably involves careful planning, proper bracing, and efficient material use. Here’s a practical workflow:
First, lay out your footings or piers using stakes and strings. Ensure they’re square and level.
Excavate to the required depth, then compact the soil. Add any necessary gravel base. Assemble your forms (plywood or OSB), securing them with screws or nails every 6-8 inches.
Brace the forms using 2x4s at right angles to the form face, spacing them every 2 feet. Place rebar as per your plans, ensuring it’s centered and properly supported. Pour concrete from one corner, working towards the opposite. Use a shovel or rake to spread and consolidate.
Curing, Stripping, and Finishing Without Costly Mistakes
Follow basic curing practices that suit your climate and project size, keeping the concrete moist as needed without overwatering nearby surfaces. Plan stripping after set time dictated by the product and conditions, and inspect for any early signs of edge damage during removal.
Address minor surface defects promptly to avoid rework, such as feathered edges or small voids, using appropriate patching methods after form removal. Document and adjust next pours to prevent repeat issues and maximize your budget savings.
Curing best practices for budget projects
Proper curing is crucial to prevent cracking and ensure long-lasting concrete. Here are some low-cost methods:
Covers: Use plastic sheets or tarps to cover the concrete at night or during hot, dry periods. Secure them with weights or stakes.
Wet burlap: Soak burlap in water and lay it over the concrete. Keep it wet for the first 7 days. This method is especially effective in windy conditions.
Curing compounds: Apply a thin layer of curing compound after initial set. It seals the surface, preventing moisture loss and protecting against damage from sunlight and rain.
Timing varies by climate:
- Hot, dry: Keep covered for 3-7 days
- Cold: Keep covered until concrete reaches 50°F (10°C)
- Moderate: Keep covered for 3-5 days
Safe stripping and post-strip fixes
Removing forms too early can cause concrete to crack. Here’s how to know when it’s safe:
Concrete is ready for form removal when it has gained sufficient strength, typically after 24-72 hours depending on mix design and weather conditions. Check with your local building department for specific guidelines.
After stripping, inspect the surface for any blemishes or imperfections. Here are simple fixes:
Pop-outs: These are small, hollow spots caused by air bubbles. Fill them with a concrete patching compound and smooth with a trowel.
Skim coat: For minor surface irregularities, apply a thin layer of cement-based skim coat. Screed it flat and smooth using a straight edge.
When to Upgrade from Budget Forms or Call a Pro
Consider upgrading if the project scale, complexity, or risk factors exceed what budget forms can safely handle. Look at stability requirements, long runs, or tight tolerances where professional-grade forms or a pro’s experience may save time and rework. If in doubt, verify with a local contractor or code guidance before proceeding.
For small, simple projects with straightforward pours and accessible sites, budget forms can work, but know your limits. Use professional help when precision, safety, or liability concerns outweigh the cost of a mistake.
Risk indicators and project complexity triggers
Budget forms are great for small, simple projects. But watch out for these red flags:
Large pours: More concrete means more weight. Budget forms might not handle it.
High walls: Taller forms need better support. DIY might not cut it.
Structural elements: Beams, columns, and foundations need solid forms. Don’t skimp here.
Difficult access: If you can’t easily reach your forms to brace them properly, consider hiring help.
Cost vs. safety decision guide
It’s tempting to go for the cheapest option, but consider this:
Safety first: cheaper isn’t always better. If forms fail, you could face costly repairs or even injuries.
Legal implications: DIY gone wrong can lead to legal trouble. Know your limits and when to call a pro.
Long-term costs: Cheap forms might need frequent replacement. Investing in better ones upfront could save you money in the long run.
Weigh these factors against your budget. Sometimes, spending a bit more ensures a solid, safe job done right.
Conclusion
Stay focused on safety, durability, and neat appearance. With budget forms, careful checks and disciplined workflow protect your investment and your project from costly rework.
Do a quick, practical check in this order: verify form tightness and alignment, confirm supports and bracing are solid, inspect joints for gaps or seepage, run a simple leak test if feasible, review material specs and safe ranges, plan curing and stripping steps, and finish with a final look for clean edges. Act on each step before you pour, and test small sections if you’re unsure.
Common mistakes to avoid are skipping proper bracing, over-tightening fasteners that bow the panels, and ignoring curing or stripping timing. Use basic safety rules: wear eye and hand protection, keep the workspace clear, and never work over wet concrete or when forms are unstable. If anything feels uncertain or out of spec, pause and reassess rather than pushing forward.
When the project starts to push beyond a budget setup—if forms crack, leak, or don’t hold shape under load, or if you’re unsure about material specs or safe ranges—calling a pro makes sense. Otherwise, follow the checks, test small areas, and proceed with measured, confident steps. Stay deliberate, stay safe, and you’ll finish strong without surprises.
FAQ
How do I spot bowing or flex in budget forms during setup?
Check for visible bends in panels and doors that don’t sit flat against the quick stakes. Run a straightedge along the edges and look for gaps that open as you tighten ties. If anything looks off, don’t pour until it’s true and snug.
What quick tests can I run to check form stiffness before pouring?
Set stakes and braces as you would for concrete loading. Push and pull on corners and mid-span to feel for movement, then tighten or add bracing where you detect wobble. If the form shifts, fix it first or it’ll show in the pour.
How can I fix minor gaps or leaks without buying fancy stuff?
Apply extra seal along joints with the simplest approved material, then resecure edges and recheck for leaks. Reusing clean, coated panels can help seal gaps where possible. If leaks persist, consider thicker bracing or adjusting the form alignment.
When should I consider upgrading from budget forms or calling a pro?
If you repeatedly fight with misalignment, excessive movement, or edge imperfections, it’s time to reassess. For critical pours or large spans, a pro can ensure accuracy and save time in the long run. Always weigh the risk of DIY fixes against potential waste.