
Introduction
Joint compound is a gypsum-based finishing material used to coat, fill, and smooth drywall joints. It’s spread over seams and screws, then sanded for a seamless finish. Choosing the right one depends on the job and your working conditions.
Common types include all-purpose, lightweight, and paper tape joint compounds, each with its own feel for taping and floating. When you’re applying, you’ll mainly deal with taping seams and building up layers for a smooth surface, then finish with a final skim coat. Drying and sanding times vary by product and environment, so always check the label and follow good sanding practices to avoid gouges or dust.
Key takeaways
- Choose all-purpose for general repairs; lightweight compounds reduce feathering and dust.
- Apply tape and feather edges before it sets to minimize sanding.
- Follow manufacturer instructions for drying times; sanding should be smooth without gouges.
- Use proper ventilation and dust mask during sanding and cleanup.
- Match texture and paint prep by testing compound on scrap or hidden area.
- Store unused joint compound sealed and off the floor to prevent drying.
Table of Contents
- Introduction
- Key takeaways
- What Is Joint Compound and When to Use It
- Types of Joint Compound and Their Pros/Cons
- How to Choose the Right Compound for Your Project
- Tools and Materials Checklist
- Application Techniques — Step-by-Step Guide
- Mixing, Drying, and Storing Joint Compound
- Texture Effects, Paint Prep, and Matching Finishes
- Safety, Environmental Impact, Cost Considerations, and Pro Tips
- Conclusion
- FAQ
What Is Joint Compound and When to Use It
Joint compound is the ready-made mud you use to seal drywall seams, cover screw and nail dimples, and create a smooth base for paint or wallpaper. It comes in different forms, from ready-mix tubs to powder that you mix yourself, and in all-purpose or setting-type varieties. It differs from spackle, which is typically for small patches, and from traditional plaster, which is a different material and application approach. For DIY projects, consider how moisture, drying time, and workability will affect your workflow.
In normal drywall work, the compound’s main jobs are to fill seams between sheets, hide fastener dimples, and build a base for skim coats. Use it as a thin, even layer to avoid ridges. Plan a simple sequence: prep and tape, apply thin coats with a mud knife, let dry, sand between coats, and finish with a final skim or light sanding for a seamless surface.
Composition and basic types
Joint compound, also known as drywall mud, is a mix of fine gypsum powder and binders. It comes in two main forms: ready-mix and powder.
Ready-mix is pre-blended with water, offering convenience but less workability. Powder, on the other hand, needs mixing at home, providing more control over consistency.
The binders and additives in joint compound affect its handling and performance. Some compounds are designed to dry quickly while others offer longer open times for larger projects.
Joint compound vs. spackle vs. plaster
Understanding the differences between these materials helps you choose the right one for your project.
Spackle is ideal for small repairs like nail holes or minor cracks. It dries quickly and sands easily but isn’t suitable for filling large gaps or seams.
Plaster is an older method used for walls and ceilings, offering a traditional look. However, it’s messier, takes longer to dry, and requires more skill to apply evenly.
Joint compound, designed specifically for drywall work, fills seams, covers screw dimples, and creates smooth finishes. It comes in all-purpose (drying-type) and setting-type varieties, each with its own advantages depending on your project’s needs.
Types of Joint Compound and Their Pros/Cons
This section covers the four main categories you’ll encounter: premixed all-purpose, lightweight, topping or finish, and setting-type powder. Each type has its own feel for workability, sanding, and typical install use cases. Look for guidance on open time, mud thickness, and how easy it is to sand when reviewing product labels or manufacturer instructions. Don’t rely on memory alone; check the data on the container or the manufacturer data sheet.
Consider how shrinkage, cure time, dust, and odor affect finish quality on walls, ceilings, or irregular surfaces. For high-traffic rooms or moisture-prone areas, weigh options for durability and surface texture. A quick decision guide can help you match project type to the right category, with notes on compatibility with primers and paints and how it interacts with existing textures.
Premixed all-purpose and lightweight compounds
Premixed all-purpose joint compound is a convenient choice for most DIY projects. It’s ready to use right out of the bucket, saving you time and mess. It’s great for basic repairs, taping, and skim coating.
Lightweight blends are perfect when you need to reduce sanding and fatigue. They’re easier to work with and produce less dust. But remember, they can be a bit trickier to handle – keep them from drying out too quickly.
Topping/finish compounds
Topping compounds are your go-to for final coats. They’re designed to provide a smooth, seamless finish. Use them when you need to feather out edges or blend into existing drywall texture.
They pair best with other compounds – use them over all-purpose or lightweight blends after the initial sanding and repairs. But keep in mind, they can be a bit more sensitive to moisture and may require longer drying times.
Setting-type (powder) compounds
Setting-type powders offer speed and strength. They set quickly, allowing you to move on to sanding and painting faster. Plus, they’re great for heavy-duty repairs where you need extra strength.
But remember, you’ll need to mix them to the right consistency – too thick or thin can cause issues. And keep an eye on working time – once mixed, you’ve got a limited window before it starts setting.
How to Choose the Right Compound for Your Project
Begin by evaluating the project scope and substrate to decide between lightweight ready-mix and setting-type products. Consider the environment and how long you can work before the surface locks up. Align your choice with your texture and finish goals, planning for feathered transitions and the number of coats needed to achieve a smooth look. Always verify manufacturer recommendations and product data sheets if you’re unsure about performance in your space.
Plan for speed, skill level, and environmental constraints as you map out the job. Think about dust control, staged work, and how many passes you’ll need to reach the desired result. Budget considerations matter too, so compare material costs with expected yield and any primers or sealers that might be required for good adhesion.
Step-by-Step Process
Follow these practical steps to choose the right joint compound for your project, ensuring a smooth and efficient process.
- Assess your project’s scope: small patches or full drywall finishing?
- Consider substrate type: gypsum board, plaster, or concrete. Check if it’s compatible with the compound you’re considering.
- Evaluate environmental conditions: temperature, humidity, and potential outdoor exposure may affect setting time and working window.
- Check manufacturer recommendations on product data sheets (and SDS) for compatibility with paints, finishes, tools, and warranty coverage. Note any special surface prep or priming requirements.
- Plan your workflow: estimate total curing time, number of passes, dust-control needs, and whether you’ll work in stages due to self-levelling behavior or access issues.
Small repairs vs. full drywall finishing
For small repairs, opt for lightweight, ready-mix compounds that are easy to apply and sand. They’re great for quick fixes like nail pops or small cracks.
However, for full drywall finishing, you’ll need multi-coat systems consisting of setting-type compounds. These provide better coverage and allow for feathered transitions and texture matching.
Remember, full finishing requires more skill, time, and material. Plan accordingly to achieve a seamless, professional-looking result.
Speed, working time, and curing needs
Premixed compounds offer quick application but have shorter working windows. They’re ideal for small jobs or when speed is crucial.
Setting-type compounds, on the other hand, require mixing but provide longer working times. This makes them perfect for larger projects or multi-person teams, allowing more time to apply and smooth out the compound before it sets.
Consider your project’s size, available time, and weather conditions when choosing between these two types. Always check the manufacturer’s recommended application temperature range to ensure optimal performance.
Matching texture and finish expectations
To achieve a seamless repair, choose a compound that sands and textures well. This is crucial for matching the existing wall’s finish, whether it’s smooth, textured, or somewhere in between.
For smooth finishes, opt for all-purpose or topping compounds that provide a fine texture and easy sanding. For textured surfaces, consider setting-type compounds designed for texture matching, ensuring they can replicate the desired texture when rolled or sprayed on.
Always test your chosen compound in an inconspicuous area first to ensure it matches the existing finish before proceeding with the full repair.
Tools and Materials Checklist
Core tool categories include knives, taping tools, a hawk and pan, mixing gear, and sanding tools. Each tool has a clear role: knives shape and feather, taping tools embed and smooth, and sanding tools finish the surface. Keep a range of sizes handy to adapt to different joints and edges as you work. You’ll also want to have a plan for storing and cleaning these items between tasks.
Essential consumables encompass the joint compound itself, mesh or paper joint tape, patching compounds, bonding agents, and optional additives. Use these with guidance from the product label and your project needs. Add helpful accessories like corner tools, a pole sander, and dust-control options to speed up corners, seams, and edges while keeping the work area cleaner.
Essential hand tools and mixing gear
Before starting any concrete work, ensure you have the right tools. Use this checklist to verify your equipment.
- Trowel (4″ – 12″): Check for straight edges and no bends. A bent trowel causes uneven surfaces.
- Margin Trowel (6″ – 8″): Ensure it’s straight and not warped to create smooth edges.
- Float (4′ x 8′): Inspect for flatness. A warped float leads to rough surfaces.
- Edging Trowel (1″ – 3″): Verify it’s straight and narrow enough for precise work.
- Concrete Knife (4″ – 6″): Check sharpness. A dull knife leaves marks on the surface.
- Mud Pan (1/2″ – 3/4″): Ensure it’s flat and not warped to hold concrete evenly.
- Concrete Mixer (capacity: 3-6 cubic feet): Test run the mixer. A faulty mixer causes inconsistent mixes.
- Wheelbarrow: Check tire pressure and wheel movement. Flat tires or stuck wheels cause delays.
Quick rule: Always inspect your tools before starting work to prevent costly rework and ensure a smooth, professional finish.
Sanding and dust control
Use this checklist before starting any sanding work to ensure you’re well-prepared and safe.
- Check sander condition: Inspect your sander for any damage or wear. Ensure the pad is secure and the sandpaper is properly attached.
- Use dust-capturing sander: For safety and cleanup, use a sander with a dust collection bag or a vacuum attachment. Check that it’s compatible with your sander model.
- Wear appropriate PPE: Put on safety glasses, a dust mask (or respirator for fine dust), and ear protection if using power tools.
- Check sandpaper grit: Ensure you’re using the correct grit size for your task. Start with coarse (e.g., 60 or 80) for initial work, then progress to finer grits (e.g., 120, 220) for finishing.
- Test sandpaper: Before use, check the sandpaper’s abrasiveness by trying to scratch a piece of scrap wood. If it doesn’t cut easily, change or sharpen your paper.
- Secure work surface: Ensure the surface you’re sanding is stable and won’t move during use. Clamp if necessary.
- Check ventilation: Open windows or use fans to ensure proper airflow in your workspace, but avoid drafts that could blow dust into your face.
- Dispose of sanding debris properly: Do not sweep or blow dust into the air. Use a damp cloth or vacuum for cleanup.
Quick rule: Always prioritize safety and dust control when sanding to protect your health and keep clean-up manageable.
Material specs and standards explained
Before you start mixing or pouring concrete, use this checklist to ensure your materials meet the required standards. This will help you avoid common mistakes that can lead to costly rework.
- Cement type: Check it matches your project’s requirements (e.g., Type I for general use, Type II for sulfate resistance).
- Water-cement ratio: Verify it’s within the recommended range (typically 0.45 to 0.6) for your mix design.
- Aggregate size: Ensure the maximum aggregate size is suitable for your formwork and reinforcement spacing.
- Admixtures: Check they’re compatible with your cement type and follow manufacturer instructions for dosage rates.
- Working time: Verify it’s sufficient for your pour, considering temperature and humidity. Too short may cause premature setting, too long can lead to excessive bleeding and segregation.
- Shrinkage/coverage: Ensure the product label indicates suitable shrinkage compensation for your application (e.g., low shrinkage for thin sections).
- VOC or safety notes: Check for any special handling, storage, or disposal requirements. Always follow safety guidelines.
- Concrete strength: Confirm the specified compressive strength (e.g., 3000 psi) matches your project’s needs and local building codes.
Quick rule: Always check product labels, manufacturer instructions, and local rules to ensure you’re using the right materials for your specific job. This simple step can save you from expensive mistakes down the line.

Application Techniques — Step-by-Step Guide
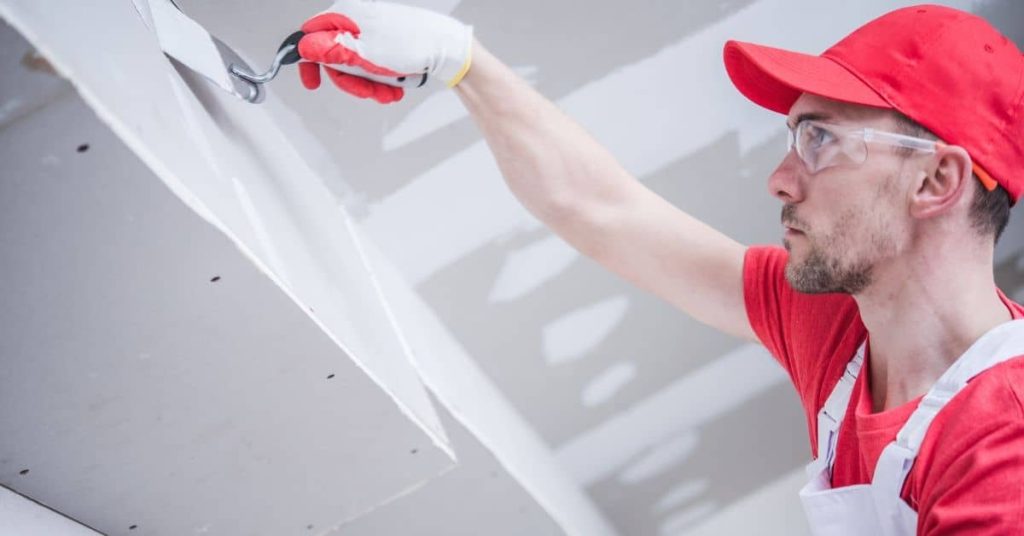
Start with surface prep and tape placement on a clean, dry substrate. Press reinforced tape firmly to avoid bubbles, then embed a thin setting layer to consolidate the tape. This helps prevent future cracks and keeps seams flat as you work. Build confidence with a controlled first coat that establishes a uniform base without creating ridges.
Move to corner and edge handling with the appropriate tool, then apply a light skim along both sides to minimize excess buildup. Feather into the surrounding wall and gradually widen the coat with subsequent passes. Plan for a second, wider coat to blend seams, and finish with careful sanding that respects the feathered edges while avoiding gouges.
Step-by-Step Process
The following steps guide you through the application of joint compound from start to finish, ensuring a smooth and professional-looking result.
- Prepare your workspace: Ensure the area is clean, dry, and well-ventilated. Gather all necessary tools and materials.
- Check substrate: Inspect the surface for any imperfections or nails that need to be addressed before taping.
- Tape placement: Apply reinforced paper or fiberglass mesh tape at seams and corners using a thin setting layer of compound, pressing firmly to avoid bubbles.
- Maintain consistency: Keep your work area organized and maintain the same technique throughout the process for consistent results.
- Final checks: After completing each step, perform a quick visual check to ensure everything looks right before moving on. If something doesn’t look quite right, don’t hesitate to recheck or consult a professional.
Taping and embedding tape correctly
Choosing the right tape is crucial for a successful joint compound application. Paper tape is suitable for most drywall seams, while fiberglass mesh tape is ideal for high-stress areas or when using setting-type compounds.
To embed tape correctly, apply a thin layer of compound over the tape, ensuring no bubbles are trapped underneath. Use a trowel or wide putty knife to press firmly and smooth out any excess compound.
Pro tip: Avoid applying too much compound when embedding tape, as this can lead to cracking and other issues down the line.
Building coats: first, fill, and finish
The purpose of each coat in the joint compound application process is to build up a smooth, seamless surface. The first coat should focus on filling gaps and seams, while subsequent coats aim to feather edges and create a flat, even surface.
Apply each coat thinly to minimize shrinkage and allow for better adhesion between layers. Switching compound types may be necessary depending on the desired finish and specific project requirements.
Remember: Patience is key when applying joint compound coats. Taking your time ensures a smoother, more professional-looking final result.
Sanding, touch-ups, and visual checkpoints
Once all coats have been applied and dried, it’s time to sand, perform touch-ups, and inspect your work for any imperfections.
- Pinholes: Inspect the surface for any small holes or voids that may need to be filled with a small amount of compound.
- Dents: Check for any indentations or low spots that require additional attention.
- Edges: Ensure edges are smooth and free from halos by lightly sanding and applying touch-ups as needed.
- Raking light: Inspect the surface under raking light to catch any imperfections that may not be visible under normal lighting conditions.
Quick rule: Always perform a final visual check under natural or artificial light to ensure your work meets your expectations before moving on to painting or other finishing touches.
Mixing, Drying, and Storing Joint Compound
Understand the two main approaches: powder versus premixed, and how to reach a workable consistency. Use common mixing tools and add water in small increments until the mud feels like a thick but workable paste. Mix in batches that fit your project pace so you don’t waste material or underwork the compound.
Drying depends on temperature, humidity, airflow, coat thickness, and how many coats you apply. Watch for signs that the surface isn’t curing properly, and plan for thinner coats in challenging environments. Store leftovers properly by resealing containers and labeling them; follow manufacturer directions for storage life and disposal options.
Mixing powder vs. using premixed
Powder joint compound needs measured water and stirring to reach the right consistency, while premixed is ready-to-use.
For powder: Start with a clean bucket, add water in small increments, then stir until you get a peanut butter-like consistency. Avoid over-aeration by not mixing too fast or for too long.
For premixed: Give it a good stir before use to ensure even consistency. If it’s been sitting, you might need to add a bit of water to loosen it up.
Drying and cure factors — how to check readiness
Temperature, humidity, airflow, coat thickness, and number of coats all affect drying time. Here’s how to tell if it’s ready:
Warm, dry conditions: Drying can take as little as 24 hours per coat. Check for a smooth, hard surface with no give.
Cooler or humid conditions: It might take up to 72 hours. Be patient; rushing it can cause cracking or flushing.
To check: Gently press the surface. If it’s firm and doesn’t leave an indentation, it’s ready for sanding or painting. If it feels soft or spongy, give it more time.
Storing leftovers and shelf life tips
Proper storage keeps your joint compound usable and safe:
Powder: Seal the bag tightly after each use, label it with the date, and store in a cool, dry place. It should stay good for up to six months.
Premixed: Reseal the container or bag tightly, label it, and refrigerate. It’ll keep for about 30 days. If it starts to smell off or change color, discard it.
Disposal: If it’s mixed with sanding dust, treat it as construction waste. Unused, unmixed powder can often be recycled. Always check local regulations first.
Texture Effects, Paint Prep, and Matching Finishes
Different joint compound formulations take texture at varying rates, and how you sand affects the final look. If you’re matching textures, small differences in sheen or grit are easy to spot after priming. When in doubt, test patches and adjust technique to keep the patch from standing out.
Common textures include several recognizable patterns, and each has a practical method for recreating on new or repaired drywall. Plan priming and paint prep with the right primer and proper surface sanding, removing dust and addressing any tape or seam issues before you apply topcoats. Visual checks with lighting help confirm a consistent match across walls and transitions.
Creating and matching wall textures
Different joint compound formulations take texture differently. Pre-mixed compounds are great for smooth, skim coats. Setting-type compounds work well for textured finishes due to their longer open time.
Knockdown: Apply with a 12-inch knife, then use a knockdown blade to create a semi-smooth, lightly textured finish. Sand lightly after drying.
Orange Peel: Use an orange peel roller or sprayer for a consistent, small-bubble texture. Sand lightly before painting.
Smooth Skim: Apply with a 6-inch knife, feathering the edges. Sand smooth and lightly before priming.
Priming and paint compatibility
Freshly repaired areas need priming to ensure durable topcoats. Primers improve paint adhesion, seal porous surfaces, and provide a uniform sheen.
Bonding primer: Use for new drywall or repairs. It promotes better paint adhesion and seals the surface.
Stain-blocking primer: Use if painting over stains or dark colors. It prevents tannins from bleeding through.
Always choose a primer that matches your topcoat’s sheen level for best results.
Visual checkpoints for a professional finish
Before painting, use this checklist to ensure a well-finished repair.
- Sight-line checks: Use raking light to reveal any imperfections. Check for visible seams or uneven texture.
- Cross-checks at corners and transitions: Ensure edges blend smoothly into adjacent surfaces.
- No-glare inspection: Inspect under typical room lighting to confirm uniform texture and color match.
- Pinholes: Check for tiny holes left by sanding. Fill with a small amount of compound, let dry, and sand smooth.
- Cracking: Look for hairline cracks, especially at corners or where tape was applied. Touch up with a small amount of compound.
- Sheen consistency: Check that the primed surface has an even sheen. Over-sanding can cause dull spots.
- Moisture-related issues: Look for signs of moisture damage, like discoloration or warping. Address any problems before painting.
- Tape edges: Ensure tape is fully embedded and not visible after sanding.
Quick rule: If in doubt, perform a test patch to confirm your work meets your standards before committing to the entire area.
Safety, Environmental Impact, Cost Considerations, and Pro Tips
Prioritize safety with dust control strategies, adequate ventilation, and PPE such as respirators, gloves, and eye protection. Establish a workflow that keeps the space breathable and reduces exposure during mixing and sanding. Use a simple checklist to keep your mixing and curing routine safe and predictable on a DIY project.
Environmentally, consider VOCs, disposal rules, and choosing products with lower emissions when possible. Compare cost versus performance by weighing upfront quality against potential rework and disposal needs. For larger jobs, plan phases, create a budget, and keep the workspace ventilated to avoid fatigue and mistakes while you work.
Safety and disposal best practices
Control dust: Keep work area damp. Use a wet saw or spray water while cutting drywall.
Wear PPE: Respirator, gloves, safety glasses, and long sleeves protect you from dust and chemicals.
Ventilate: Open windows, use fans, or set up a dust extraction system to keep air clean.
Follow local rules for disposal. Unused product, dust, and contaminated rags may need special handling. Recycle if possible.
Cost implications and budgeting
Quality: Invest in better products upfront to reduce rework, saving time and money long-term.
Tools: Consider tool costs – sanders, sprayers, mixers. They can pay off with faster, neater work.
Scope: Estimate material needs accurately. Overbuying wastes money; underbuying causes delays.
Balance performance needs and budget. Cheapest isn’t always best, but neither is breaking the bank.
Common mistakes and pro troubleshooting tips
Learn from these common errors to avoid rework:
- Overloading compound: Thick coats crack. Keep it thin, feather the edges.
- Inadequate feathering: Sharp lines show through paint. Blend edges for a smooth finish.
- Poor mixing: Lumps cause uneven application. Mix well, follow manufacturer’s guidelines.
- Timing gaps: Waiting too long between coats causes adhesion issues. Keep it consistent – 24 hours max.
Pro tip: Practice on scrap drywall before tackling walls. It pays off in a smoother, faster job.
Conclusion
Choosing the right joint compound and applying it correctly matters for safety, durability, and how your finish looks. When you pick the right product and follow solid technique, you cut the risk of cracks, peeling, and costly rework.
Make your next move by following a simple, stepwise check: confirm the project type and pick the proper compound, gather the tools and workspace, mix to the right consistency, apply in thin coats and let each coat dry thoroughly, sand lightly, and test texture before you proceed to prime and paint, then store any leftovers in a labeled container for future touch-ups.
Avoid these common missteps: skipping a proper test area and using the wrong compound or wrong mix for the surface, applying too thick a coat, or rushing drying times. Always prioritize safety and work in a well-ventilated area, wear a mask when sanding, and respect drying and cure times to prevent damage or wasted material.
If the job involves large areas, high humidity, tricky textures, or you’re unsure about substrate compatibility, don’t push through alone—call a pro. Stay focused, take it one coat at a time, and you’ll finish with a solid, long-lasting result that looks right and lasts. You’ve got this.
FAQ
What are the main types of joint compound and where do they fit best?
There are several forms like all-purpose, lightweight, and paper-finish. Each type has its own feel, spreadability, and drying behavior. Check the label or manufacturer instructions to see where it’s recommended and for any limits on sanding or finish work.
How do I tape and float joints to get a smooth finish?
Apply a thin command coat, embed the tape, and let it set a bit before applying a second coat. Use even strokes with a broad drywall knife and feather the edges out. Don’t rush; build in thin coats and let each one dry per the product’s guidance.
What should I consider for mixing and achieving proper consistency?
Use clean water and a clean bucket. Start with a small amount of water and add until the mud hangs on the knife without sagging. Do not overwork or re-wet excessively; follow the product label for your batch’s recommended texture.
How long does joint compound take to dry and when can I sand or prime?
Drying depends on humidity, temperature, and coat thickness. Always follow the manufacturer’s drying guidance and test a small area before sanding. When it’s firm to the touch and not gummy, you can sand lightly and proceed with priming per product instructions.