
Introduction
Waterfall countertops are designed to create a continuous visual flow from the top surface down the edges for a dramatic, seamless look.
You’ll learn how to assess materials, plan edge wraps, and choose build options. The guide walks through practical tips, common gotchas, and rules of thumb to help you avoid missteps in measurements, seams, and support.
Key takeaways
- Ensure solid substrate with 3/4-inch plywood and steel support for overhangs
- Use continuous vanity or cabinet framing to minimize seams and wobble
- Plan waterfall height to align with cabinet faces and appliance clearance
- Choose quartz or granite with consistent veining to enhance visual flow
- Factor edge thickness and miter joints into fabrication tolerances and finish
- Account for sealant gaps at joints and backsplash for water resistance
Table of Contents
- Introduction
- Key takeaways
- What is a Waterfall Countertop?
- Materials Best Suited for Waterfall Countertops
- Design Basics and Planning for a Waterfall Countertop
- Build Options: Fabrication and Installation Methods
- Cost, Timeframe, and Project Planning
- Common Gotchas, Failures, and How to Avoid Them
- Tools, Materials Checklist, and Visual Checkpoints for Installers
- Care, Cleaning, and Repair Guidance
- Conclusion
- FAQ
What is a Waterfall Countertop?
Waterfall countertops are slabs that visually “fall” from the horizontal surface down the edge to the base, creating a continuous edge on the sides. The term comes from how the stone looks like it drops over the edge, with full-wrap meaning the edge runs down all sides and partial waterfall running down only on one or two sides.
You’ll often see this style on kitchen islands, peninsulas, and bar-height islands where the seamless edge reads as a bold, sculptural feature in open plans. It matters because the continuous edge can maximize perceived depth, reduce visible seams, and pair well with simple cabinet profiles, materials, and modern design goals. Plan for proper substrate support, appropriate overhangs, waterproofing around sinks, and careful attachment to cabinetry to avoid common pitfalls.
Full-wrap vs. Partial Waterfall Profiles
A full-wrap waterfall countertop extends the slab down all sides of an island, creating a seamless look that maximizes perceived depth and minimizes visible seams. This style demands thicker material to support the overhang and requires careful edge treatment for durability.
Partial waterfalls, on the other hand, only extend the slab down one or two sides, typically where it meets walls or cabinets. They are easier on materials since you don’t need as much thickness across the entire countertop. This makes them a good choice if budget is tight or material constraints limit full-wrap options.
Full wraps look more dramatic and modern but can be harder to install correctly without compromising structural integrity. Partial waterfalls offer flexibility in design while still delivering that sleek, continuous edge homeowners love. Both styles require careful planning around materials, thickness, and support structures to avoid common pitfalls like cracking or sagging over time.
Choosing between full-wrap and partial waterfall profiles depends on your specific kitchen layout, material availability, and aesthetic goals. A solid understanding of these differences helps ensure a successful installation that meets both functional and design requirements.
When a Waterfall Makes Design Sense
A waterfall countertop can dramatically enhance the look of your kitchen, especially in open-plan layouts where it serves as a visual anchor. It’s particularly effective for large islands or peninsulas that act as focal points.
In smaller kitchens, waterfalls can help create an illusion of space by extending the countertop surface and reducing visible seams between the slab and cabinets. This makes the area feel more cohesive and spacious despite limited square footage.
Waterfall edges also excel at hiding cabinet end panels, which can look bulky or out-of-place in modern designs. By wrapping the countertop around these areas, you achieve a cleaner, more streamlined appearance that complements contemporary cabinetry profiles.
Ultimately, whether a waterfall makes sense depends on your kitchen’s layout and design goals. It should enhance rather than overwhelm the space, providing both aesthetic appeal and functional benefits like reduced clutter and improved workflow.
Materials Best Suited for Waterfall Countertops
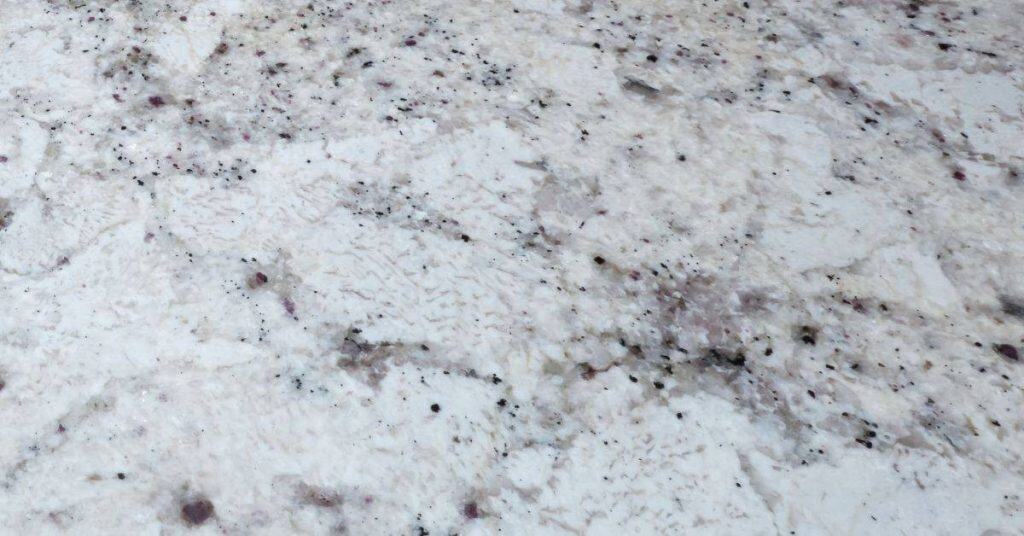
When you wrap a countertop over the edge, edge strength and geometry matter most, so pick a material that can hold a continuous edge, plan on a consistent thickness that matches your substrate, and reinforce corners or miters as needed to resist chipping or sagging under everyday use and heavier loads. Engineered quartz and solid surface tend to behave well at the edge and can be formed with relatively forgiving radii, while granite and porcelain demand precise substrate support and careful tooling, and marble usually requires extra care to guard against nicks, etching, and visible wear at the waterfall junction.
Slab availability and layout are a big part of the plan: check typical slab sizes, look for book-matching seams along the run, and think about how to align pattern and grain so the waterfall reads continuous while respecting lead times and transport constraints. Seam visibility, adhesive choice, and finish decide how clean the waterfall looks, and you must factor in maintenance and cost—some materials hide seams better but require periodic sealing or polishing, while others are more forgiving but may show wear sooner; know the label and manufacturer guidance, and plan practical DIY steps.
Engineered Stone and Quartz
Quartz countertops are a go-to for waterfall designs because they’re nonporous, come in a range of colors and patterns, and can be found in large slab sizes. This makes them ideal for seamless edges without visible seams.
To keep your quartz waterfall looking sharp, it’s crucial to install it with the right thickness—typically around 3cm or more at the edge to handle weight and stress. Reinforcing corners with metal brackets helps prevent chipping. Cleaning is a breeze; just use mild soap and water, no harsh chemicals needed.
Sealing quartz isn’t necessary as it’s naturally stain-resistant. However, regular cleaning and occasional polishing will keep your waterfall edges looking fresh and new.
Natural Stone (Granite, Marble, etc.)
Granite and marble are classic choices for countertops but come with unique challenges in waterfall designs. They’re heavy and require careful support to prevent sagging or cracking at the edge.
Pattern matching along a long waterfall can be tricky, so plan your layout carefully to minimize seams. Sealing is essential to protect against stains and moisture damage, especially on exposed vertical edges where water might run down.
Marble is softer than granite and more prone to chipping or scratching, particularly at the waterfall edge. Reinforcing corners with metal supports can help, but it’s crucial to handle these materials carefully during installation to avoid damaging them.
Alternative Materials (Porcelain, Laminate, Solid Surface)
For DIY projects or when slab sizes are limited, consider porcelain, laminate, and solid surface materials. These options offer lighter weight and larger formats compared to natural stone.
- Use: Porcelain for its durability and large slabs; laminate for cost-effective solutions with a variety of patterns.
- Spec/rating: Look for porcelain tiles rated at least PEI 4 or higher for kitchen use. Solid surface should be seamless to avoid water pooling in seams.
- Avoid: Thin laminates that can crack under weight; solid surface without proper edge reinforcement.
Mismatching materials with the wrong application can lead to cracking, staining, and weak bonds at the waterfall edge. Always choose a material suited for high-stress areas like waterfalls.
Design Basics and Planning for a Waterfall Countertop
This design basics guide centers on getting the waterfall edges to line up with the top and vertical faces through precise measurements, pattern matching, and a consistent overhang and edge profile. It also covers mapping cabinet/leg support and planning tolerances for both fabrication and on-site fitting.
Plan the workflow by laying out baseline cabinet dimensions, and by checking plumb and level early, noting any notch work for sinks or utilities and clearances for plumbing and electrical. Use this to prevent sag, gaps, and awkward transitions, and to decide where seams will be and how to conceal or emphasize them, with a clear sequence for fabrication and installation.
Pattern Matching and Bookmatching Tips
To get a seamless look across your countertop and waterfall, you need to pay close attention to how the slabs are oriented. Bookmatching is one way to achieve this by flipping the pattern of adjacent pieces so they mirror each other. This technique works well for stones with prominent veining or patterns.
When laying out your countertop, make sure you have enough material to match the grain and veins across the waterfall edge without cutting into them. If done right, it can create a stunning visual effect that ties the entire surface together.
To minimize waste while achieving pattern continuity, work closely with your fabricator to plan where seams will occur. Sometimes, moving seams slightly can save material and still give you a great look. Remember, the goal is to make the waterfall appear as one continuous piece of stone or solid surface.
Structural and Cabinet Considerations
The waterfall edge adds significant weight to your cabinets, so you need to reinforce them properly. Use metal brackets or full panels for support, especially if the countertop overhangs more than 12 inches. This helps prevent sagging and ensures stability.
When installing the cabinet legs that will hold up the waterfall, make sure they are securely anchored into the wall studs or use additional blocking to distribute the load evenly. Don’t skimp on this step; it’s crucial for long-term durability.
Clearance around appliances like sinks and cooktops is also important. Make sure you have enough space behind them for plumbing and electrical connections without compromising the integrity of your countertop or cabinets. Proper planning here can save a lot of headaches during installation.
Edge Profiles and Finishes
The edge profile you choose will affect both the aesthetics and durability of your waterfall countertop. A square edge looks clean but can be fragile, while an eased edge provides a softer look with added strength. An eased edge with a chamfer adds another layer of protection.
If you want to highlight the material’s natural beauty, go for a polished finish on both the top and waterfall edges. This will give it a sleek, modern appearance. However, if you prefer something more subtle, consider a honed or matte finish that hides seams better.
When choosing profiles and finishes, also think about how easy they are to clean. A smooth edge is easier to wipe down than one with intricate details. And remember, no matter what profile you pick, make sure it’s supported well enough to handle the weight of the countertop without cracking or chipping.
Build Options: Fabrication and Installation Methods
Fabrication options break down into three common approaches: single-slab wrap for a seamless look, mitered seams for a traditional appearance, and laminated edge panels for economical or complex edge profiles. Each method suits different materials—quartz, granite, marble, and solid-surface—and the size and shape of the slab influence where seams land, how they’re aligned, and how visible they’ll be. Edge details, like straight, eased, or Ogee profiles, pair with the chosen fabrication method and affect cure times, edge strength, and accommodation of sinks or appliance openings.
Understanding substrate, leveling, and support is the practical foundation you’ll actually see on the job. Plan for flat, true backer boards and appropriate underlayment, plus mechanical supports and clamps to keep things plumb and level during assembly. The workflow matters too—stage fabrication versus on-site bonding, watch for proper bonding and curing times, and seal according to material and use; avoid rush jobs, misaligned seams, and loose edges that can bite you later when transporting, handling, or mounting fixtures.
Single-slab Full-wrap vs. Seamed Assemblies
A single-slab full-wrap countertop is the gold standard for seamless beauty and durability, but it comes with a hefty price tag due to material costs and logistical challenges. A seamed assembly, on the other hand, uses multiple pieces joined together at mitered seams, offering a more traditional look while being easier on your budget.
The single-slab approach requires a large, continuous piece of stone or solid surface that can be difficult to transport without visible damage. Seams allow for smaller sections to fit through doorways and around tight corners with less risk of breakage. However, seamed countertops run the risk of showing joint lines over time if not meticulously installed.
For DIYers, a single-slab installation is best left to professionals due to the complexity and weight involved. Seamed assemblies are more manageable for those willing to put in the effort, but still require precision cutting and alignment skills.
Bottom line: If budget isn’t an issue and you’re after perfection, go single-slab. Otherwise, seamed options offer a classic look with less risk of visible flaws or installation mishaps.
Miter Joints, Laminations, and Mechanical Fastening
Miter joints are created by cutting the edges at precise angles to fit together seamlessly. This method is common for seamed countertops where multiple pieces meet at corners or along walls. Proper reinforcement with epoxy adhesives ensures a strong bond that resists water damage.
Laminating involves attaching thinner edge panels to the underside of the countertop, often used when working with materials like solid surface that need extra support. This technique hides seams and provides a clean look but requires careful alignment during installation.
Mechanical fastening uses brackets or clips to secure pieces together without visible hardware. These systems are crucial for load-bearing applications where structural integrity is paramount. Rapid-setting adhesives also play a key role in locking joints tight, especially when dealing with heavy stone slabs.
For DIYers tackling seamed projects, understanding these techniques and having the right tools and materials on hand can make all the difference between a professional-looking finish and one that falls short of expectations.
DIY vs. Pro Installation Considerations
When it comes to installing waterfall countertops, there are certain tasks best left to the pros due to their complexity and risk factors. Measuring accurately for cuts and ensuring proper alignment of seams is crucial but manageable with careful planning.
Removing old countertops and preparing the substrate can be tackled by DIYers if they have basic carpentry skills. However, handling large slabs safely requires experience and equipment that most homeowners lack. Professionals use cranes or specialized lifting gear to avoid injury or damage.
The precision needed for cutting miters and laminating edges is another area where professional expertise shines. Even small errors can lead to visible flaws in the finished product. Finishing touches like sealing and edge polishing also benefit from a pro’s attention to detail.
While DIY installations are possible with seamed countertops, it’s wise to consult or hire professionals for critical steps involving heavy lifting, precise cutting, and structural anchoring to ensure your countertop looks great and lasts long.

Cost, Timeframe, and Project Planning
Cost for concrete waterfall countertops hinges on material choices (aggregate, pigment, epoxy coatings), slab yield, seams and edge profiles, labor hours, and transport. Expect that durations vary by design, fabrication lead times, and delivery, so build in a contingency for hidden issues. Keep a simple budgeting framework with contingencies for substrate problems, slab defects, and potential rework.
Map the timeline from design confirmation through curing and sealing, and align procurement and fabrication with delivery and install windows. Assess site access, ventilation needs, and installer availability to avoid downtime. A clear sequence with milestones helps DIYers minimize downtime and manage waste and delays.
Cost Drivers and Budget Ranges to Expect
The primary cost drivers for waterfall countertops are the material type, slab yield, edge profiles, labor hours, and transport costs. For instance, rare stones or custom aggregates can drive up material costs significantly compared to more common options like quartz or engineered stone.
Slab size also impacts your budget; larger slabs reduce seam lines but increase fabrication complexity and cost. Complex edge profiles such as bullnose or ogee edges add labor time and materials, pushing the price higher. Don’t forget about transport costs, especially if you’re sourcing from out of state.
It’s wise to check local fabricator pricing for a baseline estimate and always build in a 10–20% contingency for hidden issues like substrate problems or slab defects that may arise during installation. This buffer helps avoid budget overruns and keeps your project on track.
Timeline: From Design to Final Install
The typical timeline for a waterfall countertop starts with design confirmation, where you finalize the layout and edge profiles. This phase is crucial as it sets the stage for all subsequent steps.
Next comes material procurement, which includes selecting your stone or concrete slabs based on availability and lead times from suppliers. Fabrication follows, involving cutting, shaping, and finishing the countertop to fit your design specifications. Allow ample time here; fabrication can take several weeks depending on complexity.
The final stages include delivery of the finished countertops, on-site installation, curing/drying periods (especially for concrete), and sealing. Each step needs careful planning to ensure smooth transitions without downtime. For example, coordinating delivery with your installer’s schedule is key to avoid delays.
Common Gotchas, Failures, and How to Avoid Them
Common issues show up fast: misaligned veins, weak miter joints, insufficient support, chip-prone vertical edges, and transport damage. Lock in template accuracy, thickness, edge radii, and joint locations to prevent miscuts and pattern breaks, and plan transitions between sinks and waterfall edges from the start. Keep a tight design and verify alignment before any concrete goes in.
This matters because early planning saves rework and costly fixes later. Use simple inspections to catch misalignment, bolster joints and supports, protect edges during transport, and set proper curing so you don’t end up with warping or color variation. A clear inspection and maintenance plan helps you keep long sections looking good and performing well over time.
Installation Mistakes and Structural Failures
Avoid these common pitfalls to ensure your waterfall countertop stays strong and stable.
- Inadequate substrate: Weak base can cause sagging. Verify cabinet reinforcement before templating.
- Undersized support framing: Insufficient bracing leads to cracking under load. Size supports based on slab dimensions.
- Misaligned template cuts: Improper measurements result in misfit joints. Double-check templates for accuracy.
- Lack of temporary supports: Slabs can shift during installation, causing damage. Use braces until final fastening is complete.
Inspect all components and verify support structures before pouring to prevent costly mistakes later on.
Aesthetic Issues: Seams, Pattern Mismatches, and Color Variance
Lighting can highlight seams and mismatches in pattern alignment. Request photo mockups from fabricators to ensure a seamless look.
Bookmatching is essential for continuity across the waterfall edge. Ensure your fabricator provides detailed photos showing how patterns will align.
Natural variation in stone color and veining is unavoidable. Accept minor differences as part of the material’s character, but insist on quality control to minimize visible discrepancies.
Maintenance and Long-Term Wear Gotchas
Edge chipping is a common issue with vertical waterfall edges. Use protective guards during installation and regular inspections afterward.
Porous stones require frequent sealing to prevent staining. Follow the manufacturer’s recommended schedule for best results.
Incorrect cleaning can dull finishes over time. Stick to mild cleaners and avoid abrasive tools or harsh chemicals.
Tools, Materials Checklist, and Visual Checkpoints for Installers
Here’s the core of the H2: a practical tools, materials, and safety checklist tailored for waterfall installs, plus clear visual checkpoints to confirm fit, alignment, and finish before you sign off. Expect to see measuring and templating gear, power tools like a miter saw, hole saw, and an angle grinder with diamond blades, routers, layout bars, clamps, level, and straight edge, plus a clean, dust-controlled workspace with a shop vacuum and magnetic trays for fasteners. You’ll also cover concrete mixes or pre-mix, bonding adhesives, epoxy or concrete seals, rebar or mesh, self-levelers, backer boards, waterproofing membranes, edge caps, and silicone or grout for final sealing—always check label directions and match to your substrate and moisture conditions; if in doubt, verify compatibility with moisture-prone kitchens and consult the manufacturer instructions.
This matters because a thorough prep and smart toolkit prevent costly misfits, leaks, and rework later in the install, and it gives you a clear path from dry fit to final sign-off. It also supports a safer, cleaner jobsite by documenting each step, keeping cabinets protected, and establishing a repeatable sequence for template transfer, adhesive cure windows, and sealing schedules—with photos, measurements, and notes to back up the final go/no-go decision.
Essential Tools and Materials
Before you start your waterfall countertop installation, make sure you have everything on this checklist.
- Lifting equipment: Use a crane or hoist to safely move heavy slabs. Confirm it can handle the weight of your concrete.
- Miter saw and accessories: Cut angles for corners accurately. Check blades are sharp and appropriate for concrete.
- Angle grinder with diamond blade: For edge profiling. Ensure you have enough blades for all cuts.
- Router: Smooth edges and create bevels. Verify bit size matches your design requirements.
- Safety gear: Eye protection, respirator, gloves, hearing protection. Wear it to avoid injuries.
- Dust control: Use a shop vacuum and magnetic trays for fasteners. Keep the workspace clean.
- Level and straight edge: Ensure countertop is perfectly flat. Check with a spirit level or laser line.
- Adhesive: Strong bonding agent for seams. Test on scrap material to confirm compatibility.
- Epoxy: For sealing joints and edges. Mix according to instructions for best results.
Quick rule: Always verify tool compatibility with your concrete mix before starting work.
Visual Quality Checklist Before Leaving the Site
Before you sign off on your waterfall countertop, run through this quick visual quality checklist.
- Seam gap: No more than 1/8 inch. Measure with a ruler to ensure tight fit.
- Edge finish: Smooth and consistent across all edges. Use a magnifying glass for detailed inspection.
- No chips or cracks: Inspect surface closely. Chips can weaken the structure over time.
- Anchoring secure: Countertop should not move when pushed gently. Check with a level to confirm stability.
- Pattern direction: Consistent throughout the countertop. Use a pattern template for verification.
Quick rule: Walk around and inspect every inch of your countertop before finalizing installation.
Care, Cleaning, and Repair Guidance
Keep daily cleaning simple and material-specific: wipe surfaces after use with a non-abrasive cleaner suited to granite, quartz, marble, concrete, and porcelain, then dry with a lint-free towel to prevent water spots. For porous stones, follow the label for reseal timing and test porosity to know when it’s time to reseal. Avoid acids, bleach, ammonia, citrus, and abrasive pads; use approved cleaners and alternatives per material.
This matters because proper care slows stains, etching, and dulling, and it helps you catch issues early. Simple repairs like chip touch-ups or seam separation can often be handled in situ, but know when to call a pro for epoxy color matching or silicone sealing. Ongoing maintenance, spill response, and routine inspections give you a longer-lasting surface and fewer surprises.
Routine Cleaning and Preventive Care
To keep your waterfall countertop looking its best, start with daily cleaning using mild dish soap and warm water. For granite and marble, use a pH-neutral cleaner to avoid etching or discoloration. Avoid harsh chemicals like bleach, ammonia, or acidic cleaners as they can damage the surface over time.
For porous stones like granite, reseal every year to maintain stain resistance. Test for porosity by applying a few drops of water and checking if it soaks in within 15 minutes; if it does, it’s time to reapply sealant. Concrete countertops can be cleaned with a mixture of baking soda and vinegar, but avoid abrasive pads that could scratch the surface.
Preventative maintenance is key. Inspect your countertop regularly for chips or cracks and address them promptly before they worsen. Use coasters under glasses to prevent water rings and heat damage from hot pots and pans. Wipe up spills immediately to prevent staining, especially with oil-based substances on porous stones.
Remember, regular cleaning and maintenance will extend the life of your countertop and keep it looking beautiful for years to come.
Small Repairs and When to Call a Professional
If you notice small chips or scratches, don’t panic. Minor damage can often be fixed with DIY methods. For chips in granite or marble, use an epoxy repair kit that matches the stone color. Apply the epoxy carefully and smooth it out before it dries.
Surface scratches can sometimes be buffed out using a polishing compound designed for natural stones. Follow the manufacturer’s instructions closely to avoid over-polishing and damaging the surface further.
If you see seam separation or cracks that go deeper than just the surface, it might be time to call in a professional. They have specialized tools and techniques to fix these issues without compromising the integrity of your countertop. Signs like water damage, deep scratches, or extensive cracking are clear indicators that DIY fixes won’t suffice.
Always assess the extent of the damage before attempting any repairs yourself. If you’re unsure about how to proceed, it’s better to consult a professional who can provide expert advice and ensure your countertop remains in top condition.

Conclusion
Waterfall countertops demand clear planning and steady hands. The result should be a durable, visually seamless edge that stays true under daily use.
Start with a clear plan, confirm material suitability, check tolerances, verify the substrate, plan, measure, and dry-fit, align the waterfall legs, and protect every surface during fabrication and installation. Keep the process simple and follow the sequence you laid out in planning and testing small areas first, then scale up as you confirm fit and finish.
Watch for these common mistakes: rushing fabrication, skipping proper substrate support, and ignoring edge alignment or expansion gaps. Follow safety first—use the right clamps, protect your eyes and lungs, and test fixes in a small, noncritical area before committing to a full install. If you encounter uncertainty, or you’re dealing with large spans, heavy stone, or complex under-mount requirements, don’t hesitate to call a professional. Stay methodical, stay safe, and you’ll have a countertop that looks right and lasts.
FAQ
What exactly is a waterfall countertop?
A waterfall countertop has the edge that runs down the sides to the floor. It creates a continuous look from top to bottom. It’s a bold style, not a simple trim job.
Can I build a waterfall edge myself?
If you’re new, don’t. It needs precise miter cuts and solid support. A rookie mistake will show up as cracks or wobble in no time.
What materials work best for waterfall countertops?
Quartz and granite are common choices. Solid surface can work too, but check for slab consistency and strong supports. Match thickness and quality to the base cabinet layout.
What are the biggest gotchas to avoid?
Weak or missing support can collapse the edge. Seams and moisture leaks cause long-term problems. Transport and installation mistakes wreck the look and fit, so plan ahead and work with good subs if needed.