
Introduction
This guide will help you identify leaks, gather necessary tools, and attempt repairs safely.
Safety is paramount; if the leak involves significant water damage or you feel unsure about proceeding, stop and reassess your situation, or call a professional for assistance.
Key takeaways
- Identify leaks by checking for water around valve and reduced pressure.
- Diagnose leak source: stem, packing nut, joint, or valve body.
- Tighten the packing nut and replace packing if there are minor leaks; consider professional help if unsure.
- Replace valve internals or cartridge for more severe issues.
- Perform full shutoff valve replacement as a last resort.
- Test repaired valve, check for leaks, ensure proper water flow.
- Consider hiring a pro if unsure, repairs can take 1-4 hours.
Table of Contents
- Introduction
- Key takeaways
- Quick Overview and When This Guide Applies
- Tools and Materials Checklist
- Safety Precautions and Preparing the Work Area
- How to Identify Signs of a Leaking Shutoff Valve
- Diagnose the Leak Source: Stem, Packing Nut, Joint, or Valve Body
- Step-by-step Repairs — Tighten Packing Nut and Replace Packing
- Step-by-step Repairs — Replace Valve Internals or Cartridge
- Step-by-step Repairs — Full Shutoff Valve Replacement
- Testing, Troubleshooting, and Visual Checkpoints After Repair
- Cost Breakdown, Time Estimate, and When to Hire a Pro
- Maintenance Tips, Common Mistakes to Avoid, and Sustainability Considerations
- Conclusion
- FAQ
Quick Overview and When This Guide Applies
This guide covers common household shutoff valves—angle stops at sinks, ball valves behind toilets, and gate or stop valves near meters—and maps where they’re typically found. It sets expectations for access and behavior, including what the surrounding plumbing usually looks like.
Which Valve Types Are Covered
This guide covers angle stops, ball valves, and gate/stop valves.
- Angle stops: Used under sinks where space is limited. They have a quarter-turn handle and are typically found on supply lines.
- Ball valves: Offer quick on/off control with a simple quarter-turn handle, making them ideal for frequent use or when you need to shut off water quickly.
- Gate/stop valves: Common in older homes, these valves have a screw-down design that presses a washer against the seat to stop water flow. They may require more effort to turn on and off compared to other valve types.
What to check: If the handle is stiff or leaks around the stem, it’s time for maintenance or replacement. When you see: Water dripping from the valve body or handle, or difficulty turning the handle, these are signs that the valve needs attention.
Common mistake: Over-tightening the packing nut can strip the threads and cause leaks. Always ensure the nut is snug but not overtightened to prevent damage.
When to Stop and Call a Professional
Before attempting any repairs, assess the severity of the leak and your comfort level with the task at hand.
- Major corrosion or visible hairline cracks in the valve housing: Inspect the valve for signs of extensive damage. If you see deep pits, flaking, or multiple cracks, it’s time to call a professional.
- Inability to isolate the water line due to seized components: Try turning the valve handle. If it doesn’t budge or turns with excessive force, there may be underlying issues that require professional attention.
- Persistent flow despite all repair attempts: If you’ve tried multiple methods and the leak persists, it’s best to consult a professional to avoid further water damage.
- Presence of lead pipes: Lead pipes are hazardous and should only be handled by licensed professionals. If your home has lead piping, do not attempt repairs yourself.
- Flooding caused by the leak: Extensive water damage can compromise the structural integrity of your property. In case of flooding, immediately turn off the main water supply and contact a professional.
Common mistake: Attempting to fix a leak without first assessing the extent of the damage or understanding the root cause. This can lead to further damage and increased repair costs.
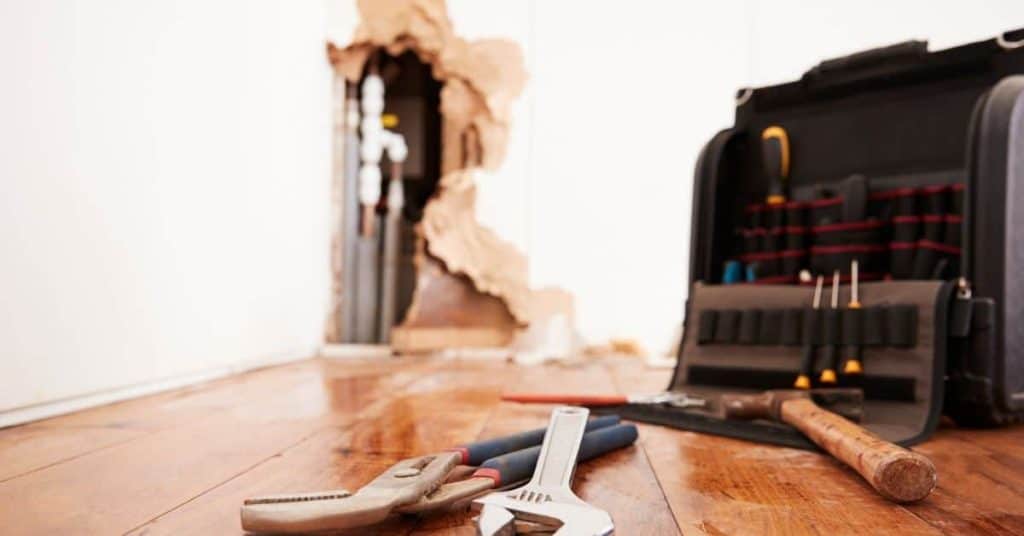
Tools and Materials Checklist
Determine the type of leak—external packing, valve stem seepage, or seal failure—and gather the appropriate tools and parts. Isolate the main shutoff, relieve pressure, drain the line, and wear eye protection and gloves to assess any corrosion or previous repairs.
- Adjustable wrench (8–15 mm)
- Slip-joint pliers or locking pliers
- Screwdriver set (flathead and Phillips)
- Basin wrench for tight spaces
- Pocket tape measure or caliper to confirm valve size (typically 1/2″ or 3/4″)
- Towels and a bucket for cleanup
- Valve packing tool if needed
- Eye protection and gloves
Optional specialty tools can expedite repairs. Ensure you have the right kit to diagnose faster without returning to the store.
Essential Tools for Every Job
Before you begin any DIY plumbing task, ensure you have these essential tools on hand to make your job safer and more efficient.
- Adjustable wrench (8–15 mm): Ideal for gripping and turning nuts and bolts securely. Use it to tighten or loosen the water shutoff valve handle.
- Slip-joint pliers or locking pliers: Great for holding or turning objects in hard-to-reach places, like behind walls or under sinks.
- Screwdriver set (flathead and Phillips): Essential for removing or tightening screws on valves, handles, or other components.
- Basin wrench: Designed to reach into tight spaces, this tool is perfect for turning nuts in confined areas like under sinks.
- Pocket tape measure or caliper: Useful for confirming the size of your valve and ensuring you’re using the correct tools or replacement parts.
What to check:
- Before tightening, ensure the valve is in the fully open position. If it’s already open but still leaks, proceed with caution.
- Inspect the valve for any visible damage or corrosion that could cause further issues.
Common mistake: Over-tightening the valve can strip the threads or break the handle, leading to more costly repairs. Be gentle and stop if you notice any movement in the valve while tightening.
Parts and Consumables to Have on Hand
- Packing material for stem leaks: Check for visible damage or wear; if present, replace.
- New valve cores (if replacing): Ensure they match your existing valve type (ball, gate, etc.).
- Replacement compression sleeves/angle-stop valves: Verify compatibility with your current fittings.
- Tape thread sealant or PTFE tape: Inspect for dryness or damage; discard if necessary.
- Liquid leak detector solution: Test on a small, inconspicuous area first to ensure it works as expected.
- Penetrating oil: Check expiration date and shake well before use.
- Compact inspection mirror: Ensure it’s clean and free of cracks or damage for optimal visibility.
Common mistake: Not checking compatibility of replacement parts with existing hardware. This can lead to improper fitting, leaks, or even damage to your plumbing system.
Safety tip: Always be cautious when replacing parts; stop immediately if you feel resistance or movement, as this could indicate a more serious issue or incorrect part installation.
Recommended Optional Tools
Before you begin, familiarize yourself with these optional tools that can make your DIY water shutoff valve repair smoother and more efficient.
- Pipe cutter: Ensures precise cuts on copper or PEX pipes. If the pipe is too large to grip, use a hacksaw instead.
- Torch and soldering kit: Essential for repairing copper pipes. Use a propane torch and silver-free solder for best results.
- Tubing wrench: Helps tighten or loosen fittings in tight spaces where standard wrenches won’t fit.
- Leak detection spray: Spray around suspected leaks to pinpoint the exact location. Look for bubbles or a change in color indicating water presence.
- Valve core tool: Allows easy replacement of valve cores in ball valves, ensuring a proper seal and preventing future leaks.
Common mistake: Over-tightening connections can cause damage to pipes or fittings. Stop if you feel resistance or movement while tightening.
Safety Precautions and Preparing the Work Area
Establish a critical shutoff plan and locate the main valve for quick access; have a temporary bypass ready if needed. Depressurize and drain safely by opening a nearby faucet and draining at the lowest point to release water pressure.
Wear appropriate eye protection that meets safety standards, gloves, and sturdy footwear. Lay down tarps or drop cloths to protect floors from leaks. Be alert that shutoffs can be under pressure and hot water can scald; stop if you encounter seized valves or high-pressure lines.
How to Safely Turn Off and Bleed the Line
To start, locate your main water supply valve or use a local shutoff if working on a specific fixture.
- Check for: Rust, corrosion, or mineral buildup around the valve handle. If present, you may need to clean it before turning off the water.
- What you’ll see: The valve handle should be clearly marked with ‘ON’ and ‘OFF’. Some valves may have a lever that needs to be turned clockwise or counterclockwise.
Once located, turn the valve slowly and firmly in the direction indicated for ‘OFF’. If it’s stiff or won’t budge, you may need to use penetrating oil or a wrench. If the valve is leaking around the stem, do not force it; call a professional.
After turning off the main supply or local shutoff:
- Open a faucet near the leak point to relieve pressure in the line. You should see water flowing out, then slowing down and stopping as the pressure drops.
- Once the pressure drops, close the faucet again.
- Common mistake: Forgetting to close the faucet can cause air to enter the system when you open the drain valve, leading to further complications. If this happens, you may need to repeat the process to remove all air from the line.
- Locate and open the lowest drain valve or faucet on the affected line to let out any remaining water. This step is crucial to prevent water damage when you start your repair.
If working on multiple lines, repeat this process for each one.
Make sure all faucets are closed before starting your repair to avoid accidental leaks. Stop if you encounter lead or polychlorinated fittings and call a professional.
Ppe and Workspace Setup
Wear appropriate eye protection that meets safety standards, gloves, and sturdy footwear. Lay down a tarp or drop cloth to protect the floor from water damage.
Keep an absorbent towel and bucket nearby to catch drips or spills. Position tools within easy reach to minimize movement around the work area.
How to Identify Signs of a Leaking Shutoff Valve
Look for visual cues like drips, damp insulation, or corrosion around the valve body and nearby pipes. Listen for hissing sounds when operating the valve. Use soapy water on joints and threads to detect air bubbles indicating leaks.
Isolate the area by turning off the main water supply and relieving pressure before starting work. Verify that the main shutoff valve is functioning correctly before proceeding.
Step-by-step Process
- Turn off the main water supply.
- Relieve pressure from the line by opening a faucet or appliance valve.
- Inspect around the valve for dampness, stains, or corrosion. Check for:
- Water droplets or puddles
- Discoloration on the floor, wall, or ceiling
- Rust or mineral deposits on the valve itself
- Apply soapy water to joints and threads; look for bubbles. What to check:
- Bubbles forming immediately indicate a leak
- No bubbles mean the joint is likely sealed
- Listen for hissing sounds when manipulating the valve handle. If you hear:
- A high-pitched hiss, it’s a sign of a severe leak
- No sound, but the valve is difficult to turn, it might be stuck or seized
Common mistake: Not documenting findings with photos. This can lead to overlooking issues or not having evidence for future reference.
If you find movement in any part of the valve, it likely needs immediate attention. Proceed with caution and consider calling a professional if unsure about any step.
Visual Checkpoints and Inspection Tips
Begin by visually inspecting the shutoff valve for any obvious signs of leakage or damage.
- Valve Body: Look for dampness, stains, or corrosion. If you see visible water droplets or discoloration, it’s a strong indication that the valve is leaking.
- Packing Nut: Check around its edges for any signs of leakage. A wet, shiny surface or dripping water suggests a problem with the packing nut.
- Stem and Handle: Inspect these components for loose connections or rust. If you notice play in the handle or visible rust, it may indicate a leak.
- Nearby Pipes and Fittings: Examine them for wet spots, mineral buildup, or other signs of leakage. Mineral deposits or moisture around joints could point to a leak.
- Insulation and Surrounding Areas: Check for dampness in these areas as well. If you find water stains on insulation or damp walls/floors, it might be due to a leaking shutoff valve.
Common Mistake: Overlooking small leaks, thinking they’re not serious. Even minor leaks can cause significant water damage over time and may indicate a larger problem.
Using Simple Tests to Confirm a Leak
Apply soap around joints and threads; bubbles indicate leaks. Use paper near suspected areas; if it gets damp, you’ve found a leak. Listen for hissing sounds when partially closing the valve.
- Check for: Water droplets or puddles around the valve base.
- Look out for: Rust or corrosion on the valve body, which could indicate a long-standing leak.
- Feel for: Warmth around the valve, as leaks can cause localized heating due to pressure changes.
If you notice any of these signs, proceed with the following:
- When: Bubbles form quickly and persistently, do: Tighten the valve using a wrench, ensuring it’s secure but not overtightened.
- When: Dampness is present but no bubbles form, do: Inspect for hairline cracks or other damage that may require professional repair.
Common mistake: Overlooking minor signs of wear and tear. Consequence: Small leaks can worsen over time, leading to costly repairs and potential water damage.
Diagnose the Leak Source: Stem, Packing Nut, Joint, or Valve Body
Identify the leak source by categorizing it into stem/packing, compression fitting, threaded joint, or a cracked valve body. Check for visual clues and perform light tests to confirm moisture entry points.
Tighten the packing nut if needed, replace damaged components, reseal joints, or consider replacing the valve body if cracks are suspected. A clear diagnosis saves time and helps decide whether DIY repair is feasible.
Diagnosing Stem/packing Leaks
Wipe down the valve to spot wet areas around the stem. Tighten the packing nut gently with an adjustable wrench; a slight turn might stop the leak temporarily.
If tightening doesn’t help and water continues, consider replacing worn or damaged packing material. Turn the handle slowly to check for steady drips indicating packing needs replacement.
Ensure the line is depressurized before attempting repairs.
Diagnosing Compression and Threaded Joint Leaks
Inspect joints for visible damage such as:
- Dents or deformations.
- Corrosion or rust.
- Gaps between joint surfaces.
- Worn-out seals or damaged threads.
If no visible damage exists, apply thread sealant and retighten connections. If leaks persist:
- Check for any signs of leakage around the joint under pressure using a leak-detect solution.
- Replace worn-out seals or damaged threads with new parts.
- Ensure all components are properly aligned and tightened to the manufacturer’s specifications.
Common mistake: Over-tightening joints can cause damage. Ensure you’re following the manufacturer’s torque specifications to avoid stripping threads or damaging connections.
Signs a Valve Body Is Compromised
A cracked valve body shows persistent leaks that don’t stop after tightening or resealing. Look for hairline cracks, especially at the base where water might seep through.
What to check:
- Inspect the valve body visually for any visible cracks or damage.
- Check for water stains or corrosion patterns on the exterior, which may indicate internal damage.
- Tighten all connections and reseal joints; if leaks persist around the base, the valve body is likely compromised.
Decision rule: If you find any of the above signs or if water continues to leak from around the base despite tight connections and resealed joints, replace the entire valve.
Common mistake: Attempting to repair a cracked valve body can lead to further issues and potential water damage. Always replace a compromised valve body to ensure proper functioning and prevent leaks.
Step-by-step Repairs — Tighten Packing Nut and Replace Packing
Relieve system pressure first, then isolate the valve and drain to a low or empty state before touching the packing area. Tighten the packing nut in small increments—about a 1/4 turn at a time—to avoid over-tightening that can damage seats or threads.
Step-by-step Repair Process
Start by ensuring the valve is completely isolated and drained to prevent any water pressure from building up during repairs.
- Safely relieve system pressure and drain all water from the line.
- Tighten the packing nut in small increments, feeling for resistance. Turn it a quarter turn at a time until you feel resistance but avoid over-tightening.
- If tightening doesn’t stop the leak, remove old packing and clean threads thoroughly.
- Insert new packing material and reassemble the valve carefully to prevent leaks.
- Ensure no water drips from the valve under working pressure. If it does, back off slightly and reassess.
- Re-pressurize the system gradually after ensuring no leaks at the packing area. Test for leaks again; if you notice movement or signs of strain, stop and reassess.
Final check: Ensure no water drips from the valve under working pressure.
How Much to Tighten Safely
Tightening too much can damage the stem or strip threads. Start with small turns and feel for resistance. Aim for a snug fit but avoid overtightening.
- If you hear metal grinding, stop immediately.
- When the nut becomes difficult to turn, check for signs of strain on the valve body.
Common mistake: Overtightening can cause excessive pressure on the stem seal, leading to leaks or damage. To avoid this:
- Use a wrench that fits securely around the nut.
- Apply steady, even pressure while turning.
- Avoid using excessive force.
Repacking the Stem: Materials and Method
Before proceeding, visually inspect the stem for any signs of damage or wear. If the stem is bent, pitted, or severely corroded, it may need to be replaced.
- Check: Stem condition – Look for any visible damage, such as bends, pits, or corrosion.
- What you’ll see: A healthy stem should have a smooth surface with no significant defects.
When selecting packing material, consider the specific application and operating conditions of your valve. For high-pressure situations, opt for graphite or PTFE.
- Graphite: Ideal for tight spaces and high-pressure applications due to its compressibility and resistance to chemicals.
- PTFE (Teflon): Suitable for temporary fixes and where chemical resistance is crucial, but it may not provide the same long-term durability as graphite.
- Preformed packing rings: Convenient for quick installation and offer reliable sealing, but they might not be suitable for all valve types or sizes.
Common mistake: Using incorrect packing material. This can lead to leaks, excessive wear on the stem, or even valve failure.
Step-by-step Repairs — Replace Valve Internals or Cartridge
Step-by-step Repair Process
Before you start, make sure the water supply is off and the valve is depressurized to prevent any leaks or damage.
- Prepare your tools: adjustable wrench, no-hub puller if needed, thread sealant, and new internals that match your valve type.
- Remove the handle and bonnet nut using an appropriate tool. Be careful not to strip the threads.
- Clean the threads with a brush to remove any debris or corrosion.
- Extract the old cartridge or core carefully without damaging the internal parts.
- Inspect all O-rings, seals, and threads for wear or damage before installing new internals.
- Apply thread sealant only on male threads as needed. Follow manufacturer guidelines for torque specifications when tightening.
- Reassemble the valve by inserting the new cartridge or core, aligning indexing marks if present.
- Tighten all components securely but avoid over-tightening which can cause leaks or damage.
Once reassembled, gradually turn on the water supply and check for any leaks at both ends of the valve. If everything looks good, your repair is complete.
Removing and Inspecting the Valve Core/cartridge
To begin, ensure safety by shutting off the main water supply.
Use an adjustable wrench or a specialized puller tool to remove the handle and bonnet nut. Be cautious not to damage the valve body; overtightening can strip threads, leading to further complications.
Carefully extract the old cartridge or core from the valve body. Inspect for:
- Worn or damaged O-rings – check for cracks, tears, or excessive wear.
- Corroded seals – look for discoloration, pitting, or other signs of deterioration.
- Thread damage – examine threads for stripping, galling, or other irregularities.
If the valve core is plastic, be gentle to avoid breaking it during removal. If broken, replace the entire valve body.
Once removed, clean these areas thoroughly with a thread-cleaning brush to ensure a proper fit for new parts and prevent debris from causing issues later on.
Inspect the valve bore for damage or corrosion that might affect the installation of new internals. If necessary, clean or re-tap the threads before proceeding with replacement. A damaged bore may require professional repair or replacement.
Reassembly and Leak-proofing Tips
When installing new valve internals, make sure to apply thread sealant only on male threads as required. Follow the manufacturer’s guidelines for torque specifications when tightening components.
After reassembling the valve, turn on the water supply gradually to test for leaks at both ends of the valve. Check that the handle operates smoothly and seals properly without any dripping or seepage. Inspect the stem and cartridge area for any signs of improper fit or misalignment.
- Check for any visible gaps around the stem or cartridge.
- Ensure the handle moves freely and engages properly with the valve mechanism.
- Look out for any water seepage from the packing nut area.
- Verify that the valve closes completely, preventing any flow when fully turned off.
Common mistake: Over-tightening components can cause damage or create a poor seal. If you notice any signs of leaking around the stem or cartridge after initial testing, shut off the water immediately and re-tighten components carefully, ensuring all parts are aligned correctly before fully testing again under low pressure.
Step-by-step Repairs — Full Shutoff Valve Replacement
The point of this step is to decide when a full shutoff valve must be replaced and to plan for the right connection method for compression, sweat (solder), or threaded valves in concrete-wall or slab-sleeved lines, including the required shutoff sequence and any transitional fittings that keep the line stable and code-compliant. It also covers the tools, materials, and site prep you need, from a pipe cutter and tubing bender to a torch with flux and solder for sweat, compression nuts and olives, thread sealant, Teflon tape, a replacement valve, approved transition fittings, plus safety gear and dust containment near concrete. Isolation, drainage, and prep steps are laid out to shut off the main, isolate the branch, depressurize and drain the line, and clean, deburr, cut square, and dry-fit the pipe ends before any connection is made.
This matters because a solid plan prevents leaks, backflow, and movement that can crack concrete installations, and it keeps you from wasting time on the wrong valve type or the wrong transition, while guiding you through proper torque or heat control to avoid damaging the pipe. The guidance helps you understand the benefits of correct workflow, accurate orientation of the valve, and thorough leak testing and post-install checks, including flushing lines and documenting code-required labeling, so you can verify the system is safe and ready for service. It also flags concrete-specific pitfalls—pipe movement, securing valve location, and vibration protection—and tells you when a pro is warranted for difficult transitions or nonstandard piping.
Step-by-step Repair Process
Replacing a full shutoff valve involves careful preparation and execution to ensure safety and success.
Before you start, check:
- The main water supply valve is accessible and functional.
- The branch line is clearly marked and isolated from other plumbing lines.
- You have the correct replacement valve that matches your existing pipe material (PVC, copper, etc.).
When cutting or reaming pipe ends:
- Ensure you’re using the right tool for your pipe material.
- Cut or ream slowly and steadily to avoid damaging the pipe.
- Inspect the cut ends for any burrs or rough edges, and smooth them out if necessary.
Common mistake: Over-torquing connections. This can damage pipes and valves, leading to leaks or even catastrophic failure.
- Shut off the main water supply, isolate the branch line, and drain any remaining water.
- Cut or ream the pipe ends as needed, ensuring they’re clean, square, and free of burrs.
- Install the new valve using the appropriate method (compression, sweat/solder, or threaded).
- Tighten connections securely: Use a wrench, turning clockwise until snug, then an additional quarter to half turn. Avoid over-torquing.
- Test for leaks by slowly turning on water pressure and inspect all joints.
Final check: Ensure all connections are secure and the valve operates smoothly before restoring full water supply.
Replacing a Compression-style Valve
Before proceeding, ensure the valve is indeed compression-style by checking for a nut and ferrule at the pipe connection.
To replace, first cut the pipe just past the old valve. Inspect the end of the pipe for any damage or burrs; if present, smooth them out to prevent leaks.
- Remove the old nut and ferrule carefully using a wrench, taking care not to damage the pipe.
- Slide on new compression fittings, ensuring they fit snugly but not too tight. The ferrule should sit flush against the pipe.
- Use a wrench to secure the nut firmly, turning it clockwise until it’s hand-tight, then give it an additional quarter to half turn.
- Avoid over-tightening as this can damage the pipe or cause leaks.
Common mistake: Not checking for and removing any burrs from the pipe end before installing new fittings. This can lead to leaks and a poor seal.
Test for leaks by turning on the water supply and observing the connection closely. If no leaks are present, fully reassemble the system.
Replacing a Sweat or Soldered Valve
Before starting, ensure the water supply is turned off at the main valve and open nearby faucets to relieve pressure. Inspect the pipe ends for any damage or rust.
What to check:
- Check if the valve’s packing nut is loose or damaged.
- Inspect the valve’s stem and disc for signs of wear or corrosion.
- Ensure the pipe ends are clean, dry, and free from any debris.
What you’ll see:
- A loose packing nut may cause water to leak around the valve.
- A damaged stem or disc can prevent the valve from closing properly.
- Dirty or wet pipe ends may result in a weak solder joint.
If the packing nut is loose, tighten it clockwise using an adjustable wrench. If it’s damaged, replace the entire valve.
Common mistake: Not properly cleaning and preparing the pipe ends before soldering can lead to weak joints that may leak or fail over time.
Choosing the Right Replacement Valve
Select a valve that matches your needs and the existing plumbing infrastructure.
What to check:
- Valve size: Ensure the replacement valve has the same inlet and outlet sizes as the old one.
- Material: Brass valves are durable, while chrome-plated ones offer a lighter weight option. Consider your space constraints and maintenance needs.
- Type: Ball valves provide smooth operation, angle stops offer easier access in tight spaces, and gate valves are suitable for high-pressure systems.
Decision rule: If you’re unsure about the valve type, consult a professional or refer to your local plumbing code requirements.
Common mistake: Not considering the water pressure in your home. High water pressure may require a specific valve type like a gate valve.
Consequence: Incorrect valve selection can lead to leaks, reduced lifespan, or even damage to your plumbing system.
Always choose lead-free materials for safer drinking water and consider durability and longevity to minimize future replacements.
Testing, Troubleshooting, and Visual Checkpoints After Repair
Begin by pressurizing the system gradually in small increments to test for leaks at every joint, packing nut area, inlet and outlet connections, and valve stem. Inspect these areas closely for drips or seepage before fully restoring water pressure.
Cycle the valve open and closed several times to ensure smooth operation and reveal intermittent leaks that static tests might miss. Check both supply-side and downstream connections thoroughly to confirm there are no unseen issues.
Pressure-testing Technique
After reassembling your water shutoff valve, slowly restore water pressure in stages:
- Open the main supply line gradually. Listen for any sudden changes or noises that could indicate a leak. If you hear anything unusual, stop and inspect further.
- Use a leak-detection spray to check all joints and packing areas. Look for bubbles or visible drips.
- Note any drips or seepage at specific components:
- Inlet: Check around the inlet connection for leaks.
- Outlet: Inspect the outlet connection for any signs of water escaping.
- Packing nut and stem: Ensure these areas are tight and free from leaks.
- Cycle the valve multiple times to ensure smooth operation. Listen for any grinding or resistance, which could indicate a problem with the valve’s mechanism.
- Inspect for corrosion or mineral buildup on the body. If present, it may be causing leaks or preventing proper sealing.
- Verify proper seating of the shutoff stem: Close and open the valve several times to ensure the stem is seating properly and not leaking.
- Thoroughly inspect both supply-side and downstream connections. Look for any signs of leaks or improper fitting.
- Look for leaks around nearby fittings and backflow components. Water shutoff valves can sometimes cause issues with adjacent plumbing if not installed correctly.
Common mistake: Rushing the pressure test can cause leaks to go undetected or worsen existing ones. Take your time and inspect thoroughly to avoid costly repairs down the line.
If you notice any movement in joints or valves, stop immediately to fix before continuing the test. If issues persist after these checks, document the spots and adjust per manufacturer specifications.
If the Leak Persists: Next Steps
After testing, if persistent leaks are found:
- Check for visible signs of damage or wear on the valve body. If you see cracks, corrosion, or other visible issues, it may be time to replace the entire valve.
- Inspect the packing nut and stem. Ensure they are properly aligned and not damaged. If the stem is stuck or difficult to turn, it might need to be reseated or replaced.
Common mistake: Over-tightening the packing nut can cause damage to the valve stem. This can lead to further leaks and potentially require a full valve replacement.
- Retorque packing nut according to manufacturer specifications.
- Reseat the stem if necessary.
- Inspect adjacent pipes for damage or loose connections.
- Consider replacing valve internals like washers, seals, or O-rings.
- Evaluate whether the entire valve needs replacement due to wear and tear.
- Check for mineral buildup affecting proper seating of components.
Decision rule: If you find significant damage or wear, replace the entire valve. If issues are minor, focus on repairing or replacing specific parts.
If leaks persist despite your efforts, it’s time to contact a professional to avoid further damage.
Cost Breakdown, Time Estimate, and When to Hire a Pro
Here’s the real cost picture for valve-leak fixes, plus how long it takes. Expect part and tool ranges that vary by region, with DIY-friendly parts (valve cores, packing nuts, screws, seal kits) often cheaper than professional-grade kits or special tool sets. Basic tools and common seals can be bought affordably, while premium or specialty tools push parts cost up; labor time includes shopping, disassembly, replacement, testing, and final check, with a conservative and an optimistic timeline depending on complexity.
This matters because safety and code issues can flip a project from a DIY win to a costly mistake. Use a simple decision rubric: compare total cost, safety concerns, permit or code needs, and whether a pro’s early failure or hidden corrosion actually lowers total cost; document scope, parts, and warranties when you compare quotes. Quick break-even guidance: if a pro quote is more than 20% higher than DIY parts or if estimated labor time exceeds about four hours, hiring a pro is often the smarter move—but don’t ignore risk factors like old or corroded pipe, gas-adjacent work, or multi-branch systems.
Typical Parts and Material Costs
Replacing a water shutoff valve can range from $10 to $60 for the valve itself, depending on the type and brand. Packing material or seal kits cost between $3 and $10 each. Specialty tools like wrenches might set you back an additional $20 to $100 if you don’t already own them.
Before purchasing, check your valve’s size and type to ensure a proper fit. You’ll typically see valves in 1/4″, 3/8″, 1/2″, or 3/4″ sizes, with common types being ball valves, gate valves, or globe valves.
- Ball valves are quarter-turn valves and easy to operate.
- Gate valves have a screw-down design for better shutoff but can be harder to turn if not maintained.
- Globe valves offer good control over water flow but may be more expensive.
Common mistake: Not considering the valve’s size and type can lead to improper installation, causing leaks or damage to your plumbing system.
To save money, shop around at local hardware stores or online retailers for deals on parts. Consider buying in bulk if you have multiple valves that need servicing. Also, look out for sales and discounts during the off-season.
Labor/time Estimates and Complexity Tiers
A simple valve repack can take anywhere from 15 to 30 minutes if you have all the right tools. Replacing a cartridge might require an hour or two, depending on how tight the old parts are.
Replacing the entire valve could take between one and two hours, especially if there’s any corrosion or rust that needs addressing first. More complex issues like dealing with multiple branch lines or older pipes can significantly increase labor time.
What a Professional Will Charge and Why
A plumber’s call-out fee typically ranges from $50 to $150, with hourly rates around $60 to $120 per hour. They charge more due to specialized tools and extensive experience.
Before hiring:
- Check if the plumber is licensed and insured.
- Ask for an estimate in writing, including parts and labor costs.
- Inquire about warranties on both labor and parts.
Common mistake: Not getting a written estimate can lead to unexpected charges. Always insist on one before any work begins.
Maintenance Tips, Common Mistakes to Avoid, and Sustainability Considerations
An outline for maintenance must include a practical schedule and a clear checklist to prevent leaks, with annual inspections of shutoff valves, seals, and surrounding piping, plus periods to test under pressure and document the results. Monitor key components such as valve bodies, stems, packing, handles, O-rings, and corrosion prone fittings, and use simple diagnostic cues to spot wear or failure before a leak shows up.
Keeping a proactive upkeep routine matters because it cuts surprises and saves big headaches on the job, and you should not ignore common DIY mistakes like over-tightening, using the wrong tools or solvents, or forgetting to depressurize and replace worn packing or faulty seals. Also address sustainability by safely disposing of lead containing parts, choosing lead free valves, selecting water saving or smart shutoff options, and keeping a simple log with dates, parts used, test results, and notes on performance to guide future maintenance.
Routine Maintenance Checklist
Regularly inspecting your water shutoff valve helps prevent leaks and ensures smooth operation.
- Lubricate the stem: Apply a small amount of plumber’s grease to the stem, ensuring it moves freely. If resistance is felt, further inspection may be needed.
- Check for corrosion: Inspect all exposed metal parts for signs of rust or discoloration. A wire brush can help remove minor corrosion.
- Inspect O-rings, seals, and packing:
- Look for cracks, tears, or soft spots in the rubber components.
- Check if they’re securely seated in their grooves.
- Replace any damaged parts to prevent leaks.
Common mistake: Neglecting to inspect O-rings and seals can lead to unexpected leaks, causing water damage and increasing repair costs.
- Test valve handle movement: Turn the handle fully open and closed. It should move smoothly without excessive force or unusual noises.
- Look for leaks: Inspect connections and joints around the valve for any signs of water dripping, pooling, or moisture.
- Replace worn-out components: If any parts show significant wear, replace them before they fail to prevent sudden leaks.
Decision rule: If the valve handle feels stiff or makes unusual noises when turning, disassemble and clean the valve mechanism immediately.
- Document findings: Keep a record of your inspections, noting any issues found and repairs made. This helps track maintenance history and plan future servicing.
- Pressure-test the system: Use a pressure gauge to check for hidden leaks in the piping. If pressure drops rapidly, there may be a leak present.
- Inspect valve body integrity: Look for cracks, warping, or other signs of stress on the valve body. Any damage could indicate a need for replacement.
Final step: Clean around the valve to remove any debris that could cause issues over time. A simple wipe-down with a damp cloth should suffice.
Common Mistakes That Cause Failures
Making a few simple errors can lead to valve failure and costly repairs. Here are some common pitfalls to avoid:
- Mistake: Over-tightening the handle. This can strip gears inside the valve, causing it to jam or leak.
- What to check: Feel for excessive resistance when turning the handle.
- What you’ll see: Handle becomes difficult to turn or sticks in place.
Fix: Tighten just enough until you feel resistance; no more than a quarter turn beyond that point.
- Mistake: Using incorrect sealant. The wrong type of lubricant or seal can degrade over time and cause leaks.
- What to check: Look for any discoloration, softness, or cracking in the sealant.
- What you’ll see: Sealant appears dried out, crumbles, or has a strange odor.
Fix: Use water-resistant plumber’s grease for all metal-to-metal connections.
- Mistake: Reusing old ferrules or washers. These parts wear out quickly and should be replaced with each repair.
- What to check: Inspect ferrules and washers for signs of wear, such as thinning or cracks.
- What you’ll see: Parts appear worn down, have visible damage, or no longer fit securely.
Fix: Always replace these components when you notice any signs of wear.
- Mistake: Ignoring corrosion signs. Rust can weaken metal parts, leading to leaks or valve failure.
- What to check: Look for rust spots, flaking paint, or discoloration on the valve body.
- What you’ll see: Visible rust, pitting, or a reddish-brown stain around the valve.
Fix: Clean and coat corroded areas with a rust inhibitor before repainting.
The fastest on-site correction is often replacing worn-out components immediately upon discovery.
Environmental and Disposal Guidance
Proper disposal of old valves and choosing sustainable replacement options are crucial for environmental responsibility.
Before disposing: Inspect your old valve for any visible damage or signs of corrosion. If the valve body is cracked, or if you notice rust or mineral buildup, it’s a clear sign that it needs to be replaced.
- Lead-containing parts should be handled with care to avoid contamination.
- Check for any remaining water in the valve before disposal to prevent spills.
- Avoid disposing of old valves in regular trash; they may contain hazardous materials.
- Look for local recycling centers or hazardous waste facilities that accept plumbing fixtures.
When replacing: Opt for lead-free alternatives that meet current safety standards. These materials offer better durability and reduced risk of future leaks or health hazards.
Common mistake to avoid: Not checking local regulations on hazardous waste disposal can lead to improper handling and potential environmental harm.

Conclusion
You now have a practical path to stop leaks, protect your home, and avoid costly damage by staying focused on safety and durability. The steps are clear, repeatable, and designed to keep you from making a bad repair worse.
Proceed with a simple, natural checklist: confirm power and water off and the area is safe, identify the leak source, choose the repair path that fits your valve, perform the repair with proper tools, then test in a small area, inspect for drips, and monitor for a full cycle before calling it complete. Do the work in order, document what you did, and verify the leak is gone before restoring normal use.
Avoid common missteps: don’t over-tighten packing nuts or valve connections, don’t mix up replacement parts, and don’t rush tests—depressurize first and check for leaks slowly. Always wear eye protection and keep a catch bucket or towels ready, and never work on live electrical devices near water. If you’re unsure about the valve type, or if the leak is widespread, don’t push through; damage or a sudden failure can cost more than a pro.
If the repair requires internal parts you don’t recognize, or a full valve replacement, or if a test shows persistent leaking after multiple attempts, it’s time to call a professional. With the right steps and good safety habits, you’ll finish strong and keep your system dry and dependable—you’ve got this.
FAQ
How can I tell if my water shutoff valve is leaking?
The obvious sign is a puddle near the valve. But, check for rust, mold, or mildew too. If you suspect a leak, turn off your main water supply and see if the leak stops.
Why do some homeowners ignore leaky valves?
They think it’s just a dripping faucet. But ignoring it risks flooding and big repairs. Don’t gamble with water, fix leaks fast.
Is it true I shouldn’t turn my valve off all the way?
Yup, turning it too far can cause it to stick or break. Just turn until you feel it stop, then back it up a quarter turn.
Can I use Teflon tape on my shutoff valve? Should I?
Skip the Teflon. It’s for supply tubes, not valves. Use plumbing grease instead to keep your valve sealing smooth and easy to turn.
<