
Introduction
Vibration for small forms reduces bugholes by helping the cement paste settle and lock to the form surface without washing off the surface layer. Bugholes stem from air pockets and laitance left on the surface, and proper vibration can minimize them if you don’t overwork the mix. Use a light, targeted approach to keep paste at the surface while the interior consolidates.
For small forms, choose vibration tools that are easy to maneuver and suited to the form size, and use them so you don’t overwork the surface. Techniques to avoid washing away cement paste include working from the edges inward, keeping the tool contact brief and controlled, and watching for a uniform surface texture rather than trying to “set” the entire pour at once. Always check the tool’s instructions and local rules for safe operation and follow product labels for any limits or recommendations.
Key takeaways
- Choose compact, controllable vibrators suited for small-form molds to avoid overwork.
- Lock vibration timing to start after bleed water escapes and paste firms.
- Prefer low-amplitude, high-frequency actions and pause to relevel form surfaces.
- Avoid direct pounding; use small-wavelength, needle-tip vibrators gently on edges.
- Inspect surfaces regularly for bugholes and adjust vibration approach before setting.
- Safety: follow PPE, avoid airborne dust, secure forms to prevent movement.
Table of Contents
- Introduction
- Key takeaways
- Why Bugholes Form in Small Concrete Forms
- Vibration Principles for Small Forms
- Tools and Materials Checklist
- Step-by-Step Vibration Procedure for Small Forms
- Common Mistakes and Corrections
- Surface Quality Control and Visual Checkpoints
- Safety, Ergonomics and Regulatory Considerations
- Planning, Cost Impacts and Sustainability
- Conclusion
- FAQ
Why Bugholes Form in Small Concrete Forms
Bugholes in small concrete forms come from three main causes: air getting trapped near the form surfaces, water bleeding up and forming pockets, and the cement paste migrating toward the form interface, leaving voids in the core. In tight or thin forms, these issues show up more because packing is limited, walls set faster near the surface, and there’s less chance for bleed water to escape. So expect surface holes where the form is close to the concrete and where paste has pulled away from the center.
This matters for a DIY project because it tells you where to focus your prep and placement—tight joints, better consolidation in corners, and careful timing with form release to avoid paste pull-back. Understanding these effects helps you adjust your mix handling and placement methods to minimize voids without overworking the concrete. Quick checks like inspecting seams and testing small pours in representative forms can guide fixes before you pour the real wall or panel.
Air entrapment mechanics and pore formation
Bugholes start with air pockets trapped during concrete placement. Form geometry, placement rate, and mix rheology all play a role.
In small forms, tight corners can trap air. Slow placement lets air rise to the surface. High-viscosity mixes hold air bubbles in place.
Air near form surfaces turns into bugholes as concrete sets. It’s like tiny balloons popping under pressure.
Form surface conditions and leakage paths
Rough, damp, or poorly sealed form surfaces and joints cause bugholes. Here’s why:
Rough surfaces trap air. Damp forms absorb paste, leaving voids. Poorly sealed joints let water escape, pulling paste with it.
Seepage at joints is a big culprit. It pulls paste out of the concrete, creating surface voids.
Mix factors that increase bughole risk
The right mix design helps prevent bugholes. Here’s what to check:
Slump: Too low, and air can’t escape. Too high, and paste bleeds out.
Aggregates: Fine aggregates help pack tightly, reducing voids. Coarse aggregates can trap air if too large or poorly graded.
Admixtures: Some speed up setting, trapping air. Others increase water demand, leading to paste bleeding.
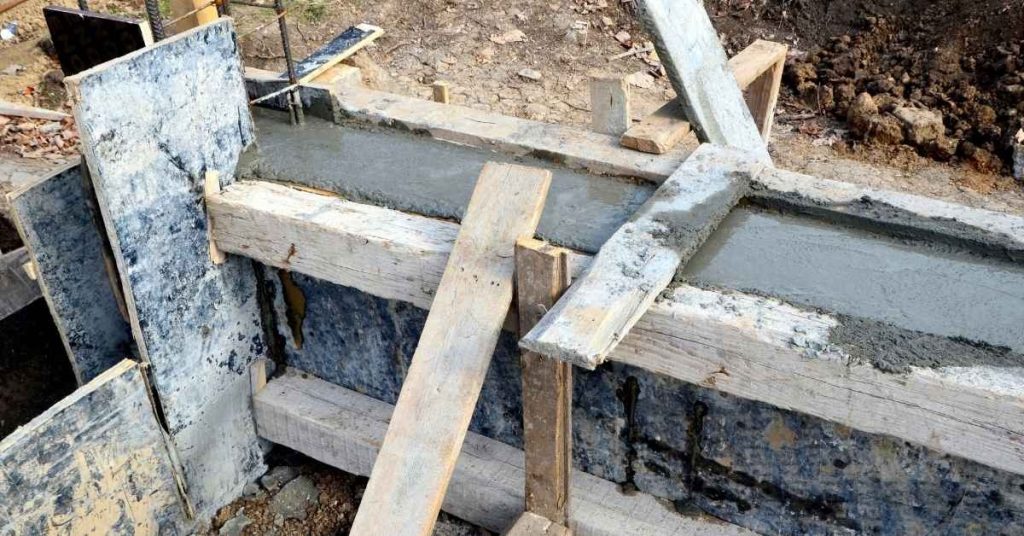
Vibration Principles for Small Forms
Vibration helps move fresh concrete into every corner of a small form and pack out air pockets. In small forms you get quicker surface settling and you must avoid moving the cement paste to the face; that’s overworking. Use the right tool and light, controlled passes to get solid internal compaction and a smoother surface.
Small forms change how you need to apply vibration because wall thickness, spacing, and rebar placement affect how the tool works. Use limited, controlled passes and choose the correct instrument for the form size; the goal is internal density without washing paste to the face. Look for signs that the mix is dense and flat on the surface, and avoid common mistakes like overworking or leaving voids.
Internal versus external vibration for confined forms
When dealing with small or thin concrete forms, choosing the right type of vibration tool is crucial. Here’s when to use internal pokers and external vibrators:
Internal Pokers: Use these for small sections where space is limited. They’re inserted into the concrete to break up air pockets directly. However, they can cause surface damage if not used carefully.
External Vibrators: These are attached to the formwork and vibrate the entire section. They’re great for larger forms but may not reach the center of small sections effectively.
The tradeoff? Internal pokers provide better compaction in tight spaces, while external vibrators offer more even consolidation over larger areas. Choose wisely based on your form’s size and shape.
Frequency, amplitude and visual consolidation cues
Vibration equipment comes with specific frequency and amplitude settings. Stick to these for best results:
Frequency: This is the number of vibrations per second. Higher frequencies (like 120 Hz) are better for small forms as they help break up tiny air pockets.
Amplitude: This is the distance a vibrator moves back and forth. Larger amplitudes (like 3 mm) work well for thicker sections, but can cause surface damage in thin ones.
Instead of fixed timings, use visual cues to judge when concrete is consolidated:
Look for a sheen on the paste’s surface – this indicates that air has been pushed out. Also, watch for bubbles rising to the top; these are trapped air pockets being released. Once you see these signs, stop vibrating.
Timing and sequence relative to placement
The timing of vibration is critical to prevent bugholes:
Too early: Vibrating before concrete has set slightly can cause it to flow out of the form, leading to leaks.
Too late: Waiting too long allows air pockets to harden, making them impossible to remove. Vibrate just after initial placement and before any significant setting occurs.
As for sequence, start vibrating from the bottom of the form, moving upwards. This forces air to rise and escape through the top. Keep an eye on the concrete’s surface – if you see paste moving towards the top, stop vibrating to prevent washing cement to the face.
Tools and Materials Checklist
For small forms, keep a few versatile vibration tools: pancake/hand-held external vibrators, needle vibrators, and compact internal vibrators. Choose based on form size, concrete slump, and how you’ll power it, and keep the tool compatible with your mix and supply. Use lightweight form panels, modular formwork, and stay-in-place options, plus corner beads and basic edge materials to keep vibration transfer clean.
Stock consumables like vibration head attachments, anti-adhesion products, form-release agents, and curing blankets, and know when to upgrade or replace them by label guidance and tool wear. Do a quick pre-use check, post-use clean-up, and routine lubrication and storage to minimize downtime. This matters because good vibration and proper formwork save surface finish, reduce bugholes, and keep your project moving without surprise repairs.
Vibrator types suited to small forms
Choose the right vibrator for your form size and accessibility.
- Internal Pokers: Best for narrow, deep forms. Check they’re long enough but not too thick to fit.
- Compact External Vibrators: Ideal for small, accessible forms. Ensure power cord is long enough.
- Handheld Vibrators: Suitable for small, shallow forms. Make sure it’s light and easy to maneuver.
- Avoid: Large external vibrators on small forms – they can cause surface damage.
Quick rule: Match vibrator size to form dimensions for best results.
Ancillary tools and form treatments
Use these tools to prep forms, prevent leaks, and improve surface finish.
- Sealants: Apply on joints to stop leakage. Check compatibility with your form material.
- Release Agents: Spray on form faces for easy stripping. Test a small area first.
- Tamping Rods: Use to consolidate concrete around rebar. Ensure they’re long enough to reach the bottom.
- Low-Absorption Facing Materials: Use for smooth surfaces. Check they don’t absorb too much water from your mix.
Quick rule: Prep forms well to reduce bugholes and improve finish.
Maintenance, inspection and calibration
Regular checks keep your vibrators in top shape, reducing defects.
- Power Check: Test before use. Replace worn-out cords or batteries.
- Coupling Check: Ensure it’s tight and secure. Loose couplings cause vibration loss.
- Shaft Integrity: Inspect for cracks or wear. Replace if damaged.
- Bearing Check: Listen for noise, check play. Replace worn bearings.
Quick rule: Regular maintenance prevents tool downtime and reduces defects.
Step-by-Step Vibration Procedure for Small Forms
This section walks you through a simple, practical vibration workflow for small concrete forms. Start with checks on form integrity, seals, release agents, and the fresh concrete temperature and slump so you minimize bugholes. It covers selecting the right vibration tool, timing, and finishing that keeps paste from the face.
Follow the sequence to place and consolidate in stages, avoid dead zones, and keep corners and edges properly contacted without overworking joints. The tips help you control paste movement, finish gains, and curing to lock in surface quality without washing the paste away.
Step-by-Step Process
This section guides you through the practical steps of vibration for small forms, ensuring minimal bugholes and no paste washout to the face.
- Pre-placement checks: Inspect form integrity, seal joints, apply release agents. Check fresh concrete temperature, slump target, and air content.
- Form setup: Place reinforcement, select vibration tool (internal or external), ensure clean work area.
- Batch and pour: Match pour rate to vibration capacity, use staggered pattern for initial pour and riser management.
- Vibration sequence: Start vibrating when concrete reaches 3-4 inches. Move vibrator in a systematic pattern, avoiding dead zones and over-vibration.
- Finishing and touchpoints: Level surface immediately after vibration, avoid washing paste to the face, plan curing considerations.
Pre-placement form and mix preparation
Clean forms thoroughly to remove any debris. Seal joints properly to prevent leakage paths for bugholes.
Confirm fresh concrete temperature is within the acceptable range (68-77°F or 20-25°C) and check slump target (4-6 inches).
Ensure air content is controlled (3% to 6%) to minimize surface defects. Stage placement to reduce air entrapment.
Vibration sequence and insertion technique
Insert vibrator at multiple points, spacing them evenly for even consolidation. Start vibrating when concrete reaches 3-4 inches in height.
Move the vibrator in a systematic pattern (e.g., ‘W’ or ‘Z’ shape) to avoid dead zones and ensure all areas are consolidated. Observe the concrete’s surface to see when it starts to bleed, indicating proper consolidation.
Consult your vibration equipment’s specifications for recommended insertion times. However, use visual indicators (like bleeding) instead of fixed times to determine when to stop vibrating.
Finishing techniques to avoid paste washout
These are common mistakes to avoid while finishing concrete to prevent paste washout to the face.
- Avoid excessive surface manipulation: Overworking the surface can drive paste to the face, causing bugholes and a poor finish.
- Use isolation or sacrificial facing where needed: For complex forms or areas prone to bugholes, use these techniques to protect the final surface.
- Time strike-off and troweling correctly: Strike off excess concrete when it starts to set (initial set), then trowel immediately after to avoid paste washout.
Remember, less is more with finishing. Minimize surface manipulation and timing is key to avoiding paste washout.

Common Mistakes and Corrections
Common vibration and finishing mistakes show up fast in small forms: starting too late or stopping too soon causes weak spots, air voids, and surface bugholes; using the wrong tool or wrong technique leaves hot spots or trapped air near corners; and over- or under-vibration spoils both consolidation and the final look. The fix is simple in concept—choose the right vibrator type for the job, vibrate just enough to settle the mix without pushing paste to the surface, and keep a careful eye on corners and edges as you work. Always check your form joints, access, and finish sequence to prevent avoidable defects before they become permanent.
Why this matters to a DIYer is clear: poor vibration and finishing wastes time, costs extra patching, and can ruin a small form project. You’ll get better results by planning the timing and duration of vibration, selecting the appropriate tool, and coordinating finish steps with curing so you don’t chase surface flaws after the fact. Keep the form tight, seal joints, and maintain good access to all areas to prevent honeycombing and voids, and remember that the curing window impacts how the surface responds to final finishing passes. If in doubt, verify with the product label or manufacturer instructions and tailor your approach to your specific mix and form setup.
Over-vibration and paste migration (washout)
Over-vibrating can cause cement paste to seep through the form’s face, leading to a weak surface. You’ll see this as a milky, wet appearance on your formwork.
Stop vibrating immediately if you notice this. Wipe off excess paste with a damp cloth. To prevent it:
Reduce vibration intensity or time for the next pour. Consider changing your sequence to vibrate less at the surface.
Under-vibration and trapped air
Insufficient consolidation leaves voids, causing bugholes or weak spots. You might see bubbles rising to the surface during vibration.
Stop vibrating and use a poker vibrator to target these areas. If bugholes persist:
Repair locally by chipping out the void, cleaning, and re-applying fresh concrete before vibrating again.
Poor vibrator placement and spacing errors
Incorrect placement can lead to uneven consolidation. Avoid these common mistakes:
- Hot spots: Too much vibration in one area causes over-consolidation.
- Exit points: Air gets trapped where vibrators exit, creating voids.
- Inadequate coverage: Insufficient insertion points leave unconsolidated areas.
- Wrong vibrator type: Using immersion when surface vibration is needed can cause over-consolidation at the bottom and trapped air at the top.
To fix, reposition your vibrators or add more insertion points. Consider switching to a different vibrator type if necessary.
Surface Quality Control and Visual Checkpoints
After the pour, run a quick but thorough surface check using a clear checklist to verify a low bughole finish, appropriate hole size, uniform surface sheen, and no exposed aggregate or paste wash. Record timing, curing conditions, lighting, and any visible defects like pinholes, bugholes, whiskers, or form-release staining to determine acceptance or remediation needs. This helps you decide whether to rework now or move on.
This routine creates a practical QA trail, helps you catch issues early, and avoids costly rework later. It assigns roles, documents photos and checklists, and keeps remedial work orders organized. Use good lighting, reference samples, and a simple before/after comparison to verify improvement after any remediation.
Immediate visual inspection checklist
Use this checklist right after vibration to ensure a low-bughole finish. Timing is crucial as defects can worsen with time.
- Sheen: Check for uniform gloss across the surface. Inconsistencies may indicate trapped air or insufficient compaction.
- Bubble release: Ensure all bubbles have risen to the surface and popped. Stagnant bubbles can lead to bugholes.
- Surface texture: Feel the surface for any rough patches. These could be signs of trapped air or aggregate exposure.
- Pinholes: Small, sharp-pointed holes indicate insufficient compaction or excessive water content in the mix.
- Bugholes: Larger, rounded holes are a sign of trapped air. Address these immediately to prevent growth.
- Whiskers: Thin, hair-like defects form when excess cement paste rises to the surface. Remove with a trowel or brush.
- Form-release staining: Check for any discoloration from form release agents. This can affect the final finish.
- Exposed aggregate: Any exposed aggregate indicates insufficient coverage, which may require additional material or remixing.
Quick rule: Address any defects immediately to prevent worsening and ensure a smooth, durable surface.
Repairing and filling bugholes effectively
Use these methods to repair small bugholes before they become larger issues. Timely intervention is key.
- Small bugholes (less than 1/4 inch): Use a trowel or brush to fill with fresh cement paste, then smooth and compact gently.
- Medium bugholes (up to 1/2 inch): Fill as above, but use a small piece of foam or rubber to press the repair firmly into place.
- Large bugholes (over 1/2 inch): Fill with a cement-based patching compound, then smooth and compact. You may need to vibrate locally to ensure compaction.
- Surface treatments: For widespread defects or non-uniform surfaces, consider a skim coat of cement-based material for a consistent finish.
- Coatings: If defects persist after repair attempts, apply a suitable coating (e.g., paint, sealant) to hide imperfections and protect the surface.
Quick rule: Address bugholes promptly. Small repairs are easier and cheaper than large ones or full surface treatments.
Material specs, sampling and acceptance criteria
Before starting work, check project specifications and relevant standards to ensure your materials meet required quality levels.
- Concrete mix design: Ensure the mix is suitable for your form size and vibration method. Check water-cement ratio, aggregate size, and cement content.
- Cement type: Use the correct type of cement (e.g., Type I, II, III) as specified in project plans or local standards.
- Admixtures: If using admixtures, ensure they are compatible with your mix design and comply with relevant standards.
- Form release agent: Check that the agent is suitable for your form material (wood, steel, etc.) and provides a clean, even release.
- Sampling: Before full production, create trial panels to test your materials and methods under real-world conditions.
- Acceptance criteria: Define clear thresholds for acceptable defects based on project specs or local standards. This may include maximum bughole density, hole size, etc.
Quick rule: Always check material specifications and acceptance criteria before starting work to avoid costly rework later.
Safety, Ergonomics and Regulatory Considerations
Safety, ergonomics and regulatory considerations for vibrator work and small-form projects are about protecting you and your crew. Expect PPE like respirators or masks, eye protection, hearing protection, and gloves, plus proper guards and lockout/tagout for maintenance. Follow dust control, ventilation, and noise mitigation, and keep electrical and temporary power setups in good shape.
This matters because good practices reduce fatigue, injuries, and rework on small forms. It helps you stay compliant, track training and inspections, and set clear work procedures before you start. A simple pre-task risk check, proper grip, and scheduled breaks make a real difference on a DIY site.
Personal protective equipment and handling safety
Safety on the jobsite starts with the right gear. Here’s what you need when working with portable vibrators.
- Respirator or Mask: Protect against silica dust. Half-face respirators with P100 filters are common and affordable ($20-$30).
- Eye Protection: Safety glasses or goggles shield your eyes from debris and cement splash.
- Hearing Protection: Earplugs or earmuffs reduce noise exposure. Disposable earplugs are cheap ($5-$10 for 20 pairs).
- Gloves: Protect your hands from vibration and rough surfaces. Leather work gloves are versatile and durable ($10-$20).
- Safety Footwear: Sturdy boots with good grip prevent slips and protect toes.
Vibration exposure, noise and ergonomics
Prolonged vibration exposure can lead to hand-arm vibration syndrome. Stay within the 5 m/s² A(8) exposure limit for an 8-hour day.
Noise from vibrators can also cause hearing damage. Use hearing protection if noise levels exceed 85 dB(A). Take regular breaks to rest your arms and hands.
Good ergonomics minimize fatigue:
- Keep your wrist straight when gripping the vibrator.
- Use both hands for better control and stability.
- Take a break every 15-20 minutes to rest your arms.
Formwork stability and safe access
Secure formwork is crucial when using vibrators. Brace forms properly to prevent failure.
Safe insertion: Ensure the vibrator can reach all areas of the form without causing instability. Use extension poles if needed.
Never climb on unsecured or unstable forms. If you must access high forms, use a secure ladder and tie-off if necessary.
Planning, Cost Impacts and Sustainability
Plan upfront goals for finish quality, acceptable defect rate, and rework thresholds to guide formwork, vibration strategy, and scheduling.
Choose a cementitious mix and additives to get good flow without creating bugholes, and lock in batching and transport timing.
Train operators and use a quick pre-pour checklist to catch issues before pouring and reduce rework.
Careful planning also cuts waste and environmental impact by using forms cleanly, controlling energy use, and aiming for long-lasting finishes.
Cost implications of poor finishing and rework
Bugholes and other surface defects don’t just look bad, they cost you. Patching these issues adds labor and material costs. Delays from reworking also hit your budget.
Prevention is cheaper: Plan for good finishes upfront. Use quality forms, right vibrators, and well-trained operators. This reduces defects and saves you money in the long run.
Surface treatments to hide bugholes? That’s extra cost too. Better to avoid them by getting it right first time.
Scheduling, training and process controls
Start with a solid plan: Select good forms, schedule vibrator use wisely. This minimizes air entrapment and overworking.
Train your team: They need to know how to use vibrators right. A quick pre-pour checklist helps too – clean forms, intact sealants, proper consolidation pattern.
Post-pour inspections catch issues early. Fix them now, not later when it’s costly.
Environmental considerations and waste reduction
Avoiding paste washout saves water. Less rework means less material waste too. That’s good for your wallet and the planet.
Sustainable practices: Use efficient vibrators, recycle form release agents, reuse or properly dispose of waste materials. Every little bit helps.
Longer-lasting finishes from reduced rework? That’s less maintenance, fewer resources used over time.
Conclusion
Controlling vibration in small forms matters because it protects safety, durability, and the final appearance. Stay disciplined: a smooth finish today saves rework and costly repairs tomorrow.
First, verify the form setup and materials, then pick the right tool and vibration setting, test on a small area, and follow the step-by-step procedure with controlled passes. Monitor the surface as you go, adjust only within safe limits, and document any issues before you finish or move to the next batch.
Two or three mistakes to watch for are over-vibrating or under-vibrating, and shifting the form or tool contact during a pass. Keep your workflow steady, maintain good footing, wear eye and ear protection, and never rush. Protect yourself and the pour by keeping hands clear of moving parts and by avoiding ad-hoc changes to cure or vibration timing.
If you see cracks, major form damage, or suspect improper curing, stop and call a professional rather than pushing on. When in doubt, safety and a solid surface beat a rushed job every time—finish confident, not frustrated.
FAQ
What causes bugholes in small concrete forms?
Bugholes come from air pockets that stay trapped as the concrete sets. They’re more common when the mix is too dry or when vibration isn’t enough to bring fines to the surface. Rough or poorly prepared form surfaces can also contribute.
Do vibration techniques actually reduce bugholes in small forms?
Vibration helps settle the mix and bring fines up, which can reduce holes. It won’t fix a surface that’s already washed or uneven; use vibration properly and finish the surface promptly. Always follow the tool’s instructions and adjust for your form size and mix.
What vibration tools work best for small forms?
Use a hand-held wand or small vibrating tool designed for concrete work. For very tight forms, a compact electric or pneumatic vibrator can work, with care not to overstay vibration in one area. Check the tool label and manufacturer guidance for recommended use in tight spaces.
How can I reduce bugholes without washing cement paste off the surface?
Vibrate in short, controlled bursts and move the tool in a consistent pattern to avoid creating streaks. Finish the surface as soon as the bleed water subsides, and use proper troweling technique to push fines toward the surface. If water or paste starts pooling, pause and adjust your approach per instructions on the product label.
What safety and finishing PPE should I use while vibrating and finishing?
Wear eye protection, gloves, and a dust mask or respirator as needed. Use hearing protection if your tools are loud, and keep sleeves and loose clothing secured. Always follow the safety gear listed by the equipment maker and stop if anything feels unsafe.