

Introduction
Uneven color after washing means the surface shows inconsistent shade because cleaning or water exposure altered the finish.
This happens when residue, detergents, or the top seal interact with the concrete and leave lighter or darker patches. The fix is practical and requires careful, in-place steps rather than a big overhaul.
Start with a thorough rinse, scrub gently with a neutral cleaner, and let the surface dry completely.
If patches remain, test a small area with a compatible color-restoration method following the product label and any local rules.
Always check manufacturer instructions and local code requirements before applying any touch‑ups or sealers.
Key takeaways
- Assess if color change is temporary from wash residue or permanent stain.
- Test small area before full reset to gauge color restoration potential.
- Wear eye protection and gloves; avoid splashes and breathing dust.
- Document existing sealers or coatings to plan compatible reapplication steps.
- Inspect washing tools for damage and select soft brushes to prevent abrasion.
Table of Contents
- Introduction
- Key takeaways
- Quick Assessment — Is the Color Issue Temporary or Permanent?
- Visual Diagnosis — Identify the Likely Causes from Appearance
- Common Causes Explained (What Washing Does to Concrete)
- Tools and Materials Checklist
- Step-by-Step Reset Workflow (Safe Progression from Least to Most Aggressive)
- Dealing with Sealers, Coatings, and Color Enhancers
- Visual Checkpoints and Quality-Control During the Process
- Preventing Recurrence — Maintenance and Correct Cleaning Practices
- Conclusion
- FAQ
Quick Assessment — Is the Color Issue Temporary or Permanent?
Start by observing the surface when it is both wet and dry to see if color differences change with moisture. Look for residues, film buildup, or cloudiness that could wash away with a rinse. If the color difference seems to disappear with water, mark it as temporary to recheck after cleaning.
If the color stays the same after a thorough rinse, consider deeper possibilities like staining or dye loss. This matters because temporary issues often respond to cleaning or neutralizing, while permanent changes may require more involved steps. Always note what you observe to guide the next action and check product labels or manufacturer instructions for compatibility.
Wet vs. dry comparison
First, check your concrete’s color when it’s fully dry. This gives you a baseline.
Next, rewet the area and observe again. If the color changes significantly, it’s likely due to temporary moisture conditions. The surface might be absorbing or releasing water, causing the uneven appearance.
Note: This test won’t work if your concrete is already permanently stained or has dye loss.
Pattern recognition (localized vs. uniform)
Look at where the color issue is most prominent. Is it along edges, in high-traffic areas, or randomly scattered?
If it’s uniform across the entire surface, it might be a dye loss issue. This could be due to improper curing or inadequate sealing.
On the other hand, if it’s localized, like blotches here and there, it could be staining from leaves, dirt, or other debris. High-traffic areas might show more wear and tear too.
Visual Diagnosis — Identify the Likely Causes from Appearance
Look for rings, ghosting, or halos that suggest cleaner residue or uneven rinsing. Bright or dull patches can indicate modified surfaces from cleaners or sealers. Efflorescence usually presents as a whitish powdery look that appears with moisture movement.
Use these clues to distinguish surface issues from deeper problems. If you see sheen differences, it may point to sealer interaction, while a rough texture could indicate etching. Verify observations with product instructions or local guidance if you’re unsure.
Residue and film indicators
Look for signs of residue left behind after washing. Streaks, a soap-like film sheen, or areas that feel slick to the touch can all indicate that there’s still some cleaner or other substance on your concrete.
These residues can cause discoloration and may even attract dirt, making the problem worse over time. So, if you spot any of these signs, it’s important to address them.
Use a soft-bristled brush and clear water to gently scrub away any visible residue. If the problem persists, consider using a concrete cleaner specifically designed to remove soap scum and other buildups.
Salt bloom and efflorescence signs
Efflorescence is a white, powdery deposit that can appear on the surface of concrete. It’s caused by salts leaching out from within the concrete itself.
Unlike bleach or fade effects, efflorescence won’t disappear with time or further washing. In fact, it may even spread and worsen if left untreated. To confirm it’s efflorescence, try brushing it gently with a damp cloth. If it brushes off easily and leaves behind a white residue on the cloth, you’re dealing with efflorescence.
To remove efflorescence, use a solution of muriatic acid (follow safety guidelines) or a commercial efflorescence remover. Always test in an inconspicuous area first to ensure it doesn’t cause discoloration.
Sealer failure and patchy gloss
If your concrete has a inconsistent sheen or areas where the sealer is peeling, it’s likely that the sealer itself is failing rather than there being an issue with the concrete.
When a sealer fails, it can cause discoloration and make the concrete more susceptible to stains and damage. To check if your sealer has failed, try the water bead test: Sprinkle some water onto the concrete. If the water beads up and stays beaded, your sealer is still intact. If it soaks in or leaves dark spots, it’s time to replace the sealer.
Before applying a new sealer, make sure to clean the concrete thoroughly to remove any old sealer residue. Then, follow the manufacturer’s instructions for application and curing.
Common Causes Explained (What Washing Does to Concrete)
Washing can alter the chemical balance of the top layer, especially with strong cleaners, leading to color changes. Dissolved salts can migrate and re-deposit unevenly, causing patches. Moisture entrapment underneath can also affect how the surface looks after drying.
Sealer interactions and differential drying can create gloss or dull patches that look like color shifts. Understanding these mechanisms helps choose safer, targeted fixes rather than broad scrubbing. When in doubt, consult product instructions or a local pro for guidance.
Chemical interactions and pH effects
Washing concrete with strong cleaners can alter its surface appearance. This happens because these cleaners often have high pH levels or contain harsh chemicals that react with the concrete’s compounds.
Always follow product instructions to ensure proper neutralization after cleaning. Improper neutralization leaves residual chemicals on the surface, causing discoloration over time.
Different types of concrete may react differently to cleaners due to variations in their composition and curing processes. Be mindful of this when selecting cleaning agents for your specific concrete mix.
Moisture and drying dynamics
Trapped moisture within the concrete can temporarily darken patches after washing. This happens because water absorbs light differently than dry concrete, leading to color variations.
Uneven drying can exacerbate this issue. Areas that dry slower will remain darker longer, creating a patchy appearance. If persistent, these temporary dark spots may affect long-term color uniformity as they age at different rates than the rest of the surface.
To mitigate this, ensure proper ventilation and avoid washing concrete when rain or high humidity is expected to slow down the drying process.
Sealer and finish complications
Existing sealers can react with cleaners, leading to blotchy areas on your concrete. This happens because some cleaners can dissolve or loosen the sealer, causing it to lift off in patches.
Additionally, if your concrete has a decorative finish like stamping or staining, these processes can be affected by washing as well. Cleaners may lighten or darken these finishes unevenly, creating an inconsistent look.
Before cleaning, test your cleaner on a small, hidden area to observe any potential reactions with your specific sealer or finish. If you notice discoloration or lifting, choose a different cleaner or consult a professional for advice tailored to your situation.
Tools and Materials Checklist
Gather basic testing supplies, protective gear, and simple cleaning tools to assess and reset color. Include items like buckets, brushes, and clean rags, plus pads or a sprayer for controlled application. Keep a notebook to record test results and observations.
Prioritize items that help you test residues, pH effects, and compatibility with coatings. Do not mix products unless the manufacturer approves it; check labels or instructions first. If you’re unsure, verify with the product data sheet or retailer guidance.
Visual and Testing Tools
Before you start, gather these tools to assess your concrete’s condition accurately.
- Garden hose: To wet the surface for better color evaluation.
- Bucket: For mixing cleaning solutions.
- pH test strips: To check if the concrete is alkaline (pH > 7).
- Microfiber towels: For wiping and testing small areas.
- Spray bottle: To apply test solutions precisely.
- White vinegar: A mild acid for quick pH tests (pH < 7 turns red).
- Clear water: To rinse and compare with wet concrete.
- Black light flashlight: To detect urine or other organic stains (if applicable).
Quick rule: Always test a small, hidden area first to avoid making the issue worse.
Cleaning and Corrective Products
Use these products to clean and reset your concrete’s color. Always follow manufacturer labels for dilution and use.
- Neutral cleaner: To remove dirt without affecting the pH (e.g., mild soap or dish detergent).
- Residue remover: For tough film or buildup (e.g., concrete degreaser).
- Mild poultice powder: To draw out stains and residue (e.g., baking soda or commercial poultices).
- Sealer stripper alternative: For removing old sealers without harsh chemicals (e.g., soy-based strippers).
- Concrete brightener: To enhance the color and remove minor stains (after cleaning).
- Acid stain remover: If you suspect acid stains, use a specific remover to neutralize them.
- Concrete cleaner with stain guard: To clean and protect against future staining.
Quick rule: Never mix cleaning products. Some combinations can create harmful gases or damage the concrete.
Safety Gear and Waste-Handling
Protect yourself and the environment with these safety measures and proper disposal practices.
- Gloves: To protect your hands from chemicals and rough surfaces.
- Eye protection: Safety glasses or goggles to shield your eyes from splashes.
- Respirator: For dusty tasks like grinding or sanding (if applicable).
- Proper disposal: Follow local regulations for chemical waste. Never pour chemicals down drains.
- Runoff control: Use barriers to prevent runoff into storm drains or waterways.
- Check local rules: Ensure you’re following guidelines for chemical use and disposal in your area.
Quick rule: Always prioritize safety. If you’re unsure about any aspect, consult a professional or local authority.
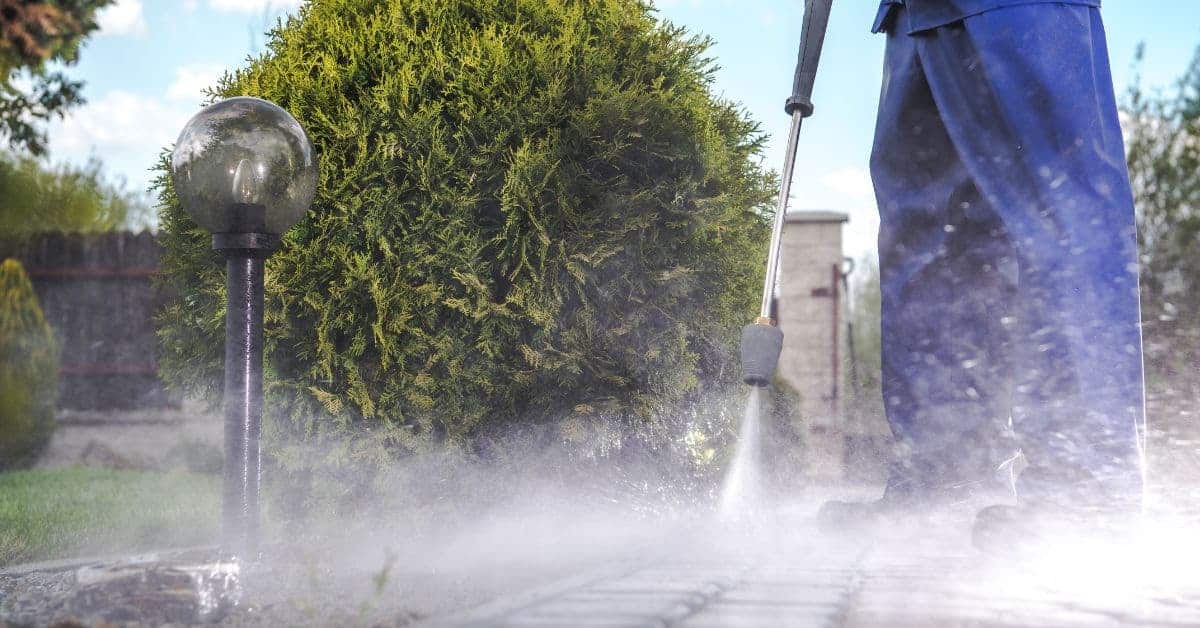
Step-by-Step Reset Workflow (Safe Progression from Least to Most Aggressive)
Begin with inspection and simple tests to identify surface residues or moisture issues. Proceed to gentle rinsing to evaluate how color responds to wash without agitation. If needed, neutralize or re-wet the surface to reset moisture balance.
Move to localized correction for stubborn patches, then consider finishing or sealing as a final step. Each step should be done with care to avoid introducing new residues or uneven drying. Always document results and stop if the color worsens and re-evaluate with reference to manufacturer guidance.
Step-by-Step Process
This sequence helps you safely reset your concrete’s color, starting from preparation to final checks.
- Preparation: Gather tools and materials. Wear safety gear – gloves, goggles, and a mask.
- Inspect and test: Use visual and testing tools (pH meter, moisture meter) as mentioned earlier to understand your concrete’s condition.
- Start with a controlled test patch: Always try fixes on a small area first. Document results before broader application.
- Gentle rewash and neutralize: Re-rinse with water, then use a mild, pH-neutral cleaner or manufacturer-recommended neutralizer to remove residue without etching.
- Targeted correction: Use a poultice for embedded residue, soft scrub for surface film, or gentle mechanical action. Avoid aggressive grinding.
- Localized correction: If needed, apply localized corrections like spot sealing or color-enhancing stains.
- Finishing and sealing: Once satisfied with the results, apply a suitable sealer to protect and enhance your concrete’s appearance.
- Cleanup and final checks: Clean tools, dispose of waste properly, and perform final visual checks to ensure satisfaction.
Start with a controlled test patch
Before applying any fix broadly, always try it on a small, inconspicuous area first. This helps avoid making the color worse.
Choose an area that’s representative of your concrete’s condition but not visible – like behind a plant or under a bench.
Document the results before and after applying the fix. Take photos, note down observations, and let it dry completely to see its full effect.
If you’re happy with the result, proceed with the rest of your concrete. If not, re-evaluate your approach or consult a professional.
Gentle rewash and neutralize
Start by rinsing your concrete with clean water to remove any loose dirt or residue. This helps the next steps work better.
Next, use a mild, pH-neutral cleaner or a manufacturer-recommended neutralizer. These won’t damage your concrete’s surface like harsh chemicals can.
Apply the cleaner or neutralizer according to the manufacturer’s instructions. Let it sit for the recommended time, then rinse off thoroughly with clean water.
Note: If you’re unsure about using a specific product, always test it on your controlled patch first.
Targeted correction (poultice, repeat cleaning, or mild abrasion)
Sometimes, residue is embedded deep in the concrete’s pores. In this case, use a poultice – a thick, paste-like cleaner that sits on the surface and draws out impurities.
For surface films, a soft scrub with a non-abrasive pad or brush can help. Be gentle to avoid damaging the surface.
If necessary, use mild mechanical action like orbital sanding with very fine grit paper (1200-grit or higher). This helps remove stubborn residue without aggressive grinding that can damage your concrete.
Remember: Always test these methods on your controlled patch first. If you’re not sure, consult a professional to avoid making the color worse.
Dealing with Sealers, Coatings, and Color Enhancers
Preexisting sealers or colorants can mask or exaggerate color changes after washing. Determine if the coating is compatible with cleaners you plan to use and whether it needs stripping. Look for signs of lifting, blush, or patchy adhesion as you evaluate.
When in doubt, test compatibility on a small area or follow the manufacturer’s stripping and reapplication steps. Avoid aggressive methods that could damage the concrete or worsen color inconsistency. Check label instructions for removal options and curing times before proceeding.
How to test sealer compatibility
Before stripping or applying new sealers, test a small area first. This helps avoid flash or patchiness.
Here’s how:
1. Choose an inconspicuous spot on your concrete.
2. Apply the stripper or new sealer according to its instructions.
3. Observe the area for any discoloration, bubbling, or peeling. If it looks good after 24 hours, proceed with caution.
When to strip vs. refresh
Knowing when to strip your sealer completely or just apply a new coat saves time and money.
Strip if you see:
– Peeling or flaking sealer
– Trapped residue after washing
– Severe discoloration that won’t budge
Refresh with a new coat if:
– The old sealer is still intact
– You just want to enhance color or add protection
Choosing a reseal or color restoration approach
Consider these factors when deciding between film-forming and penetrating sealers, or color-enhancing products.
Film-forming sealers:
– Provide a topcoat layer
– Can enhance color
– May require more maintenance
– Test samples on-site first to check appearance
Penetrating sealers:
– Soak into the concrete
– Protect from within
– Less visible, natural look
– Also test samples before applying
Visual Checkpoints and Quality-Control During the Process
Establish milestones like a uniform dry color across the area, consistent sheen, and absence of film or residue. Use a simple before/after comparison and note any changes in texture or color. Rely on observable criteria to determine when the fix is complete.
Record changes over time to verify progress and maintain a traceable reference. If you see new patches or lingering dull spots, revisit the treatment plan and consult labels or local guidelines. Objective checks help prevent guesswork on future projects.
Before-and-after documentation
Use this checklist to document your concrete’s condition before and after each step. This helps you track progress and assess fixes objectively.
- Photograph areas: Under consistent lighting and drying conditions for accurate comparisons.
- Record initial observations: Note any discoloration, residue, or inconsistencies in sheen.
- Measure pH levels: Use a pH testing kit to check your concrete’s acidity. Ideal range is 6-8.
- Test sealer compatibility: If applicable, test any sealers or coatings on a small patch first.
- Record moisture content: Use a moisture meter to ensure your concrete is dry enough for treatment.
- Check surface profile: Feel the surface with gloved hands. It should be smooth, not rough or pitted.
- Note any cracks or damage: These can affect how your concrete accepts treatments.
- Record ambient temperature and humidity: These factors can impact curing times and outcomes.
Quick rule: The more data you collect, the easier it is to troubleshoot issues later.
Drying and curing checkpoints
Use this checklist to ensure your concrete is fully dry and cured before moving on to the next step. This helps prevent issues like discoloration or weak adhesion.
- Wait for surface dryness: Touch test – if it feels dry, proceed. If not, wait longer.
- Check moisture content: Use a moisture meter to confirm your concrete is below 4% MC.
- Allow full drying cycle: Wait at least 24-72 hours after washing or wetting before proceeding.
- Recheck pH levels: Ensure they remain within the ideal range (6-8) after each step.
- Feel for warmth: Concrete should feel cool to touch, not warm. Warmth indicates it’s still curing and releasing moisture.
- Look for signs of efflorescence: White powdery deposits can indicate excess moisture or improper curing.
- Check for cracks or damage: These can worsen during the drying process if not addressed.
- Wait for full wet/dry cycle: Allow your concrete to go through a complete wet and dry cycle before proceeding with treatments.
Quick rule: Patience is key in concrete work. Rushing can lead to poor outcomes.
Preventing Recurrence — Maintenance and Correct Cleaning Practices
Choose cleaners and sealers that match the concrete’s finish and expect uneven outcomes to be repeated if incompatible products are mixed. Establish a routine rinse method that thoroughly clears soap and residues. Seasonal considerations can influence drying and salt movement, so adapt your approach accordingly.
Develop a simple maintenance plan that includes periodic cleaning without harsh scrubbing, plus testing new products on a small area first. Verify any recommendations with product labels, data sheets, or local code guidance before full application. Consistency is the best defense against color issues reappearing.
Choosing Safer Cleaners and Application Methods
First off, always pick cleaners designed for concrete. They’re formulated to be tough yet safe.
Never use concentrated acids or alkalis unless the manufacturer specifies it’s okay. Trust me, you don’t want to damage your concrete.
Follow the dilution instructions on the cleaner’s label. It might seem simple, but getting this wrong can mess up your concrete color big time.
Routine Upkeep Schedule and Spot Cleaning
Establish a regular rinse routine. Once every two weeks should do the trick, depending on how much traffic your concrete gets.
For spills, clean them immediately. Acids in drinks or food can stain your concrete if left alone too long.
Every three months or so, give your concrete a quick test with a small area of cleaner. This way, you’ll know if it’s time for a full-area treatment before any color issues crop up.
Conclusion
Uneven color after washing is fixable with a careful, stepwise approach. Stay safe, test small areas first, and don’t rush to harsh methods that can lock in the problem or cause new damage.
First, test a tiny patch to see if the color issue is temporary, then follow the safe progression from least to most aggressive, document results, and only move on when you’re confident the next step won’t hurt the concrete. Check whether sealers or coatings are part of the miscolor, match your plan to what you observe, and verify each stage with a clear visual check so you don’t overshoot.
A couple of common mistakes to avoid are pushing straight to strong cleaners or aggressive scrubs, and applying sealers or color enhancers before the concrete is truly dry and evenly back to its natural tone. Always wear eye protection and gloves, work in a well-ventilated area, test in a small area first, and keep sessions short with plenty of dry-off time. If you see persistent color imbalance after the safe steps, or if the surface shows deep staining, flaking, or inconsistent absorption, stop and re-evaluate before proceeding.
When to call a professional: if the color issue covers large areas, if you suspect etched or damaged surface, or if you’ve already tried the safe steps without a real improvement. A pro can assess substrate damage, recommend appropriate coatings or color-restoration options, and help avoid costly mistakes. Stay disciplined, and you’ll finish with a solid, durable finish you can trust.
FAQ
Is it safe to re-wash the area to even out the color, and what method should I use?
Yes, you can try a careful re-wash, but use mild cleaning methods first. Avoid harsh scrubs or strong chemicals that can etch or wash away surface material. Check product labels and manufacturer instructions for any limitations before you start.
What should I look for to know if the color difference is just a surface issue or something deeper?
Check for blotches that rub off with water or cleaner—those are surface. If the color stays uneven after a thorough, gentle rinse, it may be deeper or related to a sealer, stain, or not fully cured concrete. If in doubt, test a small, inconspicuous spot and compare with the rest of the slab.
Can I reseal or re-stain the floor to fix the color, and what should I verify first?
Resealing or staining can change color again, so verify the surface is clean, dry, and sound. Read the sealer or stain label for dry times, compatibility with your concrete, and any color-change notes. Local rules or manufacturer instructions are your best guide.
What common mistakes should I avoid when trying to reset the color?
Avoid aggressive grinding, tampering with existing coatings, or washing with unknown chemicals. Don’t seal over a damp surface or a mismatched finish. When in doubt, slow down and double-check labels and instructions before proceeding.