

Introduction
Embarking on a stucco repair project? Understanding the timeline is crucial for planning your work efficiently. This guide walks you through the step-by-step process of hiding repairs using sand float, lace, dash, and skip trowel textures, ensuring you complete each task within the right timeframe.
Whether you’re a seasoned DIYer or a first-timer, this timeline-focused approach will help you manage your expectations and allocate sufficient time for each phase of the project.
For the full guide, see Stucco Texture Options That Hide Repairs: Sand Float, Dash, and Skip Trowel.
The Stucco Repair Timeline: From Prep to Finish
Repairing stucco involves several steps that require careful planning and execution. Here’s a detailed timeline outlining the process, from surface preparation to applying the final texture:
- Surface Preparation (1-3 days): Assess substrate for cracks and moisture. Clean the surface gently, bevel edges, and allow curing between steps.
- Base Coat Application (1 day): Apply a compatible joint compound or base coat to ensure proper adhesion of the texture.
- Texture Application (2-4 days per texture):
- Sand Float: Practice on a scrap board to learn the rhythm and pressure. Apply the texture, allowing for curing time between coats.
- Lace (Spanish Lace): Master the feathering technique on a test area. Apply the lace pattern, ensuring proper curing time between layers.
- Dash (Roughcast / Knockdown / Pebble): Practice matching dash size and timing on a scrap panel. Apply the texture, allowing for curing time.
- Skip Trowel: Practice creating consistent patterns on a test area. Apply the skip trowel texture, ensuring proper curing time between coats.
- Color Matching and Painting (1-2 days): Choose a matching color and apply paint, following manufacturer guidelines for drying times.
- Final Inspection and Maintenance (Ongoing): Inspect the repair for any issues. Perform regular maintenance to ensure longevity and code compliance.
Total project duration varies depending on the size of the repair area, chosen texture, weather conditions, and your familiarity with the process. Allocating sufficient time for each step ensures a successful, long-lasting repair.
Key takeaways
The prep time significantly impacts the overall timeline, so ensure you allow enough time for surface cleaning, beveling edges, and curing between steps before applying the base coat and textures.
- Understanding textures helps repairs blend in without obvious patches, especially Sand Float and Skip Trowel.
- Sand (Float) finish hides small blemishes better when applied with consistent motion.
- Lace (Spanish Lace) textures conceal repairs but require skillful feathering and curing checks.
- Dash/Knockdown yields skip-shadow patches; patching requires matching dash size and timing.
- Choose finish by regional wear and longevity needs; smooth options simplify maintenance.
- Safety: follow scaffold, fall protection, and weather constraints; prioritize PPE and surface curing times.
Table of Contents
- Introduction
- Key takeaways
- Quick Overview: What Stucco Is and Why Texture Matters
- How Textures Hide Repairs — Key Principles
- Sand (Float) Finish — Characteristics, Repairability, and Tips
- Lace and Skip (Including Spanish Lace) — Characteristics, Repairability, and Tips
- Dash (Roughcast / Knockdown / Pebble) — Characteristics, Repairability, and Tips
- Comparative Analysis: Repair Visibility, Ease of Patching, and Best Use Cases
- Tools, Materials, and Visual Checkpoints for a Successful Repair
- Regional Considerations, Maintenance, and Longevity Factors
- Conclusion
- FAQ
Quick Overview: What Stucco Is and Why Texture Matters
Stucco is a cementitious coating typically made from cementitious base with lime and sand, finished in a protective plaster-like layer. Modern blends may add polymers or lightweight aggregates for different performance traits. This article focuses on traditional hard coat and common modern variants to set the texture discussion.
Texture influences aesthetics, weather resistance, dirt visibility, and how repairs read on the surface. The textures we compare are Sand Float, Lace/Spanish Lace, Dash/Knockdown, and Skip Trowel, with quick notes on related textures outside the main focus. You’ll get a practical framework for choosing a finish that hides repairs, matches style, and suits DIY capability and climate.
Preparing the Surface for Texture (Cleaning, Repairs, and Substrate Prep)
The first step in applying any stucco texture is preparing a clean, sound surface. Here’s how:
Cleaning: Remove all dirt, mildew, and loose material using a wire brush or pressure washer. Ensure the surface is dry.
Repairs: Fill cracks and holes with a patching compound, matching your existing stucco’s composition. Allow it to cure before texturing.
Substrate Prep: For Sand Float, Lace/Spanish Lace, and Dash/Knockdown, the surface should be slightly damp. For Skip Trowel, it should be bone dry.
Tools, Mixes, and Step-by-Step Application by Texture
Each stucco texture requires specific tools and application steps. Here’s what you need:
- Sand Float: Hawk, trowel (1/4″ – 3/8″), straight edge, sand (fine to medium), water.
- Lace/Spanish Lace: Hawk, trowel (1/2″ – 5/8″), comb float, lace texture tool, water.
- Dash/Knockdown: Hawk, trowel (3/4″ – 1″), darby, knockdown knife, water.
- Skip Trowel: Hawk, trowel (1″ – 2″), skip trowel, water.
- Mixes: Use a cement-based mix for traditional hard coat stucco. For lightweight/modern blends, follow manufacturer’s instructions.
- Application Steps: Apply the first coat (scratch coat) using a hawk and trowel. Let it set (1-2 hours), then apply the finish coat with the texturing tool. Allow it to cure before applying any sealant or paint.
How Textures Hide Repairs — Key Principles
Grain size and distribution affect patch visibility by altering how light reflects off the surface. Finer aggregates tend to read as smoother, while coarser textures create more shadow and disguise small flaws. Irregular textures scatter light to mask imperfections from typical viewing distances.
Shadowing and micro-contrast help patches blend into the overall pattern. A properly prepared substrate with a reinforced base enhances texture performance for hiding repairs. Each texture interacts differently with substrate flaws, so consider which cracks or patches are most likely to occur and how the finish will respond. Practical checks for you include planning the sequence and timing of coats and understanding cure-related changes that affect appearance over time.
Texture features that conceal imperfections
The key to a texture hiding repairs lies in its physical and visual characteristics. Coarser aggregates scatter light, making it harder for the eye to focus on specific details like cracks or patches.
Random patterns also help. A consistent, repetitive design can highlight flaws if they break the pattern. So, textures with varied, irregular designs are better at concealing.
Depth and relief in a texture create micro-shadows that further hide imperfections. The more complex the texture, the more it breaks up light and shadows, making it harder to see any specific flaw.
When a patch will still show (limitations)
Even with the best texture, some repairs can still be visible. Color mismatch is one of the biggest culprits. Stucco’s natural variation makes it tough to match exactly.
Improper feathering at the edges of a repair can also make it stand out. If the new stucco isn’t blended smoothly into the old, it’ll catch the eye.
Application thickness is another factor. If your patch is noticeably thicker or thinner than the surrounding area, it’ll be obvious. Lighting and viewing angle can also reveal repairs. Direct sunlight or low angles can highlight even well-hidden flaws.
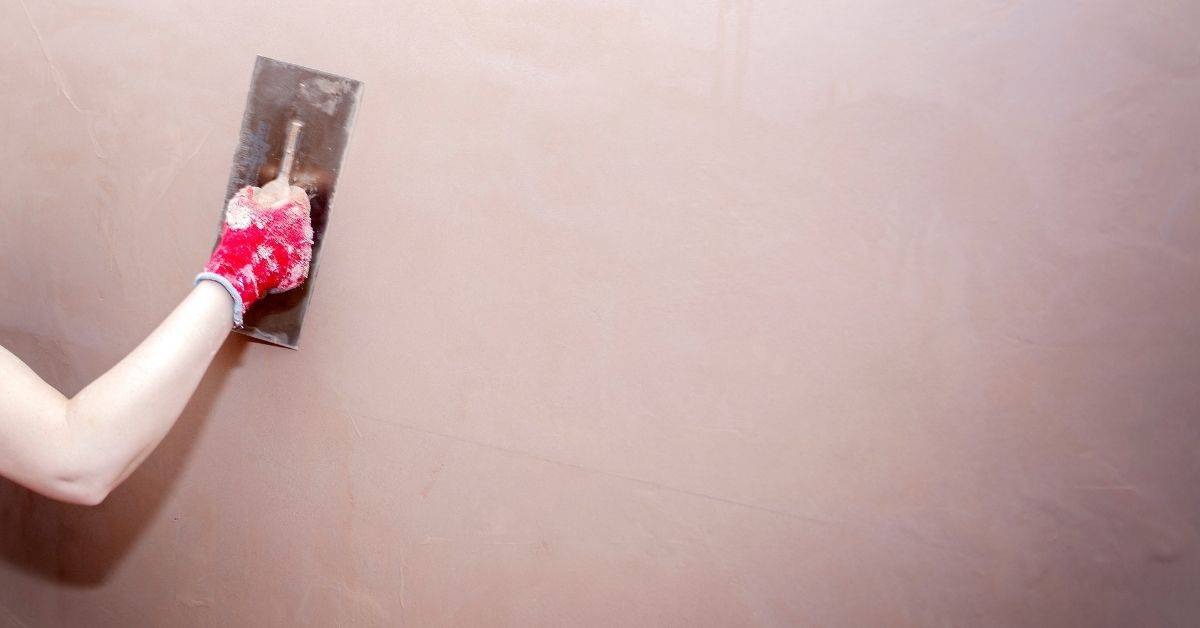
Sand (Float) Finish — Characteristics, Repairability, and Tips
Sand/float finishes come in fine, medium, and coarse variations, each reading differently on exterior walls. The depth of the texture and the visible shadow lines depend on the chosen grade. These differences guide how repairs will appear after retexturing.
Repair concealment improves with careful base prep, controlled texture, and appropriate curing. For compatibility, consider whether you’re applying over new stucco or a reseal, and how humidity or temperature may alter drying. Practical tips cover trowel direction, coat thickness, patch blending, and tool choice to keep repairs less noticeable.
Application and DIY Repair Steps
The key to a successful sand float finish lies in the application process. Here’s a step-by-step guide:
Base Coat Prep: Ensure your substrate is clean, dry, and primed. Apply a base coat of stucco mix, let it set for 24 hours.
Applying the Float Mix: Prepare your float mix – fine, medium, or coarse grain depending on your desired texture depth. Apply using a trowel, working in small sections to control texture and avoid overworking the material.
Controlling Texture: Use a float tool to create the sand float effect. Work the float across the stucco in smooth, even strokes, applying light pressure for fine grain, more for coarse. Allow it to set slightly before finishing.
Pros, Cons, Cost and Longevity
Advantages: Sand float finishes are forgiving, hiding minor imperfections well. They’re easy to blend when repairs are needed due to their uniform texture.
Drawbacks: Coarse grain can show every bump and dip in the substrate. Deep shadows may form in coarse textures, requiring more lighting or maintenance.
Cost Considerations: Sand float finishes are mid-range in cost. You’ll pay for the stucco mix and tools, but labor is minimal as it’s easy to apply.
Longevity: With proper care, a sand float finish can last 50+ years. Recoating every 10-20 years maintains its appearance and longevity.
Lace and Skip (Including Spanish Lace) — Characteristics, Repairability, and Tips
Lace and Skip textures create a semi-smooth base with distinct grooves or lace-like patterns. Spanish Lace is a related variation with its own rhythm and grip. These finishes typically hide repairs well due to irregular groove lines and shadowing.
Application methods vary: trowel sweep for lace or spray plus trowel for skip textures, which affects depth and groove pattern. Surface prep, environment, and tool selection influence durability and consistency. Use these cues to decide between Lace, Skip, or Spanish Lace based on substrate, climate, and aesthetic goals.
Application and DIY Repair Steps
The Lace and Skip textures are applied using a trowel sweep or spray + trowel method. The trowel sweep involves dragging the trowel across the surface, creating grooves as you go. The spray + trowel method first sprays the stucco onto the wall, then uses the trowel to create the texture.
For repairs, match the layer thickness of the surrounding area. Use long, steady strokes with your trowel to mimic the original pattern. Blend seams by feathering the edges of your repair into the existing texture.
Common pitfalls: Avoid applying too much or too little material at once. This can lead to inconsistent grooving and an unnatural look. Also, be mindful of trowel angle; changing it mid-stroke can create visible lines.
Pros, Cons, Cost and Longevity
Pros: Lace and Skip textures provide a distinctive look that hides repair edges well due to their semi-smooth base with distinct grooves. They are versatile, suitable for both residential and commercial applications.
Cons: These textures require some skill to apply correctly. Mismatched patterns can be visible, so it’s crucial to maintain consistency during repairs. Additionally, they may not be the best choice for areas prone to heavy wear or impact.
Cost-wise, Lace and Skip textures are mid-range. They’re more expensive than smooth finishes but cheaper than some other textured options like Dash or Skip Trowel. With proper maintenance, these textures can last 50-70 years.
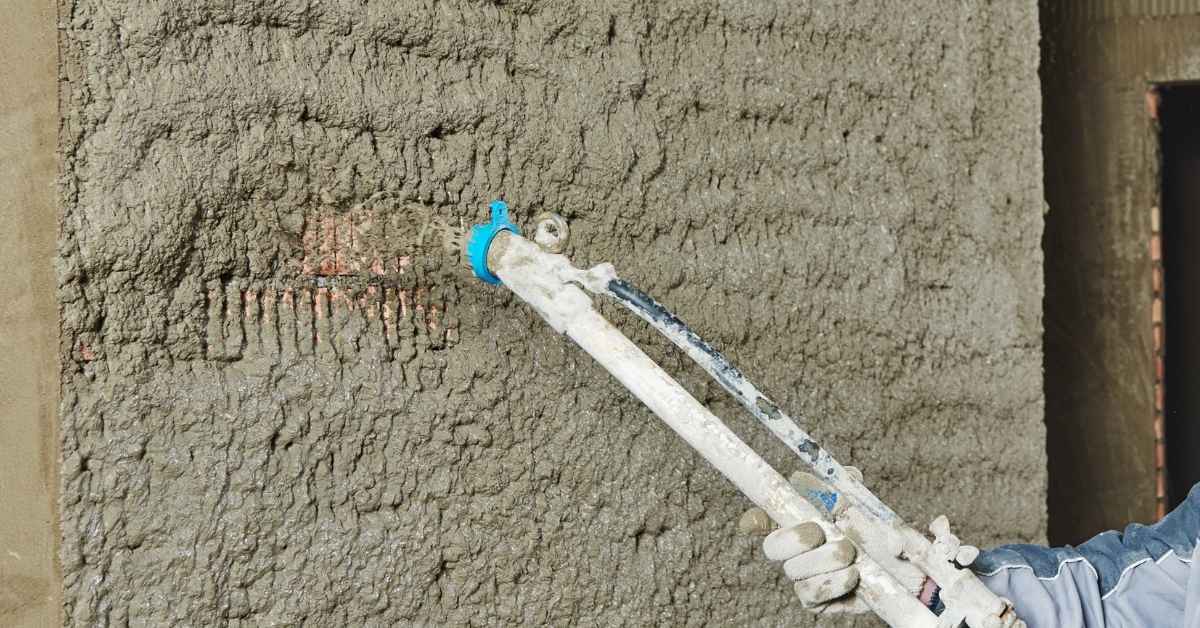
Dash (Roughcast / Knockdown / Pebble) — Characteristics, Repairability, and Tips
Dash textures use varied aggregates and application pressure to create dense or lighter patterns. Variants include roughcast, knockdown, and pebble dash, each with a distinct look. Aggregate size and finish density drive the final appearance.
Concealment improves with appropriate feathering and color matching, while deeper patterns can hide larger patches. Plan for feathered edges, compatible base coats, and staggered drying to preserve uniformity. Tips cover weather windows, tool choices, and steps to avoid over- or under-troweling for consistent results.
Application and DIY Repair Steps
The dash family, including roughcast, knockdown, and pebble/fine dash, creates texture through aggregate size and application pressure. Larger aggregates and higher pressure result in deeper textures.
For repairs, recreate the spray pattern using a hopper gun or similar tool. Match the aggregate type and size to blend seamlessly. Time your knockdown correctly – too early can cause slumping, too late may not embed the aggregate properly.
You’ll need a trowel for base coats, a knockdown knife for embedding aggregates, and possibly a float for smoothing out any rough spots. Practice on scrap material first to get the feel of your tools and materials.
Pros, Cons, Cost and Longevity
Pros: Dash textures are excellent at hiding defects due to their dense, varied pattern. They’re also durable, lasting 50-75 years with proper maintenance.
Cons: More material is required for dash textures compared to smoother finishes, leading to increased cleanup and cost. Color and aggregate matching can be challenging, especially on repairs.
Cost-wise, expect to pay around $6-$9 per square foot installed, depending on your location and the specific texture chosen. Regular touch-ups every 5-10 years will help maintain uniformity and longevity.
Comparative Analysis: Repair Visibility, Ease of Patching, and Best Use Cases
This section directly compares Sand Float, Lace/Skip, and Dash on repair concealment, DIY difficulty, and blending effort. Understand what “hidden” looks like in real-world terms for cracks, hairlines, and patches. The goal is to map texture to expected repair behavior.
We outline patching workflow, maintenance needs, and cost considerations, plus how each finish ages and requires upkeep. Quick guidance helps you choose based on existing texture, color match challenges, and exterior conditions. Look for practical rules to decide which finish fits your climate and architectural style.
Best picks by need (DIY, contractor, historic preservation, budget)
Choosing the right stucco texture for repairs depends on your needs. Here’s what to consider:
Fast DIY fixes: Sand Float is easiest to apply and blend. It requires minimal tools and time.
High-concealment needs: Dash or Lace/Skip offer better repair hiding due to their textured nature, but they’re trickier to apply.
Historic preservation: Match existing textures exactly. Sand Float is best for smooth surfaces, while Lace/Skip or Dash mimic older, hand-applied finishes.
Tools, Materials, and Visual Checkpoints for a Successful Repair
Essential tools include trowels, hawk, different float types, mixing tools, and lightweight brushes for feathering. You may also need a stainless steel trowel for precise feathering and edge work. Have masking or edging aids ready for clean transitions.
Assemble materials such as compatible stucco mix, base coats, color pigments, aggregate options, bonding agents, and cure aids. Record batch numbers and test blends on scrap to match texture and color before committing to the wall. Follow a clear workflow and monitor edge feathering, texture continuity, and curing color changes as checkpoints.
Common mistakes to avoid
Before you start your concrete repair, review this checklist to ensure a successful outcome. Use it as a quick reference on-site to avoid common pitfalls.
- Incorrect mix proportions: Check the bag label or manufacturer’s instructions for the right mix design (e.g., 3:1, 4:1 sand-to-cement ratio). Wrong proportions can lead to weak repairs that crack or crumble.
- Insufficient feathering: Ensure the repair blends smoothly with the existing concrete. Inadequate feathering results in visible edges and increased stress points where the new and old concrete meet, leading to cracking.
- Wrong water-to-cement ratio: Too much or too little water can weaken the mix. Aim for a safe range of 0.45-0.60 water-to-cement ratio. Check by performing a slump test: add water until the concrete passes a 3-inch slump test.
- Improper curing: Concrete needs moisture to gain strength. Check local rules and manufacturer’s instructions for proper curing methods (e.g., wet burlap, plastic sheeting). Insufficient curing can cause weak repairs that scale or delaminate.
- Not removing all damaged material: Ensure you’ve removed all damaged concrete, including any honeycombed or weak areas. Leaving damaged material behind can compromise the repair’s integrity.
- Using old or contaminated materials: Check the expiration dates on your cement and aggregates. Contaminated or old materials can weaken the mix and lead to failed repairs.
- Repairing in extreme temperatures: Avoid repairing concrete when temperatures are below freezing or above 90°F (32°C). Extreme temperatures can affect curing and cause weak repairs.
- Not allowing enough time for proper setting: Check the manufacturer’s instructions for the required set time. Opening a repair too soon can cause damage and weaken the repair.
Quick rule: Always follow the manufacturer’s instructions and local rules to ensure your concrete repair is durable and long-lasting.
When to hire a pro
Before you start any repair work, use this checklist to determine if you need professional help. It’s crucial to catch serious issues early to prevent costly rework.
- Structural cracks: Check for hairline or wider cracks that run vertically or diagonally. If they’re more than 1/8″ wide, consider hiring a pro as it might indicate structural damage.
- Water damage: Look for stains, peeling paint, or soft spots on the concrete. If water damage is extensive, it’s best to hire a professional to assess and repair the issue.
- Delamination: Tap the surface with a hammer; if it sounds hollow, there might be delamination (layers separating). Hire a pro for this as it requires specialized repair techniques.
- Large area patches: If you need to patch an area larger than 2′ x 2′, consider hiring a professional. Large patches require proper preparation and reinforcement, which can be challenging for DIYers.
- Uneven settling: Check if the concrete is sloping or uneven. If it’s more than 1″ out of level over 6′ (check with a long level), hire a pro as it might indicate settlement issues.
- Cracking around edges: Inspect where the concrete meets walls, steps, or other structures. Cracks here could indicate movement and require professional evaluation.
- Frost heave damage: In cold regions, check for signs of frost heaving (concrete lifted by frozen ground). If you find any, hire a pro to assess and repair the damage.
- Unsure about cause: If you can’t determine what’s causing the damage or if it’s not clear from this checklist, err on the side of caution and consult a professional.
Quick rule: If in doubt, hire a pro. It’s better to spend a bit more upfront than to risk costly rework or further damage down the line.
Regional Considerations, Maintenance, and Longevity Factors
Climate and regional conditions like humidity, freeze-thaw cycles, coastal exposure, or arid environments influence texture durability and maintenance needs. These factors also affect moisture management and color retention. Consider how your local conditions shape a repair strategy.
Sun exposure and UV impact colorfastness and repair visibility across textures. Local codes or substrate requirements may steer texture choices, so verify with the authority having jurisdiction or manufacturer instructions. Tailor maintenance cadence by texture and plan seasonal care, repainting, and retexturing to keep repairs inconspicuous.
Energy efficiency and insulation notes
While stucco textures mainly affect aesthetics, they can interact with your home’s insulation and energy efficiency. Thicker textures like Dash or Skip Trowel may slightly improve thermal mass but won’t significantly impact R-value.
EIFS (Exterior Insulation and Finish Systems): If you’re using EIFS, ensure the texture doesn’t compromise its performance. Consult a professional if unsure about compatibility.
Consult an expert: For specific energy efficiency concerns or when dealing with unique insulation setups, consider hiring a building or energy professional to assess your situation.
Routine maintenance checklist
Regularly inspecting and maintaining your stucco finish helps preserve its appearance and longevity. Use this checklist as a guide for timely upkeep.
- Annual inspection: Check for cracks, chips, or other damage. Inspect caulking around windows, doors, and flashings.
- Spring cleaning: Gently clean the surface to remove dirt, mold, or mildew using a soft-bristle brush and mild detergent.
- Post-winter check: Inspect for freeze-thaw damage. Repair any cracks promptly to prevent water intrusion.
- Fall prep: Ensure all caulking is intact before winter. Apply sealant if necessary.
- Regular paint touch-ups: Recolor and retouch areas as needed to maintain the texture’s concealment of repairs.
- Moisture management: Keep an eye on any moisture-prone areas. Address water issues promptly to prevent further damage.
- Flashing inspection: Check flashings around windows, doors, and roof intersections for signs of wear or damage.
- Trim care: Ensure tree branches and other nearby vegetation don’t scrape against the stucco, causing damage.
Quick rule: Inspect your stucco finish at least once a year to catch issues early and maintain its longevity.

Conclusion
Choosing the right texture is about hiding repairs while keeping the stucco durable and the look cohesive. Prioritize safety and a patch that blends and lasts, not just quick coverage.
Start with a simple, practical checklist: assess the existing texture and damage, decide on a matching finish, prep and prime the area, gather the right tools and materials, test a small spot, apply the patch with proper feathering, let it cure under the right conditions, and then inspect under good lighting to verify a seamless blend. Follow the same basic flow for sand, lace, and dash textures, adjusting technique to the chosen finish and local conditions.
Common mistakes to avoid include patching without proper surface prep, trying to match texture by guessing rather than testing first, and rushing a repair in extreme heat, cold, or moisture. Always use clean surfaces, wear eye protection and gloves, and keep weather in mind—poor conditions ruin texture and adhesion.
If you encounter cracked substrates, widespread damage, persistent moisture, or patches that refuse to blend after several attempts, it’s time to bring in a pro. A measured call can prevent bigger leaks and save money in the long run. Stay steady, follow the checks, and let the repair stand up to years of sun and weather.
FAQ
Which texture hides small repairs best: Sand Float, Lace, Dash, or Skip Trowel?
The Sand Float and Lace finishes are good at disguising fine lines and patches when applied evenly. Dash and Skip Trowel can also mask repairs if the repair area is blended into the surrounding texture, but they’re more sensitive to patch quality and consistency. Check the existing surface to match the texture depth and pattern as closely as you can.
What should I look for to tell if a texture is repair-friendly for DIY patches?
Look for textures that allow partial patches to blend with natural unevenness. Choose a finish that you can feather into adjacent areas and that doesn’t require perfect, uniform patterns. Always follow manufacturer guidance for setting and curing and test a small patch first.
What are practical tips to repair a Sand Float or Skip Trowel finish without obvious patches?
Keep the patch area roughly the same size and shape as the repair, then re-apply texture in light, controlled passes. Match the grain and direction of the surrounding texture and let it dry before applying a final seal or paint. If unsure, test on a hidden spot or a mock panel before touching the actual wall.
How do I decide between Lace, Dash, or Skip Trowel for a new repair project?
Consider how bold you want the texture to look and how much repair you’re hiding. Lace offers a more delicate, intricate look; Dash provides a rugged finish; Skip Trowel sits in between. Match the chosen texture to the house style and the repair size, and consult product instructions for best results.