

Introduction
Nosing options are the edge finishes and trim pieces that protect and neatly finish the front edge of each stair tile when you tile stairs.
Start with clean, dry stair surfaces and plan where each tile will sit so you don’t trap edges. Choose nosing profiles that suit your tread depth and check adhesive and tile manufacturer guidelines for stair use, then apply adhesive evenly and press tiles firmly, paying attention to cuts around risers and corners. When cutting, mark carefully, use the right blade, and dry-fit before committing to glue to avoid cracks at edges.
Key takeaways
- Plan stair dimensions and tile sizes before purchasing nosing to ensure fit.
- Choose nosing options based on stair height, tread depth, and edge visibility.
- Apply adhesive evenly on each stair, avoiding cold joints and air pockets.
- Cut tiles accurately to fit around nosing and riser transitions with support.
- Use proper tile prep, back-buttering, and spot-setting to prevent cracking.
- Wear eye protection and gloves when cutting tiles to prevent injuries.
Table of Contents
- Introduction
- Key takeaways
- Planning and Preparation
- Nosing Options and Materials
- Installation Methods for Stair Nosing
- Techniques to Prevent Cracked Edges and Chipping
- Tools, Materials, and Equipment Checklist
- Common Mistakes and Troubleshooting
- Cost, Choosing the Right Option, and Maintenance
- Conclusion
- FAQ
Planning and Preparation
Begin by assessing the stairs for levelness and squareness. Look at each tread and riser and note any wear or damage that could affect adhesion or edge durability. Record exact dimensions and plan the layout to minimize cuts and waste.
Inspect the substrate for moisture, cracks, and movement. Check flatness with a straightedge and address loose boards or patches before tiling. Map where joints will go across steps and plan a starting point that keeps symmetry and avoids awkward cuts.
Measuring and laying out tiles for stairs
Start by measuring your stair treads’ width and risers’ height. Use a tape measure, and record these dimensions precisely.
Next, decide on your tile size and orientation. Choose a size that fits well with your tread width to minimize cuts. Consider using larger tiles for wider treads to reduce the number of cuts.
Dry-fit your tiles on the stairs before applying mortar. Start from the bottom, working your way up. This helps ensure symmetry and minimizes awkward cuts. Align tile patterns so risers and treads match, and nosings are positioned consistently.
Substrate inspection and repair
Before tiling, inspect your stair substrate to ensure it’s solid and flat. A weak or uneven base can lead to tile cracking or popping off.
- Check for movement: Gently push on the substrate. If it feels soft or moves, there might be deflection or rot underneath.
- Look for cracks: Inspect for hairline fractures that could widen over time and cause tiles to crack.
- Feel for unevenness: Run your hands over the surface. Any lumps or dips need to be addressed before tiling.
- Test with a straightedge: Place a long level on the substrate. If it wobbles, there’s an issue that needs fixing.
- Check for delamination: Tap the surface with a hammer. A dull thud indicates loose boards or delamination.
- Inspect stringers and support structures: Ensure they’re solid and secure. Any weakness here can cause problems later.
- Look for moisture: Check for signs of water damage, like warping or discoloration. Moisture can compromise tile adhesion.
- Address any issues: Repair or reinforce the substrate as needed before tiling.
Quick rule: If in doubt, consult a professional. A small issue left unchecked can turn into a big problem later.
Expansion, movement joints, and code considerations
Long stair runs or landings may need expansion or movement joints to accommodate temperature changes and substrate movement. Place these joints where they’ll be least visible, like under nosings or at transitions.
Follow building codes for joint spacing. Typically, joints should be no more than 1/3 of the tile’s length apart. This helps prevent cracking due to stress from expansion and contraction.
Align stair joints with surrounding floor lines where possible. This helps maintain a consistent look throughout your space and prevents cracking at transitions.
Quick tip: Always check local building codes before starting any project. They can vary by region, and ignoring them could lead to costly mistakes.

Nosing Options and Materials
Stair nosing serves to provide safety grip, edge protection, and a finished look. Consider how different nosing choices affect tile longevity, edge integrity, and code considerations for indoor or outdoor use. Use the manufacturer guidance to confirm compatibility with your tile and substrate.
Integrated tile nosing, metal profiles, bullnose tiles, and rubber or solid-surface options each have trade-offs. Evaluate thickness compatibility, installation steps, and how they align with tread depth and edge flushness. Keep aesthetics, maintenance, and potential corrosion or staining in mind as you decide.
Metal profiles (aluminum, stainless steel, brass)
Metal nosings are durable and long-lasting. They protect tile edges from impact damage. Common types include aluminum, stainless steel, and brass.
Thickness: Typically 1/8″ to 1/4″. Choose based on your tile thickness.
Anti-slip variants: Available with textured or gritty surfaces for better grip. Essential for outdoor stairs.
Metal nosings distribute impact across the tread, reducing stress on tiles and edges. They’re easy to install using adhesive or mechanical fasteners.
Tile bullnose and pre-formed nosings
Bullnose tiles are curved edge tiles that simplify finishing. Pre-formed nosing pieces serve the same purpose, reducing edge stress.
Matching grout lines: Ensure they align with your tile pattern for a seamless look.
Proper support: Bullnose edges need proper support to prevent cracking. Use backer board or additional mortar under them.
These options are great for long stair runs, but can be pricey and may require special ordering.
Rubber, vinyl, and composite nosings
Resilient nosings are ideal for high-traffic or outdoor stairs. They’re flexible, durable, and slip-resistant.
Slip resistance: Most have textured surfaces for better grip in wet conditions.
Flexibility: Their flexibility allows them to conform to uneven substrates and reduces edge stress. But they may require additional support under heavy traffic.
These nosings are easy to install, often using adhesive or double-sided tape. They’re also cost-effective but may not be as aesthetically pleasing as metal or tile options.
Installation Methods for Stair Nosing
Match the nosing type to the stair substrate and verify what fixing method is appropriate. Some stairs respond best to adhesive, others to mechanical fasteners, and some setups use setting profiles embedded in thinset. Consider high-traffic or exterior conditions when choosing a method.
Prepare the surface with careful measurements and edge checks before installing. Confirm tread height, nosing projection, and edge squareness. Plan transitions to landings and align grout lines with the nosing for a clean finish.
Setting nosing into thinset with tile
Start by mixing your thinset according to the manufacturer’s instructions. Use a medium consistency for best results.
Butter the back of the nosing and the step tread where it will sit, ensuring full coverage. This helps distribute weight evenly and prevents edge cracking.
Align the nosing carefully, using spacers if needed to maintain consistent grout lines. Press it firmly into place, checking for level and plumb.
Use a trowel or notched spreader to apply additional thinset behind the nosing, ensuring full support. This helps minimize edge load and reduces cracking risk.
Mechanically fixed nosings and anchors
For mechanically fixed nosings, first mark the screw or anchor placement. Typically, this is every 6-8 inches along the nosing.
Drill pilot holes at your marked spots, using a drill bit slightly smaller than your screws or anchors. This prevents the wood from splitting.
Apply construction adhesive to the back of the nosing and the step tread before installing. Then, attach the nosing using screws or anchors, driving them in flush with the surface.
Seal all fasteners with a silicone-based sealant to prevent water ingress and movement that could cause cracking.
Retrofit and adhesive-only installations
For retrofit installations, clean the existing surface thoroughly. Priming may be necessary to improve adhesion.
Choose an appropriate adhesive for your nosing material and substrate. Thinset is usually a good choice, but some nosings may require a specific adhesive like construction adhesive or epoxy.
Apply adhesive generously to both the back of the nosing and the step tread. Press the nosing into place, ensuring it’s level and properly aligned with the tile pattern.
Adhesive-only installations can be sufficient for low-traffic areas, but high-traffic or external stairs may require mechanical fixing as well to prevent movement and cracking.
Techniques to Prevent Cracked Edges and Chipping
Back-buttering full tiles on treads and risers can help transfer adhesive evenly and support the tile edge. This reduces voids and improves edge bonding where the nosing sits. Use proper edge support to prevent micro-movements that lead to cracks.
Plan grout joints and movement joints to accommodate expansion and contraction without stressing edges. Practice precise cuts for eased or bull-nosed edges and protect edges during transport and setting. Use a controlled sequence to distribute weight evenly across edges as the setting cures.
Ensuring full bedding and support
Tiles that aren’t properly supported will crack under stress. Voids behind them concentrate pressure, like a bubble in a tire.
Check base compaction: Before laying tiles, ensure the substrate is solid and compacted. Tap it with a hammer; if it sounds hollow, it’s not ready.
Use the right adhesive: Thinset mortar or mastic for ceramic/porcelain, epoxy for natural stone. Follow manufacturer instructions to mix and apply.
Spread evenly: Use a notched trowel to spread adhesive evenly across the substrate. This ensures full contact with the tile back.
Correct tile cutting and protected edge finishing
First things first, mate. You wanna prevent those nasty chips and cracks on your tile edges? Start with clean cuts.
Use a good quality wet saw or hand cutter for straight, smooth edges. Check the blade – it should be sharp and suitable for your tile type. Rounded edge profiles can help too, especially on edges that’ll see heavy traffic. Just make sure they match your design.
Protect those edges during installation. Use protective profiles or edge guards to keep them safe from damage. And remember, full bedding and support? That’s not just for the middle of your tiles – do it right along the edges too.
Joint width, grout type, and sealing
Stairs take a beating. Wide joints let them breathe, reducing stress on tiles.
For stairs, aim for joint widths of 1/8″ to 3/16″. Check your tile size; wider tiles need wider joints. Never go over 1/4″.
Use flexible, polymer-modified grouts. They give a bit with temperature changes and foot traffic. Check the label for flexibility claims.
Seal between nosing and tile to stop water getting in. Use a silicone-based sealant, paint it on, let it dry. It’s cheap insurance against cracked edges.
Tools, Materials, and Equipment Checklist
Assemble a reliable set of cutting tools, notched trowels, spacers, a rubber mallet, and a grout float. Include a stable ladder or scaffold for safe stair access and a level or laser for accuracy. Have a straightedge and chalk line ready for layout checks.
Gather thinset or appropriate mortar, primers, grout, sealants, and a range of nosing profiles. Include waterproofing or crack-isolation materials if needed and ensure surface protection measures are in place. Keep spare blades, spacers, and cleaning supplies handy for a smooth workflow.
Recommended adhesives, mortars, and thinsets
Before you start tiling your stairs, ensure you have the right adhesives and mortars for a strong bond.
- Thinset mortar: Choose one suitable for concrete stairs and your tile type. Larger tiles need higher bonding strength.
- Tile size: Check manufacturer guidelines for recommended thinset based on tile size.
- Traffic level: Consider the foot traffic on your stairs when selecting a mortar. Higher traffic needs stronger adhesion.
- Primer: Some tiles may require a primer to improve adhesion and prevent moisture issues.
- Adhesive coverage: Calculate how much adhesive you’ll need based on tile size and spacing.
- Grout type/color: Choose grout that complements your tiles and is suitable for the joint width.
- Sealant: Consider using a sealant to protect grout from stains and moisture.
- Nosing profiles: Select nosing profiles made of aluminum, PVC, stone, etc., based on your design and tile type. Check recommended install methods.
Quick rule: Always follow manufacturer guidelines for best results.
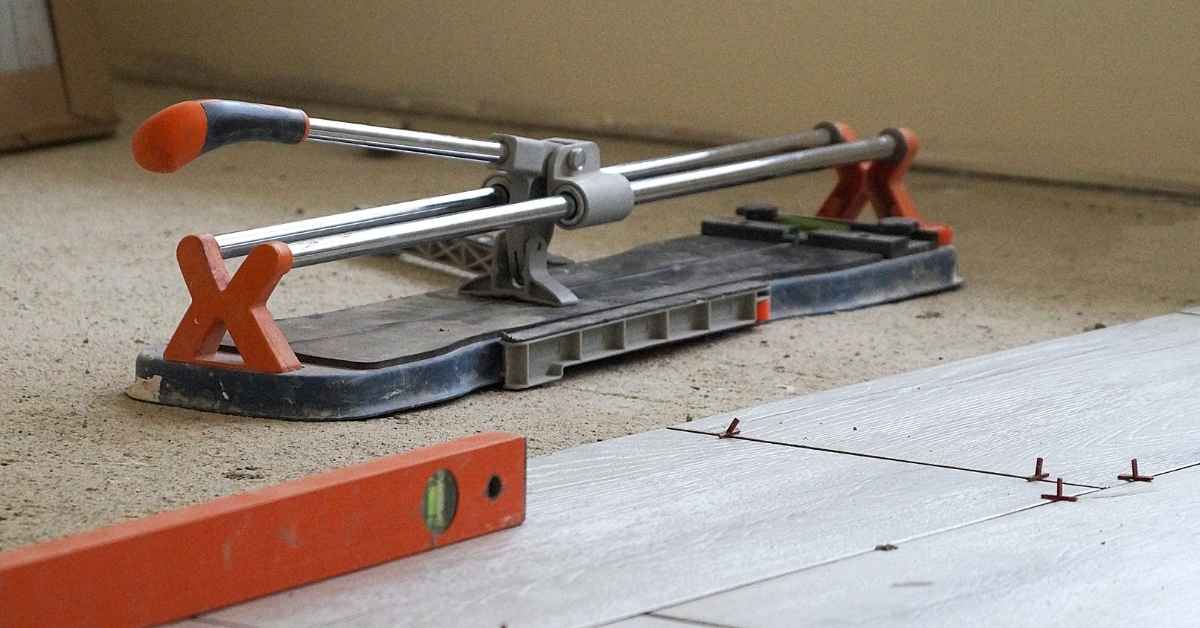
Cutting, measuring, and installation tools
Having the right tools ensures clean cuts and accurate installations.
- Tile cutter/wet saw: Essential for cutting tiles to size. A wet saw reduces dust but requires water hookup.
- Score-and-snap tool: Useful for scoring and snapping ceramic or porcelain tiles.
- Notched trowel: Required for applying mortar. Size depends on tile type (e.g., 1/4″ or 3/8″ for small to medium tiles).
- Margin trowel: Used for spreading thin-set mortar onto the back of large tiles.
- Spacers: Ensure even grout lines. Size depends on tile and grout joint width desired.
- Rubber mallet: Gently taps tiles into place without damaging them.
- Grout float: Spreads and levels grout over the tiles.
- Kneepads: Protect your knees from discomfort during long periods of kneeling.
- Stable step ladder/scaffolding: Provides safe access to stairs for tiling work.
Quick rule: Always use the right tool for the job to prevent damage and ensure quality results.
Safety equipment and site protection
Prioritize safety during your stair-tiling project with these essentials.
- Eye/ear protection: Protect eyes from debris and ears from loud tools like wet saws.
- Gloves: Prevent hand injuries when handling tiles, mortar, or other materials.
- Dust mask: Protect your lungs from tile dust during cutting and sanding.
- Edge protection: Install temporary edge guards on stairs to prevent falls while working.
- Non-slip measures: Apply non-slip tape or paint to unfinished steps to prevent accidents.
- Dust extraction/containment: Use a vacuum or containment system to control tile dust and maintain a clean workspace.
- Trip hazard management: Keep tools, materials, and waste away from walkways to prevent trips.
- Tool/equipment staging: Organize your tools and materials near the work area to minimize interruptions and return trips.
Quick rule: Never compromise safety for speed. Always prioritize safety measures.
Common Mistakes and Troubleshooting
Verify substrate and structure to prevent flexing or squeaks that can telegraph through tiles. Check stringers and treads for rigidity and address movement before tiling. If in doubt, plan an appropriate underlayment or patching approach.
Make careful nosing selections and keep edge alignment consistent. Watch for gaps, mismatched widths, or height changes that invite cracking. When issues arise, reassess adhesive choice, substrate prep, and moisture management to guide corrective steps.
Fixing cracked or loose edge tiles
If your stair nosing’s edges are cracking or tiles are loosening, act fast. First, stop using the stairs to prevent further damage.
Re-bedding tiles might solve the issue if it’s due to poor initial installation. Scrape off old adhesive, clean the surface, and re-apply fresh thinset. Press the tile back into place, ensuring full contact with the substrate.
If the nosing itself is cracked or loose, replace it. Remove the affected tiles, cut new nosing to fit, and reinstall using the methods discussed earlier in this guide.
Before re-tiling, inspect for underlying movement. Tighten any loose screws or nails in stringers. If there’s significant movement, consider sistering joists or reinforcing concrete before proceeding.
Diagnosing movement and substrate-induced cracks
Cracks in your stair tiles can be due to impact or substrate deflection. To diagnose, inspect the crack’s pattern. Hairline cracks running diagonally are often signs of substrate movement.
Impact cracks, from heavy objects dropped on stairs, are usually localized and straight. If you find these, reinforce the substrate if necessary, then re-grout and seal.
Substrate-induced cracks warrant further investigation. Check for flexing or squeaking stringers. Tighten connections, sister joists, or reinforce concrete as needed. If movement persists, consider professional assessment.
Before re-tiling, apply a crack-isolation membrane to prevent new cracks from forming and old ones from propagating.
When to call a professional
While DIY is great, some jobs are best left to the pros. Here’s when to seek help:
Structural issues. If your stairs show signs of significant structural damage—like sagging, severe cracking, or twisting—stop work and call a structural engineer or professional contractor immediately.
Heated stairs. If you’re installing heated stair nosing systems, hire a licensed electrician to ensure safety and compliance with local codes.
Complex nosing systems. Intricate stair nosing designs, especially those involving multiple materials or complex cuts, might be best handled by professionals to avoid costly mistakes.
Always err on the side of caution. It’s better to call a pro than risk injury or further damage to your home.
Cost, Choosing the Right Option, and Maintenance
Consider factors that drive costs, including material type, adhesive needs, labor time, and tools or rentals. Weigh the long-term value of different nosing choices against initial price. Use a simple decision framework to compare options without overcommitting to a single path.
Review maintenance needs for each option, from cleaning to resealing and potential edge repairs. Factor climate, traffic, and expected wear into your budgeting and upkeep plan. Use a quick checklist to guide material selection and installation decisions, and note common pitfalls to avoid.
Cost considerations by nosing type
When budgeting for stair nosings, consider the material’s initial cost, lifespan, and maintenance needs. Here’s a breakdown of common options:
Metal Nosing: Inexpensive upfront, but may dent or scratch over time. Requires periodic touch-ups.
Tile Nosing (Integrated): Mid-range cost with tiles. Long-lasting if installed correctly, but can crack at edges if not supported properly.
Resilient Nosing: More expensive initially, but durable and low-maintenance. Resistant to chips and cracks.
Routine maintenance and repair tips
Regular upkeep extends your nosing’s life. Here’s a simple routine:
Inspect annually for hairline cracks or wear. Clean with mild soap and water, avoiding harsh chemicals.
Replace worn nosing by removing old adhesive, applying new mortar, and reinstalling. Reseal joints every 2-3 years to prevent moisture intrusion.
Visual checkpoints and quality inspection
Before using your stairs, perform a final inspection to ensure durability:
- Alignment: Check nosing aligns with treads. Misaligned nosings can cause trips.
- Grout Joints: Ensure grout is level and fills joints properly. Incomplete filling allows moisture intrusion.
- Profile Seating: Confirm nosing sits flush with treads. Overhang or gap can cause tripping.
- No Movement: Gently push and pull nosings to ensure they’re secure. Movement indicates poor adhesion.
Quick rule: If in doubt, recheck your work or consult a professional before using the stairs.

Conclusion
Plan carefully and verify every step so the stairs stay safe, durable, and presentable. The payoff comes from choosing the right nosing and installing it cleanly, not from rushing through the work.
Check this as you go: measure each stair, pick the nosing type that fits your tread width, dry-fit first without adhesive, mark your cut lines, cut with the proper tool, apply bedding or adhesive evenly, secure with screws if needed, wipe away excess, and let it cure before use. Do a slow safety test with the stairs unloaded to confirm everything sits flat and true.
Avoid these common traps: rushing cuts or skipping backer support, using the wrong adhesive or over-tightening fasteners, and neglecting edge protection or leveling. Always wear eye and hand protection, keep power tools unplugged when changing blades, and test fit in a small area before committing to full installation. If a stair is uneven, or the kit calls for special supports or complex cuts, don’t push ahead—call a professional rather than risk damage or injury. Stay patient, finish strong, and your stairs will look good and last a long time.
FAQ
What are the best tile preparation steps before setting tiles on stairs?
Make sure the stair surface is clean, dry, and free of loose debris. If you have old coatings, crack repairs, or uneven spots, fix them first and roughen the surface slightly for better adhesion. Check that the tread and riser are smooth and the height is consistent across steps.
How do I choose the right nosing option for stairs?
Consider the stair height, tread depth, and safety needs. Look for nosing pieces that match your tile thickness and offer a rounded or beveled edge to reduce chipping. Ensure the profile will fit flush with adjacent tiles and won’t create a trip point.
What should I know about applying adhesive on stairs?
Use the correct thinset or tile adhesive for stairs and follow the manufacturer’s open time. Back-butter large tiles and comb the adhesive for full coverage on each step. Check that the trowel size matches the tile and substrate for a solid, even bed.
How can I ensure proper cutting and fitting of tiles on uneven stair edges?
Use a stable tile cutter or angle grinder with a diamond blade for accurate cuts. Measure twice, cut once, and dry-fit before setting. Leave small gaps for grout unless the tile and edge are designed to butt tightly with proper trim.
What about waterproofing membranes and sound insulation on stairs?
If you’re using a waterproofing membrane, follow the product directions for priming, bonding, and lapping. For sound insulation, consider underlayment compatible with stairs and your tile, and tape all seams well. Check that the membrane and underlayment don’t interfere with expansion joints or nosing fit.