
Introduction
Removing paint from trim is the careful process of stripping old paint from wood, metal, and decorative profiles without harming the trim. Use safe, tested methods and start on a small, inconspicuous area before moving to larger spots. Always follow the product label and any local regulations when choosing solvents or tools.
Assess the trim to decide which approach fits wood, metal, or profiles best. Check for lead paint if the home is older and prefer low-dust or water-based options when possible. Work in a well-ventilated space, wear protective gear, and test any method on an unseen area before committing to the whole piece.
Key takeaways
- Inspect trim for lead paint; test before sanding or scraping any surface.
- Wear eye protection, gloves, and a respirator when sanding or using solvents.
- Use the gentlest effective method first on wood trim to minimize damage.
- Check manufacturer labels for safety data, heat, and disposal guidance.
- Avoid excessive moisture; wipe and dry surfaces promptly after cleaning.
- Test for lead and stabilize conditions before refinishing or sealing surfaces.
Table of Contents
- Introduction
- Key takeaways
- Quick Overview and Safety Essentials
- Tools and Materials Checklist
- Preparing Trim and the Work Area
- Methods for Removing Paint from Wood Trim
- Methods for Removing Paint from Metal Trim
- Techniques for Profiles, Grooves, and Decorative Moldings
- Lead Paint, Testing, and Regulatory Considerations
- Cleanup, Refinishing, and Visual Checkpoints
- Conclusion
- FAQ
Quick Overview and Safety Essentials
This guide outlines practical methods for removing paint from wood, metal, and profiles while keeping you safe. It highlights what to expect and where DIY work might be unsafe without professional help.
Check your local rules and product labels for safety requirements, ventilation needs, and disposal guidance. Use a basic safety checklist to decide if the job fits your skill level and tools on hand.
Personal protective equipment and ventilation
Safety starts with the right gear. Here’s what you need:
- Gloves: Protect your hands from chemicals and splinters. Choose rubber or nitrile gloves, around $5-$10 per pair.
- Eye Protection: Goggles or safety glasses with side shields, about $10-$20, keep paint chips out of your eyes.
- Respirator: For sanding and stripping, use a half-face respirator with P100 filters, around $30-$50. Check Safety Data Sheets for specific hazard advice.
- Ventilation: Open windows or use fans to keep the area well-ventilated. Consider renting an air scrubber, about $75-$150 per day, for heavy-duty jobs.
- Clothing: Wear old clothes or a paint suit, around $20-$40, to protect your skin and clothing from chemicals.
Assessing paint age and lead risk
Before you start, check if the paint contains lead. Lead is dangerous, especially to children and pets.
Look for these clues: Older homes (built before 1978), peeling or chipping paint, and dull, powdery appearance. If you suspect lead, use lead-safe work practices until test results are known.
Purchase a lead test kit, around $10-$20, from your local hardware store. Follow the instructions carefully. If the result is positive, consider hiring a professional for safe removal.
When to hire a professional
DIY is great, but sometimes it’s best to leave it to the pros. Here are some scenarios:
Confirmed lead hazards: If your test results show lead, hire a certified lead abatement contractor. They have the training and equipment to handle lead safely.
Extensive or high-up trim: If the job is too big or involves heights that make you uncomfortable, consider hiring a painter. They have the right equipment and experience for safe working at heights.
Historic moldings: If your trim has historic value or is intricately carved, hire a professional who specializes in historic preservation. They can help maintain the original details while removing the paint safely.
Tools and Materials Checklist
Gather core items such as hand scrapers, brushes, sanding supplies, and compatible removal agents. Include protective gear like gloves, goggles, and a respirator or mask as appropriate.
Note optional tools that can simplify the job, and verify label instructions, substrate compatibility, and any measured guidelines before purchasing or using them.
Basic tools for all jobs
Before you start, ensure you have these basic tools on hand. They’ll make your paint removal job easier and safer.
- Hand Scrapers: Useful for scraping off loose paint. Look for ones with replaceable blades.
- Putty Knives: Great for getting into tight spaces. Choose flexible ones for curves, rigid for flat surfaces.
- Masking Materials: Protect areas you don’t want to strip using painter’s tape and paper.
- Drop Cloths: Cover the floor to protect it from paint chips and strippers.
- Blades: Ensure they’re sharp, durable, and have secure handles. Check for rust or damage before use.
Quick rule: Always check your tools before starting. Dull blades or damaged handles can cause accidents.
Chemical and heat-stripping supplies
When using chemicals or heat to strip paint, make sure you have these supplies ready. Safety first!
- Paint Stripper: Choose from gels, caustic, solvent, or bio-based strippers. Always check label for substrate compatibility.
- Brushes: Use natural bristles for oil-based strippers, synthetic for water-based ones.
- Heat Gun: For tough spots, use a heat gun to soften paint. Ensure it’s in good working condition.
- Safe Containers: Store and dispose of chemicals responsibly. Use approved containers.
Quick rule: Always follow manufacturer instructions when using chemicals or heat. Safety first!
Finishing and repair materials
After stripping, you’ll need these materials to prep and finish your surfaces.
- Sanding Supplies: Sandpaper or sanding sponges in various grits for smoothing surfaces.
- Wood Fillers: For gaps and holes. Choose one that matches your wood’s color.
- Metal Primers: Prime bare metal before painting to prevent rust and improve paint adhesion.
- Stains, Sealers, Topcoats: Choose products compatible with the cleaned substrate. Check labels for best results.
Quick rule: Always check material compatibility with your surface before application.
Preparing Trim and the Work Area
Start by clearing the area and protecting nearby surfaces with drop cloths or plastic. Set up containment to control dust, fumes, and debris during removal.
Seal openings, remove adjacent hardware if possible, and plan for clean disposal of waste. Ensure good ventilation and access to power tools if you intend to use them.
Masking, drop cloths, and containment
Protect your floors and walls from paint chips and dust by using masking tape and drop cloths. Start by applying painter’s tape along the edges of trim to prevent paint from bleeding onto adjacent surfaces.
Lay down plastic sheeting or canvas drop cloths on the floor beneath the work area. Secure them with weights or tape to keep them in place. For larger areas, consider using temporary barriers or zip walls to contain dust and fumes.
Tip: Use low-tack painter’s tape to avoid pulling off paint when removing it.
Removing or protecting hardware and adjacent materials
The choice of material and its condition will determine whether you need to remove trim, screws, or hardware. If the paint is old and brittle, it’s safer to take off the trim.
- Trim: Remove if paint is flaking or loose. Reinstall after stripping.
- Screws/Hardware: Mask with painter’s tape. Remove if rusted or damaged.
- Glass: Protect with removable film to prevent scratches and breakage.
- Soft Surfaces (wallpaper, fabric): Cover with plastic sheeting to avoid staining.
- Metal Trim: Mask with tape. Remove if paint is peeling or damaged.
Test spots and compatibility checks
Before stripping, perform small test removals on hidden areas to evaluate the effectiveness of your chosen method. This helps you avoid damaging the finish or substrate.
Check for any adverse reactions between the paint stripper and the trim material. Some strippers can cause discoloration or damage certain woods or metals.
Tip: Allow test spots to dry completely before proceeding with full-scale stripping.
Methods for Removing Paint from Wood Trim
Consider chemical strippers, heat, scraping, and light sanding as part of a stepwise approach. Weigh pros and cons for each method and how they affect the wood substrate.
Preserve grain and avoid gouging by testing on an inconspicuous area and following manufacturer instructions or label guidance. Use gentle techniques and work from edges inward to minimize damage.
Using chemical strippers on wood
Chemical strippers are effective for removing paint from wood trim. Choose a stripper suitable for your paint type – oil-based, latex, or unknown.
Application: Apply stripper thickly with a brush, especially in corners and crevices. For gel strippers, apply generously; for liquids, spread evenly.
Dwell time: Follow the manufacturer’s instructions. Generally, leave it on for 15-30 minutes before scraping off paint. Reapply if needed.
Neutralization and cleanup: Neutralize stripper with water or a suitable cleaner. Use a scraper to remove loosened paint, then rinse thoroughly with clean water. Wear gloves and protective clothing throughout.
Heat guns and infrared/thermal methods
Heat guns can soften paint for easy removal, but be cautious not to overheat and burn the wood. Start with a lower heat setting.
Technique: Hold the heat gun 2-3 inches away from the surface. Move it steadily along the trim, melting the paint. Use a scraper or putty knife to remove softened paint.
Infrared/thermal strippers: These tools provide consistent, lower heat for longer periods. They’re safer but slower than heat guns. Follow similar removal techniques.
Avoid charring: Keep the gun moving and don’t leave it in one spot too long. If paint starts to smoke or darken, you’re overheating the wood.
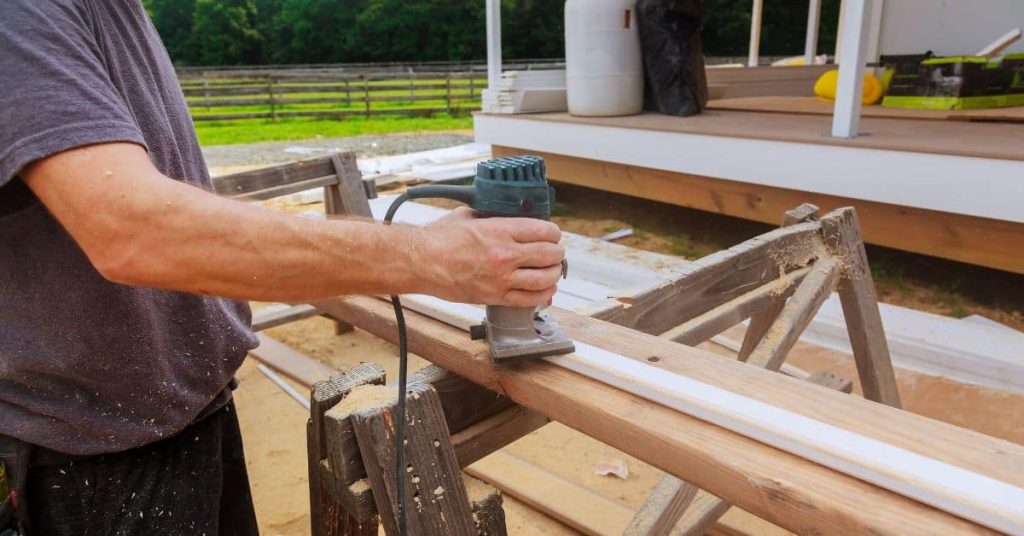
Mechanical removal and sanding strategies
Hand scraping: Use a sharp, wide-bladed scraper to remove paint. Work at an angle, applying even pressure. Start with larger areas before tackling details.
Multi-tool and detail sanding: For tight spaces, use a multi-tool or orbital sander with a fine-grit sandpaper (120-150 grit). Sand in the direction of the grain to avoid damaging the wood.
Grit progression: Start with coarse grit (60-80) for heavy paint removal, then progress to finer grits for smoothing. Be patient; rushing through grits can damage the surface.
Dust control: Use a dust mask and eye protection when sanding. Vacuum or wipe away dust regularly to prevent clogging tools and protect your lungs. Consider using a dust collection bag with your sander.

Methods for Removing Paint from Metal Trim
Explore safe chemical options for metal, along with controlled abrasive methods suited to the metal type. Avoid aggressive chemicals that can accelerate corrosion or pitting.
Take care to prevent warping by avoiding excessive heat and using appropriate pressure. Verify the trim’s metal type and corrosion resistance guidance before starting.
Solvent and Gel Strippers for Metal
When tackling metal trim, choose non-corrosive chemical strippers. These are usually solvent-based or gel formulations.
Apply the stripper evenly with a brush or squeegee. Let it sit – this is called dwell time. Follow the product’s instructions for dwell, but typically 15-30 minutes is enough.
After dwell, use a scraper to remove the loosened paint. Rinse thoroughly with water or neutralize with a suitable solution to prevent flash rust on steel.
Abrasive and Mechanical Methods for Metal
For tough paint, consider abrasive methods. Wire brushes can remove paint from nooks and crannies. Flap discs or sanding pads with coarse grits (60-80) work well on flat surfaces.
Be careful not to overheat thin metals – this could warp them. Keep moving the tool, don’t stay in one spot too long.
Media blasting is another option. It’s messy but effective. Use a fine abrasive like glass beads or aluminum oxide for metal. Always wear protective gear.
Rust Treatment and Priming
If you’ve exposed bare or lightly rusted metal, treat it first. Sand off loose rust with a wire brush or sandpaper. Apply a rust converter or primer with rust-inhibiting properties.
Choose your final primer based on the topcoat you’ll use. For example, if you’re painting, use a paint primer. If you’re applying clear coat, use a clear primer.
Always follow up with a suitable topcoat to protect the metal and prevent rust recurrence.
Techniques for Profiles, Grooves, and Decorative Moldings
Focus on preserving delicate shapes like crowns, flutes, and carvings by using small tools and light passes. Choose methods that minimize detail loss and staining in recessed areas.
Work methodically, testing on a hidden spot and adjusting pressure to avoid flattening profiles. Use brushes or micro-scrapers designed for intricate work to maintain sharp edges.
Gel strippers and poultices for intricate profiles
For delicate woodwork like crown moldings or dentil details, use thick gel strippers. They stay put on vertical surfaces and seep into crevices.
Apply generously with a brush, let it sit as directed, then gently scrape off with a plastic scraper. Work from the top down to avoid pushing paint into grooves.
Tip: For tough spots, use a poultice – a thick paste that draws out paint. Mix powdered poultice with the stripper, apply, and let it dry before removing.
Detail scraping, picks, and micro-tools
To preserve intricate profiles, use small tools designed for tight spaces. They minimize substrate damage and help maintain delicate shapes.
- Dental pick: Reaches into tiny crevices to scrape off paint. Use gently to avoid gouging.
- Brass-bristle brush: Soft bristles won’t scratch surfaces. Use for light scrubbing in grooves.
- Rotary detail bit: For power tools, these bits have small, precise tips. Choose the right size for your groove.
- Scalpel or X-Acto knife: For really tight spots, use a sharp blade to scrape off paint. Be careful not to cut yourself.
- Optional: Air-powered or electric detail sander: Rentable, these sanders have small, precise heads for fine-tuning. Use with light pressure and low grit.
Steam and swelling-sensitive materials
Steam can be a gentle way to remove paint from trims that tolerate moisture. But it’s not suitable for all materials.
- Veneer or composite trim: Steam can cause these materials to swell, crack, or delaminate. Avoid using steam on them.
- Painted plywood or MDF: Steam may cause the wood to swell and the paint to bubble. Test a small area first.
- Steam machine rating: Look for machines with adjustable temperature and pressure. Start low, then increase if needed.
- Tip: Always test steam on a hidden area first. Let it sit for 24 hours to check for any adverse reactions.
Lead Paint, Testing, and Regulatory Considerations
Identify potential lead risk by testing and observing historic materials in the area before starting. Use recommended testing options and follow safety procedures for containment.
Summarize relevant regulations and safety practices, including waste handling and disposal basics. Follow work-practice guidelines from trusted sources and manufacturer notes for every product used.
How to test for lead and interpret results
Testing for lead is crucial before you start stripping paint. DIY test kits are convenient but have limitations.
Spot tests check small areas. They’re quick, but results may not represent the entire surface. For accurate readings, consider lab analysis. Send samples to a certified lab for comprehensive testing.
If your test comes back positive, don’t panic. It just means you need to follow lead-safe procedures. If it’s negative, retest in multiple areas to be sure. Always err on the side of caution.
For peace of mind, consider hiring a certified inspector. They have specialized equipment and training to detect lead accurately.
Lead-safe work practices and containment
Working with lead paint requires careful containment. The EPA’s Renovation, Repair, and Painting Rule (RRP) sets standards for containing lead dust.
Wet methods are key. Always keep surfaces wet to control dust. Use HEPA vacuums for cleanup. Seal off work areas with plastic sheeting to contain dust.
Check local regulations before you start. Some areas have stricter rules. If your project involves more than a certain amount of lead paint, you may need a certified contractor.
Remember, safety is paramount. Lead dust is invisible and harmful. Don’t take chances with your health or the environment.
Disposal and waste handling for hazardous paint
Paint chips, rags, and other waste containing lead are hazardous materials. They can’t go in regular trash.
Label containers clearly. Store them safely until disposal. Never mix with other chemicals.
Find your local hazardous-waste collection point. Many cities have special days or facilities for this purpose. Some hardware stores accept paint waste too.
Never pour paint down drains or dispose of it in regular trash. It’s illegal and harmful to the environment. Always follow proper disposal procedures.
Cleanup, Refinishing, and Visual Checkpoints
Rinse, wipe, and remove residues from wood or metal surfaces before final sanding. Plan for minor repairs and material touch-ups as part of the cleanup.
Choose primers and finishes compatible with the substrate, then perform visual and tactile checks to verify smoothness, edge fidelity, and uniform coverage before recoating.
Surface preparation before refinishing
Before you start applying new paint or stain, make sure your trim is clean and ready for a durable finish.
- Degrease the surface: Use a degreaser to remove any dirt, grease, or oil. This ensures better adhesion of your primer or stain.
- Sand with fine grit: Lightly sand the trim using 120-220 grit sandpaper. This helps to smooth out any rough spots and provides a better surface for painting.
- Remove dust: Wipe down the trim with a damp cloth to remove all sanding dust.
- Check for damage: Inspect the trim for any cracks, holes, or other damage. Repair these areas before refinishing.
- Avoid swelling-sensitive materials: If your trim is made from swelling-sensitive materials like redwood or cedar, avoid getting it too wet during preparation.
- Test stain/paint adhesion: Perform a small test patch to ensure the new finish adheres well to the surface.
- Avoid lead paint: If your trim has old lead-based paint, follow lead-safe work practices and contain the area to prevent lead dust from spreading.
- Allow drying time: Make sure the trim is completely dry before applying any new finish.
Quick rule: A clean, dry, and well-prepared surface ensures better adhesion and a longer-lasting finish.
Visual and tactile checkpoints
Before you start applying new paint or stain, make sure your trim is clean and ready for a durable finish.
- Uniform bare surface: Check that the entire surface of the trim is evenly exposed. No paint or old finish should remain.
- No ghosting: Ensure there are no faint outlines or ‘ghosts’ of the previous design or color. This indicates incomplete removal of the old finish.
- Smooth profile edges: Inspect the edges and corners of the trim. They should be smooth and free from any residual paint or burrs.
- Residual tackiness: Lightly touch the surface with your fingertips to check for any remaining tackiness. This could indicate that some old finish was not completely removed.
- Check for gouges: Inspect the trim for any deep scratches or gouges that may have been caused during the removal process.
- Verify surface integrity: Make sure there are no soft spots, rot, or other signs of damage to the trim’s structure.
- Avoid swelling-sensitive materials: If your trim is made from swelling-sensitive materials like redwood or cedar, be gentle during inspection to avoid damaging the wood.
- Lead paint warning: If your trim has old lead-based paint, do not sand or scrape it. Follow lead-safe work practices and contain the area to prevent lead dust from spreading.
Quick rule: Thoroughly inspecting the surface ensures that all old finish is removed and the trim is ready for refinishing.
Recoating and finishing recommendations
Once your trim is properly prepared, follow these steps to ensure a durable and long-lasting finish.
- Sealer/primer first: Always apply a sealer or primer before painting. This helps the paint adhere better and provides a more even finish.
- Choose compatible products: Make sure your primer, stain, or paint is compatible with the material of your trim and any previous finishes.
- Test sample area: Before applying the new finish to the entire trim, do a small test patch to ensure you like the color and that it adheres well.
- Allow drying time: Follow the manufacturer’s recommendations for drying times between coats. Rushing this process can lead to poor adhesion and an uneven finish.
- Avoid high heat or direct sunlight: Keep the trim out of direct sunlight and away from high heat sources while it dries to prevent warping or blistering.
- Sand lightly between coats: Lightly sand the surface with fine grit sandpaper between coats to remove any dust or imperfections. Wipe off any sanding dust before applying the next coat.
- Check for drips or runs: Inspect your work for any drips, runs, or missed spots. Touch up these areas as needed.
- Allow final drying time: Once you’ve applied the last coat, allow it to dry completely before touching or handling the trim.
Quick rule: Following proper recoating and finishing procedures ensures a durable, long-lasting finish that looks great and protects your trim.
Conclusion
You can finish trim without wrecking it if you stay focused on safety, proper technique, and a careful finish. The right approach protects your wood or metal, keeps edges intact, and makes the final look durable and even.
To move forward, start by confirming good ventilation and PPE, pick the method that fits the material, clamp or steady the trim, test a small hidden area first, follow the product instructions, work in manageable sections, neutralize and clean as you go, then reassess before refinishing. Keep the work area clear and calm, and check your progress against visible checkpoints as you go.
Common mistakes to avoid include using aggressive tools on delicate profiles, skipping the test spot, rushing cleanup or neutralizing, and ignoring lead paint testing and regulatory steps. Always monitor for damage, never apply heat or harsh chemicals without proper guidance, and follow the safety rules: test first, work slowly, and protect eyes and lungs throughout the process.
If you encounter lead paint, a complex profile, or suspect hidden damage, call a professional instead of pushing on. When it makes sense to push through, stay methodical, document each step, and celebrate small wins as you see the trim return to a clean, ready-for-refinish state.
FAQ
What should I check before choosing a method to remove paint from trim?
Read the trim material and finish label. Look for recommended removal methods and any heat or chemical restrictions. If unsure, check the manufacturer instructions or local guidelines before starting.
How do I avoid damaging wood when removing paint?
Test a small, inconspicuous area first. Use the gentlest method that works and go slowly around edges and corners. If wood shows fibers raising or gouging, stop and switch to a milder approach.
What’s the safest approach for metal trim?
Choose a method that won’t pit or discolor the metal. Avoid aggressive scraping on delicate profiles. Follow product instructions and use eye and hand protection during the workflow.
What should I do with trim after paint is removed?
Inspect for remaining finish or loose material. Clean thoroughly, then dry before refinishing or repainting. Dispose of rags and waste per local guidelines and product labels.