

Introduction
Self-leveling underlayment over wood subfloors is a cementitious mix poured over prepared wood to create a flat, stable surface for new floors. It requires cleaning, securing loose boards, removing finishes, and flattening high spots so the surface is sound and ready to accept the leveling compound. Take it slow and work in small sections, watching for edge lift and edge buildup.
Choosing and applying metal lath over the prepared subfloor helps key the leveling mix. Mixing and pouring the self-leveling compound should be done in batches according to the label, and you must follow recommended curing and ventilation guidelines. This method can reduce floor bounce and create a smooth base for the final floor; always check product instructions and local rules for thickness limits and installation steps.
Key takeaways
- Prepare wood subfloors by cleaning, repairing nails, and checking flatness before leveling.
- Embed metal lath over secured substrate with rated fasteners per manufacturer.
- Mix and pour self-leveling underlayment in manageable batches, verifying consistency.
- Screed and feather edges while monitor thickness, ensuring even surface.
- Allow proper curing and confirm surface is ready before installing flooring.
- Safety: follow ventilation, PPE, and avoid traffic until surface hardens.
Table of Contents
- Introduction
- Key takeaways
- What Is Self-Leveling Underlayment and When to Use It
- Pre-Installation Inspection and Structural Requirements
- Tools, Materials, and Product Specifications
- Surface Preparation for Wood Subfloors
- Installing Metal Lath and Reinforcement Correctly
- Mixing, Pouring, and Finishing Techniques
- Curing, Readiness for Traffic, and Covering with Finished Flooring
- Common Problems, Troubleshooting, Repairs, and Safety
- Conclusion
- FAQ
What Is Self-Leveling Underlayment and When to Use It
Self-leveling underlayment (SLE) is a cementitious, polymer-modified, pourable overlay you spread over a wood subfloor to create a flat, uniform surface. Check the product technical data sheet and the label to confirm it’s rated for wood substrates and note the minimum/maximum pour thickness before you buy.
Getting this right gives a stable base for tile, vinyl, or engineered floors and can reduce minor sound and impact transfer. If you skip compatibility checks or pour over structurally unsound plywood, you risk delamination, cracks, or a finished floor that fails early.
How it differs from poured concrete and toppings
Self-leveling underlayment ain’t like regular poured concrete. It’s designed to spread out on its own, flowin’ smooth over your base, fillin’ in low spots. That’s what we call flowability, and it’s why you don’t need a bull float or trowel for this job.
Now, concrete toppings, they’re more like a thin layer of frosting on a cake. You gotta spread ’em yourself, and they ain’t gonna level out on their own. Self-levelers, though, they can be as thin as a quarter-inch or as thick as an inch, dependin’ on what you need. That’s our thin-section capability.
Lastly, self-levelers are usually made with polymers mixed in. This makes ’em stronger and more durable than regular concrete. It also helps them bond better to whatever surface they’re goin’ on top of. So, don’t be thinkin’ you can just use any old concrete for this job. You need the right stuff.
Alternatives and when to choose them
Self-leveling underlayment ain’t always the answer. Here’s a few other ways to prep your subfloor:
Patching Mortars: Good for small repairs, but not ideal for whole rooms. They can crack and don’t level like self-levelers. Use when you’ve got minor damage and want to save some cash.
Plywood Overlays: Thick stuff, adds height to your floor. Great for leveling out major low spots or fixing saggy joists. But it’s heavy and can cause deflection issues if not properly supported. Check base compaction before you lay it down.
Cement Board: Tough as nails, but it ain’t cheap. Good for showers and wet areas where you need durability. Not ideal for whole rooms though, as it can be too rigid and cause cracking in the finish floor.
Proprietary Gypsum Underlayments: These are like self-levelers, but with added goodies to make ’em stronger or faster-setting. They’re often easier to work with than concrete-based underlayments. Choose if you want something quick and easy, but remember they can be pricey.
Pre-Installation Inspection and Structural Requirements
Walk the floor with a long straightedge or laser and map highs, lows, and any loose boards, then verify framing deflection and subfloor thickness against the product’s requirements. Test wood moisture and look for rot, delamination, or previous coatings that could block adhesion; note anything that needs repair before ordering materials.
Doing a full inspection prevents wasted materials and avoids structural failures under the finished floor. If you discover excessive deflection, moisture, or delaminated panels, correct those issues first or the underlayment won’t perform despite a good pour.
Check deflection, framing, and fastening
Before you start, ensure your subfloor can handle the load. Here’s a quick checklist.
- Deflection: Check for excessive bounce. Too much flex means trouble later. Aim for L/360 or less.
- Framing: Verify framing meets span, spacing, and load requirements. Check joist size and spacing.
- Fasteners: Inspect nails/screws. Ensure they’re properly embedded, no edge lift, no loose boards.
- Sagging or warping: Look for subfloor sag or warped sheets. These need repair before proceeding.
- Load-bearing walls: Confirm any load-bearing walls are structurally sound and can handle the additional weight.
- Beam support: Check beams are properly supported and level.
- Sistering joists: If needed, add sister joists to strengthen weak areas.
- Code compliance: Ensure your work meets local building codes and manufacturer recommendations.
Quick rule: Don’t ignore deflection. It’s the first sign of trouble.
Identify damage, moisture sources, and wood condition
Before you start, check for any signs of damage or moisture. Here’s what to look for.
- Rot: Inspect for rotten wood. Tap with a hammer; it should sound solid.
- Delamination: Check for layers separating. This weakens the subfloor.
- Moisture testing: Test moisture content. It should meet the product’s tolerance (usually 12-15%).
- Leaks: Look for active leaks, especially around plumbing fixtures or windows.
- Sealers/coatings: Check for previous sealers or coatings that could affect adhesion.
- Mold/mildew: Inspect for mold or mildew. These can compromise adhesion and your health.
- Plywood/OSB condition: Assess the overall condition of the plywood or OSB sheets.
- Edge damage: Check edges for damage. Repair if necessary.
Quick rule: Moisture is your enemy here. Keep it under control.
Layout, transitions, and movement joints
Plan your layout to accommodate expansion and contraction. Here’s how:
- Thresholds: Plan for thresholds at doorways. Use transition strips if needed.
- Expansion joints: Install expansion joints every 20-30 feet, or as specified by the product.
- Walls and fixtures: Isolate underlayment from walls and fixtures to prevent cracking.
- Seams: Align plywood/OSB seams to avoid weak points.
- Corners: Reinforce corners with additional material or support.
- Furnace/AC ducts: Ensure ducts are properly supported and won’t interfere with the underlayment.
- Radiant heating: If present, ensure it’s compatible with your chosen system.
- Fire resistance: Check if fire-resistant materials are required in your area.
Quick rule: Plan for movement. It’s the key to a long-lasting floor.
Tools, Materials, and Product Specifications
Gather a mixing drill and paddle or mixer, buckets, gauge rake, screed board, spiked roller, calibrated moisture/temperature meter, PPE, and the primer the manufacturer specifies for wood. Read the product data sheet to confirm mixing method, working time, and the product’s listed minimum and maximum pour thickness for wood substrates.
Using the right tools and matching your technique to the product specs improves flow, bonding, and cure consistency. If you ignore pot life, pour thickness limits, or required primers, you’ll face adhesion failures, excessive shrinkage, or batches that set too fast to finish properly.
Tools and equipment checklist
Before you start, gather all necessary tools to ensure a smooth self-leveling underlayment application over your wood subfloors.
- Mixing drill with paddle: Essential for blending the underlayment mix. A drill with a mixing paddle attachment is crucial to avoid lumps and ensure even consistency.
- Electric whisk or mud mixer: For larger projects, consider using an electric whisk or mud mixer for faster and more efficient mixing.
- Containment bucket: Use this to mix and store your underlayment until ready for application. It helps prevent spills and keeps the material contained.
- Gauge rake or flat trowel: These tools help spread and level the underlayment evenly across the subfloor, ensuring a smooth finish.
- Screed board: A straight edge used to strike off excess material and create a level surface. It’s crucial for achieving the desired pour thickness.
- Spiked roller: Rollers with spikes help embed aggregate in the underlayment, improving its bond with the subfloor and reducing voids.
- PPE (Personal Protective Equipment): Safety glasses, gloves, and a dust mask are essential for protecting yourself from debris and harmful substances during mixing and application.
- Calibrated moisture/temperature meter: Measure the wood subfloor’s moisture content and temperature to ensure they’re within acceptable ranges before applying the underlayment.
Quick rule: Always double-check your tools before starting. Missing or faulty equipment can lead to application issues and poor results.
Underlayment types and spec items to verify
Self-leveling underlayments come in various types, each with its unique characteristics. Understanding these differences will help you choose the right product for your project.
Cementitious underlayments are typically slower-setting but offer high compressive strength and durability. Rapid-set underlayments cure faster, making them ideal for time-sensitive projects, but they may not reach the same level of strength as cementitious products.
Pre-mixed underlayments come ready to use, while dry mixes require water addition before application. Always follow the manufacturer’s guidelines for mixing methods and water-to-powder ratios to achieve optimal results.
When selecting a self-leveling underlayment, verify the following specifications on the product datasheet:
- Minimum and maximum pour thickness: Ensure the chosen underlayment can achieve your desired final floor height without exceeding its maximum pour thickness limit to avoid cracking or delamination.
- Recommended primers: Some wood subfloors may require a primer to improve bonding with the underlayment. Always follow the manufacturer’s recommendations for priming to ensure proper adhesion and prevent failures.
- Compressive strength: Check the product’s compressive strength rating to ensure it can support the intended floor covering and traffic loads.
- Acceptable floor coverings: Verify that the chosen underlayment is compatible with your planned floor covering, such as tile, hardwood, or vinyl.
Metal lath, fasteners, and reinforcement materials
The right metal lath and fasteners are crucial for a strong bond between your self-leveling underlayment and the wood subfloor. The correct choice can prevent cracking, staining, and weak bonds.
- Expanded galvanized/diamond lath: This type of lath provides excellent bonding due to its open design, allowing the underlayment to penetrate and create a strong mechanical bond with the subfloor. Use it for most applications where maximum adhesion is required.
- Welded wire lath: Welded wire lath offers good strength and flexibility but may not provide the same level of penetration as expanded lath. It’s suitable for areas with light traffic or where a more flexible underlayment is needed.
- Fasteners (screws, nails): Use corrosion-resistant fasteners to secure the metal lath to the wood subfloor. Stainless steel or galvanized screws and nails are recommended to prevent rusting and maintain a strong bond over time.
- Reinforcement materials (fiber mesh, additives): Incorporating fiber mesh or additives designed for your underlayment can improve its strength, flexibility, and crack resistance. Always follow the manufacturer’s recommendations for reinforcement materials and their proper integration into the mix.
Surface Preparation for Wood Subfloors
Remove dust, dirt, oils, and loose material, then mechanically profile the surface by sanding or grinding to create a clean, textured substrate for the primer to bite. Fasten any loose boards or screws, repair damaged plywood, and verify wood moisture is within the leveler’s allowable range per the manufacturer instructions.
Good prep is the single biggest factor in long-term adhesion and a flat pour. Skip cleaning, profiling, or fastening repairs and you’ll likely see delamination, cracking, or uneven settlement once the underlayment cures.
Cleaning, sanding, and removing contaminants
Start by removing any paint, oils, waxes, or other coatings from the wood surface. These can hinder adhesion of the self-leveling underlayment.
Use a wire brush or scraper to remove loose materials. For tougher spots, you might need a chemical stripper. Always follow manufacturer’s instructions when using chemicals.
Mechanical profiling is crucial for creating a rough surface that the underlayment can bond with. You can use a belt sander or orbital sander to lightly sand the wood, creating a ‘scuffed’ finish. Alternatively, you could use an etching solution or shot blasting, but these methods are more aggressive and may not be necessary.
Priming and sealing porous plywood
Primer is essential for porous substrates like plywood. It seals the surface, preventing the underlayment from being absorbed into the wood and ensuring a strong bond.
Check your product datasheet to verify the primer’s dry time and recoat window. Some primers may require a second coat on high-porosity substrates. Always follow the manufacturer’s recommendations.
Do not apply the primer too thickly, as this can cause it to peel or crack when the underlayment is applied.
Addressing screwheads, seams, and gaps
Countersink any protruding screws or nails to ensure a smooth surface for the underlayment. You can use a drill bit that matches the size of your screws to create a recess.
For large gaps between plywood sheets, use a flexible gap filler or backer rod before applying the underlayment. This prevents the gaps from telegraphing through to the finished floor.
Seams should be reinforced with wood glue and possibly a seam tape for added strength. This helps prevent the seams from separating during the pour, which could cause cracks in your finished floor.
Installing Metal Lath and Reinforcement Correctly
Choose the lath type the product specifies—expanded metal, welded wire mesh, or a combination—and lay panels with the recommended laps, staggered joints, and planned panel orientation. Fasten lath with corrosion-resistant screws or nails at the spacing shown by the manufacturer and secure edges and transitions with blocking where required.
Proper lath installation holds thin pours together and prevents pop-through or cracking under traffic. If lath is undersized, poorly fastened, or joints line up over weak areas, the underlayment can fail even if the mix and pour are correct.
Lath type, orientation, and overlap best practices
For thin self-leveling underlayments over wood, choose galvanized expanded metal lath. It’s lightweight, flexible, and compatible with these pours.
Orient panels with the ribs running perpendicular to the joists for maximum strength. Overlaps should be at least 2 inches wide, staggered at each joint to create a continuous, strong substrate.
Stagger seams like shingles on a roof: offset the top panel’s seam by half its width over the bottom one. This distributes stress evenly and prevents weak points.
Fastening pattern, screw type, and countersinking
Space fasteners every 4 to 6 inches along the panel edges and every 8 to 12 inches in the field. Use corrosion-resistant screws or nails.
Countersink fasteners just below the surface to avoid proud screwheads that could disrupt the pour. This also helps prevent ghosting – visible screw impressions on the finished floor.
Avoid embedding fasteners in the underlayment; they can cause cracking or delamination over time. Instead, use a washer or nail set to keep them flush with the surface.
Visual checkpoints before pouring
Before mixing and pouring your underlayment, perform these quick checks to ensure a successful pour:
- Flatness: Check for any low spots or humps. The surface should be level within 1/8 inch per 6 feet.
- No loose lath: Gently tug on the lath; it should not move. Tighten any loose fasteners.
- No protrusions: Inspect for nails, screws, or other objects that could disrupt the pour.
- Correct overlap: Verify all overlaps are at least 2 inches wide and staggered properly.
- Edge restraint: Ensure edge restraints are installed to prevent underlayment from flowing off the edges.
- Control joints: Check that control joint tape or membrane is in place to manage shrinkage cracks.
- Moisture barrier: Confirm a moisture barrier is present and intact, especially over wood subfloors.
- Fastener heads: Ensure all fasteners are countersunk or flush with the surface.
Quick rule: If anything fails these checks, fix it before pouring to avoid costly mistakes.
Mixing, Pouring, and Finishing Techniques
Mix to the exact consistency the product data sheet calls for using the recommended mixer and mixing time; test a small batch first to match site conditions. Plan the pour sequence, keep a steady flow, rake and screed to level, then use a spiked roller or finishing passes to eliminate trapped air and feather edges into adjacent work.
Control during mixing and pouring delivers a smooth, flat surface and reduces callbacks for grinding or patches. Over- or under-mixing, skipping small test batches, or rushing the spread will show up as poor flow, pinholes, or uneven set across the floor.
Mixing consistency and quality control
Start by measuring water and powder as per the manufacturer’s datasheet. Too much water makes it too fluid, too little makes it crumbly.
Mixing time is crucial – follow product instructions. A drill with a paddle attachment works best. Mix until smooth, no lumps, about 3-5 minutes.
Before pouring, mix a small test batch to check workability. It should flow like cake batter, not too thick or thin. Adjust water as needed.
Pouring, gauging, and working time
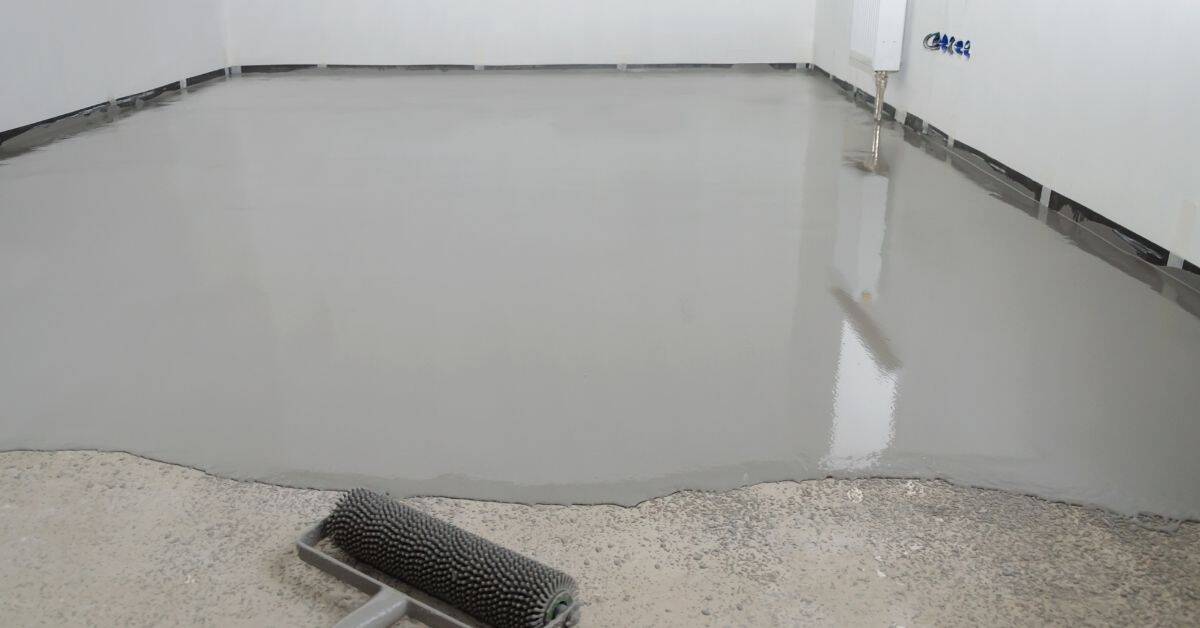
Start pouring in one corner, work your way across the room. Use a gauge rake to spread it evenly, keep it around 1/4″ thick.
Use a long-level screed or smoothing tool to maintain wet edges. Keep them damp until you’ve finished feathering.
Pot life and working time vary by product. Check the datasheet. Once it starts to set, you’re out of time. Work quickly but carefully.
Final finishing, grinding, and surface tolerance checks
Use a darby or trowel for final passes. Lightly skim the surface to achieve desired flatness. Avoid over-troweling.
Before cure begins, apply your chosen finish – smooth, broom, or texture. Use a straightedge to check flatness. It should sit level across the entire surface.
If you find high or low spots, note them for targeted touch-ups after curing. Grinding can help with minor imperfections but be careful not to damage the surface.
Curing, Readiness for Traffic, and Covering with Finished Flooring
Track cure using the product’s stated set and cure conditions and confirm ambient temperature and humidity are within recommended ranges; verify moisture and alkalinity per the manufacturer’s testing methods before installing finish flooring. Use documented test methods and results to decide when the surface is ready for foot traffic and adhesives.
Following cure windows and test limits protects the finished floor and avoids adhesive failures or mold issues later. Rushing cover-up or ignoring elevated moisture/pH readings can force removal and rework after the finish is installed.
Typical cure considerations and testing before coverings
The cure time for self-leveling underlayment varies by product and conditions. Here’s what you need to consider:
Temperature and humidity play a big role. Ideal curing is around 70°F (21°C) with 50% relative humidity. Too hot or too cold, or too dry or humid can slow cure time.
Check slab thickness. Thicker slabs take longer to cure. Sun exposure can speed up curing but may cause rapid drying and cracking. Use curing compounds or coverings as directed by the manufacturer to maintain moisture levels.
When to grind, patch, or apply leveling coats
Before installing your finished floor, you might need to do some touch-ups on the underlayment. Here’s when:
If there are trowel marks, low spots, or minor imperfections, a quick grind with a concrete grinder can smooth them out. For deeper low spots, apply a thin leveling coat (skim coat) to even out the surface.
Check for any edge conditions that need attention. If edges are rough or have laitance (a cement-rich layer), they might need priming or sanding before installing your finished floor.
Common Problems, Troubleshooting, Repairs, and Safety
Learn the typical failure signs—delamination, cracking, ghosting, and pop-through—and run basic diagnostics: check moisture, primer bond, substrate movement, and lath attachment to find the root cause. Take a stepwise approach: isolate the failure, remove loose material, re-profile and prime, then repair or re-lath as the situation calls for and the product allows.
Addressing problems methodically keeps repair scope and cost down and helps you avoid repeating the same mistake. Always use proper PPE, control dust and ventilation when grinding or cutting, and follow disposal and safety guidance on the product label and local rules.
Troubleshooting and Repair Strategies
Delamination, cracking, ghosting, and pop-through lath are common issues with self-leveling underlayment over wood subfloors. Here’s how to tackle them:
Adhesion failures: If the underlayment is peeling off, grind the affected area, remove any contaminants, apply a primer, and spot-repair using a patching compound.
Isolated low spots: Fill these with a self-leveling compound, ensuring proper mixing and application. Grind smooth after curing.
Hairline cracks: If they’re minor, grind, prime, and skim coat. For larger ones, consider removing the affected area, re-lathing, and reapplying underlayment.
Safety, PPE, Ventilation, and Dust Control
Safety is paramount when working with self-leveling underlayments. Here’s what you need:
PPE: Wear a respirator, safety glasses, gloves, and protective clothing. Keep your skin covered to avoid contact.
Ventilation: Ensure proper ventilation during mixing, pouring, and grinding. Open windows, use fans, or hire a professional ventilation system if needed.
Dust control: Wet down surfaces before grinding to minimize dust. Use damp cloths for cleaning up. Dispose of waste responsibly, following local regulations.
Job Planning, Cost Drivers, and Environmental Limits
Planning your job right can save you time, money, and rework. Here’s what to consider:
Costs: Prep (grinding, priming), materials (underlayment, lath, screws), labor, and equipment rental will all factor into your budget.
Scheduling: Plan for curing time between steps. Rushing can lead to rework and poor results.
Environmental limits: Check product datasheets for temperature and humidity limits during application and curing. Ideal conditions are 70-85°F (21-29°C) with 30-50% RH.
Conclusion
Self-leveling underlayment on wood can deliver a flat, durable surface if you follow solid prep, correct reinforcement, and proper curing. Do the safety checks, respect the material limits, and you’ll avoid costly mistakes and return your floor to service with confidence.
Proceed with a simple, logical sequence: verify the subfloor integrity and moisture, review structural requirements, prepare a clean surface, set up your space, mix and pour per the product specs, spread evenly to the required thickness, protect the area during cure, and test readiness for the finished flooring. Do a small test area first, wear PPE, and keep kids and pets out of the work zone until the floor is ready for traffic.
Common mistakes to avoid are skipping moisture testing, neglecting reinforcement or lath requirements, and rushing the pour or cure. Don’t overestimate how quickly curing happens, and don’t ignore environmental limits or surface contamination. Use the safety rules: ventilate, keep heat sources away, and never pour if the subfloor shows signs of movement or structural flaw.
If there are cracked framing, significant deflection, or you’re unsure about subfloor condition, call a professional instead of guessing. When in doubt, prioritize safety and proper prep over speed, and you’ll finish with a solid, good-looking floor that lasts. You’ve got this—finish strong and move on to the last stage with confidence.
FAQ
What’s the right way to prep a wood subfloor for self-leveling underlayment?
Make sure the wood is solid and free of loose boards, spline gaps, and big voids. Clean, vacuum, and prime if the product asks for it. Always follow the manufacturer’s prep steps and check for any local quirks that affect moisture and bonding.
How do I choose and apply metal lath over a prepared wood subfloor?
Use metal lath only if the project calls for it; some products skip the lath. Attach it securely to a solid subfloor with proper fasteners and spacing per the product instructions. Don’t over-drive fasteners or create wavy surfaces that will telegraph through the leveling compound.
How should I mix and pour self-leveling underlayment?
Follow the product label for mixing ratios, water amount, and mixing time. Mix to a smooth, lump-free consistency, then pour gradually to avoid air pockets. Work quickly and don’t re-temper the mix after it starts to set.
What are the main benefits and common challenges DIYers face?
Benefits include a flat, strong base for flooring and faster installation when done right. Common challenges are bonding to wood, controlling moisture, and avoiding premature cracking. If in doubt, test a small area and consult the manufacturer’s instructions or local rules for guidance.