
Introduction
Sealant failure at stucco joints means the sealant loses adhesion, cracks, or pulls away, allowing water intrusion.
Choosing the right sealant involves matching the substrate and climate, and confirming compatibility with stucco. Think of the job as preparing the joint, selecting a compatible sealant, and planning proper tooling.
Selecting the right tool shapes helps the sealant lay in a smooth, even bead. Use backer rods where appropriate to control depth and avoid squeeze-out. Watch for cracking, peeling, or hardening as signs of failure and plan replacement.
Key takeaways
- Choose sealant type compatible with stucco and UV exposure to minimize failure.
- Use backer rods properly to control joint depth and prevent adhesion issues.
- Dampen joint surfaces before tooling to achieve smooth, lasting seals.
- Implement proper tooling shapes to apply sealant evenly with movement.
- Inspect joints for early signs of failure and plan timely maintenance.
- Safety: wear eye protection and avoid sealant contact with skin.
Table of Contents
- Introduction
- Key takeaways
- Why Stucco Joint Sealants Fail
- Diagnosing Sealant Failure on Stucco Joints
- Choosing the Right Sealant Type for Stucco Joints
- Backer Rods and Bond Breakers: Correct Selection and Use
- Joint Preparation and Adhesion Promotion
- Tooling Shapes, Techniques, and Timing for Durable Joints
- Safety, Environmental, and Regulatory Considerations
- Long-Term Performance, Maintenance, Cost Implications, and Troubleshooting
- Conclusion
- FAQ
Why Stucco Joint Sealants Fail
Stucco joints fail mainly from adhesion loss on textured, porous substrates, mis-match between sealant elasticity and joint movement, and premature aging from weather exposure. Poor installation practices can contribute to debonding and inadequate wet-out, especially where surface texture traps dust and moisture. The porosity and roughness of stucco influence how well a sealant adheres and cures, creating a higher risk for air entrapment and weak bond at the joint face.
Assessing readiness starts with surface cleanliness, noting dust, efflorescence, and moisture risk. Evaluate the stucco’s porosity and roughness as they affect initial wet-out and long-term performance. Sealant selection should consider appropriate chemistry, hardness, and compatibility with porous masonry, plus UV stability and paintability if applicable. Movement, backer details, and proper joint design determine how well a sealant accommodates expansion and contraction and avoids three-point bonding during cure.
Common failure modes (adhesion, cohesion, three-sided adhesion)
The most common signs of sealant failure in stucco joints are:
Adhesion Loss: Sealant detaching from the substrate. This is often due to improper priming or substrate contamination.
Cohesive Failure: Cracks or breaks within the sealant itself. This can occur when the sealant’s elasticity doesn’t match the joint movement, or it wasn’t suitable for the application.
Three-Sided Adhesion: Sealant adhering to both sides of the joint and the backer rod, preventing proper cure. This is usually due to absence of a bond-breaker or incorrect backer rod use.
Environmental and movement drivers
Several factors accelerate the deterioration of sealants in stucco joints:
Temperature Cycles: Extreme heat or cold can cause sealants to lose flexibility, leading to cracks. Choose a sealant with appropriate low/high temp flexibility.
UV Exposure: Prolonged exposure to sunlight can degrade sealants over time. Select a UV-stable sealant for exterior applications.
Moisture and Building Movement: Moisture intrusion and building settlement can cause joints to move, stressing the sealant. Regularly inspect for signs of water damage or movement.
Substrate and compatibility issues
Incompatibility between sealant chemistry and stucco, coatings, or flashings can lead to breakdown:
Check for signs of incompatibility such as discoloration or softening of the sealant. Always review manufacturer’s compatibility guidance for sealants, coatings, and flashings.
If incompatible with stucco, choose a compatible sealant. If incompatible with coatings/flashings, select compatible materials or apply appropriate primers.
Diagnosing Sealant Failure on Stucco Joints
The diagnostic approach begins with identifying joint types (control, movement, and perimeter) and mapping observed failure patterns for each. Documenting crack width, adhesive loss, missing material, and signs of moisture around joints guides remediation. A defect map helps to plot location, joint type, growth direction, and environmental factors affecting failures.
Use simple field checks to distinguish movement-related failures from substrate or product issues. Probe looseness, test joint movement with gentle flex, and note patterns across elevations or weather exposure. Assess substrate conditions such as efflorescence or paint/EIFS issues and verify compatibility with the chosen sealant. Capture photos and measurements, and record suspected root causes to inform repair decisions.
Visual Inspection Checklist for Stucco Joints
Before commencing any repairs, perform a thorough visual inspection of your stucco joints to assess damage extent and nature.
- Cracks: Examine for hairline cracks (less than 0.5mm) up to larger gaps. Cracks may indicate movement, settlement, or age-related deterioration.
- Gaps: Check for open spaces between the stucco and backing material. Gaps can facilitate water intrusion and further damage.
- Staining: Look for discoloration around joints. Stains could signal moisture intrusion or sealant failure.
- Mold/Mildew: Inspect for signs of mold or mildew growth, which can indicate prolonged water exposure and poor ventilation.
- Joint Movement: Gently probe joints with a flathead screwdriver to check for looseness. Movement can cause sealant failure and further damage.
- Failure Pattern: Document the locations of failures. If cracks follow a pattern across the elevation, it could suggest movement-related issues or systemic problems.
- Moisture Intrusion: Check for signs of water damage around joints. Moisture can compromise the sealant and substrate.
- Sealant Condition: Inspect the existing sealant. If it’s brittle, peeling, or missing, it needs to be replaced.
Key Point: Always document failures to determine if the issue is localized (affecting a small area) or systemic (affecting the entire structure). This aids in planning repairs effectively.
Simple adhesion and depth checks
Before you begin repairs, perform non-destructive checks on your stucco joint sealants. This helps determine the best repair method and material selection.
Adhesion check: Gently probe joints with a knife or pick to test adhesion. If the sealant lifts easily, it’s not well-adhered and may need retooling or substrate repair before resealing.
Depth check: Measure joint geometry to ensure it meets manufacturer requirements. Use a depth gauge or ruler to check if the joint is deep enough for the chosen sealant. Consult product technical data for required depths.
When to escalate to a professional assessment
While the previous steps can help you diagnose minor sealant failures, there are situations where it’s crucial to involve professionals. Here’s when to escalate:
Widespread water intrusion: If your visual inspection reveals extensive water damage or dampness across multiple joints or areas, it indicates a more serious issue that requires professional assessment and moisture survey.
Structural concerns: Any signs of structural compromise, such as cracks in the stucco or underlying walls, warping, or bulging, should be evaluated by a structural engineer or specialist. These issues could indicate foundational problems or hidden damage that needs immediate attention.
EIFS involvement: If your home has Exterior Insulation and Finish Systems (EIFS) and you notice signs of distress like cracking, peeling, or water intrusion, consult with an EIFS specialist before proceeding with repairs. They can assess the damage and recommend appropriate solutions tailored to EIFS.
Choosing the Right Sealant Type for Stucco Joints
Choosing the right sealant type for stucco joints requires weighing adhesion, weathering, flexibility, paintability, and substrate compatibility across common chemistries such as silicone, polyurethane, hybrid STPE/silyl, and polysulfide. Rely on manufacturers’ datasheets for exact cure times, elongation, modulus, and surface prep requirements, and compare how each option handles movement and joint width in exterior environments. The key takeaway is that no single chemistry dominates all conditions, so a practical choice comes from aligning climate, joint movement, and maintenance plans with each material’s strengths and limitations.
For DIY readers, use a practical decision framework that considers climate, expected joint movement, and whether repainting is planned. Plan surface prep, priming needs, backer rod use, proper tooling shapes, and compatible sealant thickness and cure conditions for varying temperatures. Quick checks and best-practice steps—clean, dry surfaces and check for loose or damaged stucco—help prevent failure, and if movement is high or UV exposure is significant, choose a more flexible or UV-resistant option and follow a suitable primer protocol.
Performance characteristics to prioritize
When selecting a sealant for stucco joints, consider the following key performance criteria:
Expected Movement: Choose formulations with movement capabilities that match your joint’s expected expansion and contraction.
UV Exposure: Prioritize UV resistance, especially in areas with high sun exposure or near reflective surfaces.
Paintability: If repainting is planned, ensure the sealant is compatible with paint and maintains adhesion after painting. Otherwise, consider non-paintable options for long-term durability.
Adhesion to Stucco or Coatings: Ensure the sealant adheres well to your specific stucco surface or any existing coatings.
Low-modulus vs high-modulus options
The stiffness of a sealant, measured by its modulus, affects how it performs in moving joints. Here’s what to consider:
Low-Modulus Sealants: These are more flexible and suitable for larger movements or areas with frequent temperature changes. They’re often used in expansion joints.
High-Modulus Sealants: Stiffer sealants are better suited for smaller movements and areas with less frequent temperature changes. They provide better support but may not accommodate as much movement without cracking.
To choose the right modulus, check the product’s technical data for its movement capacity and match it to your joint’s expected movement.
Choosing by exposure and aesthetic needs
Consider these factors when selecting a sealant based on your specific requirements:
UV Resistance: For areas with high sun exposure or near reflective surfaces, choose non-paintable long-term silicones for superior UV resistance.
Color-Matched Finishes: If maintaining a consistent aesthetic is important, opt for paintable hybrid sealants that can be color-matched to your stucco.
Waterproofing or Chemical Resistance: For areas exposed to water or chemicals, select sealants with enhanced waterproofing or chemical resistance properties. Always review datasheets and instructions for these specific properties before making a decision.
Backer Rods and Bond Breakers: Correct Selection and Use
Backer rods control sealant depth, prevent three-sided adhesion, and support tooling and movement stress. Bond breakers complement this setup by isolating the sealant from the substrate where needed, particularly at textured stucco joints. Follow manufacturer guidance to determine how backer rod compression and placement influence cure and performance.
Detail sizing and placement rules, including recommended diameters, spacing, and rod material options for different movement ranges and joint widths. Match backer rod and bond breaker to the chosen sealant’s adhesion, flexibility, and thermal expansion needs, while accounting for stucco porosity and substrate conditions. Provide installation steps that align with joint faces and tool guidance, and include common QA checks for proper depth and bead quality.
Closed-cell vs open-cell backer rods
When selecting backer rods for your stucco joint sealant project, understanding the difference between closed-cell and open-cell options is crucial.
Closed-cell backer rods are moisture-impermeable and have a springy nature. They are ideal for joints that require a moisture barrier and need support against movement stress. Choose closed-cell rods when your joint requires resistance to water intrusion and needs a flexible, resilient support.
Open-cell backer rods, on the other hand, are compressible and provide a bondable surface. They are suitable for joints that need compressibility to accommodate movement and require a surface that can adhere to the sealant. Opt for open-cell rods when your joint needs to compress and bond with the chosen sealant.
Sizing, placement, and depth control
Properly sizing and placing backer rods is essential for controlling sealant depth and ensuring optimal performance. The first step in this process is to measure the width of your joint.
Consult the product literature or datasheet for the chosen backer rod to determine the suitable diameter based on your joint’s width. Using a backer rod that is too small may result in insufficient sealant depth, while one that is too large can lead to over-filling and potential issues with movement.
For wide joints, use larger-diameter backer rods to fill voids effectively. Conversely, for narrow joints, smaller-diameter backer rods should be used to maintain proper sealant depth and prevent under-filling.
Benefits and common backer rod mistakes
Proper use of backer rods offers several benefits, but it’s essential to be aware of common mistakes that can compromise their effectiveness. Here are some pitfalls to avoid:
- Over-compression: Excessive compression of backer rods can lead to under-filled sealant beads and reduced joint performance. To avoid this, ensure backer rods are properly seated and not overly compressed.
- Poor seating: Backer rods that are not properly seated in the joint can result in improper sealant depth and potential adhesion issues. Make sure backer rods are aligned with the joint faces and fully inserted.
- Wrong cell type: Using the incorrect cell type (closed-cell or open-cell) for your specific joint conditions can lead to premature failure of the sealant. Always select the appropriate cell type based on your joint’s requirements.
- Insufficient compression: Backer rods that are not compressed enough may result in over-filled sealant beads and potential issues with movement. Ensure backer rods are adequately compressed during installation.
By avoiding these common mistakes, you can maximize the benefits of using backer rods in your stucco joint sealant project, including reduced sealant use and proper joint profile.
Joint Preparation and Adhesion Promotion
Begin with thorough cleaning to remove dirt, efflorescence, grease, and dust, using cleaners that leave no residue and promote mechanical bonding. Remove old sealant by cutting and scraping, avoiding debris embedding that could impede adhesion. Drying and moisture control are essential, verifying the stucco is dry and allowing adequate cure time before priming or sealing.
Assess whether primers are required for stained or painted surfaces and choose products that enhance adhesion to concrete substrates. Conduct an adhesion test on representative areas and document results, ensuring they meet the sealant’s criteria before full-scale application. Inspect the joint for movement capacity and repair large cracks or structural issues prior to sealing to ensure proper bonding.
Cleaning, removal, and surface preparation
Before applying a new sealant, it’s crucial to remove any old sealant and clean the stucco surface thoroughly. This ensures better adhesion of the new sealant and promotes long-term performance.
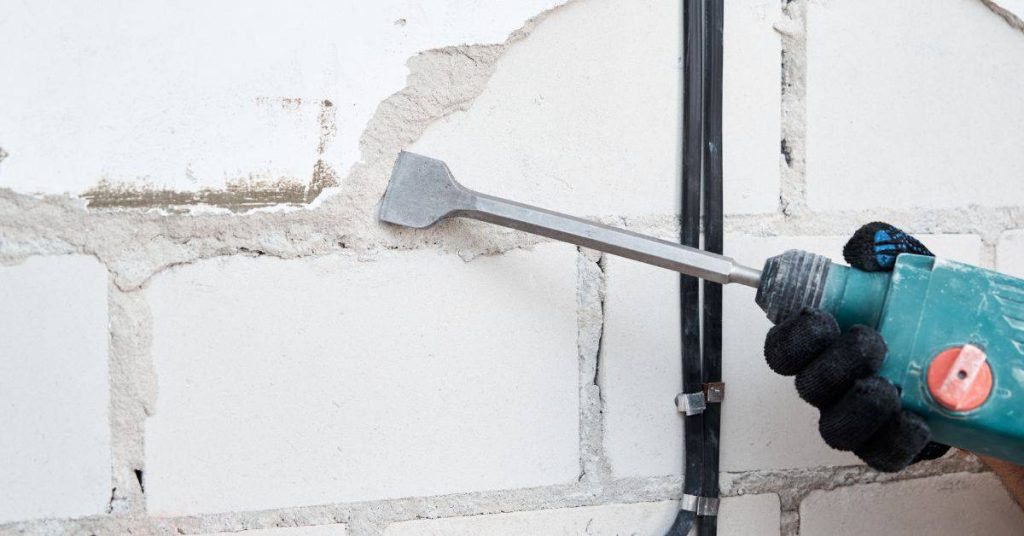
Old Sealant Removal: Mechanically cut and scrape out failed material using tools like utility knives or sealant scrapers. For stubborn films, use solvents sparingly and only where appropriate to dissolve them. Be sure not to embed debris into the substrate during removal.
Surface Cleaning: Thoroughly clean surfaces using a suitable cleaner that won’t leave residue. Remove dirt, efflorescence, grease, and dust to ensure a clean, matte surface for better mechanical bonding. Visually inspect surfaces for any remaining contaminants or loose stucco.
Primer selection and when to use it
A primer can enhance adhesion between the sealant and stucco surface, especially on stained, painted, or glazed surfaces. Always follow the sealant manufacturer’s instructions for primer recommendations.
When to Use a Primer: Primers are typically required when working with stained, painted, or glazed surfaces. They can also be beneficial on new or uncoated stucco to promote better adhesion and improve the sealant’s performance.
Primer Selection: Choose primers that are compatible with both the stucco surface and the selected sealant. Always follow the manufacturer’s recommended cure times for optimal results. If unsure, perform a small adhesion test on a representative area to confirm compatibility.
Tools and materials checklist for prep
Having the right tools and consumables ensures efficient and effective surface preparation. Here’s a DIY-friendly checklist of necessary items to verify before starting your project.
- Sealant Scrapers: Used for removing old sealant. Choose sturdy, durable scrapers with replaceable blades.
- Solvents: For dissolving stubborn sealant films. Opt for eco-friendly solvents when possible and always follow safety guidelines.
- Backer Rod: Used to control sealant depth and promote proper bonding. Choose compatible backer rod based on joint width and sealant type.
- Primer: Required for stained, painted, or glazed surfaces. Always choose a primer recommended by the sealant manufacturer.
- Cleaning Supplies: Including suitable cleaners, brushes, and rags for thorough surface cleaning. Ensure chosen cleaners won’t leave residue on the stucco.
Tooling Shapes, Techniques, and Timing for Durable Joints
Tooling profiles such as concave, flush, and angled each serve different purposes for stucco joints. The tool shape influences how the sealant sheds water, forms a bond with the substrate, and achieves the desired texture. Field cues help distinguish proper concave versus flush forms in real conditions.
Link tooling to adhesion and surface texture by explaining how micro-texture affects bond strength and wetting, while avoiding pinholes and pull-away. Timing is critical: tool within defined windows after placement to prevent sagging or excessive drag, with adjustments for warm or cool conditions. Provide a repeatable workflow from prep and backer placement through sealant application, tooling, cure, and inspection.
Concave Tooling and Why It’s Often Preferred
Concave tooling creates a stress-reducing profile in stucco joints, helping to shed water and prevent cracking. This technique is widely preferred for exterior applications due to its durability and longevity.
- Concave Groove Tool: Used to create the concave shape in the joint. Essential for achieving the desired profile. Tip: Ensure the tool’s width matches your joint size for a consistent finish.
- Trowel: Smooths and shapes the stucco after application, helping to define the joint. Optional, but recommended for a professional finish. Tip: Use a flexible trowel for better control over the concave shape.
- Hawk: Holds and transports stucco material to the trowel. Optional, but useful when working with large areas. Tip: Ensure your hawk is clean before each use to prevent contamination of the stucco.
- Level: Ensures the joint is straight and even. Essential for maintaining a consistent concave profile. Tip: Use a level with a bubble vial for easy reading and accurate results.
- Sealant Applicator Gun: Applies sealant into the concave joint. Essential for completing the process. Tip: Ensure the gun is clean before use to prevent clogging or contamination of the sealant.
Pro tip: Combining a flexible trowel with a concave groove tool allows for better control over the concave shape, ensuring a consistent profile across the entire joint. This combination also helps to reduce stress on the sealant, increasing its lifespan.
Flush, Angled, and Specialty Tooling Shapes
For a durable joint, the right tooling shape can enhance appearance, compatibility with trim, and overall performance. This section explores essential tools for flush, angled, and specialty finishes.
- Straight Edge Trowel (6″ – 12″): Used for applying sealants in straight lines or creating flush finishes. Key spec: Width depends on joint size. Tip: Ensure the edge matches the desired finish.
- Angled Trowel (45° – 90°): Ideal for creating angled or beveled finishes, enhancing trim compatibility. Key spec: Angle varies based on desired finish. Tip: Use a consistent angle for uniform results.
- Concave Trowel: Preferred for tooling large joints and creating a smooth, rounded finish. Key spec: Size matches joint width. Tip: Concave trowels can be rented or bought in various sizes.
- Backer Rod (Various Sizes): Optional, used to fill wide gaps before sealant application, ensuring an even bead and preventing over-application. Key spec: Diameter matches gap size. Tip: Use foam backer rod for wider gaps; it’s cheaper than solid rubber.
- Bond Breaker (Tape or Liquid): Optional, applied before tooling to prevent adhesion issues, especially with flush or angled finishes. Key spec: Choose tape or liquid based on joint size and substrate type. Tip: Apply bond breaker only where necessary to avoid compromising sealant performance.
Pro tip: When combining tools, start with the backer rod (if needed), then apply the sealant using a straight edge trowel for flush finishes or an angled trowel for beveled effects. Finally, use a concave trowel to create a smooth, even surface.
Quick check: Ensure the tool’s edge matches the desired finish and the substrate is dry to touch before tooling.
Pro check: An experienced installer typically checks for correct tooling shape, timing, and surface profile before proceeding.
Common mistake + fix: If sealant pulls away from the substrate, re-tool using proper technique and ensure the surface is clean and dry.
Tool Selection and Application
Select these tools to achieve durable joints in your construction projects. They help you work within the sealant’s tack-free window, apply consistent pressure, and ensure smooth adhesion on both sides of the joint.
- Sealant Gun: Apply sealant evenly along the joint. Inspect the nozzle and adjust trigger pressure for a smooth, even flow.
- Caulking Tool (Concave or Flush): Tool the sealant into the joint. Choose concave for deeper joints or flush for shallow ones. Consider renting or borrowing if usage is infrequent.
- Hammer Drill with Caulking Bit: Optional, but useful for deep, narrow joints where manual tooling is difficult. Use a bit matching the joint width and maintain a steady speed (around 10-15 RPM).
- Scraper or Utility Knife: Remove excess sealant from the surface before it dries. Use a sharp blade to avoid damaging the substrate.
- Level or Straight Edge: Ensure even application and tooling of sealant along the joint. Check for any low spots that may cause sagging.
Tip: Combine tools based on your project’s needs. For instance, use a caulking gun with a wide nozzle for large joints, then finish with a flush tool to ensure a smooth surface. Always check the sealant’s tack-free time before tooling to prevent sagging or excessive drag.
Safety, Environmental, and Regulatory Considerations
Start with safety prerequisites and PPE, then assess environmental conditions and local rules before choosing a sealant. Ensure you have the right gloves, eye protection, and respiratory protection if VOCs are present, and plan for fall protection or ladder use if working at height. Review each product’s Safety Data Sheet (SDS) and check local regulations that affect product choice and application methods.
Why it matters: weather and curing conditions influence performance and joint movement, so plan for appropriate weather windows and post-application protection. Ventilation and disposal procedures are essential when VOC sealants are used, and backer rod compatibility with stucco matters for long-term performance. Quick checks: confirm PPE is on-site and in good condition, and verify environmental limits and permit or inspection requirements with local codes and SDS guidance. If PPE is inadequate, stop work and source proper gear.
Environmental Factors Affecting Sealant Application
Sealant performance and lifespan depend on surface and ambient conditions during application. Consult the product’s datasheet for specific temperature and humidity limits before starting work.
Temperature: Most sealants require a minimum application temperature of 40°F (4°C) for optimal curing. Excessively high temperatures can lead to rapid curing and poor adhesion. If ambient temperature exceeds the product’s limit, delay application until conditions improve.
Moisture: High humidity levels can interfere with sealant cure rates and adhesion. Ensure both surface and ambient humidity are within the product’s specified range before starting work. If humidity is too high, wait for conditions to change or use a primer to enhance adhesion.
UV Exposure: Direct sunlight exposure during application can cause premature curing and impact sealant performance. Whenever possible, apply sealants in shaded areas or during cooler parts of the day to minimize UV effects.
VOCs, emissions, and code compliance
Volatile Organic Compounds (VOCs) emitted by sealants can contribute to indoor air pollution and may be subject to local regulations. Always review product labels for VOC content and relevant certifications such as GREENGUARD or CARB before purchasing.
Local Regulations: Consult local building codes and air quality standards to determine VOC limits in your area. Some regions have strict limits, especially in felony-free areas or occupied spaces like schools and hospitals.
Product certifications can help ensure compliance with these regulations. If a sealant does not meet local VOC limits or lacks relevant certifications, choose an alternative that does.
Emissions: Even low-VOC sealants may emit some volatile compounds during and after application. Ensure adequate ventilation in the work area to minimize exposure to these emissions. In occupied spaces, consider applying sealants during off-hours or when the area can be isolated from other parts of the building.
Personal protective equipment and safe handling
Proper safety measures are crucial when working with sealants. Always review the product’s Safety Data Sheet (SDS) prior to use for specific PPE requirements and handling instructions.
- Gloves: Protect hands from chemicals and debris. Choose gloves based on the specific sealant’s hazards and your tasks. For example, nitrile gloves offer good chemical resistance but may not provide sufficient grip for tooling.
- Eye Protection: Goggles or safety glasses with side shields protect eyes from splashes, debris, and UV exposure. Consider using goggles with an anti-fog coating to maintain visibility during application.
- Respirator: If the sealant contains VOCs or is otherwise hazardous, use a respirator with appropriate filters or cartridges. Ensure the respirator fits properly and follow manufacturer guidelines for maintenance and replacement.
- Clothing: Wear long-sleeved shirts, long pants, and closed-toe shoes to protect skin from chemicals and debris. Consider using disposable coveralls if working in a particularly messy environment.
- Ventilation: Ensure adequate ventilation in the work area to minimize exposure to VOCs and other emissions. If working indoors, use fans or exhaust systems to maintain air circulation. In some cases, you may need to isolate the work area from occupied spaces.
Long-Term Performance, Maintenance, Cost Implications, and Troubleshooting
Long-term performance depends on material type, joint movement ranges, UV exposure, and substrate compatibility. Look for common failure modes such as cracking, blooming, loss of adhesion, or joint gasket collapse, and use a quick field check like gently pressing the sealant to gauge elasticity. Schedule seasonal or annual inspections and use a simple field test to gauge adhesion.
Proactive maintenance lowers total lifecycle costs by catching small failures before they cause water damage and substrate degradation. Skipping routine inspections may lead to undetected sealant failures, increasing both direct and indirect costs. Keep a simple lifecycle log and plan resealing when backer material, tooling shape, and bead geometry align with the sealant family.
Inspection Best Practices and Maintenance Tips
Regularly inspecting sealant joints ensures longevity and prevents costly repairs. Use this checklist to maintain your sealants effectively.
- Visual Inspection: Check for cracks, gaps, or other signs of distress.
- Moisture Intrusion: Look for water stains, mold, or mildew, indicating moisture intrusion.
- Substrate Cracks: Inspect the substrate for any new cracks that could compromise sealant performance.
- Adhesion Check: Gently press on the joint with a gloved hand to ensure it remains firmly adhered.
- Elasticity Test: Bend the joint slightly to confirm it maintains flexibility and doesn’t feel brittle.
- Joint Geometry: Ensure the bead maintains its original shape, with no signs of collapse or excessive wear.
- Backer Rod Inspection: Check that backer rods remain in place and show no signs of degradation.
- UV Exposure: Assess areas exposed to direct sunlight for any signs of UV damage, such as discoloration or loss of elasticity.
Quick Rule: Address small failures promptly to prevent accelerated substrate degradation and water damage.
Cost Implications and Lifecycle Thinking
Upfront material and installation choices significantly impact long-term costs. Understanding these factors helps optimize your budget and maintenance plan.
Direct costs include materials (sealant, backer rods, primers) and labor for application and resealing. Indirect costs can be substantial, including water damage repairs, mold remediation, structural pitting, and accelerated substrate degradation due to sealant failure.
Pro Tip: Evaluate different material types based on expected lifespan, joint movement ranges, UV exposure, and substrate compatibility to optimize lifecycle costs. Consider both direct and indirect costs when planning maintenance and resealing.
Budgeting for proper materials, prep, and maintenance upfront reduces total lifecycle costs by minimizing repairs and remediation expenses.
Troubleshooting Common Application Mistakes
Identifying and correcting frequent errors during sealant application ensures durability and longevity. Avoid these common pitfalls:
- Insufficient Joint Preparation: Thorough cleaning, removal of contaminants, and proper surface preparation are crucial for optimal adhesion.
- Wrong Backer Rod Selection: Using the wrong size or material backer rod can lead to inadequate support and sealant failure.
- Incorrect Tooling: Using the wrong tool shape, technique, or timing can result in improper bead geometry and reduced performance.
- Improper Product Selection: Choosing a sealant that’s not compatible with your substrate or joint conditions can lead to early failure.
Re-prepare the joint, select appropriate backer rods, use correct tooling and techniques, and choose suitable sealant materials based on compatibility, joint movement ranges, UV exposure, and expected lifespan to avoid these common mistakes.
Conclusion
The core idea is simple: choosing the right sealant type, using the correct backing and bond breaker, and applying it with proper tooling and timing protects stucco joints from moisture intrusion, preserves appearance, and keeps the structure safe over time. By following careful preparation, correct material selection, and disciplined workmanship, you reduce costly repairs and extend long-term performance.
Check that the substrate is clean and dry, backer rod size matches joint depth, and the chosen sealant type is compatible with stucco and bond breaker; next, prepare the joints, apply primer if required, install bond breaker, load and tool sealant with the correct profile, and allow proper cure before exposure. Follow the recommended working temperature and curing environment, test a small area first, and verify that all materials meet local rules and manufacturer instructions.
Common mistakes to avoid include skipping joint preparation or surface cleaning, using the wrong backer rod or sealant together, and overworking or under-toting the sealant which leads to gaps or shallow profiles; always prioritize safety by wearing eye protection and gloves, working in a well-ventilated area, and avoiding compelled work in high heat, wind, or rain conditions that can compromise adhesion and cure. If in doubt about product compatibility or installation steps, consult the manufacturer instructions or a qualified professional, and consider delaying the project to align with safer conditions and local regulations; this approach helps prevent damage and costly mistakes while delivering durable joints that perform as intended.
FAQ
How do I choose the right sealant type for stucco joints?
Look for sealants labeled for exterior masonry or stucco and compatible with EIFS if used. Check the product label or datasheet for elasticity, weather resistance, and compatibility with coatings and paints. When in doubt, review the manufacturer instructions or consult the supplier.
What tooling shapes help apply sealant effectively on stucco joints?
Use a tooling shape that matches the joint profile and creates a smooth, rounded finish. A curved or rounded finishing tool helps impart a tidy profile and remove excess material. Follow the tool manufacturer’s guidance for the best results on textured stucco surfaces.
How should backer rods be used in sealant application?
Insert a backer rod to control the sealant depth and provide a rebound layer. The rod should sit below the joint surface and be compressed to fit snugly. Do not push the rod above the joint face or leave gaps for the sealant to bridge.
What signs indicate sealant failure on stucco joints?
Look for cracking, peeling, or loss of adhesion along the joint. Inspect for dense, hard, or wrinkled sealant and any gaps or separation from the surrounding surfaces. If moisture intrusion or mildew is present, review the joint and consider reapplication after proper preparation and priming per manufacturer instructions.