
Introduction
Rust ghosting is stains left in cured concrete by corroded metal in contact with the mix. It happens when moisture and metal react, causing rust to bleed into the surface during curing. Common culprits are chairs, ties, and rebar that sit in the pour.
Prevent it by choosing non‑corroding or protected hardware and by keeping metal away from fresh concrete where possible. Follow manufacturer instructions and local rules for embedment, using protective sleeves, plastic chairs, or sealed rebar, and keep forms clean. If stains are already there, use a rust stain remover labeled for concrete and follow the product instructions; test on a small area first.
Key takeaways
- Understand rust ghosting: comes from moisture-driven oxidation of embedded metals in concrete.
- Use non-reactive chairs and corrosion-resistant ties to reduce staining risk.
- For rebar and ties, cover with form finish and seal to limit exposure.
- During placement, avoid exposing metals above finish surface and use baskets.
- Inspect and remediate promptly: rust stains need surface cleaning with appropriate products.
- Safety: follow PPE and ventilation when treating existing stains and residues.
Table of Contents
- Introduction
- Key takeaways
- What Is Rust “Ghosting” and How to Recognize It
- How Embedded Metals Cause Rust Stains
- Assessment and Diagnosis: Visually and Technically
- Design and Material Choices to Prevent Rusting (New Pours)
- Site Best Practices During Placement and Finishing
- Repair and Remediation of Existing Rust Ghosting
- DIY Prevention and Step-by-Step Checklist
- Long-Term Maintenance, Costs, and Common Misconceptions
- Conclusion
- FAQ
What Is Rust “Ghosting” and How to Recognize It
Rust ghosting is a staining effect caused by embedded metals such as rebar, chairs, or ties reacting with concrete as it cures and ages. The chemistry involves rust products migrating into the surrounding matrix and leaving discoloration behind. This is distinct from ordinary dirt or mineral deposits that come from moisture or salts in the mix.
In cured concrete, expect ghosting to appear as reddish-brown to dark brown areas. Stains may form streaks, blotches, or diffuse halos near metal items or under finishes. Compare these patterns to efflorescence, which tends to be lighter and more powdery, or mineral deposits that show different textures.
Definition and visual characteristics
Rust ghosting, also known as iron staining, is a common issue in concrete caused by the oxidation of embedded metals like rebar, chairs, or ties. It appears as reddish-brown to dark brown stains on cured concrete.
The stain patterns can vary – you might see streaks, blotches, or diffuse halos. These typically show up near embedded metals, at joints, or under finishes.
To spot rust ghosting, look for these visual cues: color, pattern, and location. It’s usually not as white and powdery as efflorescence, nor does it behave like dirt or mineral deposits.
Why it matters (aesthetic vs. structural)
Rust ghosting is often purely aesthetic – it looks bad but doesn’t necessarily mean your concrete’s structurally compromised.
However, if the stains are accompanied by cracks, spalling, or delamination, there might be deeper corrosion or cover problems at play. These could weaken the concrete and affect its strength.
So, while rust ghosting can usually wait for a touch-up, it’s worth investigating further if you notice any structural signs. Better safe than sorry!
How Embedded Metals Cause Rust Stains
Embedded metals create corrosion cells when moisture and oxygen meet chlorides at vulnerable spots. This galvanic interaction drives rust that can migrate into the concrete and leave visible stains. Differential aeration helps localize the corrosion near the embedded items.
Moisture movement, including capillary rise and wetting cycles, accelerates or slows this process depending on exposure. Common entry paths for chlorides include outdoor pours and environments with de-icing or coastal exposure. Typical culprits are various forms of metal embeds, each with its own corrosion risk profile.
Common culprits: chairs, ties, anchors, and rebar
Embedded metals in concrete often cause rust ‘ghosting’. Here are common culprits:
Rebar: The most common cause. It’s ferrous, so it rusts easily.
Chair ties, anchors, and seating hardware: These also contribute to staining. Galvanized or coated metals last longer but eventually corrode.
Concrete factors that increase risk
Poor concrete quality lets moisture and chemicals reach metal, speeding corrosion:
Inadequate cover: Not enough concrete around metal means less protection.
Voids and poor consolidation: These let water and air reach metal. Porous finishes also increase risk.
Environmental and use factors
External conditions accelerate corrosion:
Deicing salts, pool chemicals, or coastal salts: These chlorides speed rusting.
Frequent wet-dry cycles: This moves moisture in and out, driving corrosion.
Assessment and Diagnosis: Visually and Technically
Begin with visual cues that align ghosting with suspected metals such as rebar, chairs, or starter bars. Note stain intensity and whether it stays surface-level or penetrates sealers or coatings. Mapping the pattern helps identify the likely source.
Use a simple diagnostic workflow: perform a mild surface cleaning test, then a solvent wipe to distinguish rust staining from mineral efflorescence. Record any bleed-through after cleaning to gauge depth and potential seal impact.
Quick visual and tactile checks
Start by looking for patterns on your concrete surface. Rust ‘ghosting’ often follows the lines of embedded metals like rebar, chairs, or ties.
Shadowing can also give them away. If you see dark lines where there shouldn’t be any, that’s a red flag.
Feel the surface too. A rind texture – rough or pitted areas – could indicate rust beneath. Snap some photos to document your findings and use them for reference later.
When to test or consult a pro
Before you start scrubbing, consider the source. If stains align with structural steel or cracks, consult an engineer or contractor. They can assess if there’s underlying damage.
For other cases, perform spot cleaning tests first. Use a mild cleaner to see if the stain lifts. But remember, if it penetrates sealers or finishes, you’ve got a bigger problem on your hands.
If stains are severe, consider sample removal. This lets you check for rust depth and determine next steps. Always wear appropriate PPE when dealing with concrete surfaces.
Design and Material Choices to Prevent Rusting (New Pours)
Choose corrosion-resistant materials for the top concrete layer when possible, such as epoxy-coated or stainless steel embeds and non-ferrous hardware. Avoid ferrous items in the upper portion to reduce ghosting risk. This choice helps set a durable foundation for the concrete surface.
Plan cover depth and placement to keep metal components below the zone where salt absorption and carbonation are most active. Coordinate formwork, vapor barriers, and curing methods to limit moisture contact with reinforcing steel and top-layer metals.
Embedment depth and layout guidance
Proper concrete cover is crucial to prevent rust ghosting. Verify your project’s required cover with your engineer or local building codes.
As a general rule, aim for at least 2 inches (50 mm) of cover in non-exposure areas and 3 inches (75 mm) in exposure areas. This keeps metal components below the critical salt-absorption or carbonation zone.
Follow your project’s structural plan for precise embedment depths and layout. Regularly check during construction to ensure these standards are met.
Corrosion-resistant options (epoxy, galvanizing, stainless)
To minimize rust ghosting, use corrosion-resistant materials in your top concrete layer.
Epoxy-coated rebar provides good protection but may not be suitable for highly alkaline environments. It’s cheaper than stainless steel but less durable.
Galvanized steel offers decent corrosion resistance, but it can degrade over time and is more expensive than epoxy-coated rebar. Stainless steel is the most resistant but also the priciest option.
Nonmetallic alternatives like fiber-reinforced polymer (FRP) rebar or glass fiber reinforced plastic (GFRP) rebar are available, offering high corrosion resistance with no metallic staining risk.
Design details: chairs, spacers, and fasteners
Use nonferrous or plastic chairs and caps near the finish to minimize staining. These materials won’t rust and can be easily removed after concrete curing.
For permanent ferrous elements like rebar ties or anchors, place them away from visible surfaces. If possible, conceal them within the concrete structure to prevent ghosting.
Use removable hardware for formwork, allowing you to reuse it without leaving marks on the finished surface. Regularly inspect and maintain these items to keep them in good working condition.

Site Best Practices During Placement and Finishing
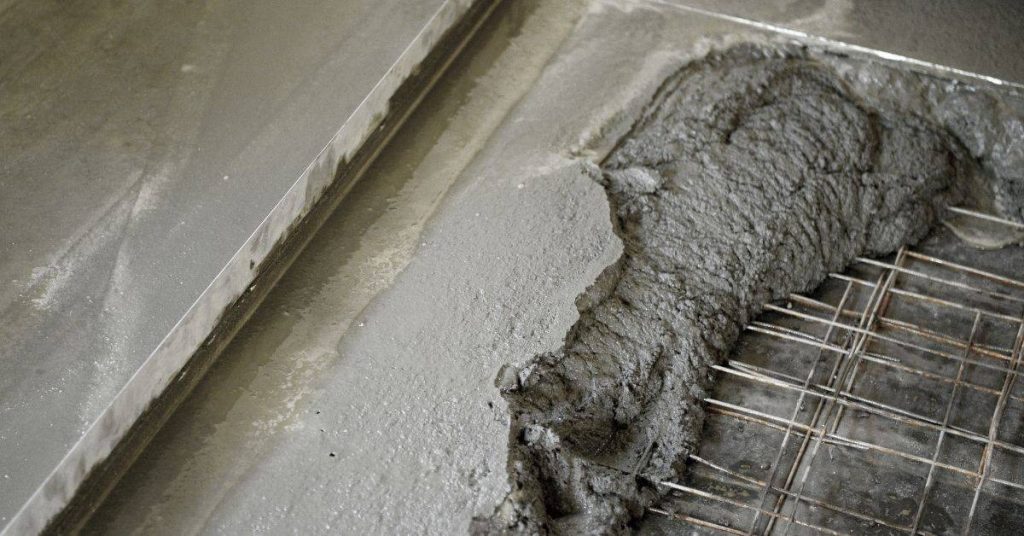
Store and handle steel properly to keep it dry and protected from moisture until the pour. Use barriers or shields to prevent concrete splatter on exposed steel during placement. Stage components in their intended positions to avoid later disturbance.
Consolidate and place material with controlled vibration to minimize voids while avoiding movement of embedded steel. Plan the finishing sequence to prevent dragging across metal elements, and align curing practices to support surface appearance. Maintain clean access and verify formwork integrity before pour.
Steel handling and storage
Keep rebar and chairs off the ground. Moisture on the ground can cause rust. Use plastic wrapping or barrier sleeves to protect steel from rain and moisture.
Minimize surface rust before placing steel in concrete. Clean or treat exposed steel on-site to prevent corrosion.
Designate a rust-free zone for storing steel. Keep it dry, covered, and away from potential sources of corrosion.
Temporary protection for chairs and ties
Use plastic caps or shims to protect chair tops. This prevents concrete from splattering onto steel surfaces.
Wrap or tape tie ends to prevent rust stains. Remove temporary steel items that would otherwise rest at the finish level.
Install barriers or shields around embedded areas. This protects them from damage during placement and finishing.
Consolidation and finishing checks
Use proper vibration and compaction to minimize voids. This helps prevent rust stains by ensuring concrete completely surrounds the steel.
Check for any exposed metal close to the surface before final finishing. Use a magnet or visual inspection to ensure no ties, chairs, or rebar are near the top.
Ensure clear separation between embedded steel and fresh concrete where needed. This helps prevent rust stains from laitance contamination.
Repair and Remediation of Existing Rust Ghosting
First diagnose the source and severity by identifying whether staining stems from rebar, chairs, or migrating moisture. Assess any cracks or delamination that could worsen with remediation. This helps determine the appropriate scope of work.
Follow a tiered remediation path from gentle cleaning to chemical treatments, reserving mechanical or structural fixes for persistent or deeper issues. Use rust converters or stain-removal products where suitable, and avoid aggressive grinding or harsh acids near intact sealers.
Non-destructive cleaning methods
Start with gentle, non-abrasive cleaning methods to remove rust ghosting from your concrete. These initial steps help preserve the surface and minimize damage.
Use a mild detergent mixed with water and a soft-bristled brush to scrub the affected areas. Test a small patch first to ensure it doesn’t damage the seal or discolor the concrete.
Commercial rust removers formulated for concrete can also be effective. Follow the manufacturer’s instructions carefully, ensuring you wear appropriate protective gear. Always test on a small area before applying to the entire stain.
Poultices are another non-destructive option. These pasty substances are applied to the stain and left to sit, drawing out the rust. Remove them after the recommended time and rinse thoroughly.
Mechanical and surface repairs
If non-destructive methods fail to remove the stain completely, consider mechanical or surface repair techniques. These methods can be more aggressive but may be necessary for stubborn rust ghosting.
Grinding can remove the top layer of concrete where the stain is most prominent. Use a low-speed grinder with a coarse disc to avoid damaging the underlying layers. Always wear appropriate safety gear, including eye and ear protection.
Shot-blasting is another option for removing surface stains. This method uses high-velocity particles to clean the surface. It’s more aggressive than grinding but can be effective on deeply embedded stains. Ensure you follow safety guidelines when operating shot-blasting equipment.
Patching may be necessary if the stain has caused minor damage or delamination. Use a concrete patching compound and follow the manufacturer’s instructions for application and curing.
Structural remediation and when to replace elements
In some cases, rust ghosting may indicate underlying structural issues that require more invasive repairs. If you notice any of the following signs, consult a structural engineer before proceeding:
Loss of cover: If the rebar or chairs are exposed due to concrete delamination or spalling, it’s a sign of severe corrosion that requires immediate attention.
Significant pitting: Deep pits in the rebar or chairs indicate advanced corrosion. These areas should be replaced to prevent further deterioration and potential structural failure.
Active spalling: If large pieces of concrete are falling off or crumbling, it’s a sign of active corrosion that requires immediate repair. This could involve replacing affected rebar or chairs, filling cracks, or encapsulating the entire structure to prevent moisture ingress.
DIY Prevention and Step-by-Step Checklist
Map out where chairs, ties, and rebar will contact concrete to plan mitigation before mixing. Identify potential risk areas and select materials that minimize imprint. This proactive step reduces ghosting potential from the start.
Prepare a tools and materials checklist that includes compatible form-release agents, non-absorbent forms, corrosion-inhibited embeds, and a suitable mix approach. Follow a step-by-step workflow that safeguards embedded items, pours carefully, and finishes without dragging across surfaces.
Tools and materials checklist
Before you start, ensure you have the right tools and materials to minimize ghosting risk. Here’s a quick checklist.
- Non-ferrous/Plastic Chairs: Check with supplier for options that won’t stain. Stainless steel can still rust if not properly protected.
- Epoxy or Coated Rebar: Specify with your supplier to prevent corrosion and ghosting.
- Rust-Inhibiting Wraps: Use these for additional protection on rebar ends and exposed areas.
- Form-Release Agents: Choose one compatible with ghosting prevention. Some can trap moisture, causing stains.
- Non-Absorbent Forms/Liners: These prevent concrete from sticking and reduce imprint risk.
- Epoxy-Coated or Corrosion-Inhibited Rebar: Specify with your supplier to prevent rusting.
- Basic Cleaners: Have mild cleaners ready for any spills or minor stains. Harsh chemicals can damage concrete surfaces.
- Suitable Concrete Mix: Choose a mix that reduces color transfer, like those with low water-cement ratio and integral water repellents.
Quick rule: Always check product compatibility to avoid ghosting risks.
Step-by-step workflow
Follow this step-by-step guide to minimize ghosting risk during your pour.
- Plan/Identify Exposed Metals: Map out where chairs, ties, and rebar will contact concrete. Plan mitigation strategies like spacing and material choices.
- Select Protective Measures: Choose compatible form-release agents, non-absorbent forms, and rust-inhibiting wraps.
- Store/Handle Steel Properly: Keep steel dry and clean to prevent rust before pouring. Rust can transfer even with protective measures.
- Set Chairs/Spacers: Place chairs and spacers carefully, ensuring they’re level and won’t imprint on the surface.
- Protect Temporary Elements: Shield surfaces during early curing to protect from moisture and staining agents.
- Pour and Compact: Pour and compact concrete without dragging or grinding against the surface. This can expose rebar ends, causing rust stains.
- Inspect Before Finishing: Check for any signs of ghosting before finishing. Timely detection allows for easy remediation.
Quick rule: Regular inspection and careful handling are key to preventing ghosting.
Visual quality-control checkpoints
Regular inspections help catch ghosting issues early. Here’s a practical checklist for pre-pour, post-consolidation, and pre-finish stages.
- Pre-Pour: Check alignment of forms, chairs, ties, and rebar. Misaligned elements can cause imprints or rust stains.
- Post-Consolidation: Inspect for any signs of rust on exposed steel. Timely detection allows for easy cleaning or wrapping.
- Pre-Finish: Check for any ghosting cues, like discoloration or imprint marks. These can be harder to fix after finishing.
- Post-Curing: Inspect the surface again after curing. Some stains may not appear until concrete has fully cured.
Quick rule: Regular, thorough inspections are crucial for catching ghosting issues early.
Long-Term Maintenance, Costs, and Common Misconceptions
Establish an ongoing inspection routine that looks for sealant wear, hairline cracks, exposed rebar, and any halos around fasteners. Decide who handles each task and document findings for future reference. Regular checks help catch issues early.
Compare prevention and remediation considerations by outlining practical maintenance tasks and their potential cost implications. Debunk common myths with clear guidance on what is true and what isn’t, and frame decisions around durability and long-term value.
Maintenance schedule and triggers
Concrete needs regular check-ups to keep it in top shape. Here’s a simple maintenance schedule:
Monthly/Seasonally: Inspect for chalking or peeling sealant, hairline cracks, exposed rebar, and rust halos around fasteners.
After Major Events (storms, heavy use): Check for new staining or cracks. These could be signs of water intrusion or structural stress.
If you find anything out of the ordinary, document it. Keep a record to track changes over time and help with future maintenance planning.
Cost considerations: prevention vs. repair
Prevention is always cheaper than cure. Here’s why:
Preventive measures like sealants, protective coatings, and proper drainage cost $0.50 to $3 per square foot. They’re a one-time or infrequent expense.
Repair, on the other hand, can escalate quickly. Rust treatment alone can range from $1 to $5 per square foot. Rebar replacement, patching, and resealing can double or triple these costs.
So, it pays to invest in prevention upfront. Check local supplier and contractor quotes to get the best deals.
Common misconceptions and FAQs
Let’s debunk some myths about rust ghosting:
Myth: Rust stains mean imminent collapse. Truth: Rust stains are unsightly but don’t necessarily indicate structural failure. Regular inspections will reveal any serious issues.
Myth: Any surface rust on rebar is catastrophic. Truth: Some rust is normal. It becomes a problem when it compromises the rebar’s cross-sectional area by more than 25%.
FAQ: Can I treat rust stains? Answer: Yes, there are treatments available. But prevention is still cheaper and more effective.
FAQ: How do rust stains affect lifespan? Answer: They don’t directly impact lifespan. However, they can indicate water intrusion, which can lead to deterioration if left untreated.
Conclusion
Rust ghosting is a visible sign of hidden metal and must be treated as a safety and durability issue. Fixing it now prevents stains, weak spots, and costly repairs later, and it keeps your concrete surfaces looking and lasting longer.
Check for what to do next in a simple sequence: inspect embedded metals early and during any new pour, verify material choices and protective coatings, keep embedment distances and placement practices tight, test small areas first, and follow a clean, repeatable finishing and sealing routine. If you’re unsure, document what you see, compare it to your plan, and proceed in small steps rather than big, irreversible changes.
Common mistakes to avoid include rushing the pour and not isolating metals from concrete, ignoring curing and sealing requirements, and assuming any stain will disappear on its own. Safety rules are simple: wear eye protection and gloves when handling metals or cleaners, test any remediation in a hidden corner first, and never compromise structural elements to chase a cosmetic fix.
If the situation looks severe, or if you’re dealing with reinforced bars or ties that show active rust after repair attempts, call a professional. A proper assessment can save time and prevent damage, and you’ll finish with concrete that stays clean and strong. Stay deliberate, follow your checklist, and you’ll keep rust ghosting from becoming a recurring problem.
FAQ
What causes rust ghosting in concrete besides rebar?
Rust ghosting comes from any metal left in contact with the concrete surface that can corrode over time. Common culprits are chairs, ties, bolts, or anchors that hold formwork or accessories in place. Moisture and exposure to air speed up the staining process.
Which materials are most likely to stain concrete with rust?
Rebar is the primary risk, but ties, chairs, anchor bolts, and other metal inserts can leave rust. Stainless steel or coated metal may resist staining, while plain carbon steel is a common source. Check manufacturer notes or labels if you’re unsure about a metal’s corrosion resistance.
How can I prevent rust staining during a new pour?
Keep metal off the surface or use protective sleeves, coatings, or plastic chairs designed to resist rust. Ensure proper concrete cover over any embedded metal as specified by the project details. Clean and remove any rust-prone items before finishing, and seal joints or gaps where moisture can pool.
What are safe methods to remove existing rust stains?
Start with a mild cleaner and a soft brush to avoid scratching the concrete. For tougher spots, use a cleaner formulated for rusty stains and follow the product label. If unsure, test a small area first and consider professional remediation for severe staining.