
Introduction
Repairing honeycombed concrete means fixing voids and loose pockets in the surface by choosing patching, injecting, or rebuilding. You evaluate how severe the honeycombing is and start with the simplest, most straightforward method. If the concrete has hollow spots you can reach, patching is usually the first option; deeper voids may need injecting, and large deterioration might require rebuilding.
Patch if the surface has small, shallow voids and the surrounding concrete is sound. Inject if you can access the voids from the surface and you need to fill voids beneath the surface without removing the whole face. Rebuild when the area is heavily damaged, spalling, or compromised structurally; always verify product instructions, labeling, and local rules before proceeding.
Key takeaways
- Visually inspect and probe honeycombed areas for depth and void continuity.
- Distinguish structural vs non-structural damage before patching or injecting decisions.
- Patch only shallow defects up to safe practical limits; avoid hidden cracks.
- Injection for small cracks in sound substrate with proper technique.
- Rebuild or replace elements when load paths or corrosion compromise capacity.
- Follow manufacturer and code guidelines; verify cure times and wear PPE.
Table of Contents
- Introduction
- Key takeaways
- Understanding Honeycombed Concrete
- Diagnosing Severity and Risk Assessment
- Structural Vs Non-Structural Honeycombing: Decision Criteria
- When to Patch: Criteria and Practical Limits
- When to Inject: Criteria and Best-Practice Use Cases
- When to Rebuild or Replace Concrete Elements
- Step-by-Step Repair Procedures (Practical Guides)
- Tools, Materials Checklist and Standards to Verify
- Conclusion
- FAQ
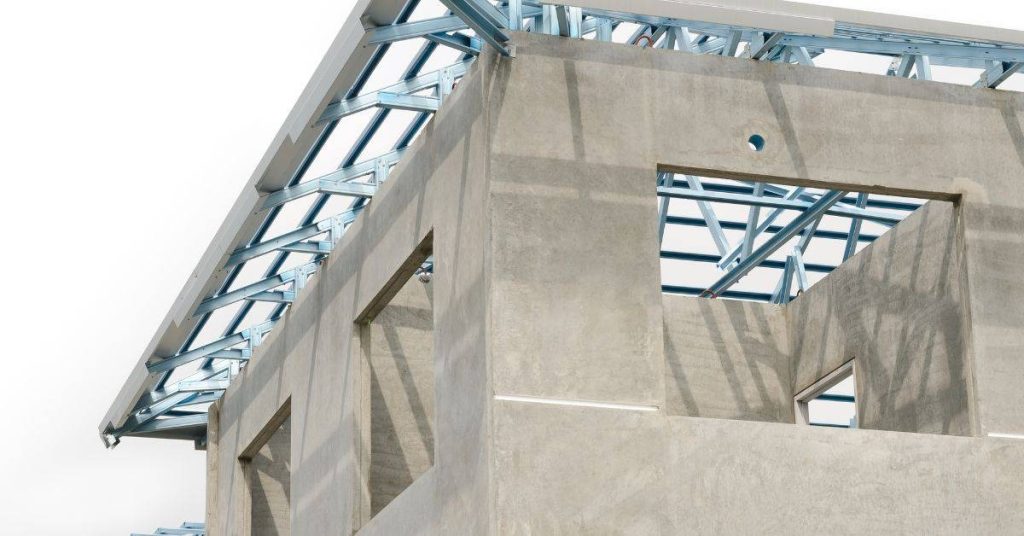
Understanding Honeycombed Concrete
Honeycombing shows up as rough, pocked surfaces with voids that reveal the underlying aggregate. By appearance, it differs from hairline cracks or spalling, which are finer or more surface-level. The goal is to recognize the telltale pattern early so you can choose the right fix.
Common causes include improper consolidation, insufficient vibration, and poor mix placement. If you see loose pockets or bare aggregate, note the location and extent for later evaluation. For accurate guidance, verify details on the product label, manufacturer instructions, or local building guidance as you plan repairs.
What honeycombing looks like
Honeycombing is easy to spot once you know what to look for. It’s different from other surface defects like cracks or spalling.
Visually, it appears as small voids or holes on the concrete surface. These voids can be scattered randomly or form a pattern resembling a honeycomb.
Tactilely, you might feel loose aggregate when running your hand over the affected area. The mortar seems to be missing, exposing the coarse and fine aggregates.
Root causes and contributing factors
Honeycombing happens due to poor consolidation during concrete placement. This means the concrete didn’t settle properly, leaving voids behind.
Improper mix design can also cause honeycombing. If there’s not enough paste (mortar) in the mix, it won’t bind the aggregates together properly, leading to voids.
Formwork leaks or vibration issues during concrete placement can also contribute to honeycombing. If water leaks out of the formwork, it takes some of the cement with it, leaving voids. Vibration can cause the concrete to segregate, pushing the heavier aggregates down and leaving voids at the surface.
Diagnosing Severity and Risk Assessment
Start with a practical visual check: how deep and widespread is the voiding? Look for continuous lines of honeycombing, depth variations, and whether the surface feels hollow under a light tap. Note any rebar exposure or movement in the affected area. This sets the initial urgency level.
Next, assess immediate safety and long-term risk by considering load, exposure, and accessibility for repair. If you doubt structural capacity, stop and consult guidance from the label, datasheet, or a qualified pro before proceeding.
Visual inspection checklist
Use this checklist when first spotting honeycombed concrete to assess severity and plan repairs.
- Size: Measure the longest dimension of each affected area. Small (<50mm) may be patched, larger (>1m) might need rebuilding.
- Depth: Estimate how deep the honeycomb goes. Shallow (<25mm) can often be patched, deeper (>50mm) could require injection or replacement.
- Location: Check if it’s on a load-bearing wall or slab. If so, consult an engineer before proceeding.
- Reinforcement exposure: Look for exposed rebar. If found, stop work and call a pro to assess structural integrity.
- Adjacent damage: Check nearby areas for cracks, delamination, or more honeycombing. Ignoring these could lead to bigger problems later on.
- Surface deterioration: Note any crumbling or flaking. This indicates advanced deterioration and might need injection or replacement.
- Moisture presence: Look for signs of water, like dampness or efflorescence. Honeycombing often worsens with moisture.
- Causes: Try to identify what caused the honeycombing. This helps prevent recurrence during repairs.
Quick rule: If in doubt about any point, consult a pro or err on the side of caution.
Non-destructive and destructive testing options
Before diving into repairs, use these tests to confirm severity and extent of honeycombing. Non-destructive tests cause no damage but may not provide full info. Destructive tests give more accurate results but leave permanent marks.
Tap-sounding: Gently tap the concrete with a hammer. Hollow sounds indicate honeycombing. Useful for quick, initial checks but not conclusive.
Rebound hammer: Measures surface hardness. Lower readings suggest honeycombing. Good for comparing different areas but results can vary based on operator and tool condition.
Chain dragging: Drag a chain over the surface to reveal weak spots. Effective in exposing honeycomb but destructive, so use sparingly and only where necessary.
Core sampling: Drill out small cylinders of concrete for lab testing. Provides most accurate results but is time-consuming, expensive, and leaves permanent holes.
Consult an expert if test results are unclear or contradictory. They can provide professional advice tailored to your specific situation.
Structural Vs Non-Structural Honeycombing: Decision Criteria
Structural honeycombing involves areas that participate in load transfer, reinforcement, or critical support. Non-structural issues are surface defects or durability concerns without notable load impact. Use your assessment of depth, location, and reinforcement exposure to separate the two.
Consider how the defect affects performance: is there ongoing deflection, cracking, or spalling that changes how the element carries load? If in doubt, verify with the original design documents or a qualified inspector before choosing a repair path.
Load-bearing considerations
Honeycombing near reinforcement? That’s a red flag. Reinforcement is what keeps your concrete strong, so if it’s compromised, you’ve got a problem.
Check the member function too. Beams and columns carry loads differently than slabs. If honeycombing affects how they’re supposed to work, you’ll need a stronger fix.
Load paths are another thing to consider. Where’s that load coming from? Where’s it going? If honeycombing disrupts the path, you might need to rebuild or inject.
Location and exposure factors
Moisture, freeze-thaw cycles, corrosive environments – these can all make honeycombing worse. If your concrete’s exposed to any of these, you’ll want a repair that protects against them.
Aesthetic zones are another story. If it’s in plain sight, you might want a patch for cosmetic reasons. But remember, looks aren’t everything. Safety comes first.
Think about access too. Some repairs need regular maintenance. If it’s hard to get to, that could be a problem down the line.
When to Patch: Criteria and Practical Limits
Patch work is appropriate for small, shallow, non-structural voids or spalled areas where the surrounding concrete remains solid. It works best when the defect is isolated and accessibility is straightforward. preparation focus is key: clean, dampen, and roughen the surface for good bonding.
Patch should not be used where there is wide, deep voiding, significant rebar exposure, or movement under load. If any of these conditions exist, seek guidance from the product instructions or a pro before proceeding.
Suitable patching methods and materials
Choosing the right repair mortar, bonding agent, and surface treatment is crucial for a successful patch job. Incompatible materials or poor substrate condition can lead to cracking, staining, or weak bonds.
- Epoxy-based mortars: Use for heavy-duty repairs. Look for high compressive strength (3000-4000 psi). Avoid in areas with high moisture content as it may cause delamination.
- Polyester-based mortars: Good for light to medium duty repairs. Spec rating should be around 2500-3500 psi. Not suitable for outdoor use due to UV degradation.
- Cement-based mortars: Use for small, non-structural repairs. Look for a spec rating of at least 2000 psi. Avoid in areas with freeze-thaw cycles as it may cause damage.
- Bonding agents: Use to improve adhesion between old and new concrete. Specify one that’s compatible with your chosen mortar. Avoid using if the substrate is too weak or contaminated.
- Surface treatments: Apply to seal the patch and protect it from weathering. Look for ones that are compatible with your chosen mortar. Avoid using if the surface isn’t properly prepared as it may not adhere well.
Surface preparation and adhesion checks
Proper surface preparation is key to ensuring good bonding of your patch. Here are the steps you need to follow:
Cleaning: Remove all dirt, grease, and loose material using a wire brush or pressure washer.
Removing loose concrete: Use a chisel or hammer to remove any loose or crumbling concrete. The surface should be sound and solid.
Roughening: Use a grinder with diamond blades or a scarifier to roughen the surface. This increases the bonding area and improves adhesion.
Moistening: Keep the substrate moist before applying the patch. This helps to prevent suction that can cause cracking. Check for good bonding conditions by performing a simple water drop test: apply a few drops of water on the prepared surface. If it beads up, the surface is too dry and needs more preparation.
When to Inject: Criteria and Best-Practice Use Cases
Injection is the preferred remedy when voids undermine bond or load transfer but the surrounding concrete is still sound. This includes deep voids behind a nonstructural face or around reinforcement where a seal and fill restore continuity. Follow the manufacturer’s mixing and injection sequence for best results.
Injection cannot fully restore compromised integrity in cases of extensive cracking, large structural voids, or sections that require a rebuild. Verify what the resin or grout is rated to do, and follow labeling and local guidance as you plan the treatment.
Injection materials and selection guidance
Choosing the right injection material is crucial for a successful repair. Different materials have varying penetration, bond, and flexibility properties.
- Epoxy/Resin: Deep penetration, strong bond, but less flexible. Use for structural repairs. Look for high viscosity ratings. Avoid in areas with movement.
- Cementitious Grout: Good penetration, decent bond, and flexible. Suitable for non-structural repairs. Check compressive strength ratings. Can stain if not properly sealed.
- Polymer-Modified Grout: Balanced penetration, bond, and flexibility. Ideal for most honeycombing cases. Look for flexural strength ratings. Avoid in areas with high stress concentrations.
- Wrong material: Using the wrong material can lead to cracking, staining, or weak bonds that don’t fix the problem.
Injection pattern, staging, and monitoring
Planning injector placement is key to a thorough repair. Here’s how:
Pattern: Place injectors in a grid pattern, spacing them 12-18 inches apart for even coverage.
Staging: Inject in stages, starting from the bottom and working up to avoid blowouts. Monitor pressure and flow rate to prevent over-injection.
Monitoring: Keep an eye on fill and curing progress. Use a gauge to check pressure and ensure proper fill. Inspect regularly for any signs of leakage or cracking during curing.
When to Rebuild or Replace Concrete Elements
Partial rebuild is warranted when damage spans multiple faces, reaches deep into the structural core, or when patching or injection cannot restore strength. This involves removing damaged material and recreating the section to match the original geometry. Plan for support, curing, and rebar details during reconstruction.
In some cases, full replacement is the safer choice, especially when the element is heavily deteriorated or interaction with other components is compromised. Check project specs and local rules to confirm scope and sequencing before moving ahead.
Partial replacement strategies
When honeycombing is localized and partial repair isn’t enough, consider partial replacement. Here’s how:
Removing damaged concrete: Use a jackhammer or chipping hammer to carefully remove the affected area. Keep cutting back until you reach solid concrete.
Preparing for new concrete: Clean and prepare the exposed surfaces. Ensure reinforcement is sound and visible. Tie new reinforcing bars into existing ones using lap splices.
Pouring new concrete: Mix fresh concrete according to specs. Pour it in place, vibrating well to remove air pockets. Let it cure properly, tying it into the existing structure for strength.
Full replacement planning and approvals
If honeycombing is extensive or structural integrity is compromised, full replacement might be necessary. Here’s how to plan:
Assess the situation: Evaluate if full replacement is indeed needed. Consider load-bearing elements and safety.
Permits and approvals: Check local building codes and obtain necessary permits. Consult a structural engineer for sign-off on plans.
Contractor selection: Choose a reputable contractor with concrete experience. Get multiple quotes, check references, and ensure they’re licensed and insured.
Step-by-Step Repair Procedures (Practical Guides)
For patches: document area, prepare surface, apply bonding agent if required, mix patch material per label, and cure according to instructions. Keep control of moisture and temperature as directed. Inspect bonding and finish after cure to ensure a flat, cohesive surface.
For injections: set up access points, clean voids, inject resin or cementitious grout per sequence, monitor flow, and seal once cured. For rebuilds: establish formwork, remove damaged material, place new concrete with the correct cover and consolidation, and cure with attention to humidity and temperature. Watch for common pitfall moments like improper compaction or uneven surfaces, and verify with the label or specs at each step.
Step-by-Step Repair Process
Follow these practical steps to repair honeycombed concrete, ensuring safety and quality.
- Preparation: Wear appropriate PPE, clear the area, and set up lighting if needed. Check for any hidden reinforcement before starting.
- Surface Preparation: Clean the affected area using a wire brush or pressure washer. Ensure the surface is dry and free of contaminants.
- Repair Work: Patch, inject, or rebuild as per your earlier decision, following the guidelines provided in this article.
- Curing: Moisten the repaired area lightly for 7 days to allow proper curing. Cover with plastic if necessary.
- Final Checks: Inspect the repair after 28 days to ensure it’s holding up well. If not, consider calling a professional.
Patching workflow with troubleshooting tips
Preparing the surface is key for successful patching. Clean and prime the area to ensure good adhesion. Apply repair mortar, following the manufacturer’s instructions, and cure properly.
Common issues include: Sagging or cracking. If sagging occurs, remove excess material immediately. For cracks, ensure proper curing and consider using a crack-bridging additive in your mortar mix.
Always check the patch after 24 hours to ensure it’s setting properly. If not, reapply or consult a professional.
Injection workflow with troubleshooting tips
Drill holes into the concrete at regular intervals, then install packers. Mix and apply grout according to manufacturer’s instructions, ensuring even pressure.
Common issues include: Poor fill. If grout isn’t filling the voids, check your injection pattern and pressure. Increase pressure or drill additional holes if necessary.
After injection, assess the repair by checking for any remaining voids using a non-destructive testing method like radiography or ultrasound. Re-inject if required.
Tools, Materials Checklist and Standards to Verify
Assemble a practical mix of hand tools, grinders, chisels, and cleaning gear, plus the specific patch or injection products you will use. Include PPE and containment for dust and spills. Create a checklist to confirm you have everything before starting.
Always verify key performance specs and standards on labels, data sheets, or local code guidance. Check recommended cure times, acceptable substrates, and any safety requirements before beginning work.
Tools and materials checklist
Before you start any repair, make sure you have the right tools and materials. This list covers essentials for patching, injecting, and rebuilding.
- Hand Tools: Trowel, brush, chisel, hammer, putty knife
- Power Tools (as needed): Angle grinder, circular saw, drill, mixer
- Mixing and Pumping Equipment: Mixer, pump (for injection), wheelbarrow
- Safety Gear: Safety glasses, gloves, ear protection, dust mask
- Patching Materials: Concrete patch mix, primer, sealant
- Injection Materials: Resin, hardener, injection ports, needles
- Rebuilding Materials: Rebar, concrete mix, forms
- Miscellaneous: Tape measure, level, screed, broom
Quick rule: Always check your tools and materials before starting. Missing or faulty gear can slow down work and compromise repairs.
Material specs, codes, and what to verify
Before purchasing materials, ensure they meet your project’s needs and comply with local codes. Here’s a checklist to guide you.
- Concrete Mix: Check compressive strength, water-cement ratio, aggregate size
- Patch Material: Verify bond strength, shrinkage, cure time, and compatibility with existing concrete
- Injection Resin: Confirm shrinkage, cure time, and tensile strength
- Rebar: Check yield strength, size, and spacing requirements
- Local Codes: Verify if a building permit is needed, and check local concrete standards
- Structural Engineer: Consult for complex repairs or loads
- Manufacturer’s Data Sheets: Always review to confirm material properties and application guidelines
- Weather Conditions: Check if temperature and humidity are suitable for concrete work
Quick rule: Skipping checks can lead to weak repairs, code violations, or even structural failures.
Conclusion
Repairing honeycombed concrete right now protects safety, durability, and appearance. Use the criteria you’ve learned to decide patch, inject, or rebuild, and stick to proven steps rather than guessing.
Make your plan in one smooth flow: confirm whether the issue is structural or non-structural, judge the severity, pick the repair path, gather the right tools and materials, prep and clean the area, apply the repair in the correct sequence, cure properly, and recheck for stability and water tightness. Start with a small test area to verify your method, then scale up only if the test passes.
Common mistakes to avoid are patching deep voids without proper backing, injecting without containment or the right seal, and using patch or injection products that aren’t compatible with the concrete or with each other. Always wear PPE, turn off any active water sources, verify substrate dryness, and follow manufacturer guidelines. If the load path is in doubt, or you’re unsure about the diagnosis, stop and seek professional help before proceeding.
If the structure carries significant loads, or you detect cracking that widens under load, or you’re unsure about the honeycombing extent, call a professional. For smaller, clearly non-structural issues, you can proceed with the outlined steps, safety checks, and documented standards. Stay steady, follow the steps, and you’ll keep the project moving safely toward a durable result.
FAQ
How do I tell if honeycombing is something I should patch, inject, or rebuild?
Patch for small, shallow voids that don’t affect load paths. Inject when there are gaps behind the surface but the structure looks solid. Rebuild when the concrete is severely deteriorated or has deep voids that compromise strength.
What should I check on the surface before patching a honeycombed area?
Clean the area to expose the voids, remove loose material, and verify the surface is reasonably stable. Look for exposed rebar, spalling, or cracks that extend beyond the patch area. If the surface is soft or hollow-sounding, treat it as a rebuild decision or consult instructions.
When is injection the right move, and what must I verify first?
Use injection when there is the intent to fill voids behind a solid surface without removing large sections. Check that you have access to the voids and follow the product label and manufacturer instructions. If the substrate is cracking or deteriorating, injection may not fix the underlying issue.
If I’m unsure, should I rebuild the concrete element?
If the voids are widespread, deep, or the member carries critical loads, rebuild is usually safer. Don’t rely on a quick fix if strength or safety is unknown. When in doubt, check the project’s requirements and local guidance, and consider professional input.