
Introduction
The timeline for applying plaster undercoats on concrete masonry units (CMU) is crucial to ensure a successful, durable finish. Understanding the duration of each step helps you plan your DIY project efficiently.
From surface preparation to cure timing, this guide walks you through the process, helping you allocate sufficient time for each task and avoid common mistakes.
For the full guide, see Plaster Undercoats on CMU: Scratch Keys, Moisture Control, and Cure Timing.
The Complete Timeline for Plaster Undercoats on CMU
The entire process of applying plaster undercoats on CMU can take anywhere from a few days to over a week, depending on factors like weather conditions, substrate moisture, and the specific materials used. Here’s a step-by-step timeline to help you plan your project:
- Surface Preparation (1-2 days): Inspect CMU for damage, clean surfaces, and assess moisture levels.
- Moisture Control (Ongoing throughout the process): Keep CMU damp before plastering, protect fresh undercoats from rapid drying or rain, and allow trapped water to escape during curing.
- Plaster Undercoat Application (1-2 days per coat): Apply the first undercoat, create scratch keys, and apply subsequent coats as needed. Allow each coat to set before proceeding.
- Cure Timing (3-7 days): Monitor environmental conditions and follow manufacturer’s cure guidance for your specific undercoat material. Protect fresh undercoats from freezing or extreme heat during this period.
Total duration can vary, but allocating around 5 to 10 days for the entire process ensures adequate time for each step and helps prevent common issues like delamination, cracking, or efflorescence.
Key takeaways
The preparation stage significantly impacts the overall timeline. Ensuring CMU surfaces are clean, dry (but not overly), and free of defects helps speed up the application process and reduces the risk of undercoat failure.
- Choose plaster undercoats for CMU based on moisture, porosity, and bond keys.
- Scratch keys improve adhesion; prepare crisp vertical scores and tease along edges.
- Control moisture before plastering: dry CMU, monitor surface dampness, avoid puddling.
- Lime and gypsum plasters behave differently; check manufacturer guidance for curing.
- Cure timing depends on environmental conditions; ensure surface is firm before topping.
- Inspect bonding and moisture barriers; wear eye protection and respirators when plastering.
Table of Contents
- Introduction
- Key takeaways
- Overview and Purpose
- Types of Plaster Undercoats for CMU
- Scratch Keys and Bonding Mechanics
- Moisture Control Strategies for CMU and Plaster
- Preparation and Surface Conditioning Before Plastering
- Cure Timing and Environmental Considerations
- Quality Control, Inspection, and Common Failures
- Planning, Cost Implications, Safety, and Environmental Impact
- Conclusion
- FAQ
Overview and Purpose
Plaster undercoats on concrete masonry units (CMU) are the base layers in a multi-coat exterior or interior system, intended to provide mechanical bond, a smooth substrate for finish coats, and control of moisture movement through the wall assembly. This introduction is written for DIYers, remodelers, and tradespeople who need practical field guidance and decision points for lime-based and cementitious undercoats.
The core goals are a durable bond to CMU, predictable moisture management through compatible materials and detailing, and reliable cure timing between coats to avoid bond failures. Where specific numbers matter—like allowable substrate moisture, primer selection, or manufacturer cure windows—check the product label or the manufacturer’s technical data sheet before proceeding.
What is an undercoat on CMU?
An undercoat on concrete masonry units (CMU) is the first layer of plaster applied to the substrate. It’s different from a finish coat, which gives the final appearance. Undercoats have specific functions: they prepare the surface for subsequent coats and improve adhesion.
CMU requires undercoats because it’s porous and absorbs moisture. A proper undercoat helps manage this moisture and creates a strong bond with the finish coat.
Undercoats are typically cement-based or lime-based plasters, depending on the desired outcome and compatibility with the finish. They’re applied in two stages: a scratch coat followed by a brown coat (or base coat).
Key performance objectives
The primary goals of an undercoat on CMU are:
1. Bond strength: A good undercoat creates a strong, durable bond with the CMU and subsequent coats.
2. Crack resistance: It helps prevent cracks by absorbing movement and stress from the substrate.
3. Moisture buffering: Undercoats manage moisture migration, preventing trapped moisture that could lead to issues like efflorescence or delamination.
4. Compatibility with finishes: A well-applied undercoat provides a suitable surface for the final finish, ensuring good adhesion and appearance.
Who should use this guide
This guide is intended for:
Masons and contractors: To refresh their knowledge on undercoats and ensure they’re up-to-date with best practices.
Specifiers: To understand the importance of specifying appropriate undercoats for CMU projects.
DIYers: To gain practical insights into applying undercoats on their own CMU projects at home. Expect detailed, step-by-step guidance with clear explanations of key concepts.
Types of Plaster Undercoats for CMU
Undercoats fall into broad categories—cementitious, lime-based, polymer-modified, and gypsum systems where applicable—and each has different behavior on CMU in terms of adhesion, breathability, and cracking tolerance. Match the undercoat family to the CMU condition, expected movement, and the intended finish coat, and verify compatibility with the manufacturer’s instructions for use on masonry.
Substrate prep and moisture condition heavily influence which system will perform: some undercoats tolerate higher suction or need bonding agents, others demand a damp substrate or special primers. When in doubt about limits like maximum coat thickness or required bonding products, consult the product data sheet and choose an approach that aligns with the finish and site constraints.
Cementitious and Polymer-Modified Undercoats
Cementitious and polymer-modified undercoats are commonly used over CMU due to their durability, adhesion, and crack-bridging capabilities. They’re ideal for new or repaired CMU surfaces.
Cement-based mixes, like cement-lime or cement-sand, provide good adhesion and breathability but may lack flexibility. They’re suitable for dry, sound CMU with minimal movement.
Polymer-modified undercoats combine cement with polymers (like acrylic or vinyl) to enhance flexibility, durability, and adhesion. They’re great for surfaces with minor cracks or where some movement is expected.
Check product compatibility with your CMU and finishes. Follow manufacturer guidelines for mixing, application, and cure timing.
Lime and Traditional Breathable Mixes
Lime-based undercoats are advantageous in historic or breathable assemblies. They allow moisture to escape, preventing trapped humidity from causing issues.
Before specifying lime over CMU, ensure the surface is clean, sound, and dry. Lime doesn’t adhere well to damp surfaces or contaminants like efflorescence.
Traditional lime-cement or lime-sand mixes provide good breathability but may lack strength compared to cement-based systems. They’re best suited for low-traffic areas with minimal movement.
Check product compatibility and follow manufacturer guidelines for application, cure timing, and finish selection.
Gypsum and Specialty Products
Gypsum-based undercoats are typically used over gypsum board but can be applied to CMU in certain cases. They provide good adhesion, fire resistance, and soundproofing.
However, they’re not suitable for all CMU surfaces due to their lack of breathability and flexibility. Avoid using them on damp or moving surfaces, as they may crack or delaminate.
Specialty proprietary products offer unique benefits like enhanced adhesion, moisture resistance, or self-priming capabilities. They might be preferred in specific scenarios but always check compatibility with your CMU and finishes.
Follow manufacturer guidelines for application, cure timing, and finish selection. Consider consulting a specialist if unsure about product suitability.
Scratch Keys and Bonding Mechanics
Scratch keys are intentional surface textures or grooves in the undercoat that create a mechanical interlock with CMU and resist delamination under shear and tensile forces. Proper keying works with the chosen undercoat type—a mortar with appropriate aggregate and plasticity—to form a continuous mechanical bond rather than relying solely on adhesive attraction.
Preparing the CMU for keying requires clean, dust-free masonry and control of substrate moisture so the scratch coat achieves the intended texture and cure profile. If you need confirmation of specific key dimensions or scoring methods, check the product instructions or local practices; perform simple field checks such as visual uniformity and a small drag test to verify key effectiveness before full application.
Methods to create effective scratch keys
Scratch keys are crucial for a strong bond between new and existing concrete. Here’s how to create them.
Raking: This is the most common method. After cleaning and preparing the surface, use a rake or broom with stiff bristles to score lines into the concrete. Aim for spacing of about 1/4″ to 3/8″.
Scratch coat: Apply a thin layer of fresh concrete (about 1/4″) over the existing surface, then rake or brush it to create keys. This method provides better bonding but requires more material.
Mechanical anchors: For heavy-duty applications, consider using mechanical anchors like studs or inserts. Drill holes into the existing concrete, insert the anchor, and secure it with a nut. Ensure you’re following manufacturer instructions for proper spacing and installation.
Mechanical vs chemical adhesion
Alright, listen up. You’ve got two ways to get your new concrete to stick to that old stuff – mechanical and chemical. Let’s keep it simple.
Mechanical interlock is like giving your concrete a good ol’ handshake with the base. You do this by creating those scratch keys we talked about earlier. When you’re done, check your base compaction. It needs to be solid, no soft spots. Then, give it a good sweep and mist it with water before pouring.
Now, chemical adhesion, that’s where bonding agents and primers come in. They help create a bond between the old and new concrete. But here’s the thing – you don’t always need them. If your base is sound and you’ve got good mechanical interlock, you might not need ’em. Check the product label or manufacturer instructions to be sure.
Visual checkpoints for bond quality
Before applying subsequent coats, use this checklist to quickly confirm that your scratch keys are adequate and the bonding mechanics are sound.
- Check key depth: Ensure keys are at least 1/8″ deep. Too shallow and bond strength will suffer.
- Inspect key spacing: Keys should be spaced no more than 2-3 times their width apart for optimal bonding.
- Verify key direction: Keys should run in the same direction as the main reinforcement. Cross-grain keys are weak points.
- Examine surface profile: The surface should have a uniform, waffle-like pattern. Irregularities may indicate poor mixing or placement.
- Check for voids: Tap the surface; a dull thud indicates voids. Rework is needed if voids are present.
- Inspect corners and edges: These areas are critical; ensure keys are well-formed here to prevent delamination.
- Check for contamination: Dirt, grease, or other contaminants can compromise bond strength. Wipe clean if necessary.
- Verify surface moisture: The surface should be slightly damp but not wet. Too much water weakens the bond; too little may cause curling.
Quick rule: If in doubt, perform a simple pull test (check manufacturer’s instructions) to ensure adequate bond strength before proceeding.
Moisture Control Strategies for CMU and Plaster
Assess substrate moisture before plastering and identify active water sources such as leaks, capillary rise, or interior vapor that can compromise the plaster system. Use a moisture meter or repeated surface checks to build a baseline and set pass/fail criteria; if you don’t have a meter, verify conditions with conservative visual and tactile tests and follow product guidance for acceptable substrate dryness.
Control measures include fixing leaks and drainage, selecting breathable primers or membranes compatible with the undercoat, and adjusting mix designs or admixtures to improve water resistance without trapping vapor. For any remedy that changes breathability or moisture transport, confirm compatibility with the undercoat and finish materials—refer to manufacturer instructions or technical data sheets to avoid unintended vapor barriers.
Substrate moisture assessment and testing
Before applying any plaster undercoat, it’s crucial to assess the moisture content of your CMU substrate. This helps ensure a successful bond and prevents future issues like delamination or efflorescence.
Start with a visual inspection. Look for signs of dampness, stains, or efflorescence on the surface. If you spot any, dig deeper with moisture meters and probe tests.
Use a CMU moisture meter to measure the moisture content in the substrate. Aim for readings below 18% for most plaster systems. If readings are higher, consult lab testing or manufacturer guidance before proceeding.
For invasive checks, use a moisture probe. Drill small holes into the CMU and insert the probe to measure moisture content at various depths. Remember, these tests only provide localized data, so take multiple readings across the wall.
Damp-proofing, vapor control, and isolation layers
To protect your plaster system from moisture, consider using damp-proof courses (DPCs), vapor retarders, or breathable barriers. Each serves a different purpose:
Damp-proof courses prevent water from migrating upwards through capillary action. They’re ideal for below-grade applications and areas prone to water intrusion.
Vapor retarders control the movement of water vapor, preventing it from reaching the plaster and causing condensation issues. Use them in walls with high interior humidity or where the plaster is exposed to exterior temperature changes.
Breathable barriers, like certain primers or coatings, allow moisture to escape while preventing liquid water entry. They’re useful when you need to protect the plaster from rain but still permit drying.
Choose your barrier based on your wall assembly and local climate conditions. Always follow manufacturer guidelines for application and compatibility with your chosen plaster system.
Design details to reduce moisture risk
Minimizing water entry and allowing drying are key to protecting your CMU walls from excessive moisture. Incorporate these design details:
Flashing: Install flashing at all openings, intersections, and transitions to direct water away from the wall.
Weep holes: Drill weep holes in the bottom course of CMU to allow any trapped water to escape. Ensure they’re not blocked by backfill or other materials.
Drainage planes: Install drainage plane materials, like house wrap or felt paper, behind cladding to facilitate water drainage and prevent it from reaching the CMU.
Termination points: Ensure all barriers and membranes terminate properly at the top of the wall, roof, or other transitions. This prevents water from being trapped behind them and causing issues.
Preparation and Surface Conditioning Before Plastering
Good preparation starts with documenting CMU surface characteristics: porosity, texture, existing coatings, and any deterioration that affects adhesion. Clean the surface of dust, efflorescence, oils, and loose material, and repair voids or damaged units with compatible patch mortars so the substrate is uniform and stable for the scratch coat.
Control saturation by testing how the block accepts water—dampen or pre-wet only if the product guidance indicates—and select primers or bonding agents suited to the undercoat and the CMU condition. Be wary of common mistakes like over-wetting, applying plaster over sealed paints, or leaving long delays between prep and plaster; when product-specific limits matter, consult the manufacturer’s application instructions.
Cleaning, repair, and substrate profiling
First things first, mate. You gotta get that surface clean and sound before you slap on any plaster.
Remove loose material. Grab your scraper or wire brush and get rid of any flaky paint, old plaster, or other muck. You want a solid base to work with.
Now, patch those honeycombs and voids. Fill ’em up with some joint compound or ready-mixed filler. Make sure it’s compatible with your substrate – check the label if you’re unsure. Let it dry, then sand smooth. Don’t be skimping on this step; undercoat won’t stick to a poor surface.
Finally, profile that sucker. You want a consistent texture for your undercoat to grab onto. Use a sanding screen or a bit of sandpaper to smooth out any rough patches. Don’t go crazy – we’re not trying to turn it into glass here.
Primers, bonding agents, and wetting practices
Before you slap on that plaster, listen up. You gotta prep your surface right to get a good bond. Here’s what you need to do:
Use primers or bonding slurries when:
- Your substrate is dusty or porous (like concrete or brick).
- You’re plastering over new, bare surfaces.
Check the product label for application instructions. Some need diluting, others don’t. Don’t be a hero, follow the rules.
Wetting or pre-dampening:
This ain’t no time to skimp. You gotta keep your surface damp before you plaster. Here’s how:
- Lightly mist your surface with water just before application.
- If it’s real hot or windy, you might need to wet the surface again right before you start.
Remember, too much water is as bad as too little. Check those manufacturer instructions and don’t go crazy with the hose.
Tools and materials checklist
Before you start plastering, use this checklist to ensure you have everything needed for a smooth job. Check each item off as you verify it.
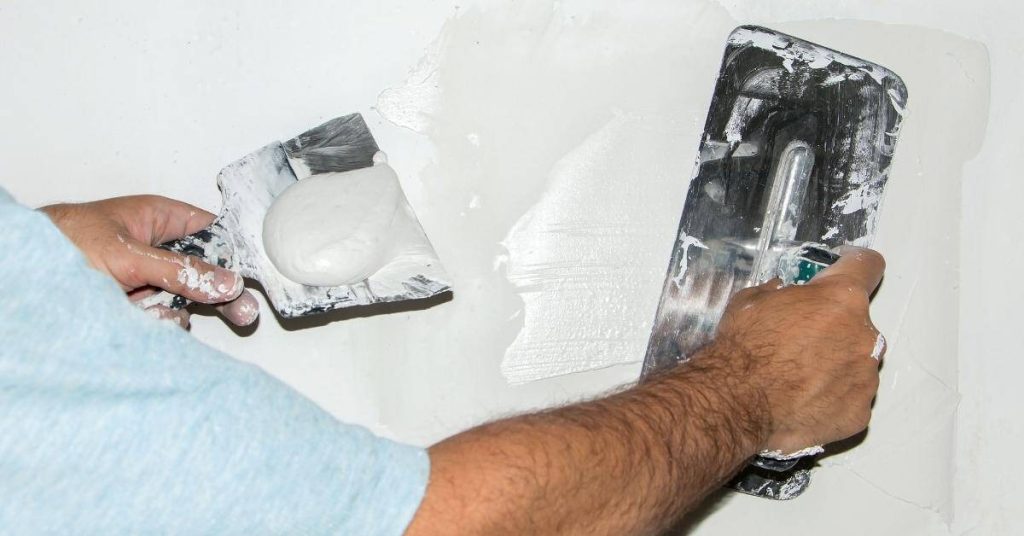
- Trowels (4″ & 12″): Inspect for straight edges and no bends. Trowels should be clean and dry before use.
- Scratchers (6′ & 8′): Ensure they are in good condition with no missing teeth or bent tines. Check the handle grip for secure fit.
- Mixing Bucket: Confirm it’s clean and free of old plaster or debris. A 5-gallon bucket is standard for most jobs.
- Plaster Mixer (Electric): Test the mixer to ensure it works properly. Check the paddle for any damage or wear.
- PPE: Gloves, Goggles, Mask: Verify you have these safety essentials. Gloves should be durable and fit well; goggles should protect eyes from dust and debris; masks should filter out plaster particles.
- Measuring Tape (25′): Check the tape for accuracy by measuring a known distance, like 10 feet, to ensure it’s correct.
- Plaster Hawk: Inspect for any cracks or damage. The hawk should be clean and ready for use.
- Plaster (Powder): Check the bag for the correct type of plaster (e.g., joint compound, setting-type, etc.). Verify it’s within its expiration date and stored properly to maintain freshness.
Quick rule: Always double-check your tools before starting. Damaged or worn-out tools can lead to poor workmanship and rework.
Cure Timing and Environmental Considerations
Set time is when the material hardens enough to be self-supporting; cure time is when it gains necessary strength and moisture equilibrium to accept subsequent coats or service loads—both are influenced by mix, temperature, humidity, wind, and substrate moisture. Monitor these conditions rather than relying on a fixed calendar day, and follow the manufacturer’s cure guidance for the particular undercoat you use.
Protect fresh undercoats from rapid drying, freezing, or rain with windbreaks, temporary enclosures, or misting as appropriate to maintain steady curing conditions. If you need specific thresholds for temperature or humidity, review the technical data sheet and document site conditions during curing so you can make informed go/no-go decisions for follow-on coats.
Environmental effects on cure and strength gain
Ambient temperature, humidity, and wind play a big role in how your plaster undercoats cure. Here’s what you need to know:
Temperature: Warmer temps speed up curing. In hot weather, the plaster dries too fast, weakening it. In cold, it cures slow or even stops. Keep an eye on forecasts and adjust your schedule.
Humidity: High humidity helps keep the plaster moist during cure. Low humidity lets it dry out too quick. If it’s dry, consider misting or covering the undercoat to control drying.
Wind: Wind dries things out fast. It can cause rapid drying and cracking. Use windbreaks or coverings to protect fresh plaster from strong winds.
Monitoring cure and when to apply subsequent coats
Keep an eye on your undercoats as they cure. Here’s how:
Check surface hardness. Gently press or tap the surface. It should feel firm, not soft or crumbly.
Do a simple adhesion test. Stick some duct tape on the surface, then pull it off. If plaster comes with it, it’s not cured enough.
Use a moisture meter to check substrate and ambient conditions. Follow manufacturer guidelines for acceptable readings before applying next coats.
Protecting fresh undercoats
Fresh plaster needs protection from the elements. Here’s how to keep it safe:
Provide shade. Keep the area out of direct sunlight, especially in hot weather.
Use misting if it’s dry. Lightly mist the undercoat to keep moisture levels up.
Set up windbreaks or use covers to protect from wind and rain. This gives the plaster time to cure properly without drying out too fast.
Quality Control, Inspection, and Common Failures
Set defined inspection checkpoints: verify substrate cleanliness and moisture before application, inspect scratch-key uniformity after the base coat, and document cure progress with visual checks and moisture readings. Use objective tests where practical—adhesion checks, moisture meter readings, and photographic records—so findings are traceable and defensible.
Watch for common failures like cracking, delamination, efflorescence, or blistering and link them to likely causes such as movement, contamination, trapped moisture, or improper cure. For remediation actions—re-keying, localized repairs, or full removal—base the plan on documented test results and manufacturer repair guidance, and record all corrective steps for quality control purposes.
Visual and performance inspection checklist
Use this checklist during and after applying plaster undercoats on CMU to ensure quality and prevent failures.
- Substrate readiness: Check CMU for cleanliness, moisture content (12-15% max), and absence of contaminants before application. Moisture issues cause efflorescence and delamination.
- Scratch coat key integrity: Inspect scratch key uniformity and depth after application. Use a straight edge to check for consistent keying. Inconsistent keys lead to poor bond and increased risk of cracking.
- Cure progress (tack-free time, initial set): Monitor cure progress by touching the surface lightly. It should be tack-free within 24 hours and fully set in 7 days. Improper curing causes delamination and weakens the undercoat.
- Surface flatness: Check for any irregularities or undulations using a straight edge after initial set. Uneven surfaces affect final finish and may require additional coats.
- Uniform porosity: Inspect the surface for consistent suction, indicating uniform porosity. Inconsistent suction causes uneven plaster absorption and weak spots.
- Adhesion/bond tests: Perform pull-off or practical delamination checks at random locations after full cure. Poor bond results in delamination and undercoat failure.
- Crack monitoring: Inspect for cracks, especially around openings and corners, during and after curing. Early detection helps prevent further cracking and costly repairs.
- Efflorescence observation: Check for signs of efflorescence (salt deposits) on the surface after full cure. Efflorescence indicates moisture migration and may require remediation.
Quick rule: Inspect regularly, document findings, and address issues promptly to maintain undercoat quality.
Common mistakes and troubleshooting
Identify and correct these common errors early to prevent plaster undercoat failures on CMU.
- Improper keying: Inadequate or inconsistent scratch keys lead to poor bond. Re-scuff and re-key the surface before recoating. Proper keying ensures strong adhesion and reduces cracking risk.
- Excessive substrate moisture: High CMU moisture content (>15%) causes efflorescence, delamination, and weak undercoats. Extend moisture cure or address intrusion issues. Moisture control is crucial for undercoat success.
- Incorrect mix/coverage: Wrong plaster mix or insufficient coverage results in weak undercoats and increased risk of failure. Correct mix design and ensure adequate coverage. Proper mix and coverage are essential for strength and durability.
- Improper tacking: Under- or over-tacking affects cure progress and final strength. Monitor tack-free time and adjust curing conditions as needed. Proper tacking ensures consistent cure and strong undercoats.
- Moisture intrusion after application: Water exposure during cure causes delamination, efflorescence, and weak spots. Protect fresh undercoats from moisture. Moisture protection is vital for successful curing.
- Contaminated substrate: Dirt, oil, or other contaminants prevent proper adhesion. Clean the surface and re-key before recoating. Cleanliness ensures strong bond and prevents delamination.
- Inadequate surface preparation: Skipping cleaning, repair, or profiling steps leads to weak undercoats and increased failure risk. Follow substrate conditioning guidelines. Proper preparation is key for successful plastering.
- Ignoring environmental factors: Extreme temperatures, humidity, or other adverse conditions affect cure and strength gain. Monitor and adjust curing conditions accordingly. Environmental control ensures consistent undercoat quality.
Quick rule: Address issues promptly to prevent minor problems from becoming major failures.
Relevant standards and specification notes
Consult these standards and specifications for acceptance criteria, testing methods, and when to involve professionals.
- ASTM C926/C926M: Standard Specification for Application of Portland Cement-Based Plaster. Use this standard for plaster mix design, application, and acceptance criteria. Follows best practices for plaster undercoat application.
- ACI 504R-16: Guide to Concrete Block Masonry: Provides guidelines for CMU construction, including moisture control and surface preparation. Helps ensure proper substrate conditions for plastering.
- Manufacturer specifications: Follow plaster manufacturer’s recommendations for mix design, application, curing, and acceptance criteria. Product-specific guidance ensures optimal performance.
- Local building codes: Check local codes for any additional requirements or restrictions on plaster undercoats. Compliance with codes prevents legal issues and ensures safety.
- Materials engineer involvement: Consult a materials engineer when complex issues arise, such as unusual substrates, extreme conditions, or specialized applications. Expertise helps resolve difficult problems and optimize performance.
- Testing lab services: Use approved testing labs for objective tests like moisture content, bond strength, and efflorescence observation. Laboratory results provide accurate, unbiased data for quality control.
- Documentation format: Keep records of test results, observations, and sign-offs in a consistent format (photos, dates, readings). Documentation ensures traceability and accountability.
- Regular inspections and sign-offs: Conduct regular inspections during and after application, with sign-offs from responsible parties. Inspections and sign-offs ensure quality control and prevent disputes.
Quick rule: Consult relevant standards and specifications regularly to maintain undercoat quality and compliance.
Planning, Cost Implications, Safety, and Environmental Impact
Plan the job around key milestones: substrate prep, scratch coat application, defined cure intervals, and finish work, and build contingency time for weather-dependent curing and moisture remediation. Evaluate cost drivers—material choice, labor for proper keying and prep, and any required waterproofing or priming—and check supplier documentation for yield and coverage to size materials accurately.
Enforce safety protocols for handling cementitious products and dust, including appropriate PPE, ventilation, and scaffold safety, and incorporate waste-reduction measures such as accurate batching and reusing clean containers. For environmental choices—low-VOC products, recyclable packaging, or durable materials—confirm claims with product data and consider lifecycle performance when balancing initial costs against long-term maintenance.
Scheduling and cost trade-offs
The choice of undercoat, cure timing, and weather windows directly impact labor scheduling and overall project cost. Here’s how:
Product Choice: Cementitious scratch coats dry faster than lime or polymer-modified mixes. Plan your schedule accordingly to avoid delays.
Cure Timing: Allow sufficient drying/curing time between undercoats. Rushing this can lead to weak bonds and failures. Factor in these windows when scheduling subsequent work steps.
Weather Windows: Humidity, temperature, and substrate variability can affect cure times and product performance. Plan contingencies for delays due to adverse conditions.
Safety protocols and PPE
Plastering undercoats on CMU involves handling alkaline materials, dust generation, and working at heights. Here are key safety precautions:
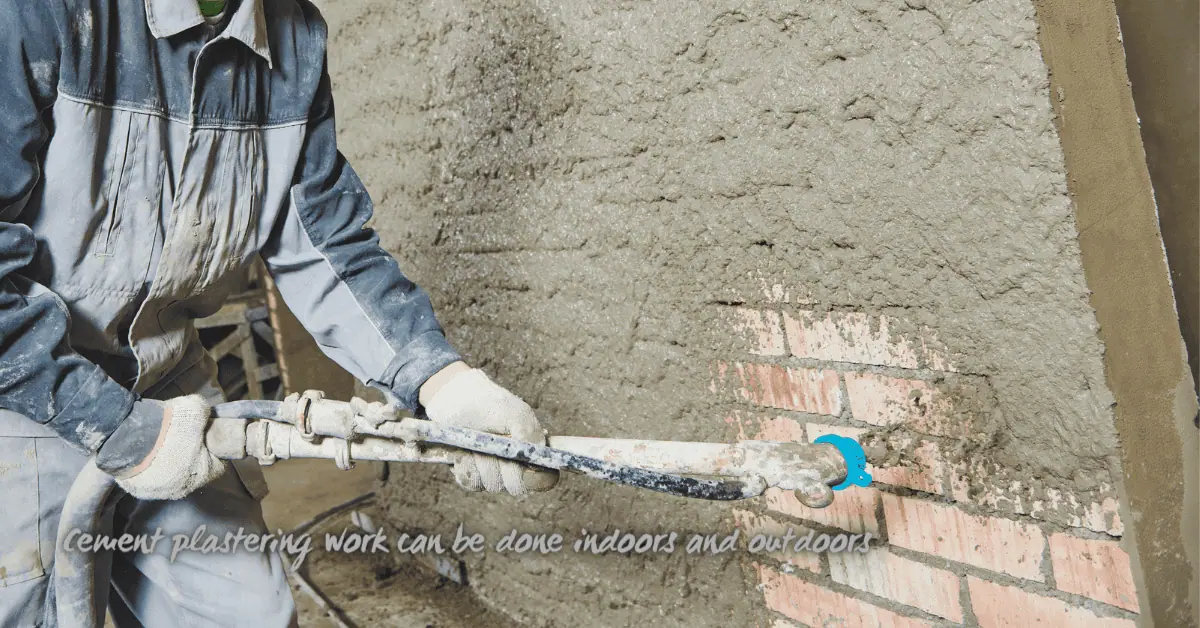
Dust Control: Use wet methods for surface preparation and application to minimize dust. Wear a respirator rated for plaster dust.
PPE: Protect your skin with gloves, long sleeves, and pants. Use eye protection and a hard hat when working at heights.
Ventilation: Ensure adequate ventilation in work areas to prevent the buildup of harmful vapors or dust clouds.
Environmental and waste management considerations
Minimizing environmental impact starts with smart material selection and waste reduction:
Material Selection: Choose low-VOC products to reduce indoor air pollution. Consider recycled-content or locally sourced materials to lower your project’s carbon footprint.
Waste Reduction: Reuse containers for mixing and storage. Minimize waste by ordering only what you need, using accurate batching, and recycling packaging where possible.
Disposal: Dispose of excess mortar responsibly. Do not pour it down drains or into waterways. Contact your local waste management authority for guidance on safe disposal methods.
Conclusion
Proper plaster undercoats on CMU, done right, protect the wall, keep moisture in check, and help you avoid costly fixes later. Stay practical: plan the sequence, test the wall, and respect cure timing so the finish looks good and lasts.
First, do a quick, whole-wall check as your guide: dry the surface, assess moisture risk, pick the right undercoat type, apply the scratch coat with proper keys, keep conditions steady during curing, and inspect bond and surface before you proceed to the next step. Bring the plan to a simple, repeatable routine you can follow room by room, and document any readings or observations for future work.
Watch out for these common mistakes: skipping moisture tests or ignoring damp CMU, overworking the scratch coat so it loses its key, and rushing cure times or drying in heat or direct sun. Safety rules are simple: wear eye protection and gloves, keep a steady temperature and humidity level when possible, and never force a coating onto a damp wall. If in doubt, test a small area first and halt if you see peeling, cracking, or prolonged tackiness.
If the wall feels uncertain after you’ve checked moisture, bond, and cure, or if you’re dealing with high humidity, wide temperature swings, or extensive damage, call a professional. Otherwise, follow your plan, stay disciplined with the moisture and cure timing, and you’ll finish with a sturdy, even surface that looks good and lasts. You’ve got this.
FAQ
What plaster materials should I consider for CMU—lime vs gypsum—and how do they differ in practice?
Lime plaster breathes and can tolerate some movement, but it takes longer to set. Gypsum plaster dries quicker and firms up faster, but it may be less forgiving on damp CMU. Check product labels and manufacturer instructions to see suitability for CMU and indoor moisture conditions.
What are reliable scratch key methods for CMU, and how do I do them without damaging the wall?
Create a mechanical grip on the CMU surface with a light, random scratch pattern. Avoid overly deep or shallow grooves; too little grip and plaster pops, too much weakens the face. Follow the product guidance for key density and depth; if in doubt, test on a small area first.
What moisture control methods should I use before and during plastering CMU walls?
Keep the CMU dry and use a suitable damp seal or primer if recommended. Monitor for elevated surface moisture and avoid plastering on wet or damp surfaces. Always follow the plaster product instructions and local guidance on moisture management.
How should I approach cure timing and the drying process on CMU after plastering?
Let the plaster cure gradually in a stable environment. Avoid rapid drying or repeated temperature swings that crack the mix. Check the product label for guidance on curing conditions and test the surface before applying subsequent coats or finishing.