

Introduction
Painting and staining a deck are two finish options with different durability, appearance, and maintenance.
You’ll learn how to choose based on climate and wood type, and walk through practical steps, tips, and rules of thumb for prepping, applying, and maintaining the finish.
Key takeaways
- Paint provides opaque color and sealing, while stain highlights wood grain.
- Stain requires less prep; paint demands surface cleaning, sanding, priming.
- For durability, acrylic paints resist moisture but can peel with sun.
- Maintenance: recoat stain every 2-5 years; paint every 5-10 years.
- Wood type matters: softwoods accept stain better than hard, treated woods need sealing.
- Environmental: low-VOC stains are safer; avoid lead-based paints on old decks.
- Budget and labor: DIY painting costs more upfront but longer lifespan savings.
Table of Contents
- Introduction
- Key takeaways
- Quick Comparison: Paint vs Stain at a glance
- Appearance, Style, and Design Considerations
- Durability and Weather Resistance
- Maintenance, Reapplication, and Repair
- Cost, Labor, and DIY vs Pro Decisions
- Wood Type Suitability and Surface Prep
- Health, Environmental, and Safety Considerations
- Common Mistakes, Troubleshooting, and Pro Tips
- Conclusion
- FAQ
Quick Comparison: Paint vs Stain at a glance
Appearance differences: Paint provides a solid, uniform color with consistent sheen across the surface, hiding wood grain and texture unless you choose a glaze or semi-gloss option; stain ranges from clear to tinted and lets the natural grain and texture show through, with options from light to dark based on the product you pick. Protection and maintenance: Paint forms a continuous film that blocks moisture and UV on the surface, which can resist peeling when properly applied but will wear away where sun, weather, or physical abrasion takes its toll; stain penetrates the wood, offering color and some protection while fading and weathering can become noticeable sooner, requiring cleaning and reapplication on a schedule you’ll want to check on the label. Recommendation grid: If you want easy maintenance and a natural wood feel, choose stain; if you want durable color control and longer protection per coat, choose paint; if budget and speed matter most, read the label for cost and application effort.
In practice, how long a finish lasts and how often you recoat depends a lot on prep, climate, and exposure, so plan for early light cleaning and inspection to catchProblems before they escalate. Consider the actual labor a project will take—sanding, priming if required, and multiple coats for paint versus straightforward penetrating coats for stain—and weigh that against your budget. Always check the product label for notes on weather suitability, recoat windows, and discard or recycling guidance, and follow local rules for disposal of leftover paint or stain.
How they protect wood (film vs. penetration)
Paint forms a solid film on the surface of your deck, creating a barrier that seals out moisture and protects against UV rays. This film-forming nature means it sits atop the wood rather than soaking in.
Stain, on the other hand, penetrates into the wood fibers, allowing for better breathability while still offering protection from water and sun damage. The penetrating action of stain helps prevent moisture buildup inside the wood, reducing the risk of warping or rotting over time.
The key difference is that paint acts like a shield, whereas stain works more like a treatment. This distinction impacts how each product performs in wet climates or high-traffic areas where durability and longevity are crucial.
Visual and aesthetic trade-offs
Paint offers solid, opaque coverage that can completely change the look of your deck. It comes in a wide range of colors but tends to hide natural wood grain, giving it a more uniform appearance.
In contrast, stain allows for greater transparency, letting you see through to the underlying wood texture and grain patterns. This means less masking of imperfections but also a more varied aesthetic that can enhance the natural beauty of your deck’s wood.
Choosing between paint and stain depends on whether you want a bold new look or a subtle enhancement of existing character. Paint is great for homeowners looking to make a statement with vibrant colors, while stain appeals to those who value preserving the natural charm of their deck.

Appearance, Style, and Design Considerations
This section helps you decide between a bold, uniform color with paint and a natural, wood-like look with stain by how each finish handles grain and surface texture. Tie your choice to your home style and exterior palette, making sure colors work with siding, roofing, brick, and trim. Think about how the look will feel with your railings, furniture, planters, and nearby stone or pavers.
Assess your deck materials and exposure to sun, rain, and freeze–thaw cycles, noting that softwoods, hardwoods, and composites take finishes differently. Consider maintenance needs like cleaning routines, recoat timing, and safety aspects such as slip resistance. This matters because the long-term design should stay cohesive with the surrounding spaces and age gracefully.
Matching house and outdoor elements
To keep your deck looking cohesive with the rest of your home, think about how the color of your deck fits with your siding, trim, and even furniture. If you’re going for a modern look, a bold paint color can tie everything together nicely. For a more traditional or rustic feel, sticking to natural wood tones with stain might be better.
Before making any big decisions, test out different colors in various lighting conditions. That way, you won’t end up with a deck that looks too dark at night or too light during the day. A quick trick is to use small paint samples on scrap pieces of your deck material and place them around your yard to see how they look under different lights.
Also, consider the colors of any outdoor elements like railings, planters, or stone accents. These should all work together to create a harmonious space that feels complete when you step outside.
Hiding vs. highlighting imperfections
Paint is great for covering up any flaws or wear on your deck, like scratches or patches from repairs. It gives a uniform look that can hide the natural grain and texture of the wood.
On the other hand, stain lets the beauty of the wood shine through while still offering protection. If you have an older deck with lots of character marks or if you’ve done some patchwork, staining will highlight those details rather than covering them up.
If your deck is in good condition but has a few spots that need attention, consider using a semi-transparent stain to let the wood’s natural beauty come through while still providing coverage for any minor imperfections. Just remember, if you’re dealing with significant damage or inconsistencies, paint might be the better choice to give your deck a fresh and uniform look.
Durability and Weather Resistance
Durability comes down to how each finish protects the wood: paint forms a film that blocks moisture and sun, while stain soaks in and slows water intrusion but offers less barrier. Expect the look and protection to fade with sun, rain, and freeze-thaw cycles, and know that recoat intervals depend on the product you choose. Check the label for guidance on lifespan expectations and signs it’s time to refresh.
This matters because maintenance, prep, and climate drive how long a deck looks good and stays healthy. In sunny or coastal sites, UV protection and moisture management will differ from shady or damp areas, so plan cleaning and recoats accordingly. Always follow product instructions and local rules for disposal, and use the label or datasheet to tailor choices to your deck’s traffic, color goals, and renovation plan.
How each finish handles moisture and rot risk
Paint forms a solid film on your deck, sealing the wood from water. While it keeps rain out, this can also trap moisture inside if there’s any leakage or standing water. Over time, trapped moisture leads to warping, swelling, and rot.
Stain, on the other hand, penetrates the wood allowing it to breathe. This means that while it still protects against rain, it doesn’t seal off the wood completely. Stains let excess moisture escape, reducing the risk of rot and keeping your deck structurally sound longer.
In high-moisture areas like coastal regions or near water features, stains are generally better because they don’t trap moisture as paint does. However, in drier climates where rain is less frequent, a well-applied paint can offer excellent protection against the elements without causing rot issues.
Lifespan expectations and factors that shorten durability
A properly applied deck stain typically lasts around 2 to 4 years, while paint can last up to 5 or even 7 years with good maintenance. However, several factors can cut these lifespans short.
High foot traffic wears down finishes faster, especially if the surface isn’t cleaned regularly. Sunlight is another big factor; UV rays break down both paints and stains over time, causing them to fade and peel.
The quality of your prep work also plays a huge role. If you don’t clean and sand the deck thoroughly before applying the finish, it won’t adhere properly and will start peeling sooner than expected. Regular maintenance like cleaning and reapplying as needed keeps both finishes looking good longer.
Maintenance, Reapplication, and Repair
Maintenance for a deck depends on finish type (paint vs stain) and how you use it, plus seasonal checks. Clean and prep before refreshes—sweep, light power wash as needed, remove mildew, and smooth rough spots without over-sanding. Recoat when wear shows; prep steps differ for painting or staining, and watch for curing time between coats.
This matters because it helps you plan time, budget, and safety for touch-ups or full refinishes. You’ll get practical guidance on tools, materials, and quick checks after winter or heavy use to avoid common pitfalls.
Routine cleaning and yearly checks
Keeping your deck clean is key to maintaining its finish. For both painted and stained decks, start with a simple sweep every week or two to remove dirt and debris. This prevents buildup that can scratch the surface.
In spring and fall, give your deck a thorough cleaning. Use a power washer set at low pressure (1200-1500 PSI) for painted surfaces; higher pressure is okay for stained decks since they’re more forgiving. Focus on removing mildew with a solution of water and bleach or commercial cleaner.
Yearly checks are crucial to catch any wear early. Look for peeling paint, cracks in the wood, or signs of rot. For stained decks, check if the color has faded significantly. If you notice issues, address them right away to prevent bigger problems down the road.
Remember, regular maintenance keeps your deck looking great and extends its life. Don’t skip these simple steps!
Recoating vs full strip: when to do each
Knowing when to recoat or fully strip your deck is crucial for maintaining its appearance and durability. For stained decks, you can usually reapply a new coat over the existing finish without stripping unless it’s heavily worn or discolored.
Painted decks require more attention. If the paint is peeling in large areas, it’s time to strip back to bare wood before repainting. This ensures good adhesion and prevents future issues like bubbling or cracking.
Before recoating either finish, clean the surface thoroughly with a power washer and mild detergent. Sand any rough spots lightly but avoid over-sanding which can damage the wood. Let it dry completely before applying new coats.
Remember, proper prep is key to successful recoating. Take your time and do it right to save money on costly repairs later.
Cost, Labor, and DIY vs Pro Decisions
When you’re budgeting, think of upfront costs as the splashy part: paint or stain products, primers, sealants, brushes and rollers, removal tools, protective coverings, and basic prep gear. Then estimate the likely labor: surface prep time, coats, drying gaps, and whether you’ll need help for tough spots or hard-to-reach areas. A clear DIY vs pro decision should hinge on your skill, schedule, access to gear, safety, and whether warranties or manufacturer instructions call for professional application.
Long-term cost of ownership means planning for recoats, maintenance tasks between finishes, and the effect of finish durability on the deck’s lifespan. It also means weighing how weather and UV exposure change the frequency of reapplication and what prep is needed before each recoat. Regional climate, the amount of sanding or power washing required, and potential unforeseen repairs all loosely shape the budget, so have a safety margin for those items.
Upfront materials and tools checklist
Use this list before starting your project to ensure you have everything needed for painting or staining.
- Paint/stain products: Check coverage rates on labels; buy enough based on square footage. Missing this can lead to extra trips to the store mid-project.
- Primer (if needed): Ensure it’s compatible with your chosen finish and wood type. Skipping primer may result in poor adhesion or uneven color.
- Sealant: Choose one that matches your climate for longevity. Omitting sealant can reduce the deck’s lifespan significantly.
- Cleaning brushes: For scrubbing dirt and grime off wood before coating. Not cleaning properly leads to poor adhesion of paint or stain.
- Sanding equipment: If your deck needs sanding, get a sander that fits the job size. Skipping this step can leave rough spots and imperfections visible.
- Pressure washer (if needed): For deep cleaning wood fibers. Essential for removing mold or mildew before applying any finish.
- Masks and gloves: Protect yourself from chemicals and dust during prep work. Safety gear is crucial to avoid health issues.
- Ladders and scaffolding (if needed): For accessing high areas safely. Essential for reaching all parts of large decks without risking injury.
Quick rule: Always double-check your materials list before starting any project to avoid delays or extra costs.
When to hire a pro (and what to expect)
If you’re dealing with complex prep work, large decks, or demanding finishes like high-gloss paint, it’s wise to bring in professionals. They have the right tools and experience.
Pro contractors can handle tricky areas that are hard for DIYers to reach safely. They also offer guarantees on their work, which is crucial for peace of mind.
When hiring a pro, ask about warranties, cleanup responsibilities, and any additional services they provide like deck sealing or maintenance plans.
Wood Type Suitability and Surface Prep
Wood type matters a lot when you paint or stain. Pressure-treated pine, cedar, redwood, and composites don’t all behave the same way because tannins, resins, and moisture push different finishes toward different problems, like bleed or poor adhesion. Prep steps, from cleaning to sanding to primer, must be tailored to each material to make the finish last.
Understanding this helps you plan the whole job, not just the top coat. For DIY readers, that means choosing the right primer or sealer, spotting knot and resin pockets, and following a sensible cleaning and sanding sequence for each material. It also means knowing when to test adhesion before full application and recognizing signs of finish failure early so you can fix them before they spread.
Preparation steps for best adhesion
Cleaning your deck is the first and most crucial step. Start by power washing to remove dirt, grime, and mold. If you spot any mildew or algae, use a commercial cleaner like bleach or a specialized deck cleaner. Rinse thoroughly and let it dry completely before moving on.
Next up is sanding. For pressure-treated pine, start with 80-grit paper to knock down rough spots and feather out knots. Move to 120-grit for a smoother finish. On cedar or redwood, you’ll need to be more careful due to resin pockets. Use a finer grit like 150-220 to avoid bringing up the tannins that can cause staining.
Priming is key for both paint and stain. For paint on hardwoods, use a bonding primer to ensure good adhesion. On cedar or redwood, apply a stain-blocking primer to prevent bleed-through of natural oils and resins. Composite decks often require specific primers designed for their surface texture.
Proper preparation is your best defense against common issues like peeling paint or tannin bleeding. Take the time to do it right, and you’ll save yourself a lot of headaches down the road.
New wood vs previously finished decks
Treating new pressure-treated lumber is different from working on an existing deck. New wood needs to weather for at least 6 months before painting or staining, allowing it to stabilize and dry out. If you’re converting a painted deck to stained, strip off the old paint completely with a chemical stripper or sanding.
For recently stained decks, check if the finish is still intact by testing in an inconspicuous area. If the stain is peeling or flaking, remove it before applying new stain. On older decks that have been painted for years, you might need to strip back to bare wood and start over.
Remember, each type of wood has its quirks. Pressure-treated pine can be tricky due to moisture content, while cedar and redwood require careful sanding to avoid bringing up tannins. Composite decks often need a primer designed specifically for their material.
A good rule of thumb is to always test your surface before committing to a full application. This will help you make informed decisions about whether to strip old finishes or proceed with new ones.
Health, Environmental, and Safety Considerations
Health notes: VOCs and runoff risk differ between deck paints and stains. Look for low-VOC or water-based options and note any certifications on the label (GREENGUARD, Green Seal). Plan containment with drop cloths, plastic sheeting, and mindful wind to keep overspray off soil and plant beds.
PPE and site protection matter: wear a respirator (organic vapor cartridges or P100), goggles, chemical-resistant gloves, long sleeves, and kneepads for prep. Follow disposal steps on the label for used rags, cans, and cleaners, and check local rules for hazardous waste and recycling options. Keep kids and pets away during application and drying, use clear signage and restricted zones, and vent the area whenever possible.
Choosing low-VOC and eco-friendly products
When it comes to deck finishes, choosing a product with low volatile organic compounds (VOCs) is crucial for both your health and the environment. Look for paints and stains that have third-party certifications like GREENGUARD or Green Seal, which indicate they meet strict environmental standards.
To minimize exposure to harmful chemicals, opt for water-based products over oil-based ones whenever possible. Water-based finishes typically contain lower levels of VOCs and are easier on your respiratory system during application. Always check the manufacturer’s safety data sheet (SDS) before buying to understand what you’re working with.
For those looking to go even greener, consider zero-VOC options available from some manufacturers. These products offer a safer alternative without compromising performance or durability. Remember, choosing eco-friendly doesn’t mean sacrificing quality—many of these finishes are just as tough and long-lasting as their more harmful counterparts.
Safe application and cleanup practices
To protect yourself while painting or staining your deck, wear the right personal protective equipment (PPE). This includes a respirator with an organic vapor cartridge or P100 filter for paint fumes, safety goggles to shield your eyes from splashes, and chemical-resistant gloves to keep your hands safe. Don’t forget long sleeves and knee pads if you’re working on your knees.
Containment is key when it comes to preventing overspray and runoff. Use drop cloths or plastic sheeting around the perimeter of your deck to catch any drips or spills. If there’s a chance of wind, set up containment booms to block drift onto nearby landscaping or driveways. This helps prevent contamination of soil and plants.
After application, safely dispose of used rags, empty cans, and leftover product according to local hazardous-waste collection rules. Metal cans can often be recycled through your municipality’s recycling program. Always follow the manufacturer’s instructions for proper disposal to avoid environmental harm.
Common Mistakes, Troubleshooting, and Pro Tips
Common mistakes here derail finish life fast: skipping thorough surface prep, using the wrong product for the deck substrate or any previous coating, and getting coats on in unsuitable weather or rushing cure times. You’ll see peeling, blotchy color, or a fuzzy surface when prep was skipped or products didn’t pair well with the surface. If you suspect trouble, check the product label and manufacturer instructions, and be ready to back up and re-sand or strip as needed before reapplying.
This section helps you diagnose symptoms quickly, plan the right fixes, and apply coatings in the best sequence to hold up over time. You’ll learn to restore a weathered surface by cleaning, brightening, light sanding, and stripping when necessary, then choose between water-based and oil-based options or stain versus paint based on the substrate and prior finish. The goal is to extend life with proper curing windows, sensible coat counts, and a conservative approach to temperature, humidity, and film thickness, plus protection and maintenance steps so you aren’t chasing new problems after the first season. Check labels for safe handling, recommended ventilation, and disposal guidance, and always verify compatibility before recoat.
Fixing peeling paint or spotty stain
If your deck finish is peeling, flaking, or has an uneven color, it’s time to take action. Start by cleaning the surface thoroughly with a pressure washer and mild detergent to remove dirt and grime.
Next, sand any rough spots or raised grain using 120-grit sandpaper. This will help new paint or stain adhere better. If you see old finish lifting off in large pieces, strip it completely before starting over.
To avoid future issues, choose the right product for your deck’s condition and climate. For example, water-based stains are easier to work with but may not last as long in humid areas. Always follow manufacturer recommendations on drying times between coats.
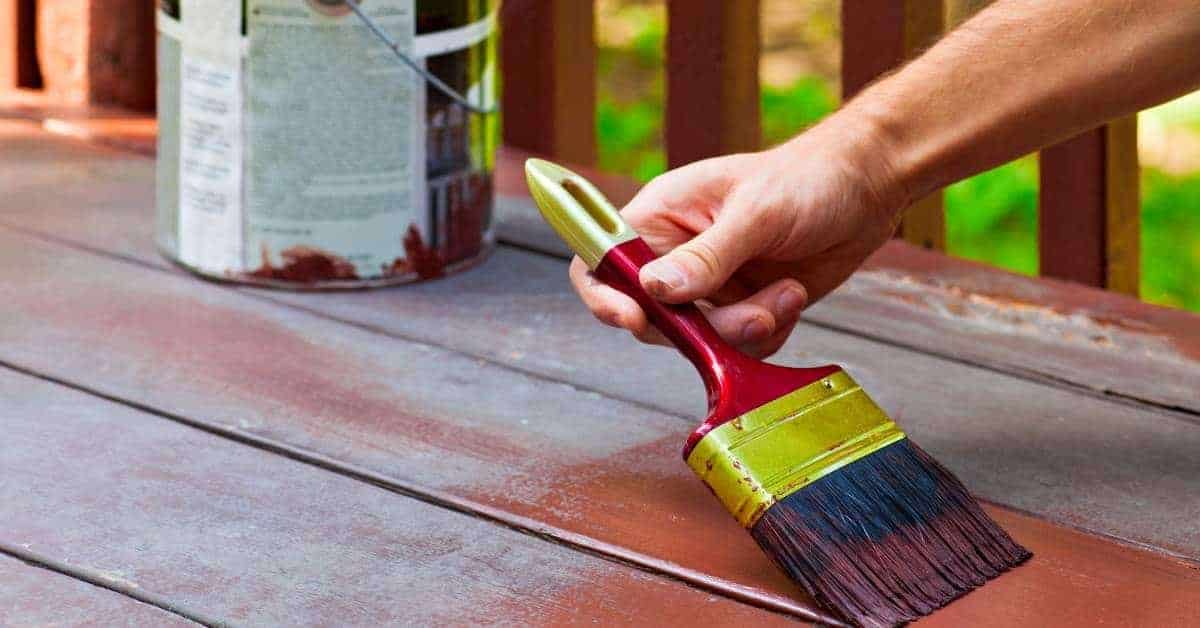
Pro timing and application techniques
The right weather conditions make all the difference when painting or staining a deck. Optimal temperatures range from 50°F to 90°F (10°C to 32°C) with low humidity levels. Avoid applying finish on hot, sunny days or in damp environments.
Work in small sections at a time to maintain a wet edge for stains and avoid lap marks. This means starting one board before the previous coat dries completely. For paints, apply thin coats evenly without overloading your roller or brush.
Maintaining proper film thickness is crucial too—too thick and it can crack; too thin and it won’t protect well enough. A good rule of thumb is two light coats rather than one heavy one. This ensures even coverage and better durability.

Conclusion
Choose the path that fits your deck’s look, how much you want to maintain it, and how much risk you’re willing to manage. A job done right protects the wood and keeps your outdoor space looking solid season after season.
Proceed with a simple check sequence: confirm the wood type and condition, test a small area for compatibility, fix any damaged boards, clean thoroughly, prime only if required by the product, apply as directed with proper weather windows, and plan your maintenance schedule for the next few years. Do the prep, pick the product that matches your goals, and stick to the manufacturer’s steps for application and cure times.
Common mistakes to dodge are skipping surface prep or moisture testing, choosing color or finish that doesn’t suit your climate, and rushing applications or recoat timing. Always wear eye and skin protection, work in mild, dry weather, and ventilate around the area. If you’re unsure about wood condition, or the project requires major repairs, call in a pro instead of guessing and risking costly damage. Stay conservative, stay safe, and you’ll get durable results that look right and last.
FAQ
What’s the main difference between painting and staining a deck?
Painting covers the wood and adds color. Staining penetrates the surface and enhances the wood grain. Choose based on look and protection you want.
Do I need to remove old finish before applying a new one?
Yes. If the old finish is peeling or cloudy, strip or lightly sand it first. A clean surface helps the new coating stick and last longer.
How often should I recoat or redo my deck finish?
Stains usually last 2–5 years depending on sun and wear. Paint can last longer but may need touch ups every few years in harsh sun.
Which should I choose for a high-traffic deck exposed to sun?
For tough wear, a solid color deck paint lasts longer in sun and resists chipping. For a natural look with easier maintenance, a penetrating stain works, but you may need more frequent refreshes.