

Introduction
Matching concrete texture in repairs means recreating the surface look of existing concrete using compatible broom and trowel patterns. This guide focuses on how to blend a new patch with the old surface, using common hand tools and basic technique. You’ll want to check the patch and the surrounding area as you work to keep the texture consistent.
Tools and materials you’ll likely need include a margin trowel, a stiff broom, release agent, and a matching concrete mix. Practice a few strokes on a scrap piece or an inconspicuous edge to match the pattern before committing to the repair, and watch for rough edges. Common mistakes to avoid are over-wet patches, inconsistent broom direction, and letting the surface dry too fast before finishing.
Key takeaways
- Assess texture by matching broom or trowel patterns across repairs.
- Prepare a clean edge and feathered transition to hide joints.
- Use the right broom texture tool and consistent stroke direction.
- Dampen new concrete slightly and test finish before full spreading.
- Blend edges with light trowel passes to minimize ridges.
- Safety: wear eye protection and face mask when mixing and finishing.
Table of Contents
- Introduction
- Key takeaways
- Understanding Broom and Trowel Textures
- Planning and Assessing the Existing Slab Before Repair
- Tools, Materials, and Material Specs You’ll Need
- Step-by-Step Repair and Texture-Matching Workflow
- Techniques to Blend New and Old Concrete Seamlessly
- Common Mistakes, Troubleshooting, and Corrective Actions
- Safety, Curing, and Long-Term Durability Considerations
- Cost Estimating, Modern Tools, and When to Hire a Pro
- Conclusion
- FAQ
Understanding Broom and Trowel Textures
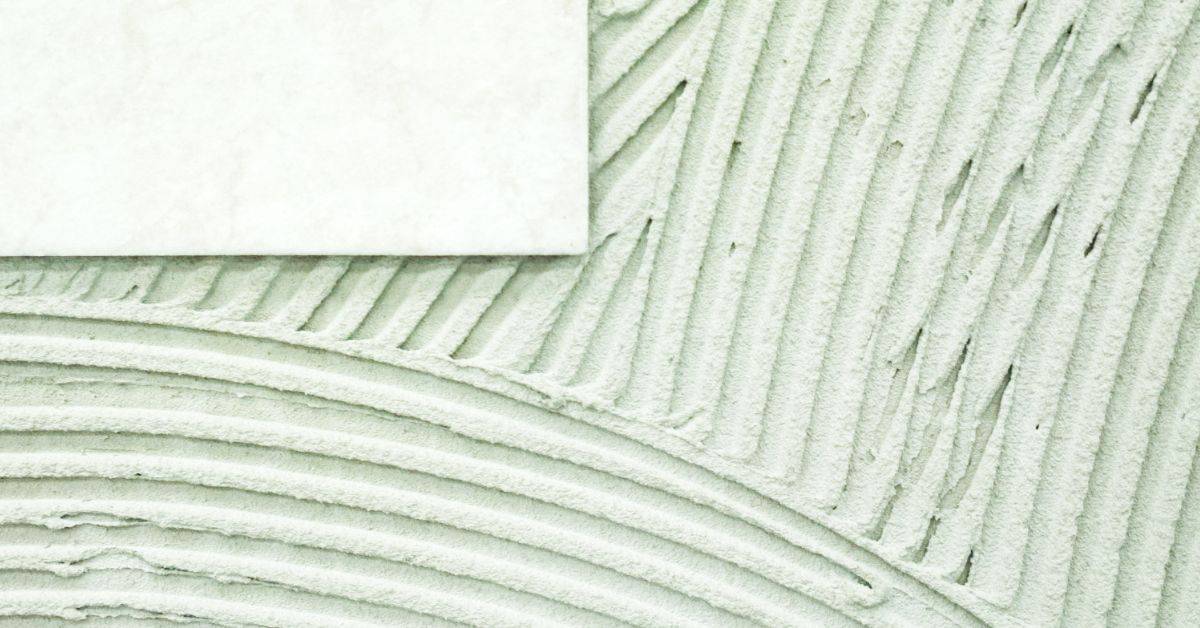
A broom finish is created by dragging a stiff broom across the surface while the concrete is still plastic. This leaves upright strokes that register as a uniform grain rather than a flat plane. A trowel finish, by contrast, is developed with a smooth, level surface as the tool moves in controlled passes.
Visual differences show up in texture depth, slip resistance, and how light plays off the surface. Lighting can make broom grains pop or recede, while a trowel finish tends to look flatter and brighter. Best-use scenarios include broom finishes on patios and walkways, with trowel finishes favored for interior slabs and high-visibility areas; consider foot traffic and weather exposure when choosing between them.
Key visual and tactile features of a broom finish
A broom finish creates distinct, uniform grooves across the concrete surface. These are created by dragging an upright broom across wet concrete.
The direction of these strokes is crucial – they should all point in the same way to create a consistent pattern. The spacing between strokes depends on the stiffness and seed pattern of the broom used.
Tactilely, a broom finish provides grip due to its textured surface. This is especially noticeable when walking on it barefoot or with smooth-soled shoes.
Key visual and tactile features of a trowel finish
A trowel finish results in a smooth, level surface with minimal texture. This is achieved by using a steel or magnesium trowel to level out the concrete.
The sheen of a trowel finish can vary depending on how many passes are made with the trowel and the amount of water in the concrete mix. More passes result in a higher sheen, but also increase the risk of over-troweling.
Tool marks may be visible under close inspection, especially if a hand-tloat is used instead of a power trowel. These marks are typically faint and only noticeable up close.
Why texture matters for safety and performance
Texture plays a crucial role in slip resistance, especially on outdoor surfaces like patios and walkways. A broom finish provides better grip than a trowel finish, making it safer to walk on when wet.
Textured surfaces also wear more evenly over time compared to smooth ones. This is because the texture helps distribute foot traffic and weather exposure across the entire surface rather than just the top layer.
Moreover, textured surfaces are better at shedding water. This can help prevent puddles from forming on your concrete, reducing the risk of slippery conditions and potential damage to the concrete itself.
Planning and Assessing the Existing Slab Before Repair
Start by defining the planning goal: can the surface be visually matched through patching, or is larger restoration required? This sets the scope before any material mixes are chosen. Look for differential settling or heaving that may dictate replacement instead of patching.
Document the process with photos and simple measurements, including crack widths and delamination depth. Sketch area boundaries and note any existing broom or trowel patterns. This record helps guide texture replication and compatibility decisions.
Visual checkpoints and documentation checklist
Use this checklist before starting any repair work to ensure you’ve gathered all necessary information.
- Photograph: The damaged area from different angles, including close-ups of cracks and texture discrepancies. This helps track progress and ensures consistency in repairs.
- Measure patch size/depth: Use a tape measure to determine the dimensions and depth of delaminations or cracks. This helps estimate repair material needs.
- Note color/aggregate: Make note of the concrete’s original color and aggregate type, as these can vary even within the same structure.
- Record weather conditions: Document current and expected weather conditions that may affect curing or application processes.
- Existing sealers: Check if there are any existing sealers on the slab. This is crucial as some repair materials may not adhere well to sealed surfaces.
- Document cracks: Note crack widths, shapes, and patterns. Hairline cracks (less than 0.1mm) can often be ignored, while wider ones may require attention.
- Assess spalling/scaling: Check for flaking or peeling (spalling) or powdery surface loss (scaling). These indicate more severe damage that might need larger repairs.
- Evaluate laitance: Look for a weak, cement-rich layer on the surface (laitance), which can affect the bond of repair materials. If present, consider removing it before repairing.
- Record texture discrepancies: Note any differences in broom or trowel marks between the damaged area and the surrounding undamaged slab.
Quick rule: Skipping these steps can lead to inconsistent repairs, wastage of materials, and potential rework.
Structural and substrate assessment
Before diving into repairs, it’s crucial to understand the slab’s structure and condition. This helps ensure your repair strategy is appropriate and effective.
Check slab thickness: Measure the thickness of the slab at various points around the damaged area. Thinner slabs may require different repair strategies than thicker ones.
Exposed reinforcement can indicate severe damage or improper concrete cover. If found, consider consulting a structural engineer before proceeding with repairs.
Signs of movement or contamination: Look for signs of slab movement (like differential settling or heaving) or contamination (e.g., oil stains, efflorescence). These can affect the success and longevity of your repairs. If present, address these issues before proceeding with patching.
DIY vs professional scope decisions
Knowing when to DIY and when to hire a pro is crucial. Here are some indicators to help you decide:
Extent of damage: Small cracks or minor spalling can often be repaired by homeowners. However, extensive damage may require professional intervention.
Textured area size: Repairing large textured areas can be challenging and time-consuming for DIYers. Consider hiring a pro if the damaged area is larger than 10-15 square feet.
Structural concerns: If there are signs of structural damage, such as exposed reinforcement or significant slab movement, it’s best to consult a professional before proceeding with any repairs. They have the expertise and tools to assess and address these issues safely and effectively.
Tools, Materials, and Material Specs You’ll Need
Core tools include hand trowels, edging tools, a margin titer, a broom, floats, and optional power tools for prep or mixing. Ergonomics matter, and have spare blades, pads, and handles on hand. A mixer and protective bits help keep batches consistent.
Patching mortars, bonding agents, admixtures, and colorants form the backbone of repairs. Note pot life, working time, curing considerations, and compatibility with the base concrete. Finish tools for broom vs. trowel textures should be chosen to match the patch and surrounding surface.
Materials and patch products to match texture and color
The right materials ensure your repair blends seamlessly with existing concrete, both in appearance and durability. Here’s what you need:
- Repair Mortar (Type N): Used for filling cracks and small repairs. Look for Type N, which has good bond strength and flexibility. It’s compatible with most concrete types. Avoid cheap, fast-setting mortars as they can cause cracking.
- Micro-Topping: For larger repairs or resurfacing, micro-toppings create a smooth, durable layer that mimics the texture of existing concrete. Check the label for acid resistance and compatibility with your substrate. Cheap alternatives may not bond well or stain over time.
- Bonding Primer: Applies before patching to improve adhesion. Choose one compatible with your repair material. Don’t skip this step; it prevents delamination and weak bonds.
- Color Additives: To match the existing concrete color, use liquid or powder additives. Check they’re compatible with your repair mortar or micro-topping. Cheap, unknown brands may not mix well or fade over time.
- Concrete Cleaner/Degreaser: Before applying any patch material, clean the area to remove dirt, grease, and efflorescence. A cheap, general-purpose cleaner is fine, but ensure it’s safe for concrete use.
Pro tip: When buying materials, check product labels for compatibility with your existing concrete type and local climate conditions. Store repair mortars in a cool, dry place to maintain their potency. Always follow manufacturer mixing instructions for best results.
Tool checklist for broom finishes
Before you start applying that final broom finish to your concrete, make sure you’ve got the right tools and know how to use them. This checklist will help you create consistent, directional striations without any costly rework.
- Broom: A stiff-bristled broom is best for creating those striations. Check that bristles are firm and not worn out. If they’re too soft or bent, replace it to avoid uneven finish.
- Broom size: Ensure the broom’s width matches your desired stripe width. A 24″ broom is standard but adjust as needed for your project.
- Broom handle length: The handle should allow you to apply even pressure while standing upright. If it’s too short, you’ll strain your back; if too long, you won’t have control.
- Timing tools (watch/stopwatch): You’ll need to keep track of when you started brooming and how long you’ve been at it. Check that your tool is reliable and easy to read.
- Tape measure: To ensure consistent stripe spacing, mark out intervals with a tape measure. Check that the markings are clear and won’t rub off during work.
- String line (optional): For larger areas or complex patterns, use a string line to guide your broom strokes. Ensure it’s taut and level before starting.
- Work gloves: Protect your hands from concrete dust and debris with a pair of sturdy work gloves. Check they’re not too thick to maintain dexterity.
- Safety glasses: Essential for protecting your eyes from flying debris. Ensure they fit well and provide clear vision.
Quick rule: Always check your tools before starting work. A few minutes spent verifying can save hours of rework later on.
Tool checklist for trowel finishes
Before you start your concrete pouring and finishing work, make sure you have all the right tools. This checklist is crucial to achieve smooth trowel finishes that prevent costly rework.
- Hand Trowels (1/2″ & 3/4″): Check for straight edges and no bends. Test by running your hand along the edge.
- Float (4′ x 8′): Ensure it’s in good condition with no broken or missing tines. Quick test: Drag it across a flat surface to check for smooth movement.
- Power Trowel (optional, but recommended): Confirm it’s in working order and has the right blade size for your project. Check manufacturer instructions for blade sizes suitable for your slab thickness.
- Edging Tool: Inspect for sharp edges to create clean, crisp lines. Test by running it along a piece of scrap wood or cardboard.
- Bull Float (optional): Check for straight handle and no damaged tines. A quick test: Drag it across a flat surface to ensure smooth movement.
- Magnet Broom: Verify magnetic strength by testing on metal debris. Weak magnets result in poor finish quality.
- Crete Brush (stiff-bristled): Inspect bristles for stiffness and no missing or broken ones. Test by running it through your hand to feel the bristle firmness.
- Finishing Trowel (12″ – 30″): Check for straight edges and no bends. Test by running your hand along the edge.
Quick rule: Always inspect tools before starting work to prevent rework due to damaged or unsuitable equipment.
Step-by-Step Repair and Texture-Matching Workflow
Begin with a quick diagnostic: assess damage scope, target texture, and material choices before any work starts. Decide on patching cementitious mix, bonding agents, and colorants up front. This reduces guesswork during the repair.
Progress through removing unsound concrete, prepping the substrate, and applying patches in thin lifts with feathered edges. Document the target texture, select tooling, and follow a step-by-step sequence to mimic grain, direction, and depth. Include edge blending with the surrounding surface and plan curing and sealing accordingly.
Step-by-Step Repair Process
The following is a clear, numbered sequence of practical steps for your step-by-step repair and texture-matching workflow. It starts with preparation and safety checks, then guides you through the main work, and finishes with cleanup or final checks.
- Assess damage scope and match existing texture as planned earlier. Wear appropriate PPE (personal protective equipment).
- Remove unsound concrete using a chisel or grinder, ensuring a flat, sound base.
- Perform a substrate moisture check to avoid issues later on.
- Prepare your patch mix according to the chosen product’s instructions, ensuring compatibility with existing materials.
- Apply the patch in thin lifts, feathering edges to blend with surrounding surface. Use a straight edge to control thickness and prevent hollow spots or cracking.
- Allow initial set time (check manufacturer’s guidelines) before recreating texture using appropriate tooling.
- Once fully cured, perform adhesion tests and compare texture under lighting to ensure a successful repair.
- Clean up the area, dispose of waste responsibly, and store tools properly for future use.
Preparation and Surface Prep Techniques
Before applying any patch or overlay, it’s crucial to clean and prepare the substrate to ensure proper adhesion. Start by removing any loose material using a grinder or chisel.
Undercut edges if necessary to create a mechanical bond. Roughen the surface with a wire brush or acid etching solution to increase bonding area.
Important: Always wear appropriate safety gear when handling chemicals and power tools.
Apply a bonding agent according to manufacturer’s instructions, ensuring full coverage of the prepared substrate. Allow it to dry as specified before proceeding with patch application.
Applying and Profiling the Patch or Overlay
Mix your chosen patch or overlay product according to package instructions, aiming for a consistency similar to peanut butter. This ensures easy application and compaction.
Place the mixed material onto the prepared substrate using a trowel or squeegee, ensuring even coverage and proper thickness control. Compact the patch using a vibrating screed or hand tamper to remove air pockets and ensure full contact with the substrate.
Profiling is crucial for matching the original plane and aggregate exposure. Use a straight edge to strike off excess material and create a smooth surface. Allow initial set time before recreating texture.
Recreating Broom and Trowel Patterns at the Right Time
Timing is key when it comes to recreating broom or trowel patterns. You want to apply these textures during the initial set, before the patch has fully hardened.
For a broom finish, use a stiff-bristled broom to drag across the surface in even strokes once the patch has lost its gloss but is still slightly tacky. Work diagonally or in a pattern that matches the existing texture.
For a trowel finish, use a steel trowel to create swirling patterns or straight lines, again working when the patch is no longer glossy but still somewhat plastic. Practice on scrap pieces first to get a feel for the right timing and technique.
Techniques to Blend New and Old Concrete Seamlessly
Assess substrate compatibility and moisture conditions to determine repair feasibility. Decide whether patching, overlay, or full-depth repair is warranted and plan surface prep steps accordingly. Verify structural soundness before committing to texture strategies.
Plan color matching and finish integration by selecting compatible pigments and determining whether to use integral color, dye, or surface colorant. Align sheen through curing compounds, sealers, and potential post-tint options to minimize gloss differences.
Color, aggregate, and sheen matching tips
Matching the color of your repair to the existing concrete is crucial. Start by testing stains or dyes on small patches. Use the same product and application method as the original slab.
For aggregate exposure: Match the depth and size of exposed aggregates in the repair area. You can do this by adjusting the amount of water added to your mix or using a mechanical texture method.
To align sheen, consider using compatible curing compounds and sealers. Some sealers provide a matte finish while others add gloss. Choose one that matches your existing slab’s sheen.
Feathering, chamfering, and edge treatment
To blend new and old concrete seamlessly, feather the edges of your repair. This involves gradually reducing the thickness of the patch as it meets the existing slab.
You can also chamfer or bevel the edges to soften the transition. Use a chisel or a specialized tool to create a 45-degree angle at the edge of your repair.
Use joint or sawcut lines to disguise transitions. These should align with existing control joints and expansion gaps.
Final finishing and sealing to unify surfaces
Choosing the right sealer is key to integrating your repair. Opt for a sealer that’s compatible with your existing slab’s finish. This could be an acrylic, epoxy, or other type of sealer.
Apply sealers evenly and consistently. Use a roller or sprayer, depending on the product’s recommendations. Remember, less is more – apply thin coats to avoid over-saturation.
For long-term maintenance: Regularly clean your concrete and reapply sealer as needed to maintain its appearance and prevent future contrasts.
Common Mistakes, Troubleshooting, and Corrective Actions
Watch for timing and curing errors, such as mis-timed pours or rushing texture work that creates uneven patterns. Avoid applying texture on a surface that is still too wet or too dry. Let materials reach proper consistency before starting.
Be mindful of tool selection and technique mismatches, which can cause flat spots or pattern deviations. Cover laitance, dust, and moisture issues that hinder adhesion, and address color inconsistencies with targeted touch-ups or patch work.
Troubleshooting broom finish issues
Uneven striations can happen if you rush the process. Take your time, work in small sections.
Over-brooming leaves lines too deep and dark. Lighten up on the pressure.
Tool marks mean your broom’s not in good shape. Replace it or reshape the bristles.
Troubleshooting trowel finish issues
Burnishing marks come from too much pressure. Lighten up and work in smooth, steady strokes.
Blisters mean there’s trapped air or moisture. Use a needle tool to pop them before they burst.
Sheen variation can happen if the surface isn’t flat. Rework with a leveling trowel for a smooth base.
Safety, Curing, and Long-Term Durability Considerations
Wear PPE such as eye protection, gloves, a respirator for dust, hearing protection near grinders, and sturdy non-slip footwear. Establish fall zones and keep exits clear. Have a spill plan and waste control in place.
Describe suitable curing methods and how they affect texture. Plan for texture-specific curing windows and avoid rapid drying that can alter sheen and grain. Maintenance should include sealing schedules and routine cleaning to sustain appearance and performance.
Safety precautions and PPE
Your safety is paramount on any jobsite. Here’s what you need:
Eye Protection: Wear safety glasses or goggles to shield your eyes from debris and chemicals.
Respiratory Protection: Use a dust-accepting respirator or suitable mask for silica dust. Near grinders, wear hearing protection too.
Footwear: Sturdy, non-slip boots are crucial to prevent falls. Establish fall zones and ladder safety protocols.
Curing methods and how they influence texture longevity
Proper curing is key to maintaining your repair’s texture and durability:
Use water mist, damp burlap, curing compound, or plastic sheeting. Monitor temperature (60-90°F/15-32°C) and humidity (70-80%) for best results.
Premature drying can alter sheen, color, and surface grain. Avoid it by covering your patch during hot, dry weather.
Cure for at least 7 days, but monitor rather than relying on fixed cure times.
Maintenance to preserve matched textures
Regular maintenance keeps your repairs looking and performing like the original slab:
Cleaning: Sweep or blow off debris every few weeks. For stains, use a mild detergent and soft-bristle brush.
Sealing: Re-seal every 2-3 years to protect against moisture intrusion. Use a sealant that matches your original slab’s sheen.
Minor Repairs: Monitor for hairline cracks. If they appear, re-scarify or re-texture the area to keep it consistent with the rest of the slab.
Cost Estimating, Modern Tools, and When to Hire a Pro
Identify cost drivers upfront, including materials, labor, tool rental, and site prep. Consider contingencies for waste, weather, or texture mismatches. This helps set realistic budgets before buying materials.
Explore tools and techniques that speed matching, such as texture rollers, broom heads, and specialized trowels. Use small test patches to verify color and texture before broader work, and know when a pro is warranted for large or critical patches.
How to estimate material, labor, and equipment needs
The first step in any repair job is knowing what you’ll need. Here’s a breakdown of key materials, labor, and tools.
- Concrete Mix: Calculate volume needed using area x depth. Standard mix for repairs is 4-1/2 bags per cubic yard.
- Colorants: Use pre-made or custom-mix pigments to match existing color. Expect to spend $50-$100 per gallon.
- Bonding Agents & Patch Compounds: These help new concrete bond with old and fill voids. Plan for around $30-$60 per pail.
- Labor: Get quotes from 2-3 local pros. Expect to pay $50-$100 per hour, plus materials markup.
- Tools (Rent/Purchase):
- Wheelbarrow: $20/day or $100 to buy
- Shovel & Trowel: $5-$10 each or included with labor
- Broom, Trowel, Float: $10-$30 each or included with labor
- Power Trowel (optional): $40-$80/day
- Site Prep: Dust control ($20-$50 per bag) and debris removal (labor cost).
Modern tools and professional techniques that raise quality
Upgrade your toolkit with these pro-grade options for better results.
- Power Brooms: Rotating broom heads ensure consistent texture. Rent for $40-$80/day or buy new for $200-$500.
- Laser Screeds: These level concrete surfaces quickly and accurately. Hire a pro with one for around $300-$600 per day.
- Pumpable Micro-Toppings: Pre-mixed, easy-to-apply toppings that replicate broom or trowel finishes. Expect to pay $50-$100 per sq ft installed.
- Color-Matching Services: Pros use advanced software and databases to match colors precisely. This service usually costs $50-$200.
- Moisture Barriers & Bonding Agents: These prevent cracking and ensure new concrete bonds with old. Plan for around $30-$60 per pail.
Decision guide: DIY vs contractor for texture matching
Choosing between DIY and hiring a pro depends on several factors. Here’s a simple decision guide.
Patch Size: Small patches (under 10 sq ft) are typically manageable DIY projects. Larger areas may require professional help to ensure consistency and structural integrity.
Aesthetic Importance & Access: If the patch is highly visible or in a hard-to-reach area, consider hiring a pro to avoid costly mistakes. However, if it’s not critical and you’re comfortable with the tools, DIY can save money.
Safety & Time Constraints: If safety is a concern (e.g., working at heights or near live electrical lines) or time is of the essence, hiring a pro may be the best choice. They have the necessary equipment and experience to complete jobs quickly and safely.
Conclusion
Keeping the texture matched isn’t cosmetic only; it protects the repair and the area from further damage. Do the work with safety in mind, test patches first, and plan for proper curing to extend durability and keep the surface looking right.
Check this like a quick field checklist: inspect the existing slab and note broom or trowel marks, choose the right texture approach, gather the listed tools and compatible materials, run a small test patch in a discreet spot, follow the repair workflow step by step, blend the new concrete into the old with the same pressure and motion you used on the original surface, and verify the texture and finish under dry and cure conditions before calling it complete.
Two common mistakes to avoid are rushing texture matching and skipping the test patch, which can leave visible seams or weak spots. Always wear eye protection and gloves, work in good light, and clean up spills promptly; never mix or apply materials beyond the recommended specs, and don’t overwork the surface once you’ve achieved the texture, or you’ll risk bond problems.
If the patch still looks off after a solid test area and you’re unsure about texture transfer, material compatibility, or curing needs, it’s wise to hire a pro. Otherwise, stay disciplined, follow the steps, and you’ll finish with a durable, seamless repair that you can be proud of.
FAQ
What tools and materials do I need to replicate broom and trowel textures during repairs?
Have the basics: a margin trowel, a steel or plastic straightedge, and a finishing float. For texture, a broom (or a synthetic broom head) and a lagged, clean surface to work on are key. Always check product labels for concrete mix, additives, and approved curing methods.
How do I create a broom texture that matches the existing slab?
Work with a dry, clean surface and use even, consistent strokes in the same direction as the existing broom lines. Start when the repair mortar is stiff enough to hold a line but not fully set, then lightly drag the broom to leave a uniform pattern. If the texture widens or faintens, practice on scrap to dial in pressure and timing before doing the real patch.
What are common mistakes when patching texture and how can I avoid them?
Avoid overworking the patch or letting it dry too fast. Don’t skip masking or cleaning the edges where the new and old concrete meet. Always blend the texture while the patch is still workable, and check the finish against the surrounding surface as you go.
How should I choose repair products to ensure longevity and texture match?
Read the product instructions for bonding, set time, and curing. Look for products designed for repairs with similar hardness and finish to the existing slab, and follow local recommendations. If in doubt, compare labels and consult manufacturer guidance or local pros for compatibility.