

Introduction
A reusable curved form for concrete planters is a mold used to shape rounded walls and can be built from plywood or plastic.
It’s designed to be strong enough to hold concrete until it cures and easy to loosen for reuse, with the fit and finish depending on the material you choose and how you assemble the curve. Plywood forms are often forgiving to work with and can be bent or cut to custom radii with basic tools. Plastic forms can stay flatter, wipe clean, and are easier to reuse with consistent shapes, but may require fasteners and clamps to hold the curve for a solid pour; always check the manufacturer guidance and local rules for safe use and care.
Key takeaways
- Plywood forms offer reusable curved panels with ease of shaping and adjustments.
- Plastic forms resist moisture and warping but require secure bracing for curves.
- Have clamps, nails, screws, hinges, and release agents ready for every step.
- Use flexible templates and gentle radii to achieve consistent curvature.
- Inspect joints, reseal edges, and clean surfaces after each project.
- Wear eye protection and gloves; pressure forms can pinch or snap unexpectedly.
Table of Contents
- Introduction
- Key takeaways
- Project Overview and Goals
- Design and Planning for Curved Concrete Planters
- Materials Comparison: Plywood Vs Plastic Forms
- Tools and Materials Checklist
- Step-by-Step: Building a Reusable Curved Plywood Form
- Step-by-Step: Building or Adapting Plastic Forms and Flexible Alternatives
- Reusability, Durability, and Cost Considerations
- Safety, Common Mistakes, and Troubleshooting
- Conclusion
- FAQ
Project Overview and Goals
This guide outlines a practical approach for DIYers to design and build a reusable curved form for concrete planters, with a clear comparison between plywood and plastic form options. It focuses on real-world workflow, from planning to disassembly, so readers can choose a method that fits their shop and climate. The goal is to help you predict outcomes around reuse, surface quality, and curvature control, while keeping the project approachable and repeatable. You’ll find guidance on expected results, common pitfalls, and a concise decision path to select plywood or plastic forms for different scenarios.
By framing planter types, profile options, and practical constraints, the guide connects material behavior to finished surfaces and durability. It highlights how form rigidity, release ease, and weight impact setup time and handling on site. You’ll see how surface finish can range from visible board marks to a smoother texture, and how reuse cycles influence planning for future builds. The scope includes troubleshooting tips, tool recommendations, safety reminders, and a quick checklist to guide material selection early in the project.
Who this guide is for
This guide is designed for DIY homeowners, small makers, and landscape designers looking to create their own concrete planters. A basic understanding of woodworking and construction principles is helpful but not required.
No prior experience with concrete work or form building is necessary.
If you can follow a step-by-step guide and use common tools, you’ll find this project well within your skillset.
What you will learn and deliverables
By the end of this guide, you’ll be able to design and build reusable curved forms for concrete planters using both plywood and plastic. You’ll understand:
- The pros and cons of each material.
- Cost-reuse tradeoffs.
- How to achieve desired surface finishes.
You’ll also receive troubleshooting tips, recommended tools, safety notes, and a quick decision guide for selecting the right form material for your project.
The deliverable is a set of reusable forms that can be used across multiple projects, saving you time and money in the long run.
Design and Planning for Curved Concrete Planters
Start by defining the curved plan and footprint with sketches, 3D previews, and full-size templates so every panel aligns with your outlet, base, and edge details. Decide on wall thickness and a consistent curvature radius to guide form dimensions, panel counts, and joinery needs before cutting any material. Mockups help verify fit and tolerance, reducing surprises during actual pours and disassembly. This planning stage sets the foundation for accurate, repeatable curvature across multiple units.
Plan reinforcement and drainage early to prevent bowing or creep during pour and cure. Choose an appropriate concrete strength and layout any embedding points for stability. Consider drainage slopes, bottom outlets, or perforations to avoid water pooling near the sides. When comparing plywood versus plastic curved forms, weigh ease of cutting, seam management, release, moisture resistance, and reuse potential, and outline how many segments are needed and how they will join with fasteners or ties. Build and test mockups to confirm fit and alignment with the planter’s outlet and edge details, adjusting dimensions to ensure smooth assembly and straightforward disassembly.
Measuring, templates, and pattern layout
Use this checklist before you start creating your curved concrete planter forms. It’s best to follow these steps once you have finalized your design and gathered all necessary materials.
- Measure desired radii: Use a measuring tape to determine the exact radius of your curves. This will help you create accurate templates later on.
- Check for consistency: Ensure that the measured radius is consistent throughout your design to maintain uniform curvature.
- Measure desired heights: Determine the height of your planters at various points along their length. This will help you create templates with accurate dimensions.
- Create full-size paper/cardboard templates: Using your measurements, draw and cut out full-size templates from cardboard or poster board. These will serve as patterns for your forms.
- Test fit templates: Assemble your templates to ensure they fit together correctly and create the desired curve. Make any necessary adjustments before proceeding.
- Transfer patterns to form material: Trace around your templates onto your chosen form material (e.g., melamine, plywood, or MDO). Ensure that your lines are dark enough to be easily visible once the forms are assembled.
- Check for straight edges: Make sure that any straight edges on your planter design are level and square. This will help ensure that your finished product has clean, crisp lines.
- Avoid overhanging templates: Be mindful of any overhangs in your design to prevent your templates from shifting or falling off during the forming process.
Quick rule: Always double-check your measurements and template fit before assembling your forms. Inaccuracies here can lead to costly rework and a poorly finished product.
Structural considerations and reinforcement
When designing curved concrete planters, wall thickness is crucial. Thinner walls mean less strength, so aim for a consistent 4″ to 6″ thickness throughout. Check your local building codes for exact requirements.
Internal ribs or rebar can beef up your planter. For curves, use #3 or #4 rebar, spacing it every 12″ to 18″. Follow manufacturer instructions on how much to embed into the wall thickness. Ribs can be added for extra support, but they’ll complicate your formwork.
The shape of your form affects concrete pressures. Curved forms need more reinforcement at the base where pressures are highest. Check your form design and ensure it’s strong enough to handle the 2000-3000 PSI pressure from wet concrete. Don’t skimp on supports or you’ll end up with a wonky planter.
Remember, concrete is heavy. A 6″ thick, 8′ long curved planter can weigh over a ton. Ensure your base compaction is solid and your planter sits level to prevent cracking or tipping. It’s not just about looking good; it’s about staying upright.
Visual checkpoints and mockups
Before you start building your curved concrete planters, use this checklist to ensure everything is on track. It’s best to do these checks after you’ve measured, templated, and planned your structure.
- Check template curvature: Verify that the templates for your curves are accurate by placing them together. They should form a smooth, continuous curve without gaps or overlaps.
- Test mockup stability: Create a small-scale mockup using cardboard or foam to test the planter’s stability and balance. It should stand upright on its own.
- Confirm footprint dimensions: Measure the base of your mockup to ensure it matches your desired planter footprint. Adjust as needed before pouring concrete.
- Check form alignment: Once forms are set up, visually check if they align properly and maintain a consistent curve throughout their length.
- Verify reinforcement placement: Before pouring, ensure that reinforcing bars or mesh are correctly placed within the forms, following your earlier layout plans.
- Check form spacing: Ensure there’s enough space between forms for proper concrete flow and to avoid overcrowding during pouring.
- Confirm form support: Check that forms are properly supported and braced to maintain their shape during the pour and curing process.
- Verify leveling: Use a laser level or water level to ensure your planter forms are level and consistent in height throughout their length.
Quick rule: Always double-check your measurements and mockups before pouring concrete. Skipping these steps can lead to costly rework, such as planters that crack, lean, or don’t fit the desired space.
Materials Comparison: Plywood Vs Plastic Forms
Understand core properties like strength, flexibility, and finish quality when evaluating curved plywood versus plastic forms. Consider how radii, wall thickness, and where screws or clamps engage will affect stability during casting. The goal is to balance predictable results with workable handling for a DIY setup. This section helps you anticipate how each material behaves at scale without overcommitting to a single approach.
Looking at shaping, assembly, and workflow, there are practical steps for bending, joining, and releasing that influence reuse. Examine how joints are formed, what fasteners are used, and how you’ll manage repeat demolding without damaging the form. Surface finish matters too; note possible grain impressions in plywood and seam visibility, along with strategies like release agents or lamination to improve the final look. Durability and reuse life, plus cost and maintenance, help you decide which path fits your climate and project cadence. Use a practical decision guide to match material to project scale, climate, curvature needs, and whether the planters are for one-off or ongoing use.
Plywood: advantages and disadvantages
Plywood is a popular choice for concrete formwork due to its strength and availability. Here we weigh the pros and cons.
Pros
- Stiffness: Plywood provides excellent stability for your curved planter forms.
- Custom Lamination: You can create custom radii by laminating sheets together.
- Low Cost: Raw plywood is affordable, making it a budget-friendly option.
- Finish Quality: Plywood can provide a smooth finish with proper preparation and release agents.
Cons
- Moisture Susceptibility: Plywood can warp or delaminate if exposed to too much moisture.
- Limited Bending Radius: Without lamination, the bending radius is limited by the sheet size.
- Surface Finish Issues: Grain impressions may telegraph onto the concrete surface.
- Maintenance: Plywood requires more maintenance than plastic forms to prevent warping and delamination.
Plywood makes sense when you need a stiff, customizable form that’s easy on your budget. Just be prepared for some extra care and potential finish issues.
Plastic forms: advantages and disadvantages
Plastic forms offer unique benefits but also have their drawbacks. Here’s a breakdown:
Pros
- Water Resistance: Plastic won’t absorb water like plywood, reducing the risk of warping.
- Smooth Surface: Plastic provides a smooth finish with minimal preparation.
- Flexibility Options: Some plastics can be thermoformed or cut to create complex curves.
- Long Lifespan: With proper care, plastic forms can last for many projects.
Cons
- Cost: Plastic forms are typically more expensive than plywood.
- Potential Creep Under Load: Some plastics may deform under the weight of wet concrete if not properly supported.
- Limits of Thermoforming/Cutting: Creating very tight radii or complex shapes can be challenging with plastic.
- Maintenance: While less than plywood, plastic forms still require cleaning and storage care to maintain their lifespan.
Plastic forms are ideal when you need a water-resistant, smooth-surfaced form that can handle repeated use. Just be prepared for the higher upfront cost.
Environmental impact and material specs
Choosing your materials wisely can help minimize environmental impact and maximize lifespan.
- Plywood: Recyclable: Yes, but not widely accepted. Lifespan Waste: Warping or delamination after multiple uses. Tip: Use exterior-grade plywood for better moisture resistance.
- Plastic Forms: Recyclable: Some types, but check local facilities. Lifespan Waste: Degradation from UV exposure and repeated use. Tip: Choose high-density polyethylene (HDPE) for better durability.
- Plywood Thickness/Ply Count: More plys and thicker sheets provide greater stability but may be overkill for small planters.
- Plastic Form Thickness: Thicker forms offer more stability but are heavier and more expensive. Choose the thinnest suitable for your project.
- Release Agents: Use compatible release agents to prevent material damage and ensure easy form removal.
- UV Protection (Plastic): Consider forms with UV inhibitors or a protective coating for outdoor use.
By understanding the environmental impact and choosing appropriate specs, you can create durable, reusable forms that minimize waste and maximize your project’s lifespan.
Tools and Materials Checklist
Outline two parallel workflows—one for plywood forms and one for plastic forms—and list the core toolsets for each, focusing on overlapped equipment to avoid duplication. This keeps your shopping focused and helps you adapt as the project evolves. A clear toolkit also supports safer, faster work on the shop floor and at the pour site. Use this list to plan purchases without overbuying or missing critical items.
Assemble a practical, itemized checklist including essential measuring and cutting tools, shaping aids, fasteners, adhesives, sealants, and consumables. Include release agents and moisture barriers, plus standard clamps, vises, and protection for edges. Safety gear belongs here too—PPE, ventilation considerations, lifting aids, and edge protection. Add workflow notes for recommended saws, routers, and curing-compatible accessories, plus quick-reference checks for leaks, misalignments, and cure-time considerations to keep the job moving smoothly.
Material specs and standards explained
Before you start any concrete work, use this checklist to ensure your materials meet the necessary standards. This will help prevent costly mistakes and rework.
- Plywood Grade: Look for exterior-grade plywood (CDX or better). Check the label for “Exterior” rating. CDX is a common choice, but you can use higher grades like ACX or BCX for added durability.
- Veneer Thickness: Exterior veneers should be at least 1/8″ thick. Measure with a tape measure to ensure they’re suitable for repeated concrete use.
- Plastic Type (Form Liner): HDPE is the most common and durable choice for concrete forms. Check the product label or ask the supplier to confirm it’s HDPE.
- Concrete Mix Design: Follow local building codes or consult a structural engineer for the appropriate mix design. Check the ready-mix truck’s ticket to ensure you’re getting the right mix.
- Reinforcement Bars (Rebar): Verify rebar size and spacing based on your project plans. Measure and count bars to ensure they match the required dimensions.
- Concrete Admixtures: If using admixtures, check the manufacturer’s instructions for proper dosage rates. Incorrect use can lead to weak concrete or delayed setting times.
- Water-Cement Ratio: The ideal range is 0.45-0.60 by weight. Check the ready-mix truck’s ticket or consult with the supplier to ensure you’re within this range.
- Concrete Slump: Aim for a slump of 3-5 inches (75-125 mm) for most projects. Test the concrete’s slump on-site using an ASTM C143 cone to ensure it’s suitable for your application.
Quick rule: Always check and double-check material specs before starting any work. A few minutes spent verifying can save you hours of rework and potential project delays.
Optional hardware and accessories
Before you start mixing concrete, ensure you have the right optional hardware and accessories to make your job faster, safer, and more accurate. Use this checklist to double-check everything.
- Formwork Clamps: Check that they are sturdy enough to hold formwork in place. Test by applying pressure on the formwork; if it doesn’t budge, you’re good to go.
- Jigs for Consistent Joints: Ensure jigs are properly calibrated and fit snugly into your forms. Dry-fit them before pouring to check.
- Release Agent: Verify it’s compatible with your concrete mix and form material (check product label). Apply a thin, even coat on form surfaces.
- Corner Brackets: Check they are secure and properly aligned. Test by trying to move the forms; if brackets hold firm, you’re set.
- Bracing Method: Ensure bracing is sturdy enough to prevent form movement. Try to wiggle the forms; if there’s no give, your bracing is adequate.
- Concrete Vibrator: Check it’s in good working condition by turning it on and observing even vibration across the head.
- Tape Measure: Ensure it’s accurate (check end-to-end measurement). Use it to verify all dimensions before pouring.
- Level and Straight Edge: Check they are functional by testing on a flat surface. Use them to ensure forms are level and plumb.
Quick rule: Always double-check your optional hardware and accessories before pouring. Skipping this can lead to costly rework, such as uneven joints, misaligned forms, or damaged concrete surfaces.
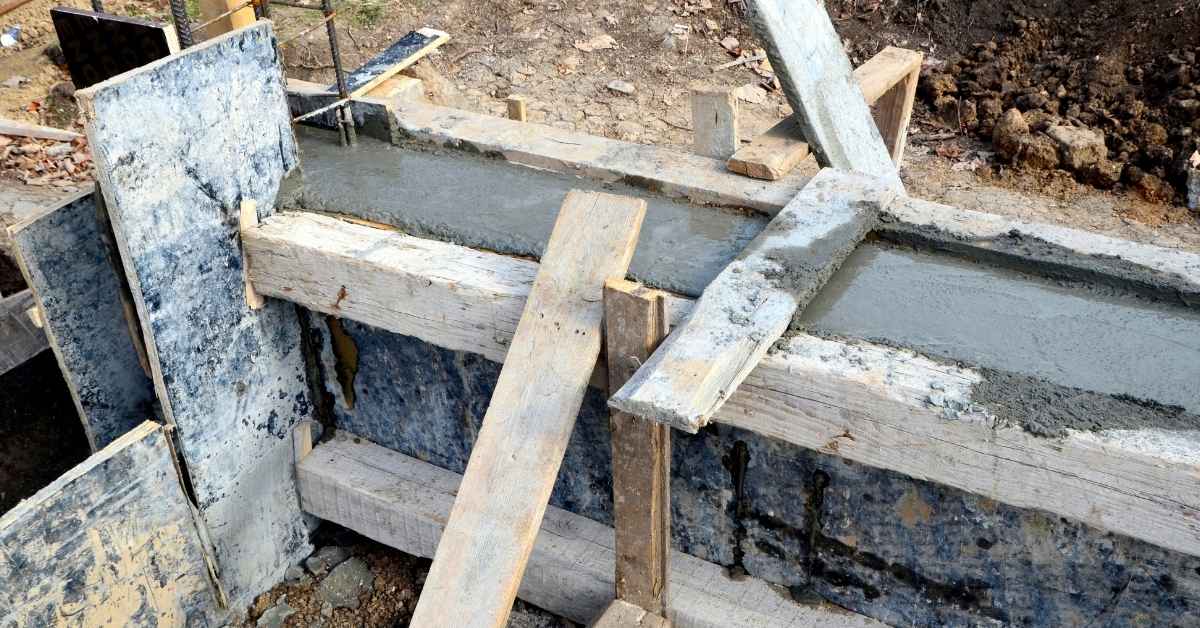
Step-by-Step: Building a Reusable Curved Plywood Form
Begin with precise curvature planning: establish the target radius, height, and wall thickness, and decide whether the curve is a full circle or a partial arc. Plan how laminated plywood layers will stack to achieve that curve without twisting or kinking, and set up templates to guide each cut. Consider tapering and how the final thickness will read when you place concrete against the interior surface. These decisions drive how you cut, lay out, and assemble the panels for accuracy.
Move into materials and cutting plans, specifying plywood grade and thickness, the number of plies, and recommended adhesives. Outline a step-by-step template strategy to ensure accurate cutouts and safe work procedures, emphasizing waste minimization and edge protection. For lamination and bending, describe the sequence, clamps or vacuum fixtures, and how to progressively bend and laminate to maintain smooth curvature. Include cure considerations, bracing frequency, and how to resist springback so the final form holds its shape during pour and cure.
Step-by-Step Process
Follow these practical steps to build a reusable curved plywood form for your concrete planters.
- Preparation: Gather tools, materials, and safety gear. Ensure work area is clear and well-lit.
- Measure and mark: Accurately measure and mark out the form’s geometry on your plywood sheets.
- Cutting: Using a circular saw or jigsaw with a fine-tooth blade, carefully cut along the marked lines.
- Kerfing: To allow bending without breaking, kerf (partially cut) the inner edges of each layer at the desired radius.
- Lamination and bending: Apply adhesive between layers, clamp or use a vacuum jig to bend them together, following your target curvature. Allow cure time as per manufacturer’s instructions.
- Bracing: Install internal bracing to maintain roundness and resist warping during tightening.
- Assembly: Join the form segments using spiral screws, dowels, or carriage bolts, ensuring a tight fit.
- Final checks: Inspect your form for any gaps or imperfections. Make adjustments as needed before pouring concrete.
Cutting, Bending, and Lamining Plywood Layers
To achieve smooth curves with adequate structural stiffness, follow these methods for cutting, bending, and laminating your plywood layers.
Kerfing: Use a jigsaw or band saw to partially cut (kerf) the inner edges of each layer at the desired radius. This allows the plywood to bend without breaking.
Cold-bending multiple thin veneers is another method. Glue and clamp thin layers together, then gradually bend them into shape using clamps or a vacuum jig. Allow the adhesive to cure before proceeding.
Laminating veneers involves gluing thin sheets of plywood together while they’re flat. Once dry, you can bend them as one piece. This method provides more structural stiffness but may require more layers and careful alignment during lamination.
Assembly, Bracing, and Sealing for Reuse
Join your form segments using appropriate fasteners such as spiral screws, dowels, or carriage bolts. Ensure a tight fit to prevent leaks.
Internal bracing: Install internal bracing to maintain the roundness of your form and resist warping during tightening. Use 2x4s or other suitable lumber, spacing them evenly along the interior length of the form.
Seal joints against seepage using a flexible, concrete-friendly sealant like silicone caulk. Apply it generously to all joints, both inside and out. Allow it to dry before applying a release agent.
Release agent: Apply a release agent like form oil or wax to the interior surface of your form. This helps prevent the concrete from sticking and makes removal easier once cured. Be sure not to damage the plywood during application.
Step-by-Step: Building or Adapting Plastic Forms and Flexible Alternatives
Define target planter shapes and tolerances to determine the best plastic form approach, whether flexible sheet plastics, thermoformed sheets, or repurposed barrels or molds. Clarify radii, edge details, and capacity to ensure the chosen method will produce the desired curvature and stability. Use this frame to select a form that matches your available tools and space. This planning helps prevent surprises during demolding and reuse.
Explore material choices and prep, comparing PETG/HDPE options with thin plywood templates for rigidity and heat tolerance. Plan for barrier or release coatings to simplify demolding and protect the interior. Lay out the forming methods step by step: flexible sheet forming with clamps, thermoforming with controlled clamping and timing, or repurposed-barrel tricks with careful cutting and seam handling. Address joints for watertight results and test-cast small panels to verify fit before committing to a full build.
Step-by-Step Process
Follow this clear, numbered sequence to build or adapt plastic forms and flexible alternatives for your concrete planters.
- Preparation: Gather materials (plastic sheets, tools, safety gear) and check their condition. Ensure you have a safe workspace with adequate ventilation.
- Define shape: Sketch or trace your desired planter shape onto the plastic sheet, marking out curves, edges, and any details.
- Cutting: Use a sharp utility knife or jigsaw to cut along your marked lines. Be cautious around curves to avoid warping.
- Forming: For flexible sheets, use clamps and spacers to hold the shape; for thermoforming, heat the plastic evenly using a heat gun or oven (follow safety guidelines).
- Assembly: Join cut pieces together using screws, bolts, or interlocking edges. Ensure joints are tight but allow for concrete shrinkage.
- Supporting: Add external frames or stiffeners to prevent bulging when filled with concrete. Use 2x4s or other rigid supports.
- Sealing: Apply barrier or release coatings to simplify demolding. Test small panels before full-scale builds to ensure watertight joints.
- Final checks: Inspect forms for any leaks, weak points, or warping. Make adjustments as needed before pouring concrete.
Thermoforming, Cutting, and Shaping Plastic Sheets
Safely heat and form common plastics or cut and bend flexible sheets without structural failure.
For thermoforming, use a heat gun set to medium temperature (around 200-250°F). Apply heat evenly across the plastic sheet until it becomes soft and pliable. Be cautious not to overheat, as this can cause warping or degradation.
When cutting flexible sheets, use a sharp utility knife or jigsaw with a fine-tooth blade. Make slow, steady cuts along your marked lines. For curves, use a compass or flexible ruler to guide your cuts and avoid structural weaknesses.
Safety first: Always wear appropriate safety gear (gloves, goggles) when handling sharp tools or hot surfaces. Keep a safe distance from heat sources to prevent burns.
Fastening, Supporting, and Avoiding Deformation
Prevent plastic forms from bulging or creeping when filled with concrete by using proper clamping, external frames, and stiffeners.
- Clamping: Use C-clamps or bar clamps to hold plastic sheets in place during assembly. Ensure they’re tight enough to prevent movement but not so tight that they warp the plastic.
- External Frames: Build a rigid frame around your form using 2x4s or other sturdy lumber. This supports the form and prevents it from bulging under pressure.
- Stiffeners: Add stiffeners like plywood or MDF to flat areas of your form to reinforce them and prevent warping when filled with concrete.
- Avoid Overfilling: Be mindful not to overfill your forms, as this can cause excessive pressure and lead to deformation.
Regularly inspect your forms during the assembly process. If you notice any bulging or warping, adjust clamps, frames, or stiffeners as needed to maintain a stable, rigid form.
Reusability, Durability, and Cost Considerations
Define clear reusability metrics for each form type, such as the number of uses and the ease of resetting between projects. Consider how curvature complexity and plan to repair or refresh joints between cycles. Use these guidelines to forecast how long a form will stay true under repeated pours and handling. Establish practical expectations for a DIY setup where reuse is a primary goal.
Outline durability and maintenance needs so you can plan protective steps after each use. Consider moisture exposure, fastener wear, and surface damage, and note recommended sealants or coatings. Build a lifecycle cost model that accounts for upfront material and fabrication costs, storage needs, and possible repair or replacement factors. Include design tips to maximize reuse, such as modular joints and standardized radii, plus a simple inspection routine to catch issues early and prevent delays in future projects.
Comparing Lifecycle Costs and Longevity
When choosing between plywood and plastic forms, consider their expected lifespan and repairability. Plywood forms can last for many pours with proper care, but they’re susceptible to water damage and warping over time.
Plastic forms, on the other hand, are more resistant to moisture and won’t warp, making them ideal for long-term use. However, they may show signs of wear from repeated demolding.
The number of pours you plan to make is crucial. For occasional projects, plywood might be cheaper upfront due to lower material costs. But if you’re planning frequent pours, investing in plastic forms could save money in the long run despite their higher initial cost.
Reuse Best Practices and Maintenance
To maximize form life, follow these routines:
Cleaning: After each use, remove any concrete residue with a wire brush or scraper. For tough spots, use a pressure washer.
Storage: Store forms in a dry place to prevent moisture damage. Plywood forms should be stacked flat to avoid warping. Plastic forms can be folded for easy storage.
Maintenance: Inspect forms regularly for signs of wear or damage. For plywood, apply a sealant after each use to protect against moisture. For plastic, check for cracks or deformations that could affect the next pour.
Disposal and Recycling Options
At the end of their useful life, both materials can be disposed of responsibly:
Plywood: If still in good condition, consider repurposing or donating. For disposal, check local recycling centers as some accept untreated wood waste.
Plastic: Check if your local waste management accepts plastic for recycling. Some plastics may not be recyclable due to their composition or contamination with concrete residue. Consider contacting a professional waste disposal service for advice.
Before disposing, always check local regulations and guidelines to ensure you’re following best practices for your area.
Safety, Common Mistakes, and Troubleshooting
Cover safety basics like PPE, proper concrete handling, and safe lifting and bracing practices to support the weight and hydrostatic pressure of wet concrete. Provide clear guidelines for creating a clean, well-ventilated work area and for handling form release agents safely. Emphasize edge protection when working with plywood and the precautions needed when using plastic forms. This foundation reduces accident risk and protects your form investments.
Discuss common mistakes and how to avoid them, such as over-tightening joints, inadequate bracing, skipping sealant or release agent, or misaligned curvature. Offer practical fixes or quick checks you can perform before pouring. For post-pour troubleshooting, outline diagnostic steps for leaks, bulges, or delayed curing, along with remedial actions like re-securing braces, patching joints, re-tamping, or re-pouring as needed. Use these guidelines to finish with a solid, stable planter and a reusable form ready for the next project.
Personal protective equipment and safe handling
Protect yourself and your workspace with the right gear and safety measures when working with concrete.
- Goggles: Protect eyes from debris. Choose impact-resistant, anti-fog goggles for around $10-$20.
- Face shield: Shield face from splashes and impacts. A full-face shield costs about $30-$50.
- Gloves: Protect hands from cuts, burns, and chemicals. Opt for durable, flexible gloves at around $10-$20 per pair.
- Dust mask/respirator: Guard against concrete dust. A basic dust mask costs $5-$10; a respirator with P100 filters is around $30-$50.
- Steel-toed boots: Safeguard feet from heavy objects and impacts. Expect to pay $40-$80 for a good pair.
Common beginner mistakes and how to avoid them
Prevent these common errors to ensure your curved concrete planters turn out perfect.
- Under-bracing: Insufficient support can cause forms to shift or tip. Use sturdy 2x4s every 16-24 inches for proper bracing.
- Insufficient release agent: Skipping this step makes removing forms difficult and may damage the concrete surface. Apply a generous coat of form release agent before pouring.
- Incorrect curvature: Misaligned or poorly cut curves lead to deformed planters. Double-check measurements and use templates for accurate cutting.
- Over-tightening joints: Too much pressure can cause leaks and cracks. Tighten joints snugly but avoid overtightening.
Regularly inspect your forms, double-check measurements, and follow best practices to avoid these common mistakes.
Troubleshooting form failures and deformations
Address these issues promptly to maintain the integrity of your concrete planters.
Leaks: Tighten joints or apply more sealant. If leaks persist, reinforce with additional bracing or patch with concrete repair mix.
Bulging: Check for insufficient bracing or over-pressurization. Reinforce bracing and ensure proper form removal timing to prevent bulges.
Lamination separation: Inspect joints and fasteners. Tighten loose screws, apply more sealant, or reinforce with additional supports as needed.
Conclusion
Final builds hinge on a safe, durable form and a clean pour. Start from a solid design, test a small section first, and pick materials that won’t fail under concrete weight or warp with moisture. The goal is a planter that looks right and lasts, without detaching or cracking when you demold.
Now move with this simple check: confirm your curved form is rigid and leak-free, confirm the curve is consistent along the full length, confirm you have a reliable release method and proper edging, then set up the pour with appropriate support, cure in a safe, shaded area, and inspect for smooth edges and uniform thickness before removing the form. Keep the process steady, check fit as you go, and stop if anything shows signs of failure.
Common mistakes to avoid are using undersized or undersupported forms, skipping tests on a small section, and rushing joints or fasteners that can crack or shift during curing. Always wear eye protection and gloves, work in a dry area, and keep moisture away from joints until the concrete sets. If a form warps or shows any sign of twisting under load, stop and rework it before proceeding.
If the plan starts to feel risky or you’re unsure about achieving the curve cleanly, call in a pro for a quick review or a test pour. Otherwise, stay methodical, document your measurements, and push ahead with deliberate steps. You’ve got this—finish with a planter that’s solid, good-looking, and built for reuse.
FAQ
What are the main benefits of plywood forms vs plastic forms for curved concrete planters?
Plywood forms are sturdy and easier to shape with simple tools. Plastic forms are lighter and store flatter, but may require more setup for tight curves and extra bracing.
What tools and equipment do I need for each material type?
Plywood: circular or keyhole saw, bar clamps, screws, a router or sanding block, and a straightedge. Plastic: utility knife, heat gun or heat tape for curves, clamps, and edge trim or fasteners recommended by the manufacturer.
How do I plan and adapt a curved design template for a reusable form?
Start with a simple arc template or a series of gentle curves. Use a flexible spline or foam roller template to trace the curve onto your form material, then cut and test-fit before final assembly. Check manufacturer guidance if using any commercially designed templates.
How should I maintain reusable forms to extend life and performance?
Keep forms clean and dry between uses. Inspect for nicks, splits, or loose fasteners and make repairs or replace parts as needed. Always follow manufacturer or material-specific care instructions and store in a dry, level area.