

Introduction
Leveling compounds are essential tools for creating a smooth, even surface when preparing your bathroom floor for tiling or installing new flooring. In small bathrooms, where space is at a premium, it’s crucial to use these products correctly to avoid common pitfalls and achieve professional results.
This guide will walk you through the dos and don’ts of using leveling compounds in small bathrooms, ensuring your project goes smoothly from start to finish.
Table of Contents
- Introduction
- Importance of Preparing a Level Surface
- Proper Use of Self-Leveling Compounds
- Common Mistakes to Avoid During Application
- Benefits of In-Floor Heating Systems
- Waterproofing Techniques for Bathrooms
- Budgeting for Unexpected Renovation Costs
- Choosing Appropriate Flooring Materials
- Importance of Ventilation and Lighting
- Cost Analysis of Using Leveling Compounds Versus Alternatives
- Eco-Friendly Flooring and Finishing Options for Small Bathrooms
- Addressing Common Misconceptions About Self-Leveling Compounds
- When to Hire Professionals for Bathroom Renovations
- Conclusion
- FAQ
Importance of Preparing a Level Surface
A level surface is crucial for successful bathroom renovations, ensuring durability, functionality, and aesthetic appeal. Proper leveling prevents issues like water pooling, uneven tile installation, and structural problems.
Tools Needed for Surface Preparation
Proper surface preparation requires the right tools to achieve a smooth, even surface. Here’s what you’ll need:
- Leveling compound: Essential for filling low spots and creating a flat surface. Opt for self-leveling types for ease of use.
- Concrete grinder: Ideal for smoothing rough patches and high spots. Consider renting one if you don’t own it; it’s worth the investment.
- Hammer drill: Necessary for removing stubborn old tiles or concrete. Ensure you use the correct bit for the job.
- Floor scraper: Handy for scraping off old adhesive or paint. A long handle will spare your back.
- Moisture meter: Vital for checking surface moisture levels. Excess moisture can ruin your leveling efforts.
- Vacuum cleaner: Essential for cleaning up dust and debris. A shop vac with a HEPA filter is recommended.
Pro tip: Invest in quality tools to ensure safety, efficiency, and longevity on the job site.
Common Surface Preparation Mistakes
A smooth, level surface is vital, but many people make simple mistakes that can derail their project. Avoid these common errors:
- Skipping the Cleaning: Dirt and debris can ruin your surface. Always clean thoroughly before starting using a broom or vacuum.
- Ignoring Moisture Levels: Moisture can cause surfaces to warp or crack. Check for dampness and let the surface dry completely before proceeding.
- Not Using a Level: Guessing isn’t accurate enough. Use a proper level tool to ensure your surface is even, preventing future stability issues.
- Overlooking Cracks and Holes: Small imperfections can lead to bigger problems. Fill and repair any cracks or holes before moving forward.
- Rushing the Process: Taking shortcuts can cost you in the long run. Allow enough time for each step, especially drying and setting times, to avoid weak surfaces.
Double-check these points before starting your project to save headaches later on.

Proper Use of Self-Leveling Compounds
To effectively use self-leveling compounds in small bathrooms, begin by ensuring the surface is clean, primed, and free from debris. Understanding the correct preparation and application techniques is vital for achieving a smooth, even floor that enhances durability and appearance.
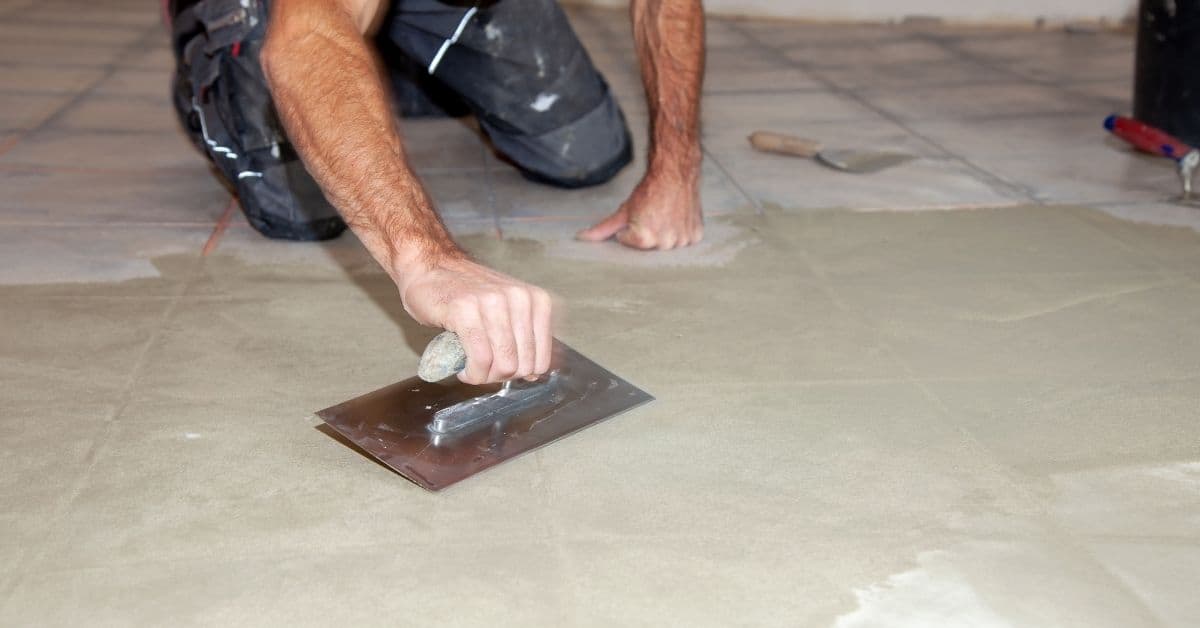
Step-by-Step Application Guide
Applying self-leveling compound can transform uneven floors into smooth surfaces. Follow these steps for successful application:
- Prepare the surface: Clean thoroughly to remove all dust, debris, and grease.
- Seal cracks or holes: Use a suitable filler, seal any cracks or holes, and allow it to dry completely.
- Prime the surface: Apply a recommended primer to ensure good adhesion. Do not skip this step.
- Mix the compound: Follow manufacturer’s instructions using a drill with a mixing paddle for consistency.
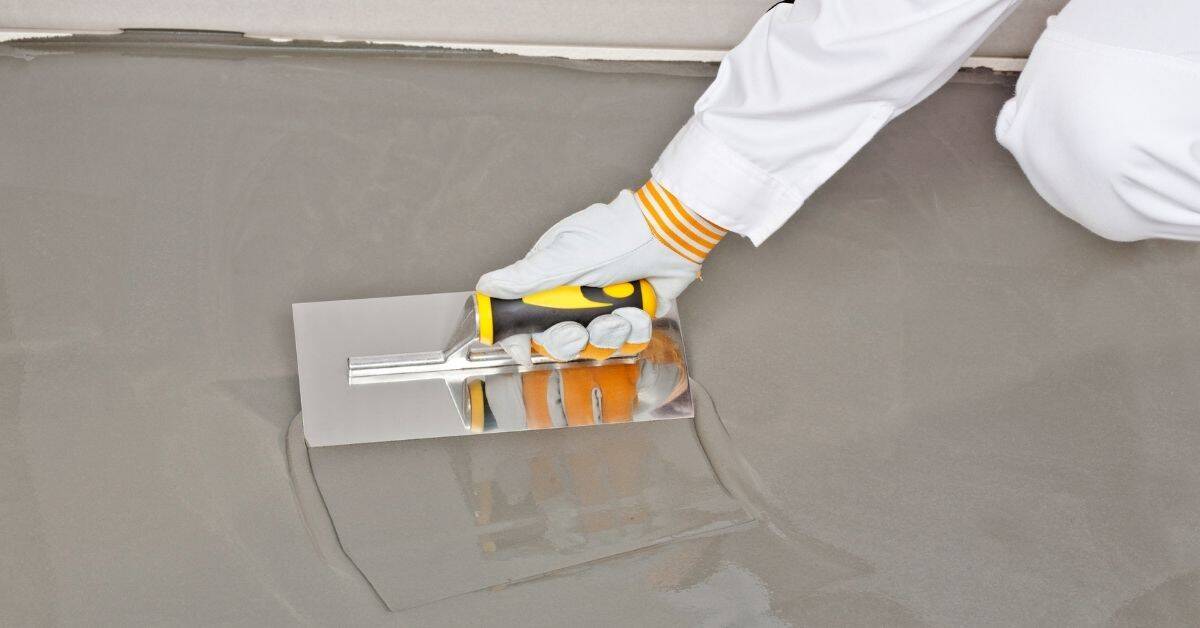
- Pour and spread: Start from the farthest corner, let it flow naturally, then use a long-handled trowel or spreader to reach all areas evenly.
- Allow curing: Let the compound cure as per manufacturer’s guidelines before walking on it or installing flooring.
Common mistake: Skipping priming can lead to poor adhesion and future floor failures. Take your time with this step.
Safety Precautions During Application
Before starting, wear protective gear: gloves, safety goggles, and a dust mask. These compounds can be harsh on skin and eyes, and you don’t want to breathe in any dust.
Work in a well-ventilated area. Keep windows and doors open for fresh air circulation. Some compounds release fumes that aren’t good for your lungs. If you feel lightheaded, take a break and get some air.
Read manufacturer’s instructions before mixing or applying the compound. Not all products are the same, and using them incorrectly can lead to a mess or damage your floor. Follow guidelines carefully.
Keep children and pets away from the work area. Avoid unnecessary setbacks by preventing curious kids or pets from stepping into wet compound.
Common Mistakes to Avoid During Application
Avoiding common pitfalls during application can greatly enhance your project’s success. This section highlights typical errors and provides practical solutions to help you steer clear of these issues.
Over-Application Issues
Using too much leveling compound can lead to uneven drying, cracks, and a weak floor. Always measure the area you need to cover and mix only what’s necessary. Excess compound is wasteful and can ruin your project.
If you’ve over-applied, allow the compound to dry completely before using a grinder or sander to remove excess material. This process takes time and effort but helps correct mistakes without starting over. Patience is key in such situations.
To prevent over-application, check base compaction before applying. A well-compacted base reduces the need for excessive leveling compound. It’s tempting to think more is better, but in this case, less is more. Stick to the recommended thickness for a successful floor project.
Benefits of In-Floor Heating Systems
In-floor heating systems, also known as radiant floor heating, offer efficient and comfortable warmth, making them ideal for small bathrooms. By evenly distributing heat across the floor, these systems eliminate cold spots and enhance the overall comfort of your space.
Cost vs. Comfort Analysis
When considering in-floor heating systems, start by evaluating your budget. Initial installation can be costly, but it’s a long-term investment that can reduce energy bills over time, especially if you’re replacing traditional heating methods. However, don’t focus solely on upfront costs.
- Factor in potential savings from improved energy efficiency. In-floor heating systems operate at lower temperatures than forced-air systems, reducing energy consumption.
- Consider increased home value. Radiant floor heating is a desirable feature that can attract buyers and increase your home’s resale value.
Comfort is where in-floor heating truly excels. It provides even warmth throughout the room, eliminating cold spots. Imagine stepping onto a warm floor on a chilly morning—it’s a luxury that traditional systems can’t match. However, ensure proper installation to maximize comfort and efficiency.
- Check base compaction. A solid foundation ensures even heat distribution and prevents heat loss.
- Insulate well. Proper insulation helps retain heat and reduces energy loss through the floor.
Ultimately, decide based on your priorities. If comfort and energy efficiency are top of your list, in-floor heating is worth the investment. Just be prepared for the initial expense and commit to proper installation to reap the full benefits.
Waterproofing Techniques for Bathrooms
Protecting small bathrooms from moisture damage is crucial. Effective waterproofing techniques, such as sealing joints, applying waterproof membranes, and ensuring proper ventilation, can significantly extend the lifespan of your bathroom surfaces and prevent costly repairs.
Choosing the Right Waterproofing Materials
Selecting appropriate materials for waterproofing is vital. The wrong choice can lead to leaks and expensive repairs. Here’s what you need:
- Waterproof Membrane – Essential for creating a barrier that prevents water from penetrating floors and walls.
- Sealant – Use high-quality silicone sealant around fixtures and joints to prevent water ingress.
- Waterproof Tape – Ideal for sealing seams and corners where a membrane might not fully cover.
- Primer – Prepares surfaces to ensure the waterproofing materials adhere properly.
- Tile Adhesive – Choose a waterproof adhesive to secure tiles without compromising the seal.
- Grout – Opt for waterproof grout to fill gaps between tiles and prevent moisture penetration.
Note: Always check the curing time of your materials. Rushing the process can compromise the waterproofing and lead to future problems.
DIY vs. Professional Waterproofing
Deciding between DIY and hiring a professional for bathroom waterproofing can be challenging. DIY might seem cost-effective, but it requires understanding materials and techniques. If you choose this route, thoroughly research products and follow instructions carefully to avoid leaks and costly repairs.
Hiring professionals ensures the job is done right the first time. They have experience handling tricky areas and often guarantee their work. While more expensive upfront, it saves potential future issues. Consider your budget, time, and skill level. If unsure, don’t risk water damage – weigh pros and cons carefully before making a decision.
Budgeting for Unexpected Renovation Costs
Planning for unforeseen expenses during bathroom renovations is crucial to keep your project on track and within budget. Setting aside a contingency fund helps manage unexpected costs, reducing financial stress and delays.
Creating a Contingency Fund
Estimate your total renovation budget, then add an extra 10-20% for contingencies. This additional amount serves as your safety net when things don’t go as planned.
Keep the fund separate from your main budget in a dedicated savings account. This helps track and protect your contingency funds from non-emergency spending.
Be discerning about what qualifies as an unexpected cost. Use the fund for genuine surprises like unanticipated structural issues or needing to upgrade outdated plumbing. Stick to this rule to avoid unnecessary dips into your contingency fund.
Choosing Appropriate Flooring Materials
When selecting flooring for small bathrooms, prioritize options that are water-resistant and durable. Understanding the unique challenges of small spaces can help you choose materials that maximize functionality and style.
Pros and Cons of Popular Flooring Options
Choosing the right flooring for your bathroom can significantly impact both style and functionality. Let’s examine the pros and cons of some popular choices:
Pros
- Ceramic Tile: Water-resistant, easy to clean.
- Vinyl: Budget-friendly, available in various styles.
- Natural Stone: Adds luxury, increases home value.
- Porcelain Tile: Highly durable, long-lasting.
- Engineered Wood: Provides a warm look, resists humidity better than solid wood.
Cons
- Ceramic Tile: Cold underfoot, can be slippery when wet.
- Vinyl: Can look cheap, may not last as long.
- Natural Stone: Expensive, requires regular sealing.
- Porcelain Tile: Difficult to install, can crack under heavy impact.
- Engineered Wood: Still susceptible to moisture damage if not sealed properly.
Each flooring option has its strengths and weaknesses. Consider ceramic or porcelain tiles for durability, vinyl for affordability, or natural stone for a high-end finish. Evaluate your budget and maintenance willingness before making a decision.
Eco-Friendly Flooring Choices
When picking flooring for a small bathroom, balance sustainability with practicality. Bamboo flooring is an excellent choice. It’s a renewable resource that grows quickly and is durable enough to handle moisture. Ensure it’s sealed properly to prevent water damage.
Cork is another great option. Harvested from the bark of cork oak trees without harming them, cork is naturally resistant to mold and mildew, making it a smart pick for bathrooms. However, it can be prone to scratches, so use a protective finish.
Recycled glass tiles offer a unique and stunning look while being made from recycled materials, reducing landfill waste. These tiles are waterproof and easy to clean but ensure the subfloor is solid to avoid cracks.
Importance of Ventilation and Lighting
Proper ventilation and lighting are vital in small bathrooms to maintain functionality, prevent moisture issues, and ensure safety. Effective ventilation reduces the risk of mold growth, while adequate lighting enhances usability and creates a welcoming space.
Lighting Solutions for Small Bathrooms
In small bathrooms, strategic lighting can significantly improve the atmosphere. Consider using recessed lighting, which is ideal for compact spaces as it doesn’t intrude visually. Install them in the ceiling to provide even, overall illumination. Always use energy-efficient LED bulbs.
Install a vanity light above or beside your mirror for task-specific lighting, such as shaving or applying makeup. Choose a fixture that complements your bathroom’s style without overwhelming the space. Opt for soft, warm lighting to add ambiance while maintaining practicality.
Don’t overlook the benefits of a well-placed sconce. Wall-mounted sconces can layer your lighting scheme and create a cozy atmosphere. Position them at eye level on either side of the mirror for balanced lighting. Avoid bulky designs that could make the room feel cramped.
Cost Analysis: Leveling Compounds vs Alternatives
When considering flooring options, understanding the financial implications of using leveling compounds versus alternatives can help you make informed decisions. Here’s a breakdown to help you compare:
Long-Term Cost Benefits
- Reduced Wear and Tear: Leveling compounds provide a smooth surface, reducing damage to flooring materials over time. This translates to fewer repairs and replacements, saving you money in the long run.
- Moisture Protection: By preventing moisture problems, leveling compounds help avoid expensive mold remediation or structural repairs. They act as a barrier, protecting your floors and your wallet.
- Time and Labor Savings: Leveling compounds are generally faster to apply than alternatives, reducing labor costs if you’re hiring help. This can lead to significant long-term savings.
Initial Investment Considerations
- Material Costs: While leveling compounds may be pricier than other options, they offer a smoother finish. You’ll need to purchase the compound itself and essential tools like a mixing paddle and trowel for proper application.
- Surface Preparation: A clean, properly primed base is crucial for successful leveling compound application. Skipping this step can lead to poor adhesion, resulting in wasted money and time.
- Skill Level and Professional Help: If you’re not confident in your DIY skills, hiring a professional may be necessary. Consider the additional cost against the benefits of a perfectly level floor when making your decision.
Eco-Friendly Flooring and Finishing Options for Small Bathrooms
Embracing eco-friendly products during your small bathroom renovation benefits both the environment and your home’s sustainability. Responsibly sourced materials create a stylish, healthy space. Explore these green options:
- Bamboo Flooring: A rapidly renewable resource, bamboo grows faster than hardwoods. It’s durable, sleek, and ideal for bathroom flooring.
- Cork Flooring: Harvested from cork oak trees’ bark, this sustainable option provides natural insulation and resists mold and mildew in damp environments.
- Recycled Glass Tiles: Made from post-consumer glass, these tiles reduce waste and offer a unique, glossy finish to brighten up small spaces.
- Low-VOC Paints and Finishes: Opt for paints with low volatile organic compounds (VOCs) to improve indoor air quality and reduce emissions during and after application.
- Natural Stone: While more energy-intensive to produce, locally sourced natural stone like slate or granite is long-lasting and minimizes transportation emissions.
- Linoleum: Made from natural materials like linseed oil and wood flour, linoleum is biodegradable and offers a resilient, water-resistant surface perfect for bathrooms.
Benefits of Eco-Friendly Choices
Choosing eco-friendly products creates a healthier home environment with fewer chemicals, reducing allergy and respiratory issues. Additionally, sustainable products can increase your home’s value, appealing to environmentally conscious buyers in the future.
Addressing Common Misconceptions About Self-Leveling Compounds
Self-leveling compounds are often shrouded in myths, leading to misunderstandings about their application and effectiveness. Let’s debunk these misconceptions for a clearer understanding of how these compounds truly work.
Myth-Busting: Self-Leveling Compounds Are Only for Professionals
Many believe that self-leveling compounds are reserved for professionals, but this isn’t true. With the right preparation and tools, anyone can achieve professional results.
Start by ensuring your surface is clean and free of debris. A dirty or uneven base can lead to poor results, so check base compaction and clean thoroughly before you begin. Mixing the compound is straightforward. Follow the instructions on the package carefully, using a drill with a mixing paddle for a smooth consistency.
Once mixed, pour the compound onto the floor and let gravity do the work. Use a smoothing tool to help spread it evenly, but remember, it’s called self-leveling for a reason. Patience is key. Allow the compound to cure fully before walking on it or adding any flooring. Rushing this step can ruin your hard work.
When to Hire Professionals for Bathroom Renovations
While DIY projects offer numerous benefits, certain aspects of bathroom renovations demand professional expertise. Knowing when to engage professionals can save you time, money, and potential headaches.
- Complex Plumbing Work: When moving or installing new plumbing fixtures, hire a licensed plumber for code-compliant, leak-free results.
- Electrical Installations: For tasks like installing new lighting or heated floors, engage an electrician to ensure safe wiring and compliance with safety standards.
- Structural Modifications: Any changes affecting your home’s structural integrity should be assessed and executed by a structural engineer or contractor.
- Waterproofing and Sealing: Proper waterproofing is crucial in bathrooms. Professionals can apply membranes and sealants correctly to prevent future damage.
- Tile Installation: Achieving a flawless tile finish requires skill and precision. A professional tiler ensures even spacing and alignment, avoiding costly mistakes.
- Floor Leveling: If the floor is significantly uneven, hire a professional to apply leveling compounds for a stable base under your flooring.
- Dealing with Mold or Asbestos: If you encounter mold or suspect asbestos during renovation, engage specialists for safe removal and remediation.
Benefits of Professional Services
Hiring professionals ensures high-quality results and provides peace of mind. They bring expertise and experience, reducing the risk of costly errors. Many also offer warranties on their work, adding an extra layer of security to your investment.
Conclusion
Achieving a perfect small bathroom floor is crucial. Thorough preparation and correct use of self-leveling compounds can prevent future issues. Avoid rushing prep work; a clean, level surface is key to success. Skipping steps or taking shortcuts may seem appealing but will likely lead to more expenses later.
Waterproofing is not optional in bathrooms; it’s essential. Combine this with good ventilation and lighting for a functional and comfortable space. When selecting flooring materials, consider the benefits of in-floor heating systems. While they may initially seem costly, their comfort and efficiency make them a worthwhile investment.
Budget for unexpected costs and avoid misconceptions about self-leveling compounds. They’re an excellent tool when used correctly but aren’t a solution to poor planning. Follow these guidelines to create a bathroom floor that lasts.
FAQ
Can I use a leveling compound on a wooden bathroom floor?
Yes, but ensure proper preparation to prevent moisture damage. Seal the wood first and apply a primer designed for wood before applying the leveling compound.
How thick should I apply the leveling compound?
Apply it between 1/8 inch (3mm) and 1/2 inch (12mm). Thicker layers may crack, while thinner ones might not level properly. Always check product recommendations for specific applications.
Do I need to remove old tiles before using a leveling compound?
Yes, it’s crucial to start with a clean, bare floor. Old tiles can cause uneven surfaces and poor adhesion, leading to subpar results.
How long does it take for the leveling compound to dry?
Most compounds dry in 24 hours, but check the product instructions for specific drying times. Rushing the process may lead to improper curing and potential issues.
Can I use leveling compound without a primer?
No, using a primer is essential for optimal results. Primer ensures the compound adheres well to the surface, preventing peeling or delamination. Always prime the surface before applying the leveling compound.