
Introduction
This is a practical DIY guide to stuccoing a home correctly, with step-by-step actions and clear stop points.
You’ll learn how to prepare the surface, mix the stucco, apply the base coat, and finish with top coats using common hand tools. Keep in mind this is hands-on work, not a read-through, and outcomes depend on surface condition and weather.
Always check product labels and manufacturer instructions, and follow local codes or rules for exterior finishes.
Watch for proper weather, surface dampness, and curing times, and know when to stop and reassess if conditions aren’t right.
Have a plan for safety, masking, and clean-up, and gather the essential tools and materials before you start.
Key takeaways
- Prepare surface by cleaning, repairing cracks, and dampening before base coat.
- Mix stucco to manufacturer guidance; check bag instructions, avoid lumping.
- Apply base coat in even, continuous passes; maintain control joints and thickness.
- Use proper trowels, hawk, and float tools; keep tools clean and wet edges.
- Wear eye protection and gloves; monitor conditions and avoid dangerous weather.
- Check for uniform thickness, pull tests, and cure conditions before final coats.
Table of Contents
- Introduction
- Key takeaways
- Safety, Permits, and Prep Planning
- Tools, Materials, and Cost Planning
- Surface Preparation and Weather Considerations
- Step-by-Step Application Process (Base Coat to Finish)
- Quality Control, Common Mistakes, and Troubleshooting
- Finishing, Cleanup, Maintenance, and Environmental Considerations
- Conclusion
- FAQ
Safety, Permits, and Prep Planning
Before you start any stucco work, check with your local building department about what triggers permits and inspections. Document approvals in a simple folder you can present if asked. Also verify HOA rules or historic guidelines that might affect finishes or methods.
Plan for site safety with fall protection, PPE, and equipment checks. Confirm utility locations and establish a communication plan with utility companies if interruptions are needed. Review safety gear, scaffold setup, and a pre‑work checklist to ensure guardrails and footing are secure.
Personal protective equipment and site safety
Safety comes first on any job site. Here’s what you need to protect yourself and others while working with stucco.
- Eye Protection: Safety glasses or goggles – Protect your eyes from debris and dust. Ensure they fit well and are comfortable for long hours of work.
- Respiratory Protection: Dust mask or respirator – Essential when sanding, mixing cement, or working with dry materials to prevent silica dust inhalation. Choose a N95 or P100 rated mask for best protection.
- Gloves: Work gloves – Protect your hands from cuts and abrasions. Opt for durable, flexible gloves that allow good grip.
- Hard Hat: Safety helmet – Mandatory when working above head height to protect against falling objects. Ensure it fits well and is in good condition.
- Fall Protection: Harness and lanyard – Required when working at heights over 6 feet (2 meters). Rent or buy a full-body harness with a lanyard for secure tie-off points.
- Scaffolding/Ladders: Inspect before use – Check for stability, levelness, and secure footing. Ensure they’re rated to hold your weight plus materials.
Permits, inspections, and when to get professional help
Before you start any stucco work, check these boxes to ensure you’re in compliance with local regulations and codes.
- Check Local Building Codes: Understand your city’s requirements for stucco work. Some may require permits for exterior re-cladding or height limits.
- Contact Building Department: Reach out to your local building department to confirm permit needs and obtain any required forms.
- Utility Locating: Call 811 before digging – This service marks underground utility lines for free, preventing strikes and potential hazards.
- Permit Application: Fill out and submit your permit application. Include detailed plans, specifications, and any required fees.
- Inspection Schedule: Know when inspections are needed – These typically occur before applying the scratch coat, brown coat, and final finish.
- Hire a Pro for Complex Work: If your project involves structural changes or specialized techniques, consider hiring a licensed contractor.
- Document Approvals: Keep records of all permits, inspections, and approvals – These may be needed if you sell your home in the future.
Quick rule: Always consult local codes and regulations before starting any major exterior work. It’s better to be safe than sorry!
Tools, Materials, and Cost Planning
Use a definitive tools list tailored for stucco over concrete, including margin trowels, hawks, mixing drill, plaster mixer, trowels, screed, level, and PPE. Note any specialty tools needed for scratch and brown coats. Keep a simple plan for organizing tools on site.
Assess material options with pros and cons for lath, mixes, additives, primers, and membranes. Check compatibility with your substrate and climate. For quantities, use a straightforward estimating method and account for waste, then set aside a contingency fund for surprises.
Tools checklist and alternatives
Before you start your stucco project, make sure you have all the necessary tools. Here’s a checklist to help you.
- Mixing drill with paddle: Essential for mixing stucco. A variable-speed drill works best.
- Plaster or stucco hawk: Used to carry and apply stucco. Get one that fits your trowel size.
- Margin trowels (3/8″ – 12″): For applying, spreading, and smoothing stucco. Start with a 6″ and 10″.
- Plaster mixer (or variable-speed drill): For mixing small batches or touching up.
- Mixing container: A large bucket for mixing stucco.
- Screed bar: Used to level and smooth the surface. Get one that matches your wall height.
- Level: To ensure walls are plumb and screeding is even.
- Personal protective gear (PPE): Safety glasses, gloves, long sleeves, and a dust mask.
- Scratch coat tools: A 1/2″ or 3/4″ notched trowel for applying scratch coats. A darby float to strike off excess material.
- Brown coat tools: A 3/8″ or 1/2″ straight trowel for applying brown coats. A darby float to smooth and compress the surface.
- Scaffolding: For reaching high walls. Rent if needed.
Quick rule: Don’t skimp on tools. Good tools make the job easier and faster.
Material selection and quantity estimation
The right materials ensure a durable, long-lasting stucco finish. Here’s how to choose them and estimate quantities.
- Stucco or cement plaster mix: Choose between standard cement-based or acrylic (polymer-modified) stucco. Acrylic offers better flexibility and durability but costs more.
- Base lath: Wire mesh, expanded metal, or wood lath can be used. Mesh is most common; choose one with 1/2″ or 3/4″ openings for concrete substrates.
- Bonding agents and primers: Use a bonding agent to improve adhesion to concrete. A primer seals the surface and improves paint adhesion later.
- Water resistance membranes (WRM): Optional, but recommended in areas with high humidity or frequent rain. They prevent water from penetrating the stucco.
- Reinforcement mesh: Optional for added strength in areas prone to cracking or high winds.
Estimating quantities: Calculate square footage, divide by coverage rate (usually 80-100 sq ft per bag), and add 10% for waste. For lath/mesh, calculate linear feet needed, divide by coverage rate (usually 5-7 sq ft per roll), and add 10% for cuts.
Surface Preparation and Weather Considerations
Start with a thorough surface inspection to identify cracks, delamination, or coatings that trap moisture. Document issues with notes and photos so you can track repairs. Decide on a removal and repair approach based on substrate condition.
Verify moisture barriers and plan tests for dampness. Identify appropriate waterproofing details to prevent future water ingress. Consider weather windows and backup plans for rain or extreme temperatures to protect curing and adhesion.
Inspecting and repairing substrate
Start by checking your home’s exterior walls for any signs of damage. You’re looking for rot, loose siding, or improperly installed flashing.
Sheathing: Inspect for cracks, holes, or soft spots. Repair with exterior-grade plywood or OSB, ensuring it’s securely fastened to the framing.
Framing: Check studs and plates for soundness. Replace any damaged members with pressure-treated lumber.
Flashing: Ensure all windows, doors, and other openings have proper flashing to direct water away from the wall. Repair or replace as needed.
Moisture management, flashings, and weather windows
Proper moisture management is crucial to prevent water damage. Here’s what you need to do:
Flashing: Install or repair flashing around doors, windows, and other openings to direct water away from the wall.
WRB (Weather-Resistant Barrier): Apply a WRB over the entire surface before stucco. This will prevent water intrusion while allowing moisture to escape.
Control Joints: Install control joints at regular intervals (every 8-10 feet) to accommodate wall movement and prevent cracking.
As for weather, apply stucco when temperatures are between 40°F and 90°F. Avoid applying in high humidity or extreme conditions like rain, frost, or high winds.

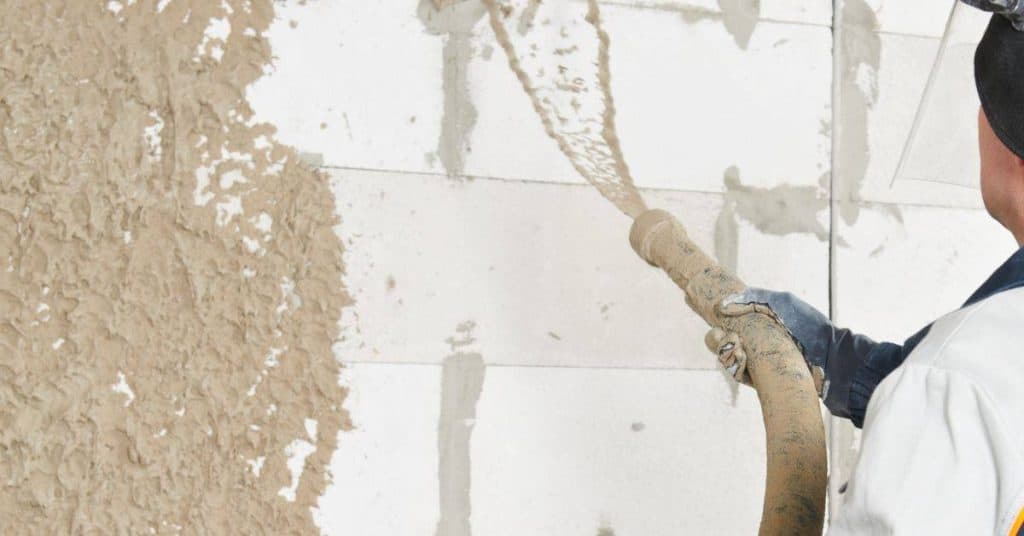
Step-by-Step Application Process (Base Coat to Finish)
Confirm wall structure, moisture risks, and lath installation before the scratch coat. Ensure the base is clean, sound, and plumb, then apply the scratch coat to create a solid key. Leave the area ready for the next step with proper damp curing in mind.
Detail the base coat batching and application, achieving the correct consistency for the chosen mix and thickness. Scrape or comb to create a proper scratch pattern and keep the surface damp as it cures. Plan the brown coat with attention to even thickness and adhesion, then move to the finish coat when ready.
Step-by-Step Process
The following is a clear, numbered sequence of practical steps for the step-by-step application process (base coat to finish). It starts with preparation and safety checks, then does the main work, and finishes with cleanup or final checks.
- Verify wall structure, moisture risks, and compatibility. Ensure base is clean, sound, and plumb.
- Install metal lath using proper mesh, fasteners, corrosion protection, and overlaps.
- Batch scratch coat mix (cement-sand-lime) with bonding agent. Achieve workable consistency.
- Apply scratch coat, comb with a tool to create key for subsequent coats. Maintain damp curing windows.
- Plan brown coat: target thickness per pass, minimum cure duration, and ambient conditions. Ensure proper compaction and adhesion.
- Choose appropriate finish (smooth, sand, or decorative texture). Apply within recommended timeframes.
- Document final curing method (air, mist, or controlled humidity) and protect from rapid drying.
- Conduct inspections between coats for bond, cracks, and moisture. Address any issues before proceeding.
Lath installation and scratch coat
Before applying the scratch coat, ensure your wall is ready by installing metal lath correctly.
Use fasteners spaced no more than 6-8 inches apart. Overlap lath strips by at least 2 inches for strength. Apply corrosion protection to prevent rusting.
Once lath is installed, batch your scratch coat mix with a cement-sand-lime ratio of 1:3 or 1:4, depending on your needs. Add a bonding agent to improve adhesion. Mix until you achieve a workable consistency.
Inspect the base before applying the scratch coat. Ensure it’s clean, sound, and plumb. Check for any moisture issues that could compromise your stucco application.
Brown coat and leveling
The brown coat is the second layer of your stucco application. It’s designed to build thickness, straighten walls, and provide a smooth surface for the finish coat.
Batch your brown coat mix with a cement-sand-lime ratio of 1:4 or 1:5. Apply it in thin layers, allowing each to cure according to manufacturer guidelines before applying the next. Use a straight edge to level and ensure uniform thickness.
Check for flatness and bond between coats. Ensure edges are feathered for seamless texture. Address any delaminations, pinholes, or unevenness immediately.
Finish coat and texture application
The finish coat is the final layer of your stucco application. It provides the desired aesthetic and protects the underlying layers from weathering.
Choose your finish (smooth, sand, or decorative texture) based on your design goals. Batch your mix according to manufacturer guidelines. Apply within recommended timeframes to prevent cracking.
Select appropriate tools for applying your chosen texture. Document your final curing method (air, mist, or controlled humidity) and protect the finish from rapid drying. Follow up with a final inspection to ensure a successful application.
Quality Control, Common Mistakes, and Troubleshooting
Establish a concise QA check that covers cleanliness, substrate readiness, and surface evenness with no holidays or pinholes. Confirm base thickness and proper bonding before proceeding. Use quick field tests to verify adhesion where applicable.
Identify common DIY missteps and how to fix them, such as improper flashing or rushing joints. When defects appear, diagnose cracks, delamination, or moisture issues and outline remediation steps. If problems persist, decide whether to recoat or call in a professional.
Visual checkpoints during and after application
Use this checklist at each stage of your stucco application to ensure quality. Catch issues early to avoid costly rework.
- Surface cleanliness: Before applying, ensure the surface is free of dust, debris, and laitance. Any residue can cause adhesion problems.
- Base coat thickness: Check for even application. Inconsistencies lead to uneven texture or cracking later on.
- Holidays/pinholes: Look for missed spots (holidays) or tiny holes (pinholes). These weaken the stucco and can cause premature failure.
- Cracks: Inspect for hairline cracks, especially at corners and joints. These may widen over time if not addressed.
- Delamination: Check for lifting or peeling. This indicates poor adhesion due to moisture, contaminants, or inadequate surface preparation.
- Uneven texture: Ensure the finish coat has a consistent appearance. Irregularities suggest application issues or substrate problems.
- Staining: Look for discoloration, which could indicate contamination, improper mixing, or moisture intrusion.
- Edges and corners: Inspect these areas closely. They’re prone to cracking due to stress concentration.
Quick rule: Don’t ignore minor issues. Address them promptly to maintain the integrity of your stucco application.
Troubleshooting fixes and when to stop
Most issues can be addressed on-site, but some require professional intervention. Know when to halt work and call a pro.
Pinholes: Small holes can be patched using a mixture of stucco and water. Apply with a trowel, feathering the edges to blend with the surrounding surface.
Cracks: Hairline cracks can often be filled and painted over. Wider cracks may require chiseling out, filling with backer rod and caulk, then applying a skim coat of stucco.
However, stop work immediately if you notice any of the following: structural movement (cracks in walls or foundations), persistent moisture issues (water stains, mold, or mildew), large delaminations (sections lifting off), or suspected mold growth. These signs indicate underlying problems that require professional remediation.
Finishing, Cleanup, Maintenance, and Environmental Considerations
Plan final sealing or painting with compatible primers and finishes, noting curing times and color considerations. Choose coatings that enhance durability and curb appeal while matching the substrate. Follow manufacturer guidance for any surface preparation required before coatings.
Outline cleanup and disposal practices for masking, debris, and waste materials, ensuring compliance with local codes. Address environmental concerns such as runoff and VOCs, and keep a maintenance log for inspections and touch‑ups. Establish a routine to monitor cracks, moisture, and paint adhesion over time.
Final sealing, painting, and touch-ups
Once your stucco is fully cured, it’s time to apply the final sealant or paint. Use a high-quality acrylic latex sealant compatible with stucco for best results. Primers like Zinsser B-I-N are great for sealing porous surfaces before painting.
Before painting, lightly sand any rough spots and clean the surface with a mild detergent. Let it dry completely. Apply paint using a high-quality brush or roller, working in small sections to avoid lap marks. Use a semi-gloss or satin finish for easy cleaning and durability.
For touch-ups, mix a small amount of paint with a little bit of the sealant used initially to match the sheen. Apply sparingly using a small brush, blending edges gently.
Long-term maintenance, lifespan, and environmental notes
Inspect your stucco annually, looking for hairline cracks or signs of moisture ingress. Clean the surface using a mild detergent and soft-bristle brush, rinsing thoroughly.
Address minor cracks with an elastomeric caulk, applying it sparingly and blending edges with a damp sponge. Re-coat every 5-7 years to maintain durability. Contain wash water in a tarp or bucket, disposing of it properly at a local waste facility.
To minimize environmental impact, use low-VOC paints and sealants. Follow manufacturer guidelines for proper disposal of leftover materials. Keep dust levels down during work by wetting the surface before sanding or using a HEPA vacuum.
Conclusion
Staying safe and making a durable, good‑looking stucco job comes down to practical steps you can own today. Protect people and the structure, follow the weather and surface rules, and keep the work deliberate from base coat through finish.
Check in plain terms: verify permits and plan, gather the right tools and materials, prep the surface and weather window, apply in the correct order from base coat to finish, and run a quick quality check as you go. Work methodically, test a small area first, and never skip the finish or cleanup steps. If a step seems unclear, pause and confirm before you proceed.
Avoid these common mistakes: rushing a base coat or mixing materials without matching to the surface, ignoring temperature or moisture limits, and skipping proper cure time or weather windows. Safety rules to follow: wear eye protection and gloves, keep a clear working area, and stop if cracking, lifting, or delamination appears. If the job looks uncertain or you hit unexpected conditions, don’t push on—reassess, reseal, or call for help as needed.
When in doubt about permits, structural issues, or large areas, consider bringing in a pro sooner rather than later. A measured, careful approach protects your home and your budget. Stay focused, work cleanly, and you’ll finish with a solid, lasting result you can be proud of.
FAQ
How do I prep the surface before stuccoing for a good bond?
Clean the wall and remove any loose material. Repair cracks or damaged areas, then roughen glossy surfaces so the stucco can grab.
What should I know about mixing stucco safely and correctly?
Follow the manufacturer’s instructions on the bag or mix. Mix in clean water and avoid lumps; don’t rush the process and keep the work area dry and organized.
How do I apply the base coat and the finishing coats properly?
Apply the base coat evenly with the right trowel or hawk, keeping it within a workable thickness. Let each coat set according to the product instructions before applying the next coat, and finish with the appropriate texture for the final look.
What tools and safety gear do I need, and what about cleanup?
Have the basics: trowels, hawks, a mixing bucket, a drill with a mixer, and a level. Wear eye protection, gloves, and a dust mask; keep the area tidy and remove debris promptly. Clean tools as soon as you’re done and wash off dust and concrete residue according to local rules.