
Introduction
Rolling paint like a pro means controlling how much paint is on the roller, how fast you move it, and when you back-roll so the finish lays down smooth without stipple or lap marks. Think in practical terms: load the roller evenly, keep a steady, deliberate pace, and follow with a light back-roll while the paint is still wet. Check the paint and roller labels for recommended nap and application notes if you’re unsure.
This is a hands-on job more than a theory lesson: feel the weight of the roller, watch how the coating spreads, and stop to reload before the roller drags. If you see tiny dimpled texture or overlapping darker bands, slow down, adjust the load, and back-roll those areas while wet. When in doubt, follow the product instructions and your best judgment for drying times and recoat windows.
Key takeaways
- Manage paint load by keeping roller evenly coated without drips or heavy globs.
- Rolling speed should be steady; avoid rushed strokes that create lap marks.
- Back-rolling helps even texture; finish by light, consistent passes from edge to edge.
- Feathering transitions eliminates stipple; blend edges with light cross-rolling after main pass.
- Use the right nap/fiber for surface type; check manufacturer’s guidance before painting.
- Plan safety: ventilate, wear PPE, and tidy ladders to prevent falls on site.
Table of Contents
- Introduction
- Key takeaways
- Understanding Stipple, Lap Marks, and How They Form
- Tools and Materials Checklist
- Types of Roller Covers and Choosing the Right Nap/Fiber
- Managing Load: How Much Paint to Put on the Roller
- Rolling Technique: Speed, Pressure, and Motion
- Back-Rolling and Feathering: Step-by-Step
- Preventing and Fixing Lap Marks, Stipple, and Other Blemishes
- Project Planning, Safety, Cost Comparison, and Tool Care
- Conclusion
- FAQ
Understanding Stipple, Lap Marks, and How They Form
Stipple is the small, often dimpled texture left when roller fibers or uneven film thickness fails to level before the paint sets; lap marks are visible bands where one pass overlaps another and the sheen or texture differs. Picture a roller that drags and rotates inconsistently — that produces a spotted texture — versus a uniformly loaded roller leaving a smooth, even finish.
The physical causes are straightforward: changing wet film thickness, uneven roller load, and drying that outpaces leveling create both stipple and laps. Environmental factors like temperature, humidity, and airflow speed alter evaporation and roller drag, while nap length, applied pressure, and whether you cross-roll or back-roll determine how well the coating blends edge-to-edge; check product labels or data sheets for drying behavior, and adjust technique and timing accordingly.
What is stipple?
Stipple refers to an uneven textured finish on your wall, caused by roller nap, dragging, or improper leveling of paint. It looks like tiny bumps or valleys in the surface, ruining that smooth, professional look you’re after.
Proper roller rotation is key here. If you’re turning your roller instead of rolling it straight back and forth, you’ll create stipple. Too much pressure can also cause this issue.
Remember: Light, even strokes are the name of the game when it comes to preventing stipple.
What are lap marks?
Lap marks are those visible overlaps or color/texture differences you see on your wall, usually where you’ve reworked an area after the paint edge has begun to dry. They’re like little stripes running horizontally across your wall.
The main culprit here is working too fast and not allowing enough time for the paint to level out before rolling over it again. This causes the edges of each roll to dry at different rates, creating those unwanted lap marks.
Tip: Be patient, let your paint level out, and avoid reworking areas until they’re ready.
How paint, substrate, and environment interact
The relationship between your paint, the surface you’re painting, and the environment can greatly affect how your paint dries and whether you’ll end up with laps or stipple.
For instance, high humidity slows down drying time, while high temperatures speeds it up. Poor airflow can also cause issues by preventing proper evaporation. Porous surfaces absorb more paint, which can lead to longer drying times and increased likelihood of laps or stipple.
Consider: The weather, room conditions, and surface porosity when planning your painting project.
Tools and Materials Checklist
This list focuses on what affects finish: choose roller frames and backup covers compatible with your extension pole, pick nap types appropriate for concrete texture, and have extra rollers to swap in for consistency. For concrete-specific coatings, have primer and finish products on hand along with the product data sheets and recommended application order so you can plan back-rolling and recoat timing.
Bring surface prep gear (brooms, commercial vacuum, tack cloths, masking, drop cloths) plus mixing and containment supplies (drill mixer, stir sticks, trays and liners) to avoid streaks and color variation. Also carry environmental tools — thermometer or dew-point gauge and ventilation aids — and run a quick pre-roll checklist (can condition, surface dryness, patch readiness, lint-free rollers) to confirm you’re ready to start and for touch-ups.
Paint types and sheen selection
Before you start rolling, ensure your paint choice supports a smooth, blemish-free finish.
- Concrete-specific paint: Use 100% acrylic latex or epoxy coatings designed for concrete. They provide better adhesion and durability.
- Base primer: Apply a base primer to seal the surface, improve paint adhesion, and block stains.
- Sheen level: Choose a low-sheen (flat or eggshell) finish for concrete. Higher sheens can highlight imperfections.
- Pot life: Check pot life to ensure you have enough time to apply the paint before it starts to skin over.
- Coverage rate: Know the coverage rate to avoid running out mid-job or wasting paint.
- Color consistency: Use color packs and stir sticks to maintain consistent color throughout your project.
- Manufacturer recommendations: Always follow the manufacturer’s guidelines for best results.
- Avoid high VOC paints: They can cause back-rolling issues due to slow drying times.
Quick rule: The right paint and primer combo, along with following manufacturer guidelines, sets the stage for a smooth finish.
Rollers, frames, and extension poles
Selecting the right roller setup ensures even application and consistent results.
- Nap length: For concrete textures, use short-nap (3/16″ to 1/2″) or medium-nap (3/4″ to 1″) rollers. Longer naps can leave texture in the paint.
- Material type: Microfiber rollers provide a smooth finish and are durable, while mohair offers better coverage but less durability.
- Extension poles: Use extension poles for hard-to-reach areas. Ensure they’re secure to prevent slippage.
- Frame compatibility: Make sure your roller covers fit your frame snugly to avoid paint leaks and uneven application.
- Backup rollers: Have extra rollers on hand to maintain consistency as the first one wears out.
- Frame size: Choose a frame that fits your roller cover snugly. A 9″ or 18″ frame is standard for concrete.
- Durability: Invest in quality hardware to avoid mid-job failures.
Quick rule: The right roller setup, along with durable hardware, ensures even application and consistent results.
Trays, liners, brushes, masking, and cleanup supplies
These supporting items help control your paint load, protect edges, and simplify cleanup.
- Paint trays: Use deep, wide trays (4″ to 6″ deep) for concrete paints. They hold more paint and reduce spills.
- Tray liners: Use disposable tray liners to simplify cleanup and prevent dried paint buildup.
- Edge-cut tools: Use edge-cut tools (e.g., angled sash brushes) for cutting-in edges and preventing lap marks.
- Masking tape: Apply painter’s tape along edges to protect them from overspray and ensure clean lines.
- Drop cloths: Use canvas or plastic drop cloths to protect the ground and catch drips.
- Burrs/roller cleaners: Keep burrs or roller cleaners on hand to remove excess paint from your roller cover between coats.
- Cleaning supplies: Have soap, water, and rags ready for quick cleanup of spills and tools.
Quick rule: The right setup of trays, liners, brushes, masking, and cleanup supplies helps maintain control over your paint load and simplifies post-job clean-up.
Types of Roller Covers and Choosing the Right Nap/Fiber
Roller covers fall into material families such as synthetic, natural, and microfiber, each behaving differently in how they pick up, hold, and release paint; consider these tendencies rather than fixed specs when choosing for concrete. Nap or fiber length is a performance concept: shorter fibers tend to smooth and lay film thin, while longer fibers carry more product and bridge texture, affecting the risk of stipple on different substrates.
Match cover type to surface category — smooth, semi-smooth, or textured — by assessing how much surface profile you need to fill and how much leveling the paint provides; consult manufacturer guidance for recommended pairings. Perform practical checks: look for shedding or lint, do a test patch to watch leveling and edge-lap behavior, and store or clean covers properly to preserve performance and compatibility with your chosen finish.
Roller cover materials: synthetic vs. natural vs. blended
The material of your roller cover affects paint pickup, release, and overall performance.
- Synthetic: Quick drying, low linting, suitable for latex paints. Avoid oil-based paints to prevent cracking.
- Natural (Animal Hair): Excellent for oil-based paints, but may shed fibers and leave marks on smooth surfaces.
- Microfiber: Blend of synthetic and natural materials. Good for both latex and oil-based paints, low linting, but can be more expensive.
- Blended (Synthetic/Natural): Combines benefits of both. Suitable for most paints, but may still shed slightly on smooth surfaces.
Nap length selection guidance
The nap length determines how much paint your roller holds and how it applies to the surface. Longer naps hold more paint but may leave marks on smooth surfaces.
For smooth surfaces, choose a short nap (1/4″ to 3/8″) for better control and less risk of stipple. For semi-smooth or textured surfaces, longer naps (3/8″ to 3/4″) are needed to fill in crevices.
Always check the paint can’s recommendations, as some paints may require specific nap lengths for optimal results.
Specialty rollers and accessories
For a smooth finish, consider lint-free covers. These are usually made of synthetic materials or microfiber to minimize shedding.
For trim work, use a mini roller with an extension pole. This allows you to reach tight spaces and cut down on lap marks.
To reduce stippling and shedding, consider using accessories like roller covers with built-in shields or extenders. These can help control paint flow and prevent excess paint from being applied.
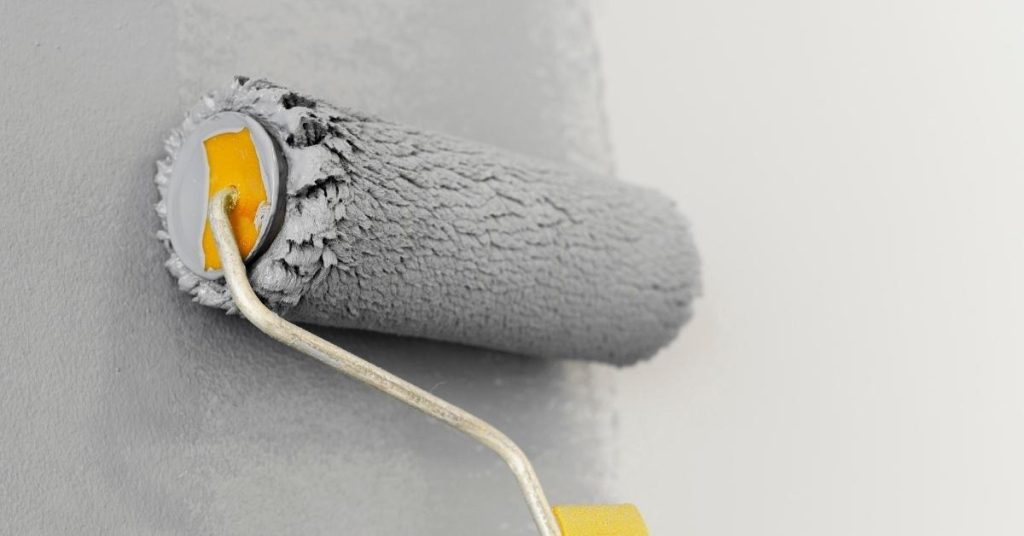
Managing Load: How Much Paint to Put on the Roller
“Load” means how much wet paint the roller is carrying and directly influences wet film thickness and drying behavior; controlling load is key to avoiding pooling or thin spots that lead to lap marks and stipple. Rather than fixed quantities, use visual and tactile cues when loading and rely on the product label or data sheet for guidance on coverage and recoating behavior.
Do a quick load test: a lightly skimmed cover leaves a faint sheen and drags, while a saturated cover beads and can sling; remove excess on a grid or tray edge and check drag on a scrap surface before continuing. Establish a loading routine—dip, roll on grid, remove excess, roll a few feet to check—and adjust cadence as the job progresses; pick a tray or grid and roller diameter that match wall size to keep load consistent and troubleshoot by reloading, back-rolling, or light re-passing when anomalies appear.
Loading technique and even saturation
The ‘load’ on your roller is the amount of paint it holds. Getting an even load is key to smooth, consistent coverage.
Start by filling your tray or grid with enough paint to cover about 1/3 to 1/2 of the roller’s surface. Dip the roller in, then roll it back and forth on the tray or grid until the entire roller is evenly coated.
Next, remove excess paint by rolling the roller on a dry section of the tray or grid. You should see even, uniform texture with no glaring spots or pooling. The goal is to have just enough paint to create an even film without leaving drips or streaks.
Signs of overloading or underloading
Too much or too little paint on your roller can lead to problems. Here’s how to spot them:
Overloading: Drips, sagging, and lap marks are signs you’ve got too much paint. You might also see excessive texture or pooling on the surface.
Underloading: Streaks, patchiness, and frequent reloading indicate not enough paint. The roller may drag on the surface, leaving thin coverage or a ‘chalky’ look.
If you notice any of these signs, adjust your loading technique immediately to avoid further issues.
Adjusting for different paints and primers
Not all paints are the same. Heavier-bodied primers and fast-flash topcoats require different loading techniques:
Heavier primers: These may need more frequent reloading to maintain an even film. Follow product guidance for specific recommendations.
Fast-flash topcoats: These dry quickly, so you’ll need to reload more often to keep up with your rolling speed. Again, follow product guidelines for the best results.
Always check the paint or primer label for specific application instructions. It’s your best guide to getting it right every time.

Rolling Technique: Speed, Pressure, and Motion
A steady rhythm preserves a wet edge: keep a consistent pace and stroke length appropriate to the surface so you don’t outpace the paint’s leveling and create lap marks. Alter stroke speed and length to match texture—shorter strokes on rough surfaces, longer on smooth—while maintaining overlap to blend passes together.
Pressure and speed work together: light-to-moderate pressure with steady motion reduces stipple from compressing fibers or dragging paint, and you’ll need to ease pressure when transitioning to a fresh edge. Use cross-rolling and deliberate back-rolling where the product or surface calls for it to flatten texture and equalize sheen; follow a section-by-section sequence and check wet-edge continuity and sheen from multiple angles as you go.
Establishing and maintaining a wet edge
A ‘wet edge’ means keeping your roller’s paint supply fresh and continuous. It prevents lap marks – those unsightly lines where previously painted sections dry before you roll over them.
Plan your work in manageable sections, like walls or ceiling areas. Start at a top corner, then work down and across to keep that wet edge going.
Why’s it important? A wet edge lets you blend new paint into old without leaving marks. It’s the key to a smooth, consistent finish.
Stroke patterns and overlap strategy
Start rolling from one corner, then work your way down or across. This ‘M’ or ‘W’ pattern helps you maintain a wet edge and avoid lap marks.
Each stroke should overlap the previous one by 50-70%. This ensures even blending between passes. Too little overlap leaves gaps; too much creates lap marks.
Adjust for texture: On rough surfaces, use longer strokes to follow contours and maintain that 50-70% overlap.
Controlling roller speed and pressure
Maintain a steady pace. Rushing creates streaks, while stopping and starting leaves visible lines.
Apply light-to-moderate pressure. Too much pushes paint out of the nap, creating texture or stipple. Too little leaves dry spots.
Adjust for surfaces: Use less pressure on fresh edges to avoid pushing paint through the surface. On primed areas, you can apply more pressure.
Back-Rolling and Feathering: Step-by-Step
Back-rolling is a secondary pass with the roller held lightly and rolled across the wet coat to smooth and blend; feathering is the controlled tapering of paint at seams and transitions to avoid hard edges. These techniques are used when the first pass leaves visible texture, on porous or profiled concrete, or whenever overlaps need blending before the paint sets.
Workflow: protect edges, apply the base coat in consistent panels, then immediately back-roll while the paint is still wet, using light pressure and overlapping strokes to feather seams; keep a wet edge and avoid stopping on a dry boundary. Watch for common errors—overworking, picking up paint, or rolling a damp edge—and use a gloved tactile check and visual inspection to confirm an even finish and plan touch-ups if needed.
What back-rolling is and when to use it
Back-rolling is a crucial step in concrete painting that involves making a smoothing pass with a dry or lightly loaded roller. It helps to blend texture, level the surface, and reduce stipple and lap marks.
When to use back-rolling:
- After applying a bold first coat
- On porous or highly textured substrates
- When edges and overlaps are visible
Back-rolling technique step-by-step
The back-rolling sequence helps to flatten the finish, eliminate stipple, and reduce lap marks.
- Wait until the paint has stopped dripping but is still wet (about 5-10 minutes)
- Lightly load your roller with paint
- Apply even pressure as you roll in the opposite direction of the initial coat
- Avoid rolling over dry edges to prevent picking up paint
- Maintain a consistent speed and overlap strokes by about 50%
Visual checkpoints to confirm a good back-roll
Use this checklist after completing the back-rolling pass to ensure you’ve achieved a smooth, even finish.
- Uniform sheen: Check for consistent gloss across the entire surface
- Absence of ribbing: Look for any visible ridges or valleys
- Consistent film thickness: Ensure no areas are too thick or thin
- No lap marks: Inspect for any visible lines where strokes overlap
- Edges and corners: Check that they’re smooth and even
Quick rule: If you spot any issues, re-roll the area or touch up as needed.
Preventing and Fixing Lap Marks, Stipple, and Other Blemishes
Prevent issues by controlling wet-edge discipline, maintaining consistent roller loading, and using back-rolling or cross-rolling to level sheen and texture as you work. Proper prep, primer choice, and substrate condition all reduce the likelihood of blemishes; review product guidance for compatibility and drying behavior before you begin.
If blemishes appear while wet, correct them immediately with controlled back-rolling, light feathering, or re-wetting edges and adjusting load or speed; once cured, assess whether light sanding and spot touch-ups or a full recoat are required. Keep notes on what caused the problem so you can change materials, nap, or technique on future jobs and reduce repeat defects.
Immediate fixes while paint is still wet
If you spot stipple, lap marks, or other blemishes while the paint is still wet, don’t panic. You can often fix them right away.
Blending: Use a clean, damp cloth to lightly dab at the edge of the mark, blending it into the surrounding area. Work quickly and gently.
Light re-rolling: Gently roll over the blemish with your roller, using minimal pressure. This helps distribute the paint evenly and smooth out any texture.
Feathering: If you have a lap mark, lightly feather the edge of your roller along the mark’s length. Start at one end and work towards the other, gradually reducing pressure to avoid overworking the paint.
Repair methods once paint has cured
Once paint has cured, you’ll need a bit more elbow grease to remove blemishes. Here’s how:
Sanding: Lightly sand the area with fine-grit sandpaper (220 or 320 grit works well). Sand in the direction of the grain, then wipe off any dust.
Spot-priming: Apply a spot primer to the area. This helps seal the surface and provides a better base for touch-up paint. Let it dry according to the manufacturer’s instructions.
Re-coating: Once primed, apply touch-up paint using your roller or a small paintbrush. Work in thin coats, allowing each to dry before assessing if more are needed.
Troubleshooting common scenarios
Here’s how to diagnose and fix some common painting problems:
Patchy coverage: This is often due to poor paint adhesion. Lightly sand the area, wipe off dust, apply a spot primer, and re-paint.
Show-through: If you’re seeing previous colors or patterns through your new paint, it’s likely that your surface wasn’t properly primed. Apply a coat of primer, let it dry, then re-paint.
Roller marks: These are usually caused by overworking the paint or using a roller with too short a nap for the paint type. Lightly sand, wipe off dust, apply a spot primer, and re-roll using appropriate technique and equipment.
Project Planning, Safety, Cost Comparison, and Tool Care
Plan scope and sequence before starting: decide between full-room work and patching, schedule prep, and allow realistic drying/curing windows that account for ambient conditions; include a decision point for back-rolling versus spraying and how to stagger coats. For timing and product-specific limits, check the manufacturer instructions or product data sheet so you don’t guess crucial cure or recoat intervals.
Safety: use appropriate PPE, ensure ventilation, secure ladders, and follow rules for handling and disposing of paints and solvents; verify lead-safe practices if the job may disturb hazardous coatings. For tools, clean and store rollers and brushes per manufacturer guidance, document material and labor choices to weigh DIY versus hiring a pro, and keep a simple inspection checklist for finish quality and tool replacement to protect future results.
Planning large projects and workflow
When tackling big paint jobs, plan your workflow to keep wet edges manageable. Start with the largest areas or highest points first.
For walls, work from top to bottom. For ceilings, use an extension pole and work in sections. Keep each section small enough that you can back-roll before moving on.
Estimate materials based on square footage. Account for waste and touch-ups. Don’t forget primer, sealers, and auxiliary tools like painter’s tape and drop cloths.
Time: Allocate time for surface prep, drying/curing between coats, and weather delays. Realistic timelines account for breaks and unexpected issues.
Safety precautions and ventilation
Ventilation: Ensure proper airflow in enclosed spaces. Use fans, open windows, or consider a respirator with an organic vapor cartridge.
PPE: Wear gloves, safety glasses, and non-slip footwear. For spraying, use a full-face shield or goggles.
Ladders & Electrical Safety: Inspect ladders before use. Keep them stable and level. Be aware of overhead power lines. Don’t paint near live electrical circuits.
Solvents: Handle paints and solvents carefully. Follow manufacturer’s guidelines for disposal. Never mix different types of solvents.
Cost comparison, tool maintenance, and storage
DIY vs Pro: Consider the size of the job, your available time, and skill level. Professionals may be faster but DIY can save money.
- Rollers: Clean with soap and water immediately after use. Store in a dry place to prevent mildew. Replace covers when worn.
- Back-rolling Brushes: Clean thoroughly, rinse, and store upright to prevent warping. Replace bristles as needed.
- Sprayers: Clean with appropriate solvent, rinse, and store according to manufacturer’s instructions.
- Storage: Store tools in a cool, dry place away from direct sunlight and heat sources.
- Optional/Rentable Tools: Consider renting expensive or specialized equipment like sprayers or scaffolding. Prices vary but can be cost-effective for one-time use.
Conclusion
Getting a smooth, durable finish comes down to control: keep the load, speed, and back-rolling steady, and always put safety first so you don’t waste time or ruin the work.
Do a quick test on a scrap area, choose the right nap, load lightly and evenly, keep a steady pace, roll out a few inches at a time, back-roll and feather while edges stay wet, and check for lap marks as you go.
Common mistakes are cheap fixes that bite later: overloading the roller and leaving heavy drips, rushing through edges or gaps, and skipping the back-roll or feathering step. Safety rules are simple—wear PPE, ventilate, use a sturdy ladder or platform, and test in a small area before committing to the whole job to avoid costly mistakes.
If the surface is tricky, the room is tight, or you’re dealing with high ceilings, consider calling a pro for the final finish. Otherwise, stay methodical, follow the steps, and you’ll end with a professional-looking result that lasts. You’ve got this.
FAQ
How do I manage paint load on the roller to avoid streaks and sag?
Load just enough paint to cover the roller evenly when you start, then roll out the excess on the tray edge. If you see heavy ridges or pooling, wipe the roller and reload lightly. Always check the roller label for guidance on recommended loading and avoid squeezing out too much.
How can I control painting speed for a quality finish?
Use a steady, consistent pace across the wall. Don’t rush the stroke to the far edge; keep a wet edge and overlap slightly with each pass. If the surface feels wobbly or you notice line marks, slow down and recheck your load and coverage.
What are proper back-rolling techniques to prevent stipple and lap marks?
Back-roll after each pass while the paint is still wet to blend and flatten texture. Use a light, even pressure and roll in the same direction as your main passes or cross-roll once for uniformity. If you see texture afterward, roll again with a clean, lightly loaded roller.
How do I identify and avoid stipple marks and lap marks?
Stipple shows up as fine speckling; lap marks show as visible seams where coats meet. Ensure your roller is properly loaded, maintain a wet edge, and keep a consistent speed. If you spot marks, back-roll or feather the area while the paint is fresh, and avoid letting sections dry uncovered.