
Introduction
Routing shapes at slab edges is the process of cutting back the edge to remove a raised lip and form a clean, even edge for repair. This helps the patch or filler stick better and reduces future cracking along the edge. It should be done with proper tools and care to avoid creating new weak spots.
Start by outlining the area to be routed and choosing a shape that blends with the surrounding slab. Use a suitable tool, keep a steady motion, and stop before you cut into solid subgrade. Check the repair material instructions and local code rules for depth, cure time, and edge finish.
Key takeaways
- Inspect crack patterns to identify potential failures before routing.
- Plan routing to avoid creating weak lips at slab edges.
- Use appropriate router bits and set depth per material, not guess.
- Verify edge condition with moisture and movement before repair.
- Always wear eye and hearing protection; dust hazards require masking and containment.
- Bonding materials require clean, dry surfaces and follow manufacturer guidelines.
Table of Contents
- Introduction
- Key takeaways
- Understanding Slab-Edge Cracks and Failure Modes
- Diagnosing Edge Condition and Risk Assessment
- Principles of Routing Shapes That Avoid Weak Lips
- Router Bits and Tools — Selection and Setup
- Determining Cut Depth, Width, and Profile — Safe Practices
- Repair Materials and Bonding Strategies
- Step-by-Step Repair Procedure
- Visual Checkpoints, Testing, and Quality Assurance
- Conclusion
- FAQ
Understanding Slab-Edge Cracks and Failure Modes
Edge cracks on a slab often show as shallow fissures or wider gaps that follow the edge line. They can appear as map-like patterns or as narrow, vertical splits near the edge. The edges are more vulnerable because they lack full underlying support and can be prone to spalling under load or freeze‑thaw cycles.
Look for signs of movement, flaking on the edge, or cracking that runs toward the surface. This section helps you recognize typical edge crack behavior rather than interior cracks. Always verify with the label or manufacturer guidance if you have questions about a specific concrete mix or curing method.
Common causes of edge cracking
Edge cracks in concrete slabs are typically caused by a combination of factors. Understanding these causes helps you route and repair cracks effectively.
Shrinkage occurs as the concrete dries, pulling the slab apart at its edges where it’s unsupported. This is often the primary cause of edge cracking.
Settlement happens when the soil beneath the slab compresses over time, causing the slab to crack along its edges. Freeze-thaw cycles can also contribute to this.
Impact damage from heavy vehicles or equipment parking on the edge of slabs can cause cracks. Poor consolidation during construction, with insufficient vibration to remove air pockets, can also lead to edge cracking.
Distinguishing structural vs nonstructural cracks
Not all cracks in your concrete slab are created equal. Some affect the structure’s integrity, while others are purely cosmetic.
Structural cracks move or widen over time, indicating a loss of support or ongoing settlement. If reinforcement is exposed, it’s a sure sign that the crack affects the slab’s structural capacity and needs immediate attention.
Nonstructural cracks, on the other hand, are typically hairline, don’t move or widen, and don’t expose reinforcement. These can usually be patched for cosmetic purposes without compromising the structure.
Diagnosing Edge Condition and Risk Assessment
Begin with a calm walk‑around to note crack length, width, and direction along the edge. Check for nearby damage, such as chipping, scaling, or hollow sounds when tapped. Identify any exposed reinforcement that may influence how you cut or repair.
Assess the overall edge condition: is there movement, moisture intrusion, or active spalling risk? Before cutting or injecting, confirm project details with the product data sheet or local code guidance. This keeps your plan aligned with what the edge can safely tolerate.
Measuring geometry and mapping defects
Start by measuring the length, width, and depth of each crack. This helps you understand the severity and plan your repair strategy.
Length: Measure from start to end of the crack. If it’s curved, use a flexible tape measure or string to trace its path.
Width: Measure at the widest point. If it varies, note down multiple widths along the length.
Depth: Use a screwdriver or similar tool to probe the crack’s depth gently. Mark it on the edge for reference.
Assessing reinforcement and corrosion risk
Check if there’s reinforcement (rebar or mesh) near the edge. If so, note its location and condition.
Visual check: Look for exposed rebar ends or rust stains on the surface. If you see any, they might be signs of corrosion.
Non-destructive testing (NDT): Use a cover meter to measure concrete cover over reinforcement. If it’s thin, there’s a higher risk of corrosion. You can also use half-cell potential testing to check for active corrosion.
If you find signs of corrosion or have doubts about the reinforcement’s condition, consult an engineer. They can advise on further investigation and repair methods.
Evaluating loads, drainage, and environmental factors
Consider how loads, water, and freeze cycles affect your slab edge. This helps you choose the right routing profile for your repair.
Loads: Note down any heavy traffic or equipment using the area. Edge loads can cause cracks to widen or new ones to form.
Drainage: Check how water drains from the slab edge. Standing water can weaken concrete and cause further deterioration.
Environmental factors: Consider freeze-thaw cycles, especially in colder regions. These can exacerbate cracks and cause spalling if not addressed properly. Also, note down any de-icing salts used in the area, as they can accelerate corrosion of reinforcement.
Principles of Routing Shapes That Avoid Weak Lips
Routing profiles should preserve cross‑section strength and maintain load transfer along the edge. Avoid sharp, narrow lips that can be pried loose or chip under load. A gradual, rounded transition helps the edge carry design loads without creating isolated weak points.
Think in terms of continuous treatment around the edge rather than isolated pockets of removal. If you’re unsure, check the manufacturer’s instructions or local rules about acceptable edge shapes for your slab type. Choose shapes that balance repair needs with long‑term durability.
Stress Flow and Edge Continuity
Edge geometry plays a crucial role in how stresses are distributed across your slab. Sharp corners can concentrate stress, leading to cracking. Smooth transitions help maintain a continuous flow of stress, preserving edge strength.
Undercuts—cuts that go deeper than the surrounding surface—create weak points where stress can concentrate and cause chipping or spalling. Avoid them to keep your edges strong.
Rule of thumb: Keep your routing profiles smooth and avoid undercuts for a strong, durable edge.
Profile Characteristics to Avoid Lips
Certain profile qualities can create weak lips that are prone to chipping or spalling. Here’s what to avoid:
- Abrasive edges: Sharp corners create stress concentrations and invite damage.
- Overhangs: These leave unsupported concrete that can break off easily.
- Sharp transitions: Abrupt changes in profile can concentrate stress and cause cracking.
- Negative support: Cuts that go deeper than the surrounding surface create weak points.
Instead, opt for profiles with gradual radii, positive support behind the cut, and no overhangs to maintain a strong edge.
When to Use Chamfers, Rounded Edges, or Keyed Profiles
Different routing profiles serve different purposes. Here’s when to use each:
Chamfers: These are best for creating a smooth transition from the slab edge to the vertical surface. They’re great for preventing tripping hazards and reducing stress concentrations at the edge.
Rounded edges: These distribute stress evenly across the edge, helping to prevent cracking. They’re ideal for areas subject to frequent impact or heavy loads.
Keyed profiles: These are useful when you need to install edge treatments like metal flashings or other accessories. However, they can create weak lips if not designed properly, so be sure to maintain positive support behind the cut.
Router Bits and Tools — Selection and Setup
Use router bits designed for concrete edge work, selecting styles that produce smooth transitions without undercutting the edge. Ensure the bit geometry and carbide quality match the material you’re routing. Confirm the tool diameter and angle will not overreach into unsupported areas.
Set up the tool with proper guides and clamping to control depth and alignment. Always follow the manufacturer instructions for speed, feed rate, and safety features. If in doubt, label the instruction sheet and verify with your local rules or product data.
Bit profiles and materials
Choosing the right bit is crucial for clean cuts and job efficiency. Material and profile affect cut quality, feed rates, and final result.
- Diamond bits: Ideal for concrete, durable, long-lasting. Look for high diamond concentration (e.g., 120/140 mesh). Avoid low-quality diamonds that crack or break.
- Carbide-tipped bits: Cheaper but less durable than diamond. Suitable for light-duty work. Expect to replace tips more often.
- Profile shapes:
- Chamfer: 45° or 90° bevels for clean edges.
- Rounded: Half-round or full-round profiles for smooth, lip-free edges.
- Keyed: Interlocking profiles for added strength. Complex to cut; use only when necessary.
Tip: Always follow manufacturer guidelines for feed rates and bit maintenance.
Power tools, guides, and fixtures
Selecting the right tool ensures accurate cuts. Guides and jigs improve repeatability and safety.
- Handheld routers: Versatile, portable. Ideal for small jobs. Control speed with variable-speed trigger.
- Walk-behind routers: Heavy-duty, efficient. Great for large slabs. Requires more space and setup time.
- Grinders with diamond blades: Can cut concrete but creates dust and heat. Use for quick removal of damaged material before routing.
- Edge guides: Attach to router or tool, keeps bit at consistent angle. Ensures straight, even cuts.
- Straight-edge guides: Clamp to slab edge, guides router along it. Provides support and accuracy for long cuts.
- Jigs and fixtures: Custom-made or store-bought. Help maintain consistent profile shapes and sizes. Essential for complex keyed profiles.
- Safety gear: Safety glasses, work gloves, ear protection, dust mask or respirator.
- Router and bits: Ensure router is in good working order. Have necessary bit profiles ready.
- Guides and jigs: Prepare edge guides, straight-edges, or custom jigs for complex cuts.
- Dust control: Vacuum or dust collection system to minimize mess and health risks.
- PPE (Personal Protective Equipment): Hard hat, steel-toed boots, high-visibility vest if working in traffic areas.
- Repair materials: Concrete patching compound, sealant, reinforcement (if necessary).
- Measuring tools: Tape measure, level, square. Ensure they’re accurate and functional.
- Miscellaneous: Chalk line, markers, pencils, shop towels, extension cords.
Tip: Consider renting heavy-duty tools to save on purchase costs.
Tools and materials checklist
Before starting, ensure you have everything needed for a safe, efficient job. Use this checklist to prepare.
Quick rule: Always double-check your safety gear and tools before starting any job.

Determining Cut Depth, Width, and Profile — Safe Practices
Decide on conservative cut depths that remove damaged concrete while leaving adequate edge integrity. Avoid exposing reinforcement beyond what is necessary for the repair. Ensure the width of the routed area does not create a new weak lip along the edge.
Verify your dimensions with the product guide or guidance from the supplier. Use test cuts on scrap in similar material if available. Document how you measured and checked the profile before proceeding with the repair work.
Establishing conservative cut limits
When determining your cut depth and width, remember: less is more. You’re here to remove damage, not create new problems.
Depth: Start shallow. Aim for 1/3 the slab’s thickness. This minimizes risk of hitting reinforcement or weakening the edge too much.
Width: Narrow cuts are stronger. Stick to 1-2 inches wide. Any wider risks excessive removal and edge weakness.
Always confirm your limits with rebar scans or engineering input. Better safe than sorry.
Measuring, marking, and trial cuts
First, measure and mark your cut line accurately. Use a straight edge and scribe for clean lines.
Before diving in, make trial cuts in hidden areas. This lets you see what’s under the surface without ruining your project.
If you hit unexpected conditions, adjust your plan. It’s better to stop and rethink than force a cut that could cause more damage.
Once satisfied, mark your final cut line clearly. You’ll thank yourself later for not having to guess.
What to do if reinforcement or voids are encountered
If you hit reinforcement, stop cutting immediately. You’re risking damage to the rebar and slab.
Voids? Document them clearly. Take photos, note their size and location. These could indicate bigger issues.
When in doubt, consult a structural professional. They can assess the situation and advise next steps. It’s always best to err on the side of caution with structural integrity.
Until you’ve got the green light, don’t proceed. Safety first, always.
Repair Materials and Bonding Strategies
Compare repair materials for compatibility with existing concrete and expected edge loading. Favor products rated for edge applications and moisture exposure, paying attention to bond strength and modulus of elasticity. Consider how the repair will transfer loads at the edge and around any routing shapes.
Choose bonding methods that suit the edge profile, surface preparation, and exposure conditions. Always follow the product label for prep steps and curing requirements. If you’re unsure, consult the manufacturer instructions or local guidance on material compatibility.
Material options: epoxies, polymer-modified mortars, and grout
The choice of repair material significantly impacts the durability and longevity of your crack repair at slab edges. Each material has its unique properties that make it suitable for different situations.
- Epoxies: High bond strength, flexible, cure at room temperature. Look for high tensile strength and elongation ratings. Avoid using in areas with heavy foot traffic until fully cured.
- Polymer-modified mortars: Good bond strength, flexible, cure under various conditions. Check manufacturer’s substrate prep requirements. Avoid applying in extreme temperatures.
- Grout: Low cost, easy to apply, but weak bond and flexibility. Use only for minor cracks where appearance is more important than durability. Wrong choice can lead to cracking and staining.
Backer materials, joint fillers, and sealants
The right backer material, joint filler, and sealant ensure a durable repair that can withstand edge loading and prevent ingress of moisture.
- Backer rods: Control material depth, prevent over-application. Use with larger cracks to maintain a smooth surface. Avoid using in narrow gaps where it may not fit properly.
- Bond-breakers: Prevent adhesion between old and new concrete. Use when you want to remove the repair easily later. Avoid using if you need a permanent repair.
- Sealants: Protect against moisture ingress, accommodate differential movement. Look for good elongation and tear resistance ratings. Wrong choice can lead to cracking and delamination.
Surface preparation and bonding promotion
Proper surface preparation is crucial for achieving reliable adhesion between the old concrete and repair material. Start by cleaning the area to remove all loose debris, dirt, and contaminants.
Next, roughen the surface using a suitable tool like a wire brush or diamond blade. This increases the surface area and promotes mechanical bonding. Be careful not to over-roughen and create micro-cracks.
Apply a primer designed for your chosen repair material. Primers promote adhesion, improve bond strength, and seal the concrete surface. Ensure the surface is dry before applying the primer.
Moisture control is vital during the repair process. Keep the repaired area moist (but not wet) using damp cloths or plastic sheeting until the repair material has cured properly. This promotes better curing and stronger bond.
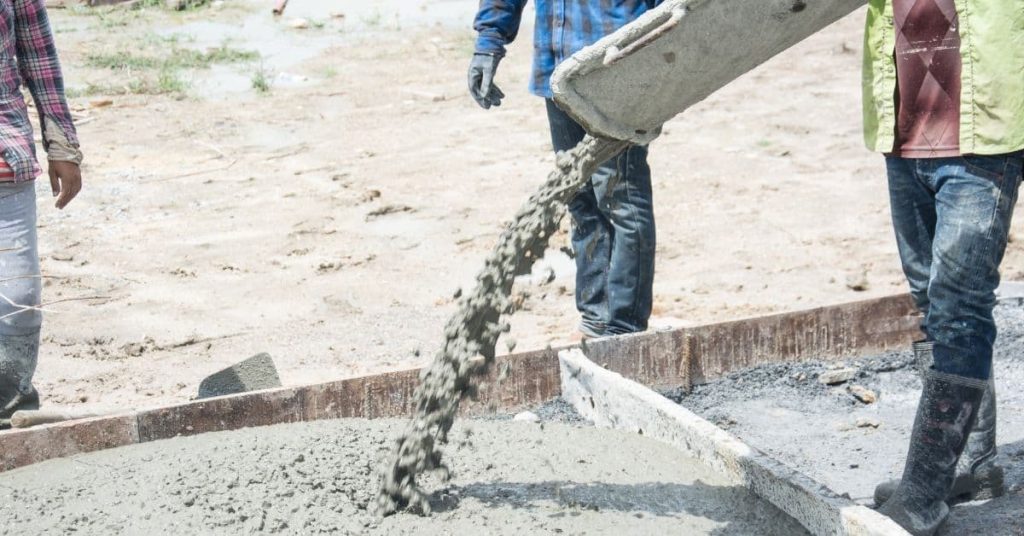
Step-by-Step Repair Procedure
Prepare the site by sealing adjacent areas and controlling dust and debris. Execute the routing to create the intended edge profile with steady, controlled passes. Clean the area and set up for repair material application without rushing the process.
Apply repair material according to the chosen method and ensure adequate cure time. Monitor the edge for signs of movement or cracking during curing and adjust future steps if needed. Always reference the product data sheet or manufacturer instructions for sequence and timing.
Step-by-Step Repair Process
The following steps guide you through repairing cracks at slab edges, from preparation to final checks.
- Inspect the area: Check for any underlying issues causing the crack. If unsure, consult a pro.
- Gather tools and materials: Refer to your checklist from earlier in the article.
- Set up safety barriers: Protect surrounding areas from debris and dust.
- Make the cut: Using your router and guide, carefully route out the planned shape. Keep cuts conservative as advised.
- Clean up: Remove loose material and vacuum the area to prepare for repair placement.
- Place repair material: Apply chosen material according to its specifications.
- Shape the profile: Tool the routed area to maintain smooth load transfer and eliminate voids.
- Cure and finish: Follow appropriate curing practices, then apply sealants to extend service life.
Surface Prep and Controlled Routing
Preparing the area properly ensures a successful repair. Start by clearing any debris from the crack using a wire brush or vacuum.
Mark out your routing path clearly, ensuring it doesn’t create weak lips at slab edges. Use a straight edge and pencil for accurate lines.
Secure your router to a guide or fixture to maintain a consistent depth and width while routing. Keep the bit speed steady and apply even pressure as you follow your marked line. After routing, remove loose material using a chisel or vacuum, then check edge stability by gently tapping it with a hammer.
Placing Repair Material and Shaping the Profile
Choosing the right repair material is crucial for a lasting fix. Consider factors like crack width, slab movement, and exposure to elements.
- Epoxies: Ideal for small cracks and voids. Mix according to package instructions and apply with a trowel or putty knife, ensuring no voids remain.
- Polymer-modified mortars: Suitable for wider cracks and joints. Apply using a trowel, tooling the material to match the routed profile.
- Grout: Best used in conjunction with other materials for filling voids. Ensure it’s compatible with your chosen repair material.
Tool the routed area using a trowel or float, ensuring smooth load transfer and eliminating voids. Allow the material to cure according to its specifications before proceeding.
Curing, Finishing, and Final Sealing
Proper curing ensures your repair material reaches its full strength. Follow the manufacturer’s guidelines for optimal results.
Finish the surface to match the surrounding area, using a trowel or float as needed. Ensure any excess material is removed and edges are smooth.
Apply sealants according to their package instructions, ensuring full coverage of the repaired area. This extends service life by preventing water intrusion and other damage. Allow sealants to cure completely before exposing them to heavy traffic or elements.
Visual Checkpoints, Testing, and Quality Assurance
Perform a visual inspection to confirm the routed edge matches the planned profile and there are no sharp lips. Tap tests or simple surface checks can help identify defects after repair. Look for uniform color and texture across the repaired area.
Document the results and conduct any recommended simple tests from the product guidance to confirm adhesion and curing. If gaps or movement are detected, revisit the edge treatment plan with the appropriate reference material. Verify against label instructions or local codes as needed.
Visual and tactile acceptance criteria
Before you declare the repair job done, use this checklist to ensure your work meets the mark.
- Continuous profile: The repaired area should blend seamlessly with the surrounding slab. Check for any gaps or missing patches.
- No overhangs: Ensure there are no lumps or high spots that could trip someone or cause damage.
- Flush bonding: The repair material should be level with the existing concrete, not sunken or raised.
- No visible cracks: Inspect for any hairline cracks that may have formed during the repair process.
- Uniform color: The repaired area should match the surrounding concrete as closely as possible. Discoloration could indicate a problem with the bonding or material used.
- No delamination: Gently tap the repaired area with a hammer. Listen for a dull thud, which indicates strong bonding. A hollow sound suggests delamination.
- No movement: Try to wiggle the repaired area with your hands. Any movement could indicate a weak repair.
- Smooth texture: Run your hand over the repaired area. It should feel smooth, with no rough spots or sharp edges.
Quick rule: If it looks and feels right, it probably is. But always double-check to be sure.
Simple field tests and documentation
These non-destructive checks will help you confirm the integrity of your repair and keep a record for future reference.
- Sound testing: Tap the repaired area with a hammer. A clear, ringing sound indicates solid concrete. A dull thud suggests a problem.
- Probe testing: Gently probe the edges of the repair with a screwdriver or awl. Any crumbling or movement could indicate a weak spot.
- Before-and-after photos: Take pictures of the area before and after the repair to document the process and results.
- Measurements: Record the dimensions of the repaired area, as well as any relevant measurements taken during the repair process.
- Materials used: Note down the type and brand of repair material used, as well as any primers or sealants applied.
- Weather conditions: Record the temperature and humidity at the time of the repair, as these can affect curing and bonding.
- Date and time: Keep a record of when the repair was completed to help track its performance over time.
Quick rule: The more information you document, the better equipped you’ll be to address any future issues that may arise.
When additional testing is warranted
Sometimes, a visual inspection isn’t enough. Here are signs that indicate more advanced testing or engineering assessment is needed.
- Continued cracking: If cracks continue to appear after the repair, it could indicate an underlying structural issue that requires further investigation.
- Movement: Any movement in the repaired area, even slight, should be cause for concern and warrants further testing.
- Exposed reinforcement: If the repair process exposes any reinforcing bars or other structural elements, it’s a sign that the slab may be deteriorating more extensively than initially thought.
- Moisture intrusion: Evidence of water penetration in or around the repaired area could indicate a leak or other moisture-related issue that requires further investigation.
- Uneven settling: If the repaired area appears to be settling unevenly, it could indicate a problem with the slab’s foundation or support structure.
Quick rule: When in doubt, err on the side of caution. It’s always better to investigate further than to assume everything is okay.
Conclusion
Fixing slab-edge cracks is about making a durable, clean edge without creating weak lips. When you follow solid routing practice and pick the right materials, you protect safety, appearance, and long-term performance.
Do this next: inspect the edge and choose a shape that avoids thin, vulnerable lips; set depth and profile conservatively; select the right bits and bonding method; perform the repair in measured steps, test in a small area first, and verify with a visual check and a light load test before going bigger. Start with a dry run and then proceed only if every step looks solid.
Common mistakes to avoid are rushing the routing, oversizing or undercutting the edge, and mixing materials or curing methods that don’t match the edge condition. Safety-first mindset means steady work, eye protection, dust control, and stopping if any step feels uncertain. Keep tests small, follow the planned depths, and don’t force a fit that could crack again.
If the crack runs deep, the edge is severely compromised, or you’re unsure about bonding or load conditions, call a professional before you push on. A careful evaluation here saves costly damage later and keeps the project moving. Stay focused, follow the steps, and you’ll get a durable repair that looks right and lasts.
FAQ
How do I confirm routing will not create a weak lip on the edge crack repair?
Check that the edge remains solid around the crack and that you’re not thinning it to a fragile edge. Follow the tool path and keep to the manufacturer’s guidance for shape and depth. If unsure, stop and verify with the product instructions or local guidance.
What should I look for in bonding agents or repair mortars compatibility with the slab and finish?
Read the label for concrete compatibility and surface prep needs. Use products rated for concrete slabs and compatible with the existing finish. If in doubt, check the manufacturer instructions or packaging for bonding notes.
How do I finish the edge after routing to prevent edge spalling?
Shape the edge to avoid sharp transitions and apply a suitable sealant or bonding agent as recommended. Smooth the area so it blends with the surrounding slab without removing too much material. If you see gaps or rough spots, address them per product guidance.
What checks should I do after repair before resuming use?
Do a visual check for smoothness and any movement along the edge. Let the repair cure per the product instructions and test for sound or movement as you would with intact concrete. If movement appears, pause and reassess with the instructions from the product or seek advice.