
Introduction
Recoating a concrete sealer means applying a fresh layer over a sealed concrete surface after confirming the old layer sticks well. Before you open a new can, inspect the old finish for peeling or staining and prepare to clean and roughen the surface as needed. Keep the goal simple: the new coat should bond without lifting or peeling later.
Start by preparing the surface: remove loose material, clean thoroughly, and neutralize any contaminants. If the old sealer is stubborn, follow safe removal methods that won’t scratch concrete, and verify you’re not leaving residues that could trap moisture. Do a simple adhesion check by applying a small test patch and watching for any peeling after a light test, then choose a compatible sealer based on the concrete and manufacturer instructions.
Key takeaways
- Inspect substrate and test adhesion to confirm acceptable bonding before recoating.
- Remove old sealer per manufacturer guidance without gouging the concrete surface.
- Perform moisture and contamination checks; fix active moisture before priming.
- Choose compatible sealer types; test adhesion and compatibility with the topcoat.
- Use a cement-compatible primer if adhesion tests indicate marginal bonding.
- Document steps, wear PPE, and ventilate area to avoid fumes and dust.
Table of Contents
- Introduction
- Key takeaways
- When to Recoat Vs Strip and Project Overview
- Tools, Materials, and Safety Checklist
- Surface Assessment and Moisture/Contamination Checks
- Step-by-Step Surface Preparation to Prevent Peeling
- Adhesion Tests to Run Before Recoating
- Priming and Recoat Application Best Practices
- Troubleshooting Peeling and Common Mistakes
- Costs, Environmental Impact, and Long-Term Maintenance
- Conclusion
- FAQ
When to Recoat Vs Strip and Project Overview
This section guides you through the decision tree for recoating an existing sealer versus stripping it away. Start with what the surface looks and feels like, and compare that to how it performs under cleaning and use. Visual cues and simple tests together indicate whether a new coat will bond or if the substrate needs a fresh start. Use this overview to set up a practical plan for the project from the first pass to the final seal.
Document the signs you observe with notes and photos, and translate them into action steps. Create a quick decision matrix for recoating or stripping, then outline the required tools, PPE, ventilation, and sequencing. This keeps the plan clear for clients and the crew alike as you move forward.
Visual and performance checks
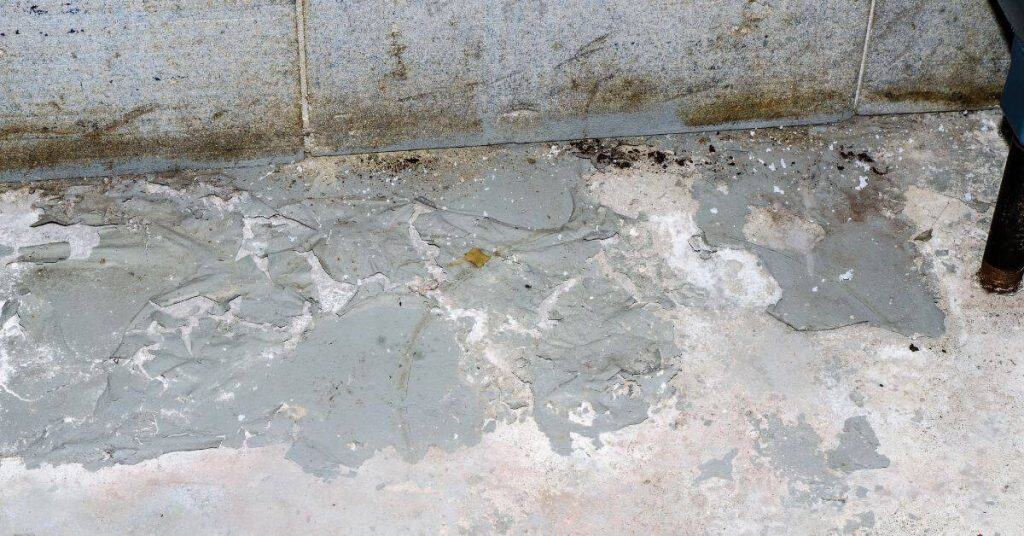
Before you decide to recoat, inspect your concrete sealer for any signs of failure. Here’s what to look for:
Flaking or Bubbling: These are clear signs that the sealer is not adhering properly. Recoating over these areas won’t fix the problem.
Discoloration: A change in color could indicate that the sealer is breaking down. If it’s localized, you might be able to recoat. But if it’s widespread, stripping and starting fresh may be necessary.
Loss of Bond: Check for any areas where the sealer seems to be lifting off or has lost its gloss. These spots won’t bond with a new coat and should be addressed before recoating.
Risks and benefits of recoating
Recoating your concrete sealer can save you time and money, but it’s not always the best solution. Here are some things to consider:
Benefits: Recoating is faster and cheaper than stripping and reapplying a new sealer. It’s also less disruptive to your schedule.
Risks: If the existing sealer has adhesion issues, recoating won’t fix them. In fact, it could make them worse by trapping moisture or other contaminants under the new coat. Always perform adhesion tests before recoating to ensure a successful outcome.
Tools, Materials, and Safety Checklist
This checklist covers the practical gear and cleaners you need to prep and coat with confidence. List grinders or polishers with diamond pads, a vacuum, hand tools, mixing gear, trays, and rollers or sprayers sized to the project. Have a plan for dust control and containment from start to finish.
Pair the tools with cleaners, degreasers, and etching options that suit your surface. Include suitable primers, bonding coats, and sealer compatibility products, plus proper PPE and spill control. Quick quality checks along the way keep you on track and safe.
Cleaners, degreasers, and etchants explained
Before you start, understand the cleaning process to ensure your new sealer adheres properly.
- Degreasing: Use a heavy-duty cleaner to remove oils, grease, and dirt. Skip this step and new sealer won’t bond.
- Etching (Acid Wash): For old coatings, use an acid wash like muriatic acid to create micro-pores for better adhesion. Not suitable for uncoated surfaces or alkaline cleaners.
- Mechanical Abrading: For tough stains or old coatings, use a grinder with coarse pads to remove the top layer.
- pH-Neutral Cleaner: After degreasing and/or etching, use a pH-neutral cleaner to remove residue. Wrong cleaner can affect sealer adhesion.
- Rinse Thoroughly: Use clean water or a pressure washer to rinse off all cleaning agents.
- Damp-Hold Test: After rinsing, wet the surface and let it sit. If it dries in <15 minutes, you need more prep.
- Check Sealer Compatibility: Ensure your cleaners are compatible with your existing sealer film to avoid damage.
Quick rule: Always follow manufacturer’s guidelines for cleaner usage and safety precautions.
Mechanical prep tools and consumables
Use these tools to prepare the surface for recoating.
- Grinders/Polishers: Use with diamond pads (coarse to fine) to remove old coatings, stains, or profiling. Wrong grit can damage surface.
- Shot Blasters: For heavy-duty removal of old coatings or contaminants. Can create too much dust if not controlled.
- Sanding Pads/Brushes: Use with grinders for light profiling or stain removal. Wrong pad can leave marks.
- Vacuum or Shop Broom: Clean up dust between steps to maintain a clean working surface.
- Needlenose Pliers: Remove any loose debris or nails from the surface.
Quick rule: Always wear appropriate safety gear when using power tools and follow manufacturer’s guidelines for tool usage.
Safety gear and environmental controls
Protect yourself and the environment during prep work.
- Respirator (P100 or Organic Vapor): Protect against dust, fumes, and vapors. No respirator means potential health risks.
- Chemical-Resistant Gloves: Protect hands from cleaners, degreasers, and sealers. Wrong gloves can cause skin irritation or damage.
- Eye Protection: Goggles or safety glasses to protect eyes from debris and chemicals. No eye protection risks eye injuries.
- Long Sleeves: Protect skin from cleaning agents, sealers, and UV exposure.
- Hearing Protection: Use when operating power tools to prevent hearing damage. Noise levels can exceed safe limits without protection.
- Dust Control: Use wet methods or HEPA vacuums to control dust during grinding and sanding.
- Runoff Control: Contain cleaning agents and sealers to prevent environmental contamination. Uncontrolled runoff can harm plants, animals, and water sources.
- Ventilation: Ensure proper ventilation when using chemicals or power tools. Inadequate ventilation can cause health issues.
Quick rule: Always follow Material Safety Data Sheets (MSDS) guidelines for safe handling and disposal of chemicals.
Surface Assessment and Moisture/Contamination Checks
Begin with visual and tactile checks for cleanliness and coating history. Look for oil, curing compounds, laitance, dust, and any sticky residues. Document contaminants and decide whether cleaning or mechanical removal is needed.
Then assess moisture risk and porosity to guide adhesion decisions. Use simple on-site tests and note how results affect primer choice and timing. This foundation helps prevent peeling later in the project.
Cleanliness checks and residue tests
Before recoating, check your concrete surface for cleanliness. Here’s how:
Wipe test: Use a clean white cloth dampened with water to wipe the surface. If it comes away dirty or leaves residue, you’ve got contamination.
Solvent test: Apply a small amount of solvent like acetone or isopropyl alcohol to another area using a cotton swab. If the surface becomes cleaner, there was wax, oil, or curing compound present.
pH spot check: Use pH paper to test for efflorescence. Efflorescence is alkaline and will turn the paper blue. If present, remove it before recoating.
Moisture and vapor considerations
High moisture levels can ruin your new sealer. Here’s how to check:
Tack-free time: Touch the surface after cleaning. If it feels tacky, it’s too soon to recoat.
Moisture meters: Use a non-invasive meter to test for moisture. If readings are above 4%, consider delaying recoating or using a moisture-tolerant primer.
Plastic sheet test: Tape a plastic sheet to the surface and leave it for 24 hours. If condensation forms, there’s too much moisture for recoating.
When to call a lab or pro
Sometimes, DIY checks aren’t enough. Here are signs to call in the experts:
Uncertain contaminants: If you can’t identify what’s causing issues, get professional help.
Widespread adhesion failure: If large areas of your old sealer are peeling off, it might be a structural issue.
Structural cracks: Deep or wide cracks could indicate serious problems. Don’t recoat until they’re fixed.
Step-by-Step Surface Preparation to Prevent Peeling
Set clear adhesion goals and perform pre-coating tests that guide your next steps. Establish containment, safety, and proper ventilation to protect everyone on site. This baseline keeps prep consistent and reduces surprises.
Proceed through thorough cleaning, degreasing, and moisture checks. Profile the surface mechanically or chemically as needed, perform any required repairs, and re-clean to ensure readiness before coating. A careful sequence minimizes peeling risk.
Step-by-Step Process
The following is a clear, numbered sequence of practical steps for step-by-step surface preparation to prevent peeling. It starts with safety checks and ends with final checks.
- Contain the area: Use plastic sheets or tape to control dust and protect surrounding surfaces.
- Safety first: Wear appropriate PPE (gloves, goggles, etc.) and ensure proper ventilation.
- Initial cleaning: Pressure wash the surface to remove loose material and dirt. Follow up with a detergent scrub if necessary.
- Degrease: Use a suitable solvent like acetone or lacquer thinner to wipe away any remaining grease or oil.
- Moisture check: Perform a moisture test using a concrete moisture meter (CM) to ensure the surface is dry enough for coating.
- Profile creation: Choose and implement your preferred profiling method – etching, grinding, or blasting – to achieve the desired profile.
- Repair cracks: Fill hairline cracks and spalls with an appropriate patch material and allow it to cure.
- Final cleaning: Thoroughly clean the surface again to remove any residual dust or contaminants. Ensure it’s dry before testing or priming.
Heavy cleaning and degreasing
Start by pressure washing the concrete with water to remove loose material, dirt, and dust. Use a suitable detergent if necessary, but avoid using one that leaves a residue.
Next, use a stiff-bristled brush or broom to scrub the surface, paying special attention to areas where dirt tends to accumulate, like corners and edges.
Finally, degrease the concrete using a suitable solvent. Apply it with a cloth or brush, let it sit for a few minutes to break down grease, then wipe it off. Be sure to follow safety guidelines when handling solvents.
Creating the right surface profile (etching, grinding, blasting)
For old sealed concrete, you’ll need to create a suitable profile for your new sealer. Here are three common methods:
Acid etching is quick and easy but can be harsh on the environment. It’s best used when you want a light profile (Sa 1-2) and the concrete is in good condition.
Mechanical grinding, like diamond grinding, creates a consistent, heavy profile (Sa 3-4). It’s ideal for removing old coatings or creating a rough surface on smooth concrete. However, it can be messy and requires proper dust control.
Abrasive blasting, such as shot blast or sandblasting, provides a very aggressive profile (H index >15) but is typically overkill for most sealers. It’s best reserved for heavy-duty applications like removing old paint or rust.
Repairs, filling, and final substrate conditioning
Before applying your new sealer, it’s crucial to repair any cracks or holes in the concrete. Use an appropriate patch material for hairline cracks and spalls, following the manufacturer’s instructions for mixing and application.
If there are areas with loose film, carefully feather the edges using a razor blade or scraper to ensure a smooth transition between the repaired area and the rest of the surface.
After all repairs are complete, allow them to cure fully according to the manufacturer’s guidelines. Then, thoroughly clean the surface again to remove any residual dust or contaminants from the repair process.
Finally, ensure the substrate is completely dry and that the temperature and relative humidity meet the coating specifications before applying your new sealer.
Adhesion Tests to Run Before Recoating
Outline reliable adhesion tests that homeowners can perform, such as tape pull, scratch, or a simple water/solvent test. Use materials you already have and follow clear steps to obtain repeatable results. These tests help you gauge readiness without guesswork.
Learn to interpret what you see: edge lifting, flaking, or residue signals a red flag. Use the results to decide if you can proceed, or if you need more prep, etching, or primer choice. Document outcomes for future reference.
Cross-cut and Tape Pull Method
The cross-cut and tape pull test is a simple, DIY-friendly adhesion test. Here’s how:
1. Using a utility knife, score an ‘X’ into the sealer, about 2-3 inches across.
2. Apply a strip of painter’s tape over the scored area, press firmly to ensure good contact.
3. Pull the tape off quickly at a 90-degree angle. If more than 65% of the sealer comes off with the tape, that’s a fail. It indicates weak adhesion and potential recoating issues.
Pull-Off Adhesion Test: Overview & Pass/Fail Guidance
The pull-off adhesion test is a professional-grade method. It uses specialized equipment to measure the force required to pull off a disc-shaped specimen.
Use this test when you need more precise data, or if the cross-cut and tape pull test fails. Here’s how to interpret results:
– Pass: If the sealer pulls off cleanly from the concrete, with no edge lifting or flaking, that’s a pass.
– Fail: If you see edge lifting, flaking, or stringy residue, that’s a fail. It indicates weak adhesion and potential recoating issues. Consider stripping back to bare concrete before proceeding.
Test-Area Recoating Trial
Before you recoat the entire surface, do a small test area first. This real-world trial confirms adhesion and appearance:
1. Choose an inconspicuous spot, about 2×2 feet.
2. Follow your full prep, prime, and recoating process on this test area.
3. Inspect the test area after it’s fully cured. If there are no signs of peeling, bubbling, or other issues, you’re good to proceed with the rest of the surface. If not, troubleshoot and adjust your prep or sealer before continuing.
Priming and Recoat Application Best Practices
Begin by confirming that adhesion and moisture criteria are met, then decide if a dedicated primer is needed for the chosen sealer. Check compatibility with existing coatings and the concrete substrate, including recoat windows and ventilation needs. This ensures a durable bond from the start.
Outline the surface prep for primers, including cleaning and profiling if required. Specify the primer type and application method, plus film thickness targets and how to avoid laps or pinholes. Provide guidance on timing and monitoring between steps to prevent early peeling.
Choosing primer/sealer systems and compatibility checks
Before you start, confirm your chosen primer and sealer are compatible with the existing sealer on your concrete. Check product data sheets or contact manufacturers for guidance.
Some sealers require a specific bonding primer to maximize adhesion. If yours does, use that exact primer to ensure the best bond.
Note: Water-based and solvent-based sealers have different requirements. Make sure your primer matches your sealer’s base.
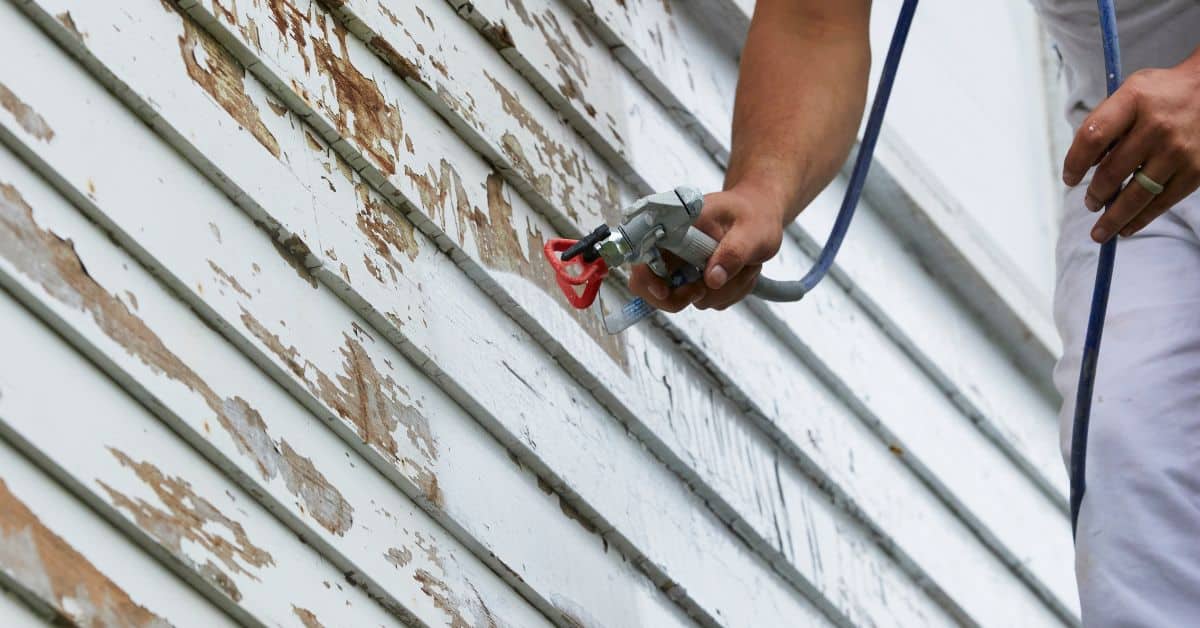
Application methods and film-control tips
Apply primers using a brush, roller, or sprayer depending on the product. Follow manufacturer recommendations for application method and coverage rate.
For rolling or brushing: Work in small sections, maintaining a ‘wet edge’ to avoid lap marks. Apply evenly, avoiding puddles or thin spots that can cause peeling.
Spraying: Use even strokes, overlapping each pass by about 50%. Keep the nozzle moving at a consistent speed to maintain film thickness.
Environmental and curing conditions
Temperature and humidity affect primer and sealer cure times. Follow manufacturer guidelines for ideal application temperatures (usually between 50°F – 90°F).
Keep surfaces dry during application and curing. Moisture can interfere with adhesion and cause peeling.
Curing: Allow the primer to cure as recommended by the manufacturer before applying the sealer. This usually takes 24-72 hours, but can vary depending on conditions.
Troubleshooting Peeling and Common Mistakes
Identify root causes of peeling: moisture intrusion, improper prep, incompatibilities, contamination, or curing timing issues. Knowing why peeling occurs helps you tackle the right problem first. Use this as a diagnostic guide on the job.
Describe corrective pathways for spot repairs or full removal, and outline safe, repeatable steps for re-prepping. List common mistakes to avoid and keep thorough records of all steps, tests, and results to prevent recurrence.
Common causes and immediate fixes
The most common reasons for peeling sealers are contamination, moisture, incompatible products, or a poor surface profile. Here’s how to tackle these issues:
Contamination: If the surface was dirty or glossy before sealing, the sealer couldn’t bond properly. Clean and degrease thoroughly before reapplying.
Moisture: Moisture intrusion can cause peeling. Use a moisture meter to check for dampness. If present, address the source and let it dry completely before recoating.
Incompatible products: Using incompatible primers or sealers can lead to failures. Always ensure your primer and sealer are compatible with each other and the existing surface.
When spot repair is acceptable vs full strip
Deciding between spot repairs or full removal depends on the extent of failure. Here’s how to determine which approach to take:
Spot repair: If only small areas are peeling, you can perform spot repairs. First, clean and degrease the affected area. Then, abrade the edges, re-prime with a compatible bonding primer, recoat with the same/sealant system, and allow proper cure between coats.
Full removal: If large areas are peeling or the entire surface is failing, it’s best to fully remove the sealer. Start by cleaning to bare concrete. Then, follow the steps for spot repairs but apply them to the entire surface.
Preventive checklist to avoid repeat problems
Before starting any recoating project, use this checklist to minimize the risk of recurring issues:
- Surface cleanliness: Ensure the surface is clean and free of contaminants. Heavy cleaning and degreasing should be done before applying any primer or sealer.
- Moisture check: Use a moisture meter to confirm the surface is dry. Moisture intrusion can cause peeling, so it’s crucial to address this issue before recoating.
- Surface profile: Create the right surface profile (etching, grinding, blasting) to ensure proper adhesion of the primer and sealer.
- Compatibility check: Ensure your primer and sealer are compatible with each other and the existing surface. Incompatible products can lead to failures.
- Adhesion test: Perform an adhesion test (pull-off or tape test) before recoating to ensure the surface is ready for a new application.
- Cure time: Allow proper cure time between coats and after final application. Rushing this process can lead to failures.
- Temperature/humidity control: Maintain optimal temperature and humidity levels during application and curing to prevent issues caused by extreme conditions.
- Documentation: Record surface prep steps, moisture readings, adhesion test results, product lot numbers, and post-recoat cure observations for future reference.
Quick rule: Always follow the manufacturer’s guidelines for their specific products to ensure optimal performance and longevity.
Costs, Environmental Impact, and Long-Term Maintenance
Develop a clear framework for choosing between recoat, strip and reseal, or switching systems. Base the decision on adhesion tests, current seal condition, substrate porosity, and finish goals. Include a simple flow to guide next steps.
Discuss environmental factors and long-term maintenance, including VOC considerations and disposal. Provide preventive strategies and a maintenance plan to extend life and minimize peeling over time. Include a practical prep-and-apply checklist to avoid common issues.
How to compare cost and value
When recoating, stripping, or switching your concrete sealer, costs vary based on prep level, labor, scope, and product type. Here’s how to compare:
Preparation: Prepping the surface for a new coat can be minimal (just cleaning) or extensive (grinding, repairing). More prep means higher initial cost but better long-term performance.
Labor: DIY saves money, but pros ensure quality. Get quotes from local contractors to compare.
Scope and product type: Recoating is cheaper than stripping and resealing or switching systems. Choose a sealer that matches your old one for compatibility and lower cost.
Environmental and health considerations
VOCs in sealers can harm indoor air quality. Consider low-VOC or waterborne alternatives:
Check labels: Look for products with low VOC content (less than 50 g/L). Water-based sealers are typically low VOC.
Disposal: Follow local regulations for disposing of old coatings. Some areas require special handling or recycling.
Ventilation: Ensure proper ventilation during application, especially with solvent-based products. Open windows and use fans if possible.
Maintenance schedule and lifespan-extending tips
Regular maintenance keeps your recoated sealer performing at its best:
Cleaning: Regularly clean your concrete to remove dirt, stains, and debris. Use a mild detergent and soft-bristle brush.
Spot repairs: Address minor damage promptly to prevent it from spreading or causing more extensive issues.
Re-inspection: Inspect your sealer annually for signs of wear or damage. Recoat every 3-5 years, depending on traffic and use.
Conclusion
Protecting the job means sticking to the test-and-prepare method: verify moisture and contamination, run adhesion tests, and make sure the surface is clean and truly dry before any primer or sealer goes down. If you nail the prep and test, the coating will bond and stay put, looking even and lasting longer.
Proceed with a simple, logical checklist in your own words: start by evaluating where water or contaminants could hide, then confirm the surface will accept a coat by a quick adhesion check, clean and/or etch only as needed, repair flaws, dry thoroughly, then apply primer and the sealer in recommended cycles with proper curing and ventilation, finally inspect the finish after each step and keep records for maintenance. If any step seems uncertain, pause and confirm the requirements for that product; safety gear and ventilation are non negotiable.
Common mistakes to avoid are skipping the adhesion tests, ignoring moisture or contamination, and applying sealer over a peeling or damp surface. Don’t rush the dry time, don’t neglect ventilation or PPE, and don’t mix products unless the manufacturer allows it. These rules of thumb keep you safe and prevent costly fixes.
If moisture is high, or you see spreading peeling after a test, or you’re unsure about the substrate, it’s time to call a professional rather than pushing ahead. Stay practical, document results, and you’ll finish with a durable, good-looking coat. You’ve got this—tackle the prep right, and your concrete will reward you with solid adhesion and long-term maintenance benefits.
FAQ
How do I prepare the concrete surface before recoating to prevent peeling?
Clean the area thoroughly to remove dust, oil, and curing compounds. Scrape and scrub high spots, rinse, and let it dry completely before any adhesion test or coating.
How can I remove an old sealer without damaging the concrete?
Follow the sealer label for removal options, usually by using a compatible remover or mechanical abrasion. Test a small area first to see if the concrete reacts or if the remover leaves residue.
What adhesion tests should I run before applying a new sealer?
Do a simple tape or scrub test on a small area to check for lifting. If the coating adheres poorly, address surface porosity and contaminant residues before proceeding.
What application technique should I use for painting or rolling a sealer on?
Apply in thin, even coats with the tool you prefer (brush, roller, or sprayer) and follow manufacturer instructions. Maintain a steady pace and avoid overworking; stop when the surface looks uniform and wet edges aren’t visible.