
Introduction
Hardwood and softwood refer to different types of trees and their wood, with hardwood generally denser and slower-growing than softwood. Choose by use case, considering factors like weight, workability, and finish, rather than color alone. Always check the product label and manufacturer recommendations for your project.
In practice, match the wood to function—flooring, framing, or visible trim. If you’re unsure, test a scrap piece and check the label or manufacturer guidance for your project. Always verify any local rules or building codes before committing to a choice.
Key takeaways
- Choose hardwood for high-traffic areas but verify hardness class and finish compatibility.
- Softwoods suit framing and exterior projects where ease of installation matters.
- Check moisture content before installation and acclimate wood to site conditions.
- Choose appropriate finishes and maintenance schedules to reduce surface checking; wear PPE.
- For outdoor use, select decay-resistant species and use proper sealants.
- Always follow local codes and manufacturer guidelines for fasteners and treatments.
Table of Contents
- Introduction
- Key takeaways
- Quick Decision Guide by Use-Case
- Hardwood Vs Softwood — Core Differences Explained
- Performance by Specific Applications
- Durability, Maintenance, and Repair
- Outdoor Use, Treatment, and Decay Resistance
- Cost, Availability, and Sustainability
- Visual Checkpoints and Species Identification
- Tools, Materials Checklist, and Installation Tips
- Conclusion
- FAQ
Quick Decision Guide by Use-Case
Use this at-a-glance guide to pick hardwood or softwood by project type. It’s a quick reference for common DIY tasks you’ll tackle. Check the product label or data sheet for exact recommendations if you’re unsure.
For floors, furniture, exterior builds, and structural framing, follow practical rules of thumb. Consider how the project will be used, the desired finish, and maintenance needs. When in doubt, compare two options side by side before buying from the supplier.
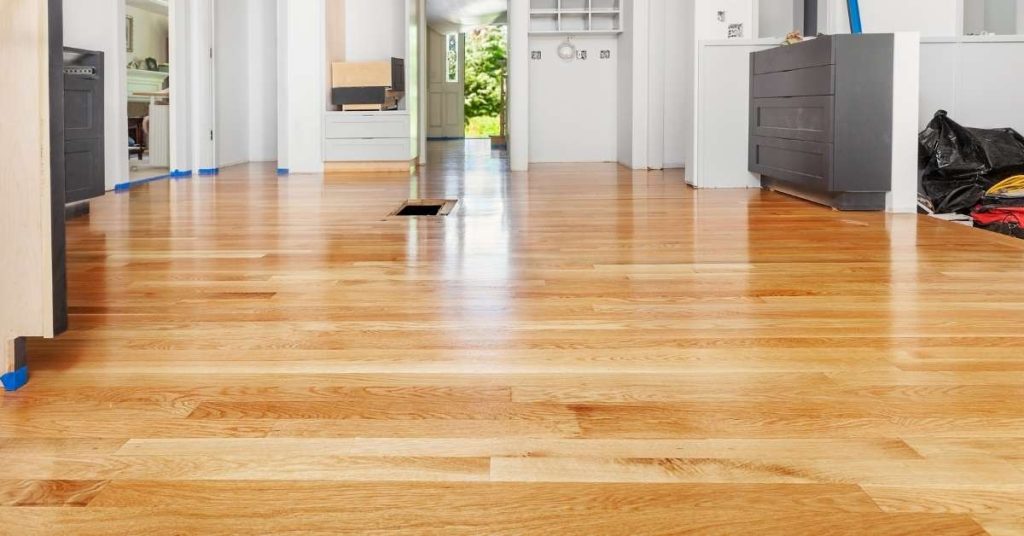
Flooring and high-traffic interiors
For long-lasting floors, you want a hardwood with high durability. Check the Janka hardness rating – it’s a standard measure of wood’s resistance to denting.
Oak, maple, and bamboo are top picks for their hardness and timeless aesthetics. They also take stains well, giving you flexibility in design.
Softwoods like pine can be used but they’re softer and show wear faster. If you go this route, consider engineered hardwood or laminate flooring with a softwood look-alike for better durability.
Outdoor structures and landscaping
When it comes to outdoor projects, rot resistance is key. Pressure-treated lumber is your best bet here – it’s softwood with added preservatives.
For decks, consider cedar or redwood. They’re naturally resistant to rot and insects. But they still need regular maintenance like any outdoor wood.
For fences, pressure-treated pine is common due to its affordability. For garden structures, consider composite materials for low-maintenance durability.
Furniture, cabinetry, and decorative carpentry
The choice between hardwood and softwood here depends on the look you want and how much work you’re willing to put in.
Hardwoods like cherry, walnut, or mahogany offer rich colors and beautiful grain patterns. They’re harder to work with but take stains and finishes beautifully.
Softwoods like pine are easier to work with, cheaper, and great for rustic looks. But they’re softer, so expect more wear and tear over time. And they don’t stain as well, so you’ll see the natural wood color more than with hardwoods.
Hardwood Vs Softwood — Core Differences Explained
Botanically, hardwoods come from angiosperm trees and softwoods from conifers. That distinction shows up in growth patterns and cell structure. Look up the species data sheet if you want exact growth and grain notes.
Grain, density, and how the wood machines affect appearance and strength. These factors drive mechanical performance and the visual result you’ll see in finished work. Use manufacturer instructions to confirm any claims about hardness or workability.
Botanical and Growth Distinctions
Hardwoods and softwoods are defined by their botanical characteristics, not the actual ‘hardness’ or ‘softness’ of the wood.
Hardwoods come from deciduous trees that lose their leaves annually. They grow slower, denser, and have a more complex grain structure due to their growth cycle. This makes them heavier and stronger.
Softwoods, on the other hand, are from evergreen conifers. They grow faster, lighter, and with a simpler grain pattern. Their growth rate makes them more affordable but less durable.
Physical Properties That Matter
The key physical properties affecting performance are hardness, density, and grain structure. These determine the wood’s strength, stability, and workability.
Hardness is measured by the Janka test. Hardwoods score higher (e.g., maple at 1450 lbf), while softwoods are lower (e.g., pine at 690 lbf). Density varies accordingly, with hardwoods denser than softwoods.
The grain affects how the wood looks and performs. Hardwoods often have more intricate patterns due to their slower growth, while softwoods are straighter and simpler.
Workability and Tooling Considerations
Working with hardwoods and softwoods requires different approaches due to their distinct properties.
- Cutting: Softwoods cut easier, while hardwoods require sharper blades. Use a 40-60 tooth blade for softwoods and 80+ for hardwoods.
- Sanding: Hardwoods need finer grits (120+) due to their density, while softwoods can be sanded with coarser grits (80-100).
- Routing: Use a slower speed and lighter depth of cut for hardwoods. Softwoods allow faster speeds and deeper cuts.
- Joining: Hardwoods require stronger joinery due to their density. Consider mortise-and-tenon or dovetail joints. Softwoods can use simpler joints like pocket holes.
- Tooling tips: For hardwoods, consider rentable tools like a high-quality jigsaw or router for intricate cuts. For softwoods, a circular saw and basic router will suffice.
Performance by Specific Applications
Break down performance by function rather than broad labels. Some softwoods handle framing and decking well with proper protection. Others excel in furniture or paneling where耐 wear and surface feel matter.
Match the wood to the job’s priorities: stiffness, weight, nail/fastener behavior, and finish response. Always verify the project’s requirements with product data before committing to a type.
Flooring and Staircases
When it comes to flooring and staircases, you’re looking for durability and a good finish. Here’s what you need to know:
Hardwoods are your best bet for high-traffic areas like hallways or living rooms. They’re tougher, more dent-resistant, and hold up better over time. Oak, maple, and hickory are popular choices.
Engineered softwoods, like engineered oak or bamboo, can be a great alternative for stairs and areas with less traffic. They’re more affordable, easier to install, and still look good. But they might show wear faster than solid hardwoods.
For finishes, both hardwoods and engineered softwoods take stain well. But if you’re painting, opt for a species that takes paint evenly, like maple or birch.
Structural Framing and Load-Bearing Uses
For structural work, you need wood that’s strong and stable. Here’s what to consider:
Most softwoods, like construction-grade lumber (2x4s, 2x6s), are fine for common framing tasks. They’re affordable, easy to find, and strong enough for most loads.
But if you need extra strength or stability, consider engineered hardwood products or laminated veneer lumber (LVL). These are made from layers of wood glued together, making them stronger and more dimensionally stable than regular lumber. They’re great for beams, headers, and other load-bearing parts.
Remember, even with these strong woods, you still need to follow proper construction techniques and building codes.
Millwork, Moulding, and Trim
For intricate millwork and trim, dimensional stability and ease of finishing are key. Here’s what to look for:
Choose woods that are known for their stability, like poplar, maple, or birch. These won’t warp or twist as much as others when they’re cut into thin pieces.
If you’re painting, opt for a wood that takes paint evenly and doesn’t show grain too much, like maple or poplar. If you’re staining, consider woods with interesting grain patterns, like oak or cherry.
For intricate profiles, it’s often best to go with hardwoods. They hold details better than softwoods and are less likely to chip or break during installation.
Durability, Maintenance, and Repair
Outline typical maintenance routines for hardwoods and softwoods in varying environments. Routine cleaning, sealing, and re-coating often extend life. Plan for wear patterns you expect to encounter in the space.
Cover common failure modes like scratches, checking, or rot with practical repair approaches. Consult repair guides or manufacturer notes for recommended methods and compatible products.
Finishing and ongoing protection
Choosing the right finish is crucial for protecting your hardwood or softwood project. For both, you can use penetrating oils, varnishes, or paints.
Hardwoods, with their dense grain, take well to oil-based finishes. These enhance the natural color and grain pattern. They’re great for indoor furniture and cabinetry.
Softwoods, being more porous, benefit from film-forming finishes like varnishes or paints. These protect against moisture and wear. Ideal for outdoor structures and interior trim.
Common damage types and DIY repairs
Over time, expect some damage. Here’s how to tackle common issues:
Dents and scratches are inevitable on high-traffic surfaces. For hardwoods, use a color-matched filler, let it dry, then sand and refinish. Softwoods may require replacement of damaged boards.
Rot, caused by moisture, affects softwoods more. Remove rotted areas, ensure the wood is dry, then apply a preservative before repair.
Splits happen due to seasonal expansion/contraction. Fill with an appropriate wood filler, let it dry, then sand and refinish.
Lifespan expectations and warranty considerations
The lifespan of your hardwood or softwood project depends on several factors. Expect:
Hardwoods, with their durability, to last 50+ years indoors. Outdoors, they may last 20-30 years with proper maintenance.
Softwoods have a shorter lifespan – around 15-30 years outdoors, depending on the species and finish. Indoors, they can last up to 40 years.
Check manufacturer or seller warranties. These typically range from 1-25 years, covering defects in materials and workmanship.

Outdoor Use, Treatment, and Decay Resistance
Outdoor longevity hinges on rot and insect resistance and proper treatment. Understand how each wood species responds to moisture and sun. Verify treatment options with product instructions and local rules before applying finishes.
Implement best practices for outdoor projects, including correct flashing, drainage, and ventilation. When choosing finishes, confirm compatibility with the wood type and climate in your area.
Natural decay resistance and species selection
Not all woods are created equal when it comes to outdoor use. Some have a natural resistance to decay that makes them ideal for outdoor projects.
When choosing your wood, consider your climate and exposure:
- Wet climates: Opt for species like Western Red Cedar or Cypress. They’re naturally rot-resistant due to their high tannin content.
- Dry climates: You can get away with using woods like Douglas Fir or Pine, but they’ll still need treatment to extend their lifespan.
Always check the wood’s label or manufacturer instructions for specific decay resistance ratings. And remember, no matter how durable the species, it won’t last if you don’t prep and maintain it properly.
Pressure Treatments, Sealants, and Coatings
When it comes to outdoor wood projects, you need to protect your work from decay. Here’s how:
Pressure treatments are the best way to start. They force preservatives deep into the wood. Check the label for these key points:
- Active ingredient: Look for chemicals like chromated copper arsenate (CCA), copper azole, or alkaline copper quaternary (ACQ).
- Retention level: This tells you how much preservative is in the wood. Higher levels offer more protection.
For sealants, look for these features:
- Type: Choose between film-forming (like paint or varnish) and penetrating (like linseed oil or sealers).
- Base: Some are water-based, others solvent-based. Water-based are usually safer to handle.
- Additives: Some have UV protection or fungicides for extra defense.
Coatings like paint and stain offer color and extra protection. Always check the label for:
- Coverage: This tells you how much area one gallon will cover.
- Dry time: Longer dry times mean slower progress, but better protection.
When applying, remember these tips:
- Always follow the manufacturer’s instructions.
- Wear appropriate safety gear (gloves, goggles, etc.).
- Apply in thin, even coats. Thicker isn’t always better.
- Let each coat dry completely before applying the next.
Installation and maintenance for exterior projects
When working on exterior concrete projects, water is your enemy. Here’s how to keep it at bay:
Drainage is key. Ensure the base is well-compacted and slopes slightly away from structures to prevent water pooling. Check local rules for precise slope requirements.
Use expansion joints every 6-8 feet to control cracking. And keep those gaps clean – fill them with a flexible sealant every 2-3 years to stop water intrusion.
Avoid using nails or screws for attaching things like formwork or metal lath. They can rust and cause cracks. Use concrete staples or ties instead.
Cost, Availability, and Sustainability
Weigh upfront price against lifecycle cost and performance. Consider how often maintenance may be required and the expected service life. Check local availability to avoid long lead times on rare species.
Environmental impact matters, so look for sourcing info and certifications if that’s a priority. If you’re unsure, ask for the supplier’s sustainable options and any handling recommendations.
Price drivers and lifecycle cost
Hardwoods and softwoods have different price points, driven by factors like species rarity, processing needs, and transportation costs. Here’s what to consider:
Upfront Cost: Softwoods are generally cheaper due to faster growth rates and easier processing. Hardwoods, being slower-growing, are more expensive.
Lifecycle Cost: While hardwoods have a higher upfront cost, they often outlast softwoods, reducing maintenance and replacement costs over time. Consider the long-term picture when comparing prices.
Certifications and responsible sourcing
Choosing responsibly sourced wood is crucial for sustainability. Here’s how to verify:
Recognized Certifications: Look for certifications like FSC (Forest Stewardship Council) or PEFC (Programme for the Endorsement of Forest Certification). These ensure forests are managed sustainably.
Ask suppliers about their sourcing practices. Request documentation to confirm their claims and ensure you’re supporting responsible forestry.
Local availability and substitute species
Using locally available species can reduce costs and environmental impact by minimizing transportation. Here’s how to navigate this:
Check Local Lumberyards: Visit local lumberyards or talk to suppliers about what’s in season or grown nearby.
If your desired species isn’t available, consider substitute species. Ask suppliers for recommendations based on the project’s needs. Some softwoods can mimic hardwood characteristics, offering cost savings without sacrificing performance.
Visual Checkpoints and Species Identification
Use practical visual and tactile cues to distinguish hardwoods from softwoods. Look at grain density, weight feel, and surface texture when you handle pieces. For species clues, reference simple field guides or supplier labels.
DIY-friendly signs include typical color tones, pore visibility, and growth ring patterns. If you’re unsure of a species, compare to labeled samples or ask the supplier to confirm identification.
Grain, Growth Rings, and Color Cues
Use this checklist when you’re unsure about the wood species based on visual inspection alone.
- Check grain pattern: Hardwoods often have wavier, interlocked grains. Softwoods are usually straighter.
- Look at porosity: Hardwoods can be more porous due to their slower growth rate. Softwoods are typically less so.
- Count growth rings: More rings per inch (RPI) means faster growth, common in softwoods. Fewer RPI indicates hardwoods.
- Examine color: Hardwoods often have richer, darker colors. Softwoods tend to be lighter and more uniform.
- Feel the texture: Hardwoods can feel coarser due to their dense grain. Softwoods are usually smoother.
- Check for sapwood: Softwoods often have distinct, lighter-colored sapwood. Hardwoods may not.
- Observe end grain: Hardwoods show distinct pores. Softwoods have fewer, smaller pores or none at all.
- Compare to known samples: If available, compare your wood to samples of known species for confirmation.
Quick rule: When in doubt, use multiple cues together for the most accurate identification.
Weight, Sound, and Scratch Testing
Use these simple tests when you need to check hardness and density without specialized tools.
- Lift a board: Hardwoods are denser. Lifting should feel noticeably heavier than softwoods of the same size.
- Tap with knuckles: A dull, solid sound indicates hardwood. Softwoods sound lighter and more hollow.
- Scratch test: Use a coin or nail to scratch the surface gently. Hardwoods resist scratching better than softwoods.
- Bend a thin strip: Softwoods are easier to bend due to their lower density. Hardwoods resist bending more.
- Check for denting: Hardwoods are less likely to dent or show marks from casual handling.
- Compare with known samples: If available, test known hardwoods and softwoods for comparison.
Quick rule: These tests give a rough idea. For precise identification, use visual cues and documentation together.
When to Ask for Mill/Retailer Documentation
Request species designation, grade stamp, or treatment documentation from suppliers in these situations:
- Large projects: Ensure consistency and quality across all materials.
- Exotic woods: Confirm the exact species and origin to avoid surprises.
- Treated lumber: Check for proper treatment levels and types (e.g., ACQ, CA).
- Grade stamps: Verify the grade (e.g., Select, #1 Common) meets your project’s needs.
- FSC or other certifications: Confirm sustainability claims with official documentation.
- Local regulations: Ensure compliance with local building codes or environmental standards.
- Warranty considerations: Document species and treatment for future reference, if needed.
Quick rule: Don’t hesitate to ask. Good suppliers should provide documentation readily.
Tools, Materials Checklist, and Installation Tips
Prepare a practical shopping list and toolbox tailored to your wood choice. Include fasteners, finishes, and protective gear matching hardwood or softwood needs. Always verify that your chosen fasteners and finishes are compatible with the wood type.
Pack a setup checklist for installation, including moisture considerations and acclimation. When in doubt, consult the manufacturer instructions or local building guidance for installation specifics.
Essential tools and safety equipment
Before you start, ensure you have the right tools and safety gear for cutting, sanding, and finishing your hardwood or softwood project.
- Circular saw: For crosscutting. Use a blade with 40-50 teeth for clean cuts.
- Jigsaw: For intricate cuts. Use blades designed for wood and follow the grain.
- Orbital sander: For sanding. Start with 120-grit, finish with 220-grit.
- Hearing protection: Essential when using power tools.
- Safety glasses: Protect your eyes from debris.
- Dust mask: For sanding to avoid inhaling dust.
- Work gloves: To protect hands from cuts and splinters.
- Clamp meter: To check moisture content in wood before finishing.
- Chisel set: For fine-tuning cuts and removing waste.
Quick rule: Always use the right blade for the job. Wrong blades can cause kickback or poor-quality cuts.
Prep and acclimation guidance
Before installation, prepare your hardwood or softwood to ensure a successful project with no surprises.
- Acclimate wood: Store indoors for at least 72 hours before use. Keep it dry and well-ventilated.
- Check moisture content: Use a clamp meter. Ideal range is 6-8% for most woods.
- Avoid green wood: Wood with high moisture content can warp or crack during drying.
- Inspect for defects: Look for knots, cracks, or other issues that could compromise the wood’s integrity.
- Plan your cuts: Before you start, know exactly how each piece will be used to minimize waste.
Quick rule: Never install wood with a moisture content above 12%. It will likely warp or crack as it dries.
Fasteners, adhesives, and finishing recommendations
Choose the right fasteners, adhesives, and finishes for your hardwood or softwood project to ensure longevity and durability.
- Hardwood fasteners: Use #8 or #10 screws. They’re strong enough to hold dense hardwoods.
- Softwood fasteners: #6 or #8 screws are usually sufficient for softer species.
- Adhesives: Use wood glue designed for your specific project. Some are better for plywood, others for solid wood.
- Finishes for hardwoods: Consider oil-based finishes or varnishes to bring out the grain and protect against wear.
- Finishes for softwoods: Water-based finishes are often sufficient. They’re easier to clean up but may not offer as much protection.
Quick rule: Always follow the manufacturer’s guidelines when using adhesives and finishes. Incorrect application can lead to poor results or even damage your project.
Conclusion
Picking the right wood comes down to use, safety, and how it will look and hold up over time. Make the call with a clear plan, then test your approach on a small area before you commit.
First, confirm your use case, then decide hardwood or softwood based on core differences, then check whether the job is indoor, outdoor, or structural, and verify decay resistance and treatment needs before counting cost or availability. Then confirm species visually, gather the right tools and materials, and do a dry fit or small patch test before you proceed with any finishing or installation.
Common mistakes to avoid are buying the cheapest wood for outdoor or load-bearing work, skipping treatment or proper sealing, and neglecting moisture control or ventilation. Follow safety rules: wear eye and hand protection, work in a dry, well-ventilated area, and never rush finishing or assembly—test first, measure twice, cut once, and read product guidelines before applying treatments or coatings. If in doubt about structural work, complex outdoor projects, or existing decay in framing, call a professional rather than pushing on.
When you know the use case, verify material choices, and approach the project step by step, you’ll finish with results that last. Stay focused, trust the checks, and you’ll stay safe and keep costs down while getting a solid, good-looking result.
FAQ
How do I pick hardwood vs softwood for a given interior use like trim, furniture, or flooring?
Think about how it will be used and how it’ll look. Hardwoods resist dents and wear better in high-traffic spots, while softwoods are easier to cut and finish for simpler projects. Match the wood to the task and your finish plan, then check the manufacturer instructions for any special prep or coatings.
Is it ever acceptable to use softwood for structural or load-bearing parts on a DIY project?
Only if the wood is rated for structural use and the project follows the maker’s instructions. For critical loads, stick with the recommended species and grade and double-check with the plans or a pro if in doubt. Don’t improvise on something that bears weight.
What maintenance steps help outdoor or exposed-softwood last longer without a big project?
Keep it dry, seal it properly, and follow the product label for coatings and reapplication. Use a finish designed for exterior use and check it periodically for peeling or wear. If the wood shows damage, address it before it spreads.
When is hardwood worth the extra cost for a visible project?
When finish quality and long-term durability matter for a visible surface, hardwood can pay off. For lower-visibility or budget-first projects, softwood with a good finish can be enough. Always check the project requirements and your finish plan before deciding.