

Introduction
This article explains affordable hardwood flooring options that balance looks, durability, and cost. It speaks from a DIY carpenter’s perspective and focuses on practical choices you can actually install. Stay mindful of what to check on the label and with local rules before buying.
We’ll cover practical picks and the common pitfalls to avoid. Always read the manufacturer’s instructions and check your subfloor, acclimation needs, and room conditions before you start. If something isn’t clear, verify with the product label or local building rules and choose options that fit your space and budget.
Key takeaways
- Verify species hardness and milling method before purchasing to avoid surprises.
- Check moisture content guidelines and acclimation needs with your climate zone.
- Wear eye and hearing protection; follow manufacturer safety guidelines during cutting and nailing.
- Compare installation methods early; DIY may require specific subfloor prep.
- Inspect warranties and verify coverage for DIY installations and refinished surfaces.
- Prioritize moisture barriers, proper fasteners, and underlayment to reduce future failures.
- Document defects and keep receipts; negotiates channels and service responses if issues.
Table of Contents
- Introduction
- Key takeaways
- At-a-Glance Picks: the 19 Budget-Friendly Hardwoods
- Detailed Profiles: Species, Looks, and Real-World Suitability
- Price Considerations: What Affects Cost and How to Compare Offers
- Installation Methods and When to DIY Vs Hire Pros
- Maintenance, Repairs, and the Lifecycle of Affordable Hardwood
- Common Pitfalls and Buyer Mistakes to Avoid
- Tools, Materials Checklist and Visual Checkpoints for Buyers and Diyers
- Buying Channels, Warranties, and Negotiation Strategies
- Conclusion
- FAQ
At-a-Glance Picks: the 19 Budget-Friendly Hardwoods
This section gives you a quick snapshot of the 19 affordable hardwood options with a short, one-line reason for why each stands out for price and beauty. You’ll see picks that skew toward durability, look, and value as you scan quickly.
Use the quick filters to narrow by traffic needs, budget priorities, or look-alike species. For each option, verify labels and product data sheets to confirm what you’re getting before you buy.
Categorized by construction and finish
Hardwood flooring comes in three main constructions: solid, engineered, and prefinished. Each affects price and installation.
Solid: 100% hardwood, durable but pricier. Nails down, expands/contracts with humidity.
Engineered: Top layer of hardwood, core of plywood or HDF. Stable, cheaper, can be floated or glued.
Prefinished: Factory-finished, easier installation, less mess. Often more expensive due to extra processing.
Quick pros-and-cons for each pick
Here’s a quick rundown of each hardwood’s pros and cons:
1. Oak: Durable, versatile, takes stain well. Can be too common.
2. Maple: Light, modern look, very durable. Can be too light for some tastes.
3. Hickory: Very hard, unique grain patterns. Can be too dark or rustic for some.
4. Walnut: Rich color, beautiful grain. More expensive, can be too dark.
Detailed Profiles: Species, Looks, and Real-World Suitability
Here you’ll find the species, visual character, and typical finishes for each of the 19 options. The focus is on real-world performance rather than marketing claims.
Note where the planks excel, like high-traffic rooms or moisture considerations, and where they may need extra care. Always check manufacturer instructions and local rules for installation and acclimation guidance.
Visual style and grain guide
Each hardwood species has its unique look, defined by grain patterns and color ranges. These characteristics greatly influence the perceived value and overall aesthetic of your room.
For instance, red oak offers a classic, warm tone with prominent grain patterns, making it a popular choice for traditional homes. On the other hand, maple presents a smoother, more subtle grain with a lighter color palette, suiting modern minimalist spaces.
The width and direction of the planks also play a role in the final look. Narrower planks can make a room feel larger, while wider ones create a cozier atmosphere. Straight grains give a formal impression, whereas more irregular patterns add a rustic touch.
Performance notes by room type
When selecting hardwood flooring, consider the specific demands of each room in your home. Here’s how different species hold up under varying conditions:
High-traffic areas, like living rooms and hallways, require durable woods that can withstand frequent foot traffic. Hickory is an excellent choice here, with its high Janka hardness rating. Meanwhile, pine might not be the best fit due to its softer nature.
For pet-friendly zones, opt for harder woods that can resist scratches and dents from claws and paws. Bamboo is a great eco-friendly option, offering exceptional durability despite being a grass species.
In sunlight-exposed rooms, consider woods with natural resistance to UV damage or those that take well to site-finished applications. Walnut darkens beautifully over time when exposed to sunlight, while cherry can be refinished to maintain its initial color.
Price Considerations: What Affects Cost and How to Compare Offers
Costs vary with species, plank width and length, finish, grade, and supply chain factors. This section helps you understand what drives price and how to read quotes.
When you request bids, compare line items like material, underlayment, fasteners, and installation methods. Confirm what is included in the quoted price by checking the supplier’s terms and the product label or data sheet.
True cost checklist (material, delivery, installation, extras)
Use this checklist when comparing quotes to avoid unexpected charges. It’s best to review it before signing any contract.
- Material quantities: Check if the quote includes enough material for your project’s square footage. You can calculate this by multiplying length x width of your slab or wall.
- Material quality: Ask for the mix design and check if it meets your needs (e.g., regular, high-strength, or lightweight).
- Delivery fees: Confirm if delivery is included in the quote. If not, ask for a breakdown of delivery charges.
- Delivery schedule: Ensure the delivery dates work with your project timeline to avoid delays.
- Installation labor: Check if labor costs are included and if they’re priced hourly or as a flat rate.
- Formwork materials: Confirm if formwork (wood, plywood, etc.) is included in the quote. If not, you’ll need to source it separately.
- Extras: Reinforcement, waterproofing, etc.: Ensure any additional items like rebar, wire mesh, or waterproofing membranes are accounted for in the quote.
- Permit and inspection fees: Check if these are included. If not, you’ll need to factor them into your budget.
Quick rule: Always ask for a detailed breakdown of any quote that seems too good to be true. It’s better to spend time upfront understanding the costs than dealing with unexpected charges later on.
Where to save and where to invest
When it comes to concrete work, there are places you can skimp on costs without sacrificing quality, and areas where investing a bit more will pay off in the long run.
Save: On small things that won’t affect the final result. Like using rebar ties instead of wire for reinforcing. They’re cheaper and just as effective. Also, consider buying pre-mixed concrete bags for smaller projects. They’re more expensive per yard but save you the hassle and cost of renting a mixer.
Invest: In quality materials and experienced labor where it matters most. Don’t skimp on rebar, it’s what keeps your concrete strong. Go for a thicker wear layer if you can afford it, it’ll last longer and look better. And always check the base compaction. A poorly compacted base will lead to cracking no matter how good the top layer is.
Installation Methods and When to DIY Vs Hire Pros
We compare nail-down, staple, glue-down, and floating installations and identify the substrates and underlayment each method requires. Practical tradeoffs are explained for typical home projects.
Be aware of the risks of DIY for each method, and use decision signals to decide when to bring in a pro. Always consult manufacturer instructions and local building rules before starting.
Step-by-step mini overview for DIY-friendly installs
This section guides you through a simple floating or click-lock hardwood floor installation. It focuses on the critical sequence to ensure your floor looks great and lasts.
- Acclimate your flooring: Keep boards in the room for 72 hours to match the moisture level of the space. This prevents gaps or warping later.
- Prepare subfloor: Ensure it’s clean, dry, and flat (<1/8″ variance over 6ft). Use a self-leveling compound if needed.
- Lay out rows: Start from the center of the room, working outward. This helps distribute expansion gaps evenly.
- Install boards: Follow your chosen method (floating or click-lock), ensuring each board is fully seated and secure.
- Check expansion gaps: Leave 1/2″-3/4″ between walls and built-in features to allow for expansion. Use spacers if needed.
Red flags that should trigger professional installation
While DIY can save you money, certain conditions warrant hiring a pro to avoid costly mistakes. Here are some red flags:
Uneven subfloor: If your subfloor has more than 1/8″ variance over 6 feet, it needs leveling or repair before installation.
Moisture issues: High moisture levels can cause warping and cupping. Consider hiring a pro to assess and address any moisture problems.
Complex layouts: Intricate patterns (e.g., herringbone, diagonal) or rooms with multiple transitions require expert planning and execution.
Maintenance, Repairs, and the Lifecycle of Affordable Hardwood
Daily and weekly care routines help you keep the look and performance of affordable hardwood. This section covers stain prevention and routine upkeep.
It also explains refinishing limits for engineered versus solid planks and what to expect as the floor ages. Check product guidance and local best practices when planning long-term upkeep.
Cleaning products and routines that protect finishes
Use cleaners specifically designed for hardwood floors. Avoid harsh chemicals, ammonia, or vinegar as they can dull the finish.
Regularly sweep or vacuum to remove dirt and debris. Use a damp mop with warm water and a mild cleaner once a week. Always spot test new products first.
Check product labels. Look for ‘suitable for hardwood floors’ or similar phrasing. If unsure, ask the store staff or consult the manufacturer’s website.
Repair and refinishing options based on construction
Solid hardwood can be sanded and refinished multiple times. Engineered wood has a thinner top layer, limiting refinish potential.
For spot repairs, use a touch-up kit that matches your floor’s color and finish. For larger areas, replace boards if possible. Sanding and refinishing should be done by professionals to avoid damaging the floor.
Engineered wood can usually be refinished once or twice. Solid hardwood can handle 3-5 refinishings. Check the manufacturer’s guidelines for your specific flooring.
Common Pitfalls and Buyer Mistakes to Avoid
Common errors include buying on appearance alone, ignoring grade and defect allowances, skipping acclimation, and underestimating subfloor prep. Practical steps help you avoid these traps.
Look for misleading wording in product descriptions and verify it against labels, datasheets, and manufacturer instructions. Clarify all expectations before purchasing to prevent surprises later.
Misleading marketing terms decoded
When shopping for flooring, you might come across terms like “hardwood look” or “real wood veneer”. Before you make a decision, let’s decode these terms and help you ask the right questions.
Hardwood Look: This term is often used to describe laminate or vinyl flooring that mimics the appearance of hardwood. While it might look like hardwood, it doesn’t feel or perform like the real thing. To confirm durability:
- Check the wear layer thickness – thicker layers mean better durability.
- Look for a high AC rating (AC1 to AC5) for better resistance to indentation and impact.
Real Wood Veneer: This term suggests that there’s real wood in the product, but it doesn’t tell you how much. A true hardwood floor has solid wood throughout. To confirm construction:
- Check if the core is made of plywood or HDF (high-density fiberboard).
- Look for a top layer that’s at least 2mm thick, with a visible wood grain pattern.
Installation mistakes that lead to warping and gaps
While installing concrete, avoid these common pitfalls to ensure a smooth, gap-free surface.
- Skipping moisture test: Concrete needs a solid base. Check for moisture before pouring. If it’s too wet, wait or use a moisture barrier.
- Incorrect expansion gaps: Concrete expands and contracts with temperature changes. Leave 3/16″ to 1/4″ gaps at joints and edges. Fill these with backer rod and caulk after curing.
- Inadequate underlayment: A sturdy, level base is crucial. Use a proper underlayment like plywood or foam board, not just a dirt or gravel bed.
Double-check these points before starting to avoid costly mistakes and ensure your concrete lasts.
Tools, Materials Checklist and Visual Checkpoints for Buyers and Diyers
This section provides a practical checklist of essential tools, materials, and safety gear for a typical installation, plus some optional pro tools for faster work. It keeps you organized from day one.
Included is a short visual inspection checklist to check delivered planks for defects before installation. Always inspect against the supplier’s stated tolerances and the product label before opening packaging.
Tools and supplies by installation type
Before you start, make sure you have the right tools for your chosen installation method. Here’s a checklist to help you prepare or estimate rental costs.
- Floating install: Underlayment, transition strips, spacers, tapping block, pull bar.
- Glue-down install: Trowel, notched trowel, adhesive, spreader, scraper.
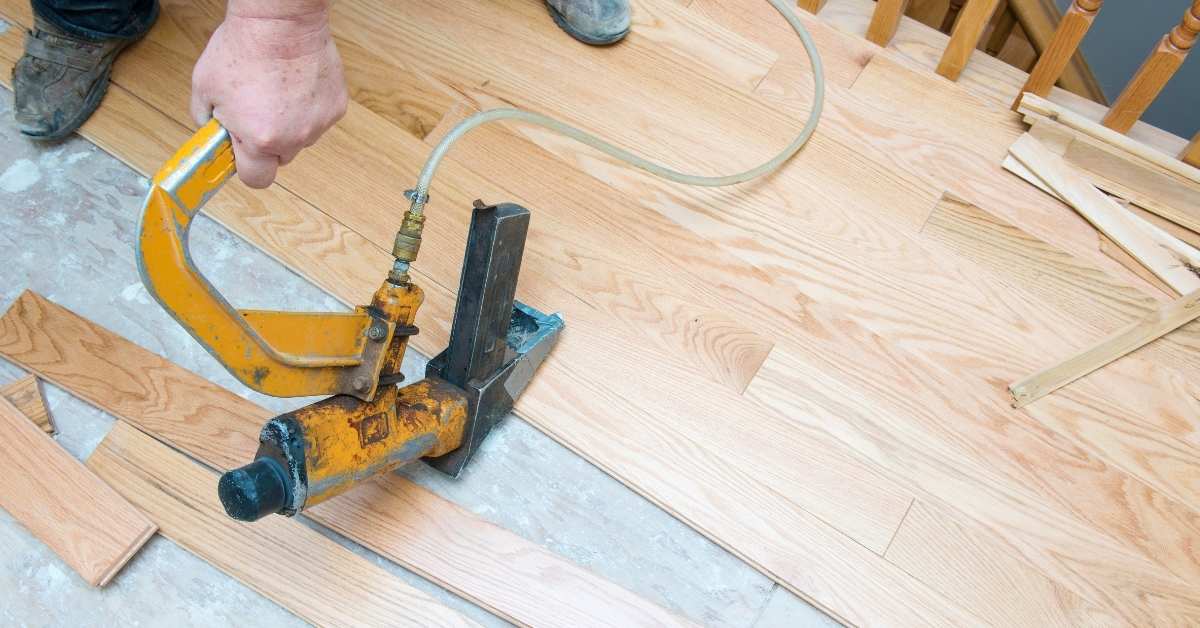
- Nail-down install: Air compressor, pneumatic nail gun, finish nails, cleats, brad nails.
- General tools: Circular saw, jigsaw, tape measure, chalk line, safety glasses, work gloves, dust mask.
Quick rule: Always check your manufacturer’s recommendations for specific tool and material needs.
Visual quality checkpoints on delivery
Before you sign that delivery receipt, make sure to inspect your hardwood planks. Here’s a checklist to help you spot any defects or inconsistencies.
- Color lot consistency: Check for variations in color and tone throughout the batch. Inconsistencies can lead to an uneven final look.
- Edge finish: Inspect edges for smooth, even cuts. Rough or uneven edges can cause installation issues and gaps.
- Surface defects: Look for cracks, knots, holes, or other surface imperfections that could affect the final appearance.
- Board straightness: Check for warped or bowed boards. These can cause installation problems and lead to gaps over time.
Quick rule: If you find any issues, don’t sign the receipt until they’re addressed or resolved.
Buying Channels, Warranties, and Negotiation Strategies
Compare options from big-box retailers, specialty flooring stores, local mills, and online sellers. Each channel has its own pros and cons for price, selection, and returns.
Learn how to interpret warranty language and what to negotiate on price and services. When in doubt, review the warranty text, terms of service, and any included coverage with the seller.
How to Read and Compare Warranties and Return Policies
A warranty is your safety net. Here’s how to read and compare them.
Finish vs Structural: Finish covers surface damage, structural covers defects like warping or gaps.
Transferability: Some warranties let you transfer coverage to new owners if you sell.
Coverage Limits: Check duration and what’s covered. Most are 25 years for finish, lifetime for structure.
Negotiation and Sourcing Tips to Stretch Your Budget
Don’t overspend. Here’s how to get the best value:
Price Matching: Ask big-box stores to match online prices.
Clearance/End-of-Line Boards: Buy discounted, slightly imperfect boards from specialty stores or mills.
Bundled Installation Discounts: Some sellers offer discounts if you buy install services too.
Sample Checks: Inspect samples for quality. If they’re poor, the full batch might be too.
Conclusion
One simple truth guides every good floor job: a affordable hardwood that fits your space will pay off in days of beauty and years of durability if you install and care for it correctly and safely. Keep safety top of mind from first cut to final finish, and you’ll avoid costly mistakes and reversals.
To move from plan to solid results, verify the species and grade match your room, estimate a realistic budget including underlayment and fasteners, inspect each plank for warping or defects, choose an installation method that fits your skill and space, map out a small-area test first, confirm warranty terms and return options, gather the necessary tools and safety gear, schedule timely delivery, and keep a simple log of what you bought and what you touched so you can compare offers later.
Common mistakes to avoid are mixing lots of different lots or species in one room, skipping acclimation and moisture testing, rushing underlayment or fastener choices, and neglecting PPE or a proper ventilation plan. A few safety rules help: test a small area first and watch for gaps or cupping, keep a constant room temperature and humidity level during and after installation, and never force planks into place or skip surface prep. If a project feels beyond your comfort level, or you’re unsure about moisture, subfloor, or warranty terms, don’t push ahead—call a professional and get a clear estimate before you risk expensive damage.
When it makes sense to hire help, consider noisy or complex installs, tricky transitions, or if you’re running into moisture or warranty questions that could trip you up. Stay focused, take it one step at a time, and finish with a floor that looks great and lasts. You’ve got this.
FAQ
Which affordable hardwood options hold up well in high-traffic areas?
Look for engineered options with a solid wear layer and a reputable finish. Compare manufacturer guidance on durability and suitable rooms, then pick something with good surface protection. Always check the label for recommended use and warranty notes.
How should I handle grading and underlayment to save money without risking damage?
Make the subfloor as flat as possible and use an appropriate underlayment for your climate and subfloor type. Follow the product instructions for moisture barriers and installation direction. When in doubt, ask the supplier for the right combination for your room and budget.
What mistakes commonly trip up DIYers during finishing or sealing?
Avoid uneven staining, lap marks, and dust contamination by prepping the surface and following the finish label. Don’t mix products or skip drying times recommended by the manufacturer. If the instructions aren’t clear, contact the product maker or a pro for guidance.
Is it worth skipping professional installation on budget hardwood?
DIY installation can save money, but improper fitting or subfloor issues can ruin the floor. If you have a straightforward layout and the process is clearly described by the manufacturer, you can proceed. If the room has moisture concerns or complex layouts, consider a pro’s install to protect the investment.